Skip to content
DisclaimerTerms Of UseGDPR PolicyCookie Policy

yumymoments

  • Home
  • Drinks
  • Appetizers
  • Dinner
  • Dessert
  • About
  • Contact
  • Privacy Policy
DisclaimerTerms Of UseGDPR PolicyCookie Policy

NO-ING-IMG

- 8 oz. fusilli pasta - 1 cup cherry tomatoes, halved - 1 cucumber, diced - 1/2 red onion, finely chopped - 1/2 cup fresh basil leaves, roughly torn - 1/4 cup extra virgin olive oil - 3 tablespoons freshly squeezed lemon juice - 1 teaspoon lemon zest - Salt and freshly cracked black pepper, to taste - 1/4 cup feta cheese, crumbled (optional) - 1/4 cup walnuts, coarsely chopped (optional) This Lemon Basil Pasta Salad is both fresh and tasty. The ingredients come together in a way that brightens any meal. First, the fusilli pasta serves as the base. It holds the dressing and toppings well. Then, the cherry tomatoes add a burst of sweetness. They contrast nicely with the crunch of the cucumber. The red onion brings a touch of sharpness. You can adjust how much you use based on your taste. Fresh basil leaves give the salad a lovely aroma. They make it feel light and vibrant. The dressing combines extra virgin olive oil, lemon juice, and zest. This mix adds a zesty kick that wakes up the flavors. Finally, the optional feta cheese and walnuts add a creamy and crunchy layer. This makes the dish even more delightful. For the full recipe, check the instructions above. Enjoy your cooking! To start, you need to boil salted water in a large pot. Once the water is bubbling, add your fusilli pasta. Cook it according to the package directions, which usually takes about 8 to 10 minutes. You want it to be al dente, or firm to the bite. When it’s done, drain the pasta in a colander. Rinse it under cold water to stop the cooking process. This also cools the pasta for the salad. While the pasta cooks, it's time to chop your fresh veggies. Slice the cherry tomatoes in half. Next, dice the cucumber into small pieces. Finely chop the red onion. Once everything is chopped, mix the vegetables in a large bowl. This colorful mix adds freshness to your salad. Now, let’s make the dressing. In a small bowl, whisk together the extra virgin olive oil, lemon juice, and lemon zest. Add a pinch of salt and a dash of pepper to taste. You want a smooth and tasty dressing that will tie the salad together. After the pasta has cooled, add it to your bowl with the mixed vegetables. Pour the zesty dressing over everything. Gently toss the mixture until all the ingredients are well-coated. Now, fold in the torn basil leaves. If you like, sprinkle in crumbled feta cheese and chopped walnuts for extra flavor and texture. Cover the pasta salad with plastic wrap or place it in an airtight container. Chill it in the fridge for at least 30 minutes. This helps the flavors blend nicely. When ready to serve, you can enjoy it cold or at room temperature. For a lovely finish, garnish the salad with extra basil leaves and a light drizzle of olive oil right before serving. For the complete recipe, check out the [Full Recipe]. To make the best lemon basil pasta salad, cook your pasta al dente. This means it should be firm but not hard. Use a large pot of salted boiling water. Follow the package time, usually 8-10 minutes. Drain the pasta and rinse it under cold water. This stops the cooking and cools the pasta for the salad. Next, adjust the dressing to fit your taste. Start with the basic mix of olive oil, lemon juice, and zest. If you like it tangier, add more lemon juice. For extra flavor, toss in more herbs, like parsley or oregano. A pinch of red pepper flakes can also add a nice kick. For a heartier meal, pair this salad with grilled chicken or shrimp. It works great for picnics, barbecues, or potlucks. Serve it at room temperature or chill it for a refreshing dish. Add some extra basil leaves and a sprinkle of feta on top for a beautiful finish. Check out the Full Recipe for more details! {{image_4}} You can have fun with your Lemon Basil Pasta Salad by changing the pasta type. Try farfalle or penne for a twist. You can also use whole wheat pasta for added nutrition. For vegetables, think outside the box. Bell peppers add crunch, while zucchini offers a fresh taste. You can also toss in olives or artichokes for a Mediterranean vibe. If you need a gluten-free option, choose gluten-free pasta. There are many tasty choices made from rice or quinoa. These work well in this salad. For a vegan version, skip the feta cheese. You can use avocado instead for creaminess. It adds healthy fats and keeps the dish delicious. To change up flavors, try different dressings. Balsamic vinegar adds a sweet tang. You can also mix in some pesto for a herby kick. Seasonal ingredients can elevate your salad. In summer, add fresh corn or grilled veggies. In fall, roasted butternut squash adds warmth and sweetness. Adjust your salad based on what’s fresh and bright! To keep your lemon basil pasta salad fresh, store it in the fridge. Use airtight containers to avoid air exposure. This helps prevent the salad from drying out or absorbing other smells in the fridge. Always let the salad cool before sealing it up. This keeps moisture at bay. When stored properly, lemon basil pasta salad can last up to three days in the fridge. Check for any off smells or a slimy texture. These are signs that the salad has spoiled. If you see any mold, throw it away immediately. Pasta salad is best enjoyed cold. If you prefer it warm, reheat gently in a pan. Avoid using the microwave, as it can make the pasta mushy. Always add a splash of olive oil or a bit of lemon juice for freshness. This keeps the flavors bright and tasty. For a quick bite, enjoy it straight from the fridge. Remember, freshness is key! For the Full Recipe, check out the complete guide! You can make this salad ahead of time. First, cook the pasta and let it cool. Next, chop the veggies and mix them in a bowl. Make the dressing and store it separately. When ready to serve, combine all the parts. This keeps the salad fresh and tasty. Store the salad in the fridge for up to two days. If you add toppings like cheese or nuts, wait until serving time. This way, your salad stays crunchy and bright. Freezing this pasta salad is not ideal. Pasta can become mushy when thawed. If you must freeze it, leave out fresh veggies and toppings. Store the pasta and dressing in an airtight container. When you want to eat it, thaw in the fridge overnight. Add fresh ingredients just before serving. You can add many things to this salad! Here are some ideas: - Grilled chicken for protein - Bell peppers for extra crunch - Avocado for creaminess - Olives for a salty bite - Spinach for added greens These ingredients mix well with the lemon and basil flavors. Yes! This recipe works great for meal prep. It keeps well in the fridge. You can portion out servings for lunch or dinner. Make sure to store the dressing separately. This keeps everything fresh and prevents sogginess. Prepare it on a Sunday, and enjoy it all week! This Lemon Basil Pasta Salad is easy and fun to make. You learned how to cook fusilli, prepare fresh veggies, and make a tasty dressing. I shared tips on enhancing flavors and making variations based on your taste. Remember, you can adjust ingredients to fit your diet. This salad lasts well in the fridge, making it great for meal prep. Keep it fresh and enjoy your delicious creation!

Lemon Basil Pasta Salad Fresh and Flavorful Delight

Ready to brighten your dinner table? Lemon Basil Pasta Salad is a fresh and vibrant dish bursting with flavor. This

- 6 large eggs - 3 tablespoons creamy mayonnaise - 1 teaspoon tangy Dijon mustard - 1 teaspoon apple cider vinegar - 1/4 teaspoon smoky paprika - Salt and freshly cracked black pepper to taste - 1 tablespoon fresh chives, finely chopped - A few dashes of your favorite hot sauce (optional) You can swap mayonnaise with Greek yogurt for a lighter dish. This change keeps the creaminess while cutting calories. If you want a vegan option, use mashed avocado instead. It adds a nice flavor and a green hue. For a lower-calorie version, try using a mix of cottage cheese and mustard. This mix gives you the creaminess without the extra fat. These swaps offer tasty ways to adapt the classic deviled egg recipe. You can still enjoy the rich flavors while meeting your dietary needs. If you want to explore even more variations, check the Full Recipe for additional insights! To begin, place the eggs in a pot and cover them with cold water. The water should be about an inch above the eggs. Set the pot on medium-high heat until the water boils. Once boiling, cover the pot and remove it from heat. Let the eggs sit in the hot water for 9-12 minutes. For creamy yolks, aim for 9 minutes. For firmer yolks, go for 12 minutes. After the time is up, transfer the eggs to an ice bath. This cools them quickly and helps with peeling. Let them sit in the ice bath for at least 5 minutes. When cool, gently peel the eggs. If the shell sticks, try peeling them under cool running water. Next, slice each egg in half lengthwise. Carefully scoop the yolks into a mixing bowl. To the yolks, add 3 tablespoons of creamy mayonnaise, 1 teaspoon of Dijon mustard, 1 teaspoon of apple cider vinegar, and 1/4 teaspoon of smoky paprika. Season with salt and black pepper to taste. Use a fork to mash the mixture until it’s smooth and creamy. Taste the filling and adjust the seasoning if needed. If you want a kick, add a few dashes of your favorite hot sauce. This adds a nice layer of flavor. Now it's time to fill the egg whites. You can spoon the mixture in, but for a fun look, use a piping bag with a star tip. This gives a pretty swirl on top. For a nice finish, sprinkle some chopped chives on top. You can also add more smoked paprika for color. Arrange the deviled eggs on a plate for a beautiful presentation. Serve them chilled or at room temperature for the best flavor. For the full recipe, check out the details above! To make deviled eggs great, avoid common mistakes. One big mistake is overcooking the eggs. This can turn the yolk green and make it taste bad. To get this right, follow the timing in the full recipe closely. Peeling eggs can be tricky too. If the shell sticks, try this quick method: place the cooked eggs in an ice bath. The cold water helps separate the shell from the egg. You can also peel them under running water. This can save time and keep the egg intact. Deviled eggs shine at parties. Pair them with fresh veggies or crisp crackers. These sides add crunch and balance. You can also serve them with a light dip. This will make your spread more exciting. For time-saving tips, make the filling ahead. Store it in the fridge until you are ready to fill the eggs. This cuts down on last-minute work. You can whip these up in no time. Garnishing can elevate your dish. Try adding sliced radishes or a sprinkle of paprika. This adds color and flavor. You can use fresh herbs like dill or parsley for a burst of freshness. Experiment with spices too. A dash of cayenne or smoked paprika can give your eggs a kick. These small changes can make a big difference in taste and presentation. {{image_4}} You can spice up your deviled eggs in fun ways. Try making spicy deviled eggs. Just add diced jalapeños or a sprinkle of cayenne pepper to the yolk mix. This gives your eggs a nice kick. Another tasty twist is to make avocado deviled eggs. Swap out some mayonnaise for mashed avocado. This adds creaminess and a fresh flavor. You can also mix in some lime juice for a zesty touch. If you follow a keto diet, you can still enjoy deviled eggs. Use full-fat mayonnaise and avoid any added sugars. You can even add cooked bacon bits for extra flavor. This makes for a satisfying and low-carb snack. For those needing low-sodium options, reduce the salt. You can enhance flavor with fresh herbs like dill or parsley. These herbs add taste without the extra sodium. When holidays come around, you can get creative with your deviled eggs. For Halloween, add a bit of black food coloring to the yolk mix. It makes a spooky treat that looks great on a platter. Cultural variations can also add fun. For a Mediterranean twist, mix in some feta cheese and olives. This gives your eggs a unique flavor that’s sure to impress. Explore these variations for your next gathering. They’re sure to delight your guests. For the full recipe, check out the details above! To keep deviled eggs fresh, store them in the refrigerator. Place them in a sealed container. This helps keep them safe from other smells and keeps them moist. If you have leftover filling, store it separately. Cover it tightly to avoid drying out. You can make deviled eggs ahead of time for events. Prepare the eggs and filling in advance, but wait to assemble them until just before serving. This keeps them looking fresh. You should not freeze deviled eggs, as freezing changes the texture. The egg whites can become rubbery and unappetizing. In the fridge, deviled eggs can last up to three days. Always check for signs of spoilage. If the eggs smell bad or look slimy, it’s time to toss them. Keeping an eye on them will ensure you serve only the best to your guests. To boil eggs for deviled eggs, timing is key. For creamy yolks, boil for 9 minutes. If you want firmer yolks, increase the time to 12 minutes. After boiling, cool the eggs quickly in ice water. This stops cooking and makes peeling easier. Yes, you can make deviled eggs the day before. Prepare the filling and store it in the fridge. Keep the egg whites separate until you are ready to serve. This keeps them fresh and tasty. To boost flavor, try these mix-ins: - Chopped pickles or relish for tang - Crumbled bacon for a savory touch - Sriracha or hot sauce for heat - Avocado for creaminess Experiment with different ingredients to find your favorite combo. A green yolk means the eggs cooked too long. To avoid this, follow these tips: - Don’t boil too long; stick to 9-12 minutes. - Cool the eggs in ice water right after boiling. This helps keep the yolks bright and yellow. For a full recipe, check out my Zesty Deviled Eggs with a Smoky Kick. Deviled eggs are simple, tasty, and versatile. We explored key ingredients, adjustments, and unique variations. With the right method, anyone can make them perfectly. Suggested add-ins and garnishes increase flavor and appeal. Remember to store them properly for the best taste. Try making them ahead for parties or gatherings. With creativity, you can personalize this classic dish. Enjoy crafting deviled eggs that delight your guests and family!

Classic Deviled Eggs Tasty and Easy Party Treat

Craving a tasty, easy party treat? Look no further than classic deviled eggs! These creamy bites pack a punch with

In this section, I'll share the key ingredients for making no-bake chocolate oatmeal cookies. Each ingredient plays a vital role in flavor and texture. - 1 cup rolled oats - 1/2 cup creamy peanut butter - 1/2 cup unsweetened cocoa powder - 1/2 cup honey or maple syrup - 1/4 cup coconut oil, melted - 1 teaspoon pure vanilla extract - 1/4 teaspoon fine sea salt - Optional add-ins: 1/2 cup chocolate chips, 1/4 cup shredded coconut These ingredients come together to create a rich, chewy, and satisfying treat. Rolled oats form the base, giving the cookies structure. Creamy peanut butter adds creaminess and protein. Unsweetened cocoa powder gives that deep chocolate flavor. Honey or maple syrup acts as a natural sweetener, while coconut oil helps bind the mix together. Don't forget the vanilla extract for aroma and flavor! A pinch of fine sea salt enhances all the tastes. If you want to add extra fun, toss in chocolate chips or shredded coconut for texture. You can find the full recipe in the previous section. Each ingredient works together to create a quick and easy treat you will love! Gather all your ingredients and tools before you start. You will need: - 1 cup rolled oats - 1/2 cup creamy peanut butter - 1/2 cup unsweetened cocoa powder - 1/2 cup honey or maple syrup - 1/4 cup coconut oil, melted - 1 teaspoon pure vanilla extract - 1/4 teaspoon fine sea salt - 1/2 cup chocolate chips (optional) - 1/4 cup shredded coconut (optional) Using a medium-sized saucepan is key. It prevents spills and gives enough space for mixing. Start by melting the coconut oil in the saucepan. Add honey or maple syrup, cocoa powder, and sea salt. Heat this over low to medium. Stir it well. You want a smooth, velvety mix. Once smooth, take it off the heat. Now, mix in the peanut butter and vanilla extract. Stir until they blend completely. This creates a rich chocolate base that is simply divine. Next, fold in the rolled oats. Gently stir until every oat is coated in the chocolate mix. If you want extra flavor, fold in chocolate chips or shredded coconut. Now, line a baking sheet with parchment paper. Using a spoon or cookie scoop, drop spoonfuls of the mixture onto the paper. Shape them into cookies if you like. Keep the sizes even for better setting. Finally, place the baking sheet in the fridge. Let the cookies set for at least 30 minutes. After that, they are ready to enjoy! For the full recipe, refer to the earlier section. Mixing well is key to your cookies. If you don't blend the ingredients enough, the texture suffers. Aim for a smooth, homogenous chocolate base before adding oats. Adding the right amount of oats is also important. If your mixture is too thick, add a splash of your sweetener. If too thin, add more oats. You can also play with add-ins like chocolate chips or shredded coconut. These can change texture and flavor in delightful ways. When you serve these no-bake cookies, think about presentation. Place them on a nice platter. A sprinkle of cocoa or coconut on top adds charm. You can pair these treats with a glass of cold milk or a warm cup of coffee. They also go well with herbal tea for a relaxing snack. If your cookies crumble, you may need to adjust the moisture. Adding a bit more peanut butter or sweetener can help. For a smooth chocolate mixture, heat gently and stir continuously. If it seizes or thickens too much, add a tiny bit of warm water. This can bring it back to life. Remember, the goal is a silky, rich chocolate mixture that coats the oats perfectly. For the [Full Recipe], check the earlier section! {{image_4}} You can make your no-bake cookies even better by adding spices. Try cinnamon for warmth or nutmeg for a festive taste. Both spices blend well with chocolate. If you love nut butter, explore other options. Almond butter, cashew butter, or sunflower seed butter work nicely. Each brings a unique flavor to your cookies. Want to make your cookies vegan? Use maple syrup instead of honey. It adds sweetness without any animal products. For a gluten-free treat, choose certified gluten-free oats. This ensures your cookies are safe for those with gluten allergies. Make your cookies more exciting by adding nuts or seeds. Chopped walnuts or sunflower seeds add crunch and healthy fats. You can also mix in dried fruit like raisins or cranberries. They give a sweet surprise in every bite. If you want a twist, use flavored chocolate or dark chocolate. These options elevate the taste and make your cookies special. For the full recipe, check out the section above. To keep your no-bake chocolate oatmeal cookies fresh, store them in an airtight container. This prevents them from drying out. You can use glass or plastic containers. Both types work well. Avoid using containers that do not seal tightly. These cookies stay fresh in the fridge for up to one week. If they start to smell off or look dry, it’s time to toss them. Always check for any mold or unusual colors. If they seem hard, they might be past their prime. If you want to save them longer, you can freeze the cookies. Place them in a single layer on a baking sheet first. This prevents them from sticking together. Once frozen, transfer them to a freezer-safe container. They can stay frozen for up to three months. To thaw, leave them in the fridge overnight. This way, they keep their flavor and texture. If you need them fast, let them sit at room temperature for a while. Enjoy your no-bake treats any time! For the full recipe, check out the details above. Yes, you can use quick oats. They will change the texture. Quick oats absorb moisture more quickly. This may make your cookies softer. If you like a chewy cookie, stick with rolled oats. No-bake cookies usually take about 30 minutes to set. It is best to chill them in the fridge. This helps them firm up nicely. You can leave them longer if you want them firmer. You can use almond butter or sunflower seed butter. Both offer a similar creamy texture. If nut-free, sunflower seed butter is a great choice. Just ensure it is smooth for best results. Yes, you can melt the mixture in the microwave. Use a microwave-safe bowl and heat in short bursts. Stir between each interval to prevent burning. This method is quick and easy! Yes, no-bake cookies are safe to eat without baking. The ingredients are usually safe raw. However, always check your ingredients for quality. Enjoy these sweet treats without any worries! For the full recipe, check out the section above. In this blog post, we explored how to make delicious no-bake cookies. We discussed each ingredient's role, from oats to coconut oil. You learned step-by-step instructions for the perfect cookie texture. We also covered tips for serving and variations to suit your taste. Remember, cooking can be fun and simple. With these recipes and tips, you can create tasty treats. Enjoy experimenting with flavors and sharing your cookies. Happy baking!

No-Bake Chocolate Oatmeal Cookies Simple and Quick

Looking for a sweet treat that’s quick and easy? No-bake chocolate oatmeal cookies are the answer! I’ll show you how

- 1 pound Brussels sprouts, trimmed and halved - 3 tablespoons extra-virgin olive oil - 2 tablespoons pure maple syrup - 1 tablespoon Dijon mustard - 1 tablespoon apple cider vinegar - 1 teaspoon garlic powder - 1/2 teaspoon sea salt - 1/4 teaspoon freshly ground black pepper - Optional: 1/4 cup pecans or walnuts, roughly chopped To create Maple Dijon roasted Brussels sprouts, you need fresh, high-quality ingredients. Start with Brussels sprouts that are green and firm. The olive oil adds richness, while maple syrup brings a sweet touch. Dijon mustard adds a tangy kick, and apple cider vinegar gives a nice balance. Garlic powder enhances the flavor beautifully, and salt with pepper rounds it all out. - Mixing bowl - Baking sheet - Whisk - Measuring spoons For this recipe, keep your equipment simple. A mixing bowl helps you combine all your ingredients smoothly. A baking sheet is essential for roasting the Brussels sprouts evenly. A whisk is handy for mixing the dressing well, ensuring all flavors blend. Measuring spoons help you add the right amounts of each ingredient, keeping everything balanced. This recipe is more than just a side dish; it's a celebration of flavors. You can find the full recipe above to guide you through the steps. Enjoy this delightful dish that will impress your guests and family! Set your oven to 400°F (200°C). This hot temperature makes the Brussels sprouts turn brown and crisp. In a large bowl, mix these ingredients: - 3 tablespoons extra-virgin olive oil - 2 tablespoons pure maple syrup - 1 tablespoon Dijon mustard - 1 tablespoon apple cider vinegar - 1 teaspoon garlic powder - 1/2 teaspoon sea salt - 1/4 teaspoon freshly ground black pepper Whisk them together until smooth. This mix gives the sprouts a sweet and tangy flavor. Add 1 pound of halved Brussels sprouts into the bowl. Toss them well with the dressing. Make sure each sprout gets coated evenly. If you want some crunch, add 1/4 cup of chopped pecans or walnuts. Spread the coated Brussels sprouts on a large baking sheet. Make sure they are in a single layer. This helps them roast evenly. Put the baking sheet in your preheated oven. Roast them for 20-25 minutes. Stir them halfway through to ensure they cook well. Look for a golden-brown color and tenderness. After roasting, take them out of the oven. Let them cool for a few minutes. Then, serve them in a nice dish. For a special touch, drizzle some extra maple syrup on top before serving. You can also sprinkle some fresh herbs for color. Enjoy your Maple Dijon Roasted Brussels Sprouts! For the detailed steps, check out the Full Recipe. To achieve perfect caramelization, start with dry Brussels sprouts. Moisture can lead to steaming, not roasting. Trim and halve them evenly to ensure they cook at the same rate. Spread them out on the baking sheet in a single layer. This allows hot air to circulate and promotes even browning. Stir them halfway through cooking to enhance their color and flavor. The ideal roasting time is 20-25 minutes at 400°F (200°C). Look for a deep golden color and a fork-tender texture. To boost the flavor, consider adding a few ingredients. Try tossing in some finely chopped shallots or garlic for extra zest. A sprinkle of red pepper flakes can add a kick. If you crave sweetness, a touch of balsamic vinegar complements the maple syrup well. You could even mix in grated Parmesan cheese before serving to add a savory note. Each addition can transform the dish into something unique and delicious. Maple Dijon Roasted Brussels Sprouts pair well with many main dishes. They make a great side for roasted chicken or pork. You can also serve them with grains like quinoa or farro for a hearty meal. For a fresh twist, garnish with lemon zest or fresh herbs like thyme. These simple toppings can brighten the dish and enhance the flavors. Don't forget to check the Full Recipe for more tips on serving! {{image_4}} If you want a nut-free dish, simply skip the nuts. This keeps the recipe safe for those with nut allergies. You won’t lose any flavor by leaving them out. The Brussels sprouts still shine with the sweet and tangy maple Dijon sauce. To make this dish vegan, swap the Dijon mustard for a vegan-friendly brand. You can also use agave syrup instead of maple syrup for a similar taste. These simple changes keep the dish plant-based without losing its deliciousness. You can add other vegetables to this recipe for extra flavor. Carrots, sweet potatoes, or even parsnips work well. Just chop them to similar sizes as the Brussels sprouts. Toss them in the same maple Dijon sauce before roasting. This creates a colorful and tasty medley. For the full recipe, check out the details above. To keep your Maple Dijon Roasted Brussels Sprouts fresh, place them in an airtight container. This helps avoid moisture and keeps them crisp. They can last in the fridge for up to 3 days. If you want to enjoy them later, make sure they cool down completely before storing. This will help prevent sogginess. When you're ready to eat your leftovers, avoid the microwave if you can. Microwaving can make them mushy. Instead, preheat your oven to 350°F (175°C). Spread the Brussels sprouts on a baking sheet and heat for about 10 minutes. This keeps them crispy and brings back that roasted flavor. If you want to freeze them, it's best to do so before cooking. Clean and halve the Brussels sprouts, then blanch them in boiling water for 3 minutes. After blanching, cool them in ice water for 3 minutes. Drain well and pack them in freezer bags. They can last in the freezer for up to 3 months. To thaw, place them in the fridge overnight before cooking. For the full recipe, check out the Maple Dijon Roasted Brussels Sprouts section. Yes, you can use frozen Brussels sprouts. However, fresh Brussels sprouts taste better. Frozen sprouts can become mushy when cooked. If you choose frozen, roast them straight from the freezer. Just add a few extra minutes to the cooking time. Brussels sprouts are cooked when they are fork-tender. They should also have a nice golden-brown color. If they are soft but still bright green, they are ready. A good test is to pierce one with a fork. If it goes in easily, they're done! If you need a substitute, you can use honey or agave syrup. You can also try brown sugar mixed with a bit of water. These options will still give a sweet flavor but change the taste slightly. To reduce bitterness, try soaking them in cold water for 30 minutes before cooking. You can also add a pinch of sugar to your dressing. Roasting them with sweet ingredients, like maple syrup, helps balance the flavor too. This post covered how to make Maple Dijon Roasted Brussels Sprouts from start to finish. You learned about the key ingredients, tools, cooking methods, and how to make them taste amazing. Remember, small tweaks can enhance your dish, like adding nuts or other veggies. For perfect results, follow the tips on roasting and storing leftovers. Enjoy these easy, tasty sprouts as a side or snack. With this guide, your Brussels sprouts will always impress!

Maple Dijon Roasted Brussels Sprouts Flavorful Side Dish

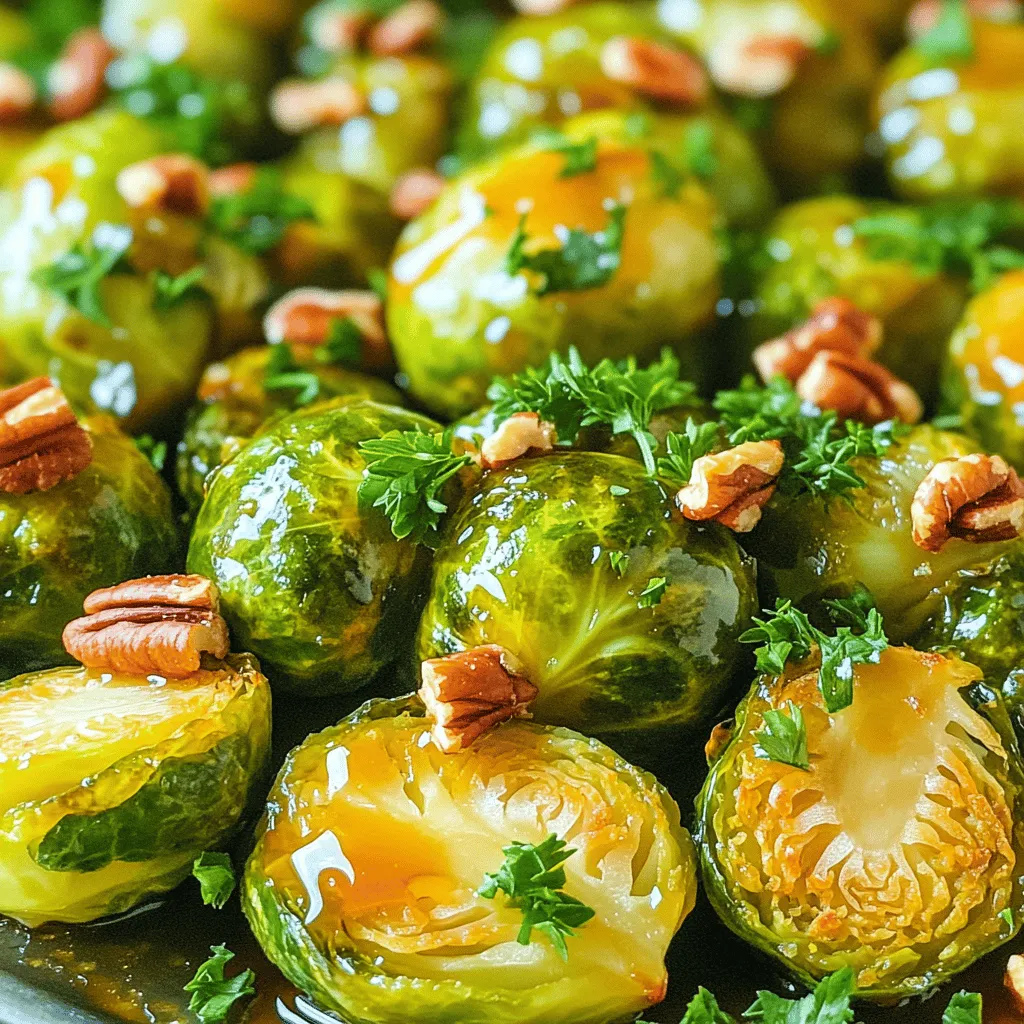
Looking for a delicious side dish that will impress everyone? Maple Dijon Roasted Brussels Sprouts are your answer! This recipe

To make delicious coconut macaroons, you need: - 2 ¾ cups sweetened shredded coconut - ½ cup sweetened condensed milk - 1 teaspoon vanilla extract - ¼ teaspoon almond extract - 2 large egg whites - Pinch of salt These ingredients come together to create a chewy and sweet treat. The sweetened coconut gives it a rich flavor, while the condensed milk adds creaminess. The vanilla and almond extracts give a nice depth to the taste. If you want to add a chocolate drizzle, grab: - ½ cup semi-sweet chocolate chips This optional step makes the macaroons even more special. The warm, melted chocolate adds a nice touch. You can make some swaps if you need to. For a dairy-free option, use coconut cream instead of condensed milk. If you want to cut sugar, try unsweetened coconut with a sugar substitute. You can also add different flavors. Try using orange zest for a citrus twist or mix in chopped nuts for added crunch. These small changes can give your macaroons a unique spin. For the full recipe, check out the detailed steps to create these tasty treats! First, preheat your oven to 325°F (160°C). This ensures your macaroons bake evenly. While the oven heats, line a baking sheet with parchment paper. This step prevents the macaroons from sticking. Next, grab a mixing bowl. Combine the sweetened shredded coconut, sweetened condensed milk, vanilla extract, and almond extract. Stir well until the coconut is fully coated. The mixture should look moist and sticky. This is key for keeping your macaroons together. Now, take a separate large bowl. Add the egg whites and a pinch of salt. Beat them with an electric mixer on medium speed. Keep mixing until soft peaks form. This step adds air and makes the macaroons light. Fold the whipped egg whites into the coconut mixture gently. Use a rubber spatula to keep the mixture fluffy and airy. Use a teaspoon or a small ice cream scoop to shape the macaroons. Place rounded mounds on the prepared baking sheet, leaving about 2 inches apart. This space helps them expand while baking. Bake in the preheated oven for 15-20 minutes. Watch for a golden brown color on top. After baking, cool them on the sheet for a few minutes. Then, transfer to a wire rack to cool completely. If you want to drizzle chocolate, melt the chocolate chips and drizzle over the cooled macaroons. Enjoy your delicious coconut macaroons! For the full recipe, check the details above. To get the best texture for your macaroons, focus on the egg whites. Beat them until soft peaks form. This adds air and makes them light. Don’t rush this step. Gently fold the egg whites into the coconut mixture. Keep the fluffiness intact. This is key for that perfect bite. One common mistake is overmixing. You want to keep the mixture airy. If you mix too hard, your macaroons will be dense. Another mistake is not spacing them well on the baking sheet. They need room to expand while baking. Lastly, don’t skip cooling time. Let them cool on a wire rack to firm up nicely. Make your macaroons shine by arranging them on a nice platter. You can add a sprinkle of toasted coconut flakes around them. This adds a lovely touch. If you drizzle them with chocolate, it adds elegance. Use a fork or piping bag to create beautiful patterns. This makes your sweet treat look even more tempting! {{image_4}} I love chocolate-dipped coconut macaroons. They are a sweet twist on the classic recipe. To make them, simply follow the full recipe. After baking, let the macaroons cool. Next, melt semi-sweet chocolate chips in the microwave. Drizzle the warm chocolate over each macaroon. This adds a rich, creamy layer that pairs well with the coconut. Good news! Coconut macaroons are naturally gluten-free. You only need coconut, egg whites, and condensed milk. Just make sure your sweetened condensed milk is gluten-free. This treat is perfect for those who avoid gluten. Everyone can enjoy these delicious bites! You can get creative with flavor variations. Try adding chopped nuts like almonds or pistachios. These add crunch and flavor to each bite. You could also mix in spices like cinnamon or nutmeg for warmth. For a tropical twist, add crushed pineapple or lime zest. Each change gives your macaroons a unique taste, keeping them exciting every time you bake! To keep your coconut macaroons fresh, place them in an airtight container. Line the container with parchment paper to avoid sticking. Store them at room temperature for up to a week. If you want to keep them longer, consider freezing them. To freeze coconut macaroons, first let them cool completely. Arrange the macaroons in a single layer on a baking sheet. Freeze them for about an hour. Once frozen, transfer them to a freezer-safe bag or container. They can last up to three months in the freezer. When you're ready to enjoy, just thaw them at room temperature. Coconut macaroons can stay fresh for a week at room temperature. After this, watch for signs of spoilage. Look out for changes in texture or smell. If they become hard or develop an off odor, it's time to toss them. Always trust your senses! Coconut macaroons are made from simple ingredients. You need: - Sweetened shredded coconut - Sweetened condensed milk - Vanilla extract - Almond extract - Egg whites - Pinch of salt - Semi-sweet chocolate chips (optional for drizzling) These elements create a chewy and sweet treat. The coconut gives a rich flavor, while the condensed milk adds sweetness. To make coconut macaroons stick, you must mix the ingredients well. The sweetened condensed milk acts as glue. Beating the egg whites helps add structure. Fold the egg whites into the coconut mixture gently. This keeps the mixture light and airy. Yes, you can make coconut macaroons in advance. They store well in an airtight container. Keep them at room temperature for up to a week. If you want them fresh for longer, freeze them. Just let them thaw before serving. No, coconut macaroons differ from coconut cookies. Macaroons are denser and chewier. They contain more coconut and use egg whites. Cookies are softer and often have flour in them. Macaroons focus on the coconut flavor. To adjust sweetness, change the amount of sweetened condensed milk. If you want less sweetness, reduce it slightly. You can also use unsweetened coconut. Just remember to balance flavors. Adding a bit of salt helps enhance the taste too. You can experiment to find your perfect level of sweetness. For the full recipe, check the section above! In this article, we explored the key ingredients for coconut macaroons, including variations and substitutes. We outlined step-by-step instructions for mixing, baking, and perfecting your treats. I shared tips to achieve the best texture and avoid common mistakes. Lastly, we discussed storage methods to keep your macaroons fresh. Coconut macaroons are fun and easy to make, and they can fit many tastes. Try new flavors or toppings to make them your own!

Coconut Macaroons Delightful Sweet Treat Recipe

If you love sweet treats, you’ll adore these Coconut Macaroons! This easy recipe will guide you to perfect, chewy macaroons

- 1 lb fresh broccoli florets - 4 tablespoons extra virgin olive oil - 4 garlic cloves, finely minced - ½ cup freshly grated Parmesan cheese These ingredients make this dish shine. Fresh broccoli gives a nice crunch. Olive oil helps it roast well. Garlic adds bold flavor. Parmesan cheese brings a rich taste that makes the dish special. - 1 teaspoon red pepper flakes (optional, for a spicy kick) - Juice of 1 fresh lemon - Zest of 1 lemon - Fresh parsley, finely chopped (for garnish) Adding red pepper flakes can give your broccoli a kick. Lemon juice and zest brighten the dish with freshness. Garnishing with parsley adds color and a fresh taste. For the full recipe, check out the details above. Set your oven to 425°F (220°C). This heat will give the broccoli a nice, crispy edge. In a large bowl, toss the fresh broccoli florets with 4 tablespoons of olive oil. Add 4 minced garlic cloves, salt, and pepper. If you like heat, sprinkle in red pepper flakes. Toss well to coat every piece. Spread the broccoli in a single layer on a lined baking sheet. This helps it roast evenly. Place the tray in the hot oven. Roast for 15-20 minutes. Look for crispy edges and bright green color. Take out the baking sheet and sprinkle ½ cup of grated Parmesan cheese over the hot broccoli. Return it to the oven for another 3-5 minutes. The cheese will melt and turn golden. Once the cheese melts, drizzle the juice of one fresh lemon over the broccoli. Add lemon zest for extra flavor. Toss gently to mix. Transfer to a serving plate and garnish with finely chopped parsley. Enjoy your flavorful side dish! For the full recipe, see the details above. To make great garlic Parmesan roasted broccoli, start with fresh broccoli florets. Look for bright green color and firm stems. Avoid any yellow spots or wilting. Fresh broccoli tastes better, and it holds its shape when roasted. You can find it at farmers' markets or grocery stores. One common mistake is overcrowding the baking sheet. If you place too many florets close together, they will steam instead of roast. This means they won't get crispy. Always spread the broccoli in a single layer. Use two baking sheets if needed. This helps each piece get nice and golden. Experimenting with seasoning can take your dish to the next level. Besides garlic and Parmesan, try adding lemon zest or crushed red pepper for a kick. You can also mix in different herbs like thyme or oregano. This adds depth and personal flair. For the full recipe, check out the details above! {{image_4}} You can make Garlic Parmesan Roasted Broccoli a full meal by adding protein. Grilled chicken or shrimp works great. Simply season your protein with salt and pepper before cooking. Grill or pan-sear until cooked through. Then, serve it alongside your roasted broccoli. This adds flavor and makes the dish heartier. If you want to switch things up, try using feta or goat cheese. Both cheeses provide a tangy flavor that pairs well with broccoli. Crumble the cheese over the hot broccoli after roasting. This gives a new twist to your dish while keeping it delicious. Get creative with your seasonings! Balsamic vinegar can enhance the flavor. Drizzle it over the broccoli before roasting. You can also add fresh herbs like thyme or oregano. This gives your dish a fresh and vibrant taste. Feel free to explore different spices to find your favorite flavor profile. For the full recipe, check out the link. To keep your garlic Parmesan roasted broccoli fresh, store it in an airtight container. Place it in the fridge within two hours after cooking. This helps to keep it safe and tasty. It can last about 3 to 4 days in the refrigerator. For best results, avoid storing it with moisture to prevent sogginess. When reheating, the goal is to keep the texture crispy. You can use the oven or a skillet. For the oven, preheat to 350°F (175°C). Spread the broccoli on a baking sheet and heat for about 10 minutes. If using a skillet, warm it on medium heat for about 5 minutes. This keeps the cheese melty and the broccoli tender. Freezing is a great option if you want to save leftovers. First, let the broccoli cool completely. Then, place it in a freezer-safe bag. Remove as much air as possible before sealing it. It can stay in the freezer for up to 3 months. When you're ready to eat it, thaw it in the fridge overnight. Reheat it in the oven for best results. Enjoy every bite of this delicious dish later! For the full recipe, check out the detailed instructions above. You will know broccoli is done roasting when it has bright green color and crispy edges. The florets should feel tender when you pierce them with a fork. The garlic will be fragrant, and the Parmesan cheese should be melted and slightly golden. These signs tell you that the broccoli is ready to enjoy! You can use frozen broccoli, but it may change the taste and feel. Frozen broccoli has more water, making it softer after cooking. This can lead to a mushy texture. For the best results, I recommend using fresh broccoli. It gives you that perfect crunch and flavor. Garlic Parmesan roasted broccoli pairs well with many dishes. It’s great with grilled chicken or fish. You can also serve it with pasta or rice. This dish adds color and flavor to any meal. It is a versatile side that everyone will love. For more ideas, check out the Full Recipe for inspiration! Garlic Parmesan roasted broccoli is a simple, tasty dish you can make easily. This recipe uses fresh broccoli, olive oil, and garlic, topped with delicious Parmesan. Remember to preheat the oven and toss your broccoli well. Avoid overcrowding the baking sheet for the best roast. You can mix in proteins and different cheeses for variety. Store leftovers properly and reheat with care. Now, you can enjoy a healthy treat that pairs well with many meals. Make this dish your own and share it with others!

Garlic Parmesan Roasted Broccoli Flavorful Side Dish

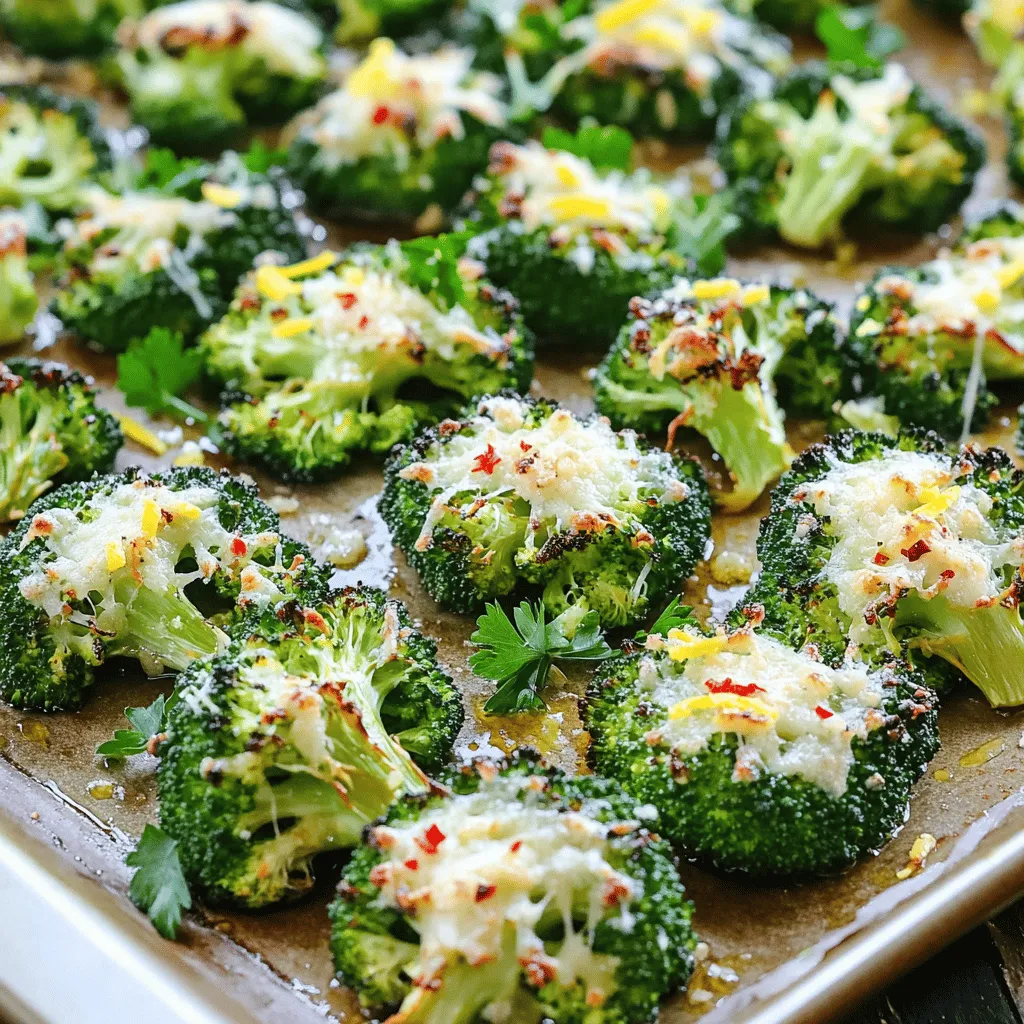
Are you ready to elevate your side dish game? Garlic Parmesan Roasted Broccoli is a tasty, simple way to turn

- 2 ripe avocados - 300g spaghetti or preferred pasta - 2 cloves garlic, finely minced - 1 cup fresh basil leaves, packed - 2 tablespoons fresh lemon juice - 3 tablespoons extra virgin olive oil - 1/2 teaspoon red pepper flakes (optional for heat) - Sea salt and freshly cracked black pepper to taste - Grated parmesan cheese (for serving, optional) - Cherry tomatoes, halved (for garnish, optional) Gathering these ingredients is the first step to making creamy avocado pasta. Choose ripe avocados for the best flavor and creaminess. Spaghetti works well, but feel free to use your favorite pasta. Fresh basil adds a nice aroma and taste to the dish, while garlic gives a wonderful kick. Lemon juice brightens the flavor and helps keep the avocados from browning. Extra virgin olive oil adds richness, and red pepper flakes can spice things up if you like heat. Don't forget the sea salt and black pepper to enhance all the flavors. You can top the dish with grated parmesan cheese for a savory touch. Cherry tomatoes make a vibrant garnish and add freshness. Now, you're ready to create a quick and tasty meal using these fantastic ingredients! For the full recipe, check out Creamy Avocado Delight Pasta. - Bring salted water to a boil. - Cook spaghetti until al dente, about 8-10 minutes. Cooking pasta is simple. You want it to be firm but not hard when you bite into it. Al dente means "to the tooth" in Italian. This texture makes your pasta perfect for mixing with the sauce. Remember to save a cup of the pasta water before draining. This water helps adjust the sauce later. - Blend avocados, garlic, basil, lemon juice, and olive oil. - Adjust seasoning with salt and pepper. To make the sauce, use ripe avocados. Cut them in half and scoop out the green flesh. The blender is your best friend here. Add minced garlic, fresh basil leaves, lemon juice, and olive oil. Blend until it’s smooth. If it tastes flat, add more salt and pepper to bring out the flavors. You can also add red pepper flakes for a bit of heat. - Mix pasta with avocado sauce. - Add reserved pasta water for desired consistency. - Serve and garnish. Once your pasta is cooked, return it to the pot. Pour in the creamy avocado sauce and mix well over low heat. If the sauce is too thick, add some reserved pasta water. This step makes the sauce silky and easier to coat the pasta. Now, it's time to serve! Divide the pasta into bowls, and feel free to sprinkle some grated parmesan cheese and halved cherry tomatoes on top for a pop of color. Enjoy your meal while it's warm and creamy! For the full recipe, check out the details above. To make great creamy avocado pasta, start with ripe avocados. A ripe avocado feels slightly soft when you press it gently. The skin should be dark green or black. Avoid avocados with large dark spots. Store avocados at room temperature until they ripen. Once ripe, move them to the fridge to slow the ripening. This way, you can enjoy your avocados longer. The sauce needs the right consistency. If it's too thick, add more pasta water. Just a little at a time helps. If it’s too thin, blend in more avocado. For extra flavor, try adding fresh herbs. Chopped parsley or cilantro can give your sauce a unique twist. You can also add a pinch of garlic powder for more depth. Creamy avocado pasta pairs well with proteins. Grilled chicken or shrimp adds a nice touch. You can also try adding chickpeas for a vegetarian option. For sides, consider a fresh salad or garlic bread. A simple green salad with lemon vinaigrette is perfect. For the full recipe, check the ingredients and steps listed above. {{image_4}} For a fun twist on creamy avocado pasta, try different pasta types. You can use gluten-free pasta if you want to avoid gluten. Whole grain pasta adds extra fiber and a nutty flavor. If you're cutting out dairy, skip the parmesan cheese. Nutritional yeast offers a cheesy taste without the dairy. Want to make your dish even heartier? Adding proteins like grilled chicken or shrimp works wonders. Just cook them before mixing them with the pasta. You can also toss in other veggies. Spinach adds a nice color and nutrition. Peas add a pop of sweetness and bright green color. To control the heat, adjust the red pepper flakes. If you want less spice, use half the amount or skip them altogether. For more heat, add sliced jalapeños or a dash of hot sauce. You can even sprinkle cayenne pepper on top for an extra kick. Explore these variations to make your creamy avocado pasta a new experience each time. If you want the full recipe, check out the section above. To keep your creamy avocado pasta fresh, store it in an airtight container. Make sure the container is clean and dry before putting the pasta inside. You can keep it in the fridge for up to three days. Always check for any off smells before eating. Can you freeze creamy avocado pasta? Yes, but it’s not ideal. The texture may change when thawed. If you want to freeze it, place the pasta in a freezer-safe container. Seal it tightly and label it with the date. You can freeze it for about one month. When you’re ready to eat, thaw it in the fridge overnight. To reheat your pasta, use low heat on the stove. Add a splash of olive oil or a bit of water to keep it creamy. Stir often to avoid burning. Avoid using the microwave, as it can make the pasta dry and rubbery. You want to enjoy the smooth texture of the sauce! Creamy avocado pasta is a simple dish made with ripe avocados blended into a rich sauce. It mixes well with pasta for a tasty meal. The sauce is smooth and flavorful, making it a great option for a quick dinner. Avocado gives this dish healthy fats and a creamy texture without heavy cream. Plus, you can easily add herbs and spices to suit your taste. You can prepare the avocado sauce ahead of time. Just keep it in the fridge until you're ready to eat. Cook the pasta fresh when you want to serve it. This way, the pasta stays warm and the sauce stays creamy. If you store the sauce, cover it tightly to prevent browning. A bit of lemon juice helps keep the color fresh. Yes, creamy avocado pasta is quite healthy! Here are some benefits of the main ingredients: - Avocados: Packed with healthy fats, vitamins, and fiber. - Pasta: Provides energy and can be made with whole grains for extra nutrients. - Garlic: Boosts flavor and has health benefits like supporting your immune system. - Basil: Adds flavor and contains antioxidants. All these ingredients make a balanced meal that’s nourishing and delicious. Creamy avocado pasta is best enjoyed fresh. However, if you have leftovers, store them in an airtight container. They can last up to two days in the fridge. The avocado sauce may darken, but it will still taste good. For the best flavor, eat it within a day. Creamy avocado pasta combines fresh flavors and ease of preparation. You learned how to cook pasta, make a smooth avocado sauce, and combine them. Remember to adjust flavors and textures to your liking. Explore variations for new tastes and enjoy it with your favorite proteins. This dish is not just satisfying but healthy too. With tips on storage and reheating, you can enjoy leftovers easily. Now, you can delight in a quick meal full of flavor. Cook this dish and impress your friends and family!

Creamy Avocado Pasta Quick and Tasty Meal Idea

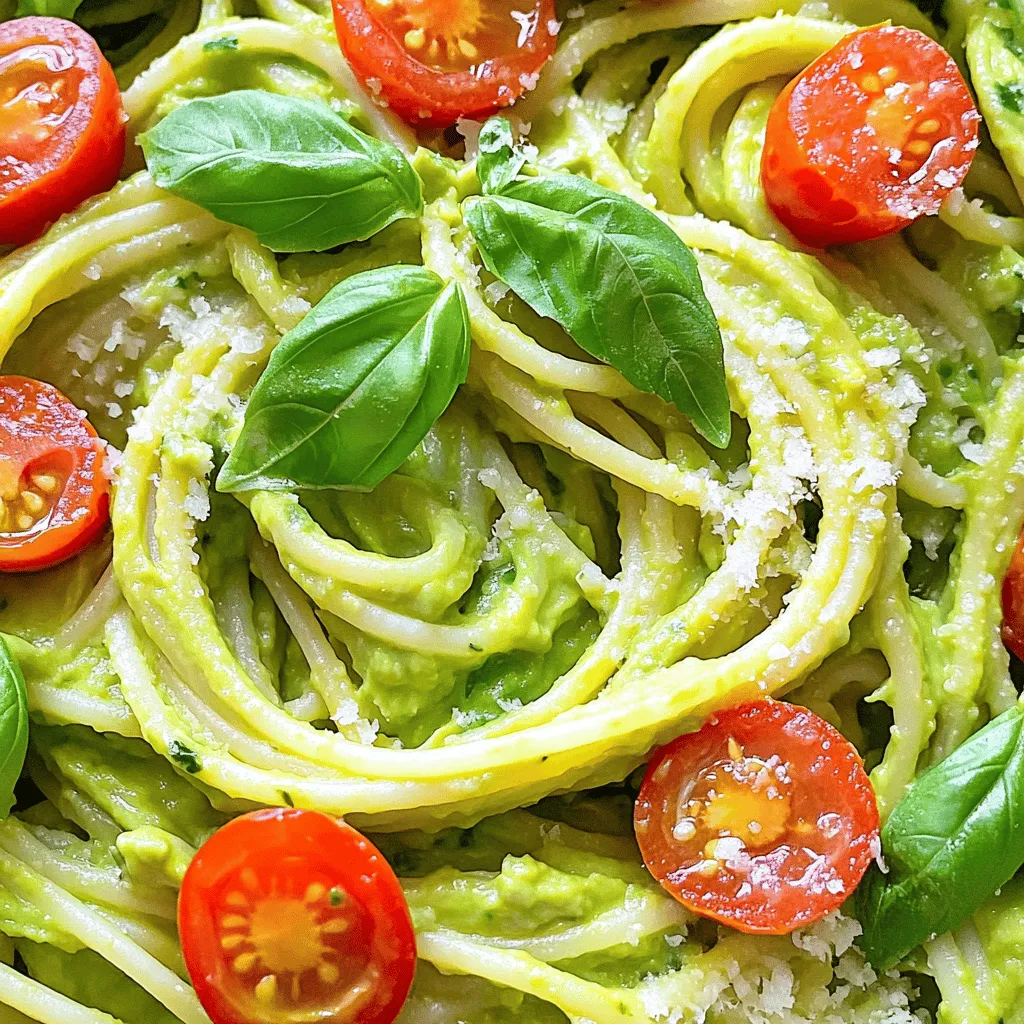
Looking for a quick and tasty meal? You’ll love this creamy avocado pasta! It’s simple, fresh, and packed with flavor.

To make delicious Honey Mustard Chicken Skewers, you need some simple ingredients. Here’s what you will need: - 1 lb boneless, skinless chicken breast, cubed - 1/4 cup honey - 1/4 cup Dijon mustard - 2 tablespoons olive oil - 2 tablespoons apple cider vinegar - 2 garlic cloves, minced - 1 teaspoon smoked paprika - Salt and black pepper to taste - Bell pepper and red onion for skewering - Skewers (if using wooden skewers, soak in water for at least 30 minutes to prevent burning) These ingredients blend together to create a wonderful taste. The honey adds sweetness, while the Dijon mustard gives it a nice tang. Olive oil and apple cider vinegar help to soften the chicken and add depth. The garlic and smoked paprika bring in rich flavors. When you skewer the chicken with bell pepper and onion, you create a bright and colorful dish. This makes it not only tasty but also beautiful to serve. For the full recipe, check out the [Full Recipe]. Enjoy cooking these skewers! To start, combine the honey, Dijon mustard, olive oil, apple cider vinegar, garlic, smoked paprika, salt, and black pepper in a medium bowl. This blend creates the base of your marinade. Make sure to whisk until smooth. A good mix ensures the flavors meld well together, making every bite delicious. Next, add the cubed chicken breast to your marinade. Use a spatula or spoon to coat each piece well. Once all the chicken is covered, cover the bowl with plastic wrap or a lid. Pop it in the fridge for at least 30 minutes. This step allows the chicken to soak up all the flavors. For better taste, you can marinate for up to 4 hours. Preheat your grill to medium heat. This is key for cooking the chicken evenly. While the grill heats, thread the marinated chicken onto skewers. Alternate with colorful bell pepper cubes and onion wedges. This adds both color and flavor. Place the skewers on the grill and cook for about 10-12 minutes. Turn them regularly to get nice grill marks. The chicken should be fully cooked, reaching an internal temperature of 165°F. Once done, let the skewers rest for about 5 minutes before serving. This helps keep the chicken juicy. For the full recipe, check out the detailed instructions! To get nice grill marks, heat your grill to medium. This means around 350°F to 400°F. When you place the skewers on the grill, wait about 3-4 minutes before flipping. This timing helps the chicken develop those beautiful marks. After flipping, cook for another 3-4 minutes. Always check that your chicken reaches 165°F inside for safety. To make your skewers even tastier, try adding extra seasonings like cumin or chili powder. You can also swap in different mustards, like whole grain, for a twist. For the best flavor, marinate the chicken for at least 30 minutes. If you have time, let it sit for up to 4 hours. This longer marination infuses more flavor into the chicken. Honey Mustard Chicken Skewers pair well with many sides. A fresh salad or grilled veggies work great. For a fun presentation, arrange the skewers on a large plate. You can garnish with chopped parsley for color. Drizzle some extra honey mustard sauce on top and serve the rest on the side for dipping. This makes the dish look appealing and adds extra flavor! {{image_4}} You can switch up the protein in this dish. Chicken thighs work great because they stay juicy. Shrimp is another fun option. Just make sure to adjust the grilling time. Shrimp cooks faster than chicken. If you use shrimp, grill them for about 5-7 minutes. If you want a meat-free version, try using tofu. Tofu absorbs flavors well, making it tasty. You can also use vegetable skewers, like zucchini, mushrooms, or cherry tomatoes. Marinate the veggies in the same honey mustard sauce. This will give them a nice, rich flavor. Grill them for about 8-10 minutes. Get creative by adding spices from other cuisines. Try adding cumin for a bit of warmth or ginger for a fresh twist. You can also experiment with different types of mustard. Spicy brown mustard adds a kick, while honey mustard gives sweetness. This lets you create your own unique taste with Honey Mustard Chicken Skewers. To keep your Honey Mustard Chicken Skewers fresh, store leftovers in the fridge. Place them in an airtight container. This keeps moisture in and prevents strong smells from other foods. You can use glass or plastic containers with tight lids. If you want, wrap the skewers in plastic wrap before placing them in the container. Yes, you can freeze Honey Mustard Chicken Skewers! To do this, place cooled skewers in a freezer-safe bag. Try to remove as much air as possible to prevent freezer burn. When you want to eat them, thaw them in the fridge overnight. Then, reheat them in the oven or on the grill until hot. In the fridge, your leftovers will last about 3 to 4 days. In the freezer, they can stay fresh for up to 3 months. Just make sure they are well-packed to keep their taste and texture. The average grilling time for chicken skewers is about 10-12 minutes. You should turn the skewers every few minutes. This helps to cook the chicken evenly and get nice grill marks. To ensure your chicken skewers are safe to eat, check the internal temperature. The chicken should reach at least 165°F. You can use a meat thermometer for this. It’s the best way to be sure. Yes, you can use different types of mustard. Honey mustard gives a sweet touch, while Dijon adds a bit of tang. You can also try yellow mustard or whole grain for more texture. Each mustard will change the flavor of the dish a little. Honey Mustard Chicken Skewers go well with many sides. Popular choices include fresh salads and grilled veggies. A simple green salad with vinaigrette is a great match. You can also serve them with corn on the cob or roasted potatoes for a hearty meal. Honey Mustard Chicken Skewers are easy and delicious. We covered the ingredients and steps for making them. I shared tips for grilling and ways to enhance their flavor. You can even explore different proteins or make them vegetarian. Lastly, I provided storage advice to keep leftovers fresh. Enjoy your tasty skewers at your next meal or gathering! They are sure to impress everyone at the table.

Savory Honey Mustard Chicken Skewers for Grilling

Ready to elevate your grilling game? These Savory Honey Mustard Chicken Skewers are packed with flavor and easy to make.

To make this tasty treat, you need a few simple ingredients. The sweet mix of chocolate, marshmallows, and graham crackers makes a perfect dip. - 1 cup semi-sweet chocolate chips - 1 cup mini marshmallows - ½ cup graham cracker crumbs - ¼ cup unsalted butter, melted - 1 teaspoon pure vanilla extract - Pinch of sea salt - Extra graham crackers for dipping - Optional: chocolate sauce for drizzling You can use dark chocolate if you like a richer taste. If you want a stronger flavor, add more vanilla extract. For a gluten-free option, try using gluten-free graham crackers. You can also swap the mini marshmallows for larger ones if that’s what you have. Just cut them into smaller pieces for even melting. Want to make it extra special? Drizzle some chocolate sauce on top before serving. Each ingredient plays a role in making this dip a delight. Start by preheating your oven to 450°F (230°C). This hot temperature helps the dip bake evenly. You want that warm, gooey goodness. Use an oven thermometer if needed to check the heat. This ensures your dip turns out perfect every time. In a medium bowl, mix graham cracker crumbs, melted butter, and a pinch of sea salt. Stir until it looks like wet sand. This mix forms a tasty crust. Press it firmly into the bottom of a 9-inch skillet or baking dish. Make sure it’s even so it holds the layers well. Sprinkle semi-sweet chocolate chips over the crust. Cover every inch for a rich chocolate taste. Next, add mini marshmallows on top of the chocolate. Spread them out evenly. This will create a fluffy layer that puffs up nicely. Now, place the dish in the preheated oven. Bake for 5-7 minutes. Watch for the marshmallows to turn golden brown. When done, let it cool a bit before serving. Drizzle chocolate sauce on top for extra flavor. Enjoy! For the full recipe, check the earlier section. To bake your s'mores dip, preheat your oven to 450°F (230°C). This high heat is key. It helps the marshmallows puff up and turn golden brown. Bake the dip for about 5 to 7 minutes. Watch closely as it cooks. The marshmallows will grow and get a nice color. The chocolate will melt, creating a gooey layer beneath. Make sure you don't leave it in too long, or it might burn. After baking, take the dish out of the oven. Let it cool for about two minutes. This step is important. It helps the dip set just enough to make it easier to scoop. Serve the dip straight from the skillet or baking dish. This gives it a warm, cozy feel. For a pop of color, add a sprig of fresh mint on top. It looks great and adds a hint of freshness. When serving, place extra graham crackers around the dip. This makes it easy for everyone to enjoy. You can also offer chocolate sauce for drizzling. It adds a rich touch that everyone will love. Encourage guests to dig in while it’s warm. The melted marshmallows and chocolate create the best experience. This s'mores dip is perfect for sharing at parties or cozy nights in. Check out the Full Recipe for more details. {{image_4}} To get the best dip, the chocolate should melt just right. Use semi-sweet chocolate chips for a rich taste. Spread them evenly over the crust. When you add marshmallows, make sure to cover the chocolate fully. This way, they puff up and create a nice top. The goal is a gooey inside with a golden crust. Keep an eye on the oven; you want that beautiful brown look without burning. Extra graham crackers are a must for dipping. They add a nice crunch to the soft dip. You can also use fruit like strawberries or banana slices. These fruity bites offer a fresh twist. For a fun change, try pretzels. The saltiness pairs well with the sweet dip. You can even use cookies for a unique flavor. The options are endless! Add a splash of vanilla extract to brighten the dip's taste. For a twist, mix in some peanut butter with the chocolate. This creates a creamy texture and adds depth. A pinch of sea salt enhances sweetness, balancing the flavors. For extra fun, drizzle chocolate sauce on top after baking. This makes it look fancy and adds more chocolate goodness. Consider using flavored marshmallows for a surprise element too. For the full recipe, check the earlier section! You can change up the flavor of your S'mores dip. Adding peanut butter makes it creamy and rich. Simply mix ½ cup of smooth peanut butter into the chocolate layer. You can also try different chocolate types. Dark chocolate or milk chocolate both work well. For a fun twist, add some caramel sauce for a sweet surprise. Toppings can add crunch and flavor. Try using chopped nuts like almonds or walnuts. They give a nice texture and nutty taste. You can also sprinkle crushed candy bars on top. M&M's or Reese's Pieces add a pop of color. For a fruity touch, add sliced strawberries or bananas. They pair perfectly with chocolate and marshmallows. The crust is key to a great dip. Instead of graham crackers, you can use crushed Oreos for a chocolatey base. For a gluten-free option, try almond flour. Mix it with melted butter to form a crust. You can even use cookie dough as a crust. Just bake it first, then add the chocolate and marshmallows on top. Explore these variations to make your S'mores dip unique and tasty. For the complete recipe, check the full recipe section. Bake your S'mores Dip for about 5 to 7 minutes. I recommend watching closely. The marshmallows should puff up and turn golden brown. This shows they are ready. You want the chocolate to melt nicely beneath. A little time in the oven makes a big difference! You can prepare the dip ahead of time. Just assemble it in your baking dish and cover it. Store it in the fridge until you are ready to bake. When you are ready, take it out and let it sit for a few minutes. Then, pop it in the oven to bake. This makes it easy for parties or family nights. If you want to switch it up, try other options. You might use digestive biscuits, vanilla wafers, or even chocolate cookies. Each will add a different flavor, so feel free to experiment. Just keep the same crumb texture for the base. This way, your dip stays delicious! This post covered how to make a tasty S’mores Dip. You learned about the ingredients, including swaps if needed. I shared simple steps for making the dip, from the base to baking. Helpful tips helped ensure your dip turns out great. Finally, I explored fun variations for flavor and toppings. In conclusion, making your own S’mores Dip is fun and easy. Experiment with flavors and toppings to make it yours. Enjoy sharing this sweet treat with friends and family!

S’mores Dip in the Oven Delightfully Sweet Treat

Are you ready to enjoy a sweet, melty twist on a classic treat? S’mores Dip in the Oven combines gooey

- 1 cup mixed berries (fresh or frozen: strawberries, blueberries, raspberries) - 1 ripe banana, sliced - 1 cup unsweetened almond milk (or any milk of your choice) - 1 tablespoon chia seeds - 1 tablespoon honey or maple syrup (optional, for added sweetness) - 1/2 teaspoon pure vanilla extract - Granola - 1 sliced kiwi - Coconut flakes - Fresh mint leaves When making a berry smoothie bowl, I love using fresh or frozen mixed berries. They add great flavor and nutrition. I often choose strawberries, blueberries, and raspberries. Each berry brings its unique taste and health benefits. Next, I add a ripe banana. It makes the smoothie creamy and sweet. I slice the banana before adding it to the blender. For the liquid base, I use unsweetened almond milk. It keeps the recipe light and tasty. You can swap it for any milk you prefer. Optional ingredients like chia seeds boost the fiber and protein. If you want some extra sweetness, honey or maple syrup works well. A little vanilla extract adds a nice touch of flavor. Now, for toppings, I go for granola. It adds crunch to the smooth texture. Sliced kiwi gives a bright color and fresh taste. I sprinkle coconut flakes on top for a tropical vibe. Finally, I finish with fresh mint leaves for a pop of color and flavor. Check out the Full Recipe for all the details on this delicious dish! To make your berry smoothie bowl, first, gather all your ingredients. You will need: - 1 cup mixed berries (fresh or frozen: strawberries, blueberries, raspberries) - 1 ripe banana, sliced - 1 cup unsweetened almond milk (or any milk of your choice) - 1 tablespoon chia seeds - 1 tablespoon honey or maple syrup (optional, for added sweetness) - 1/2 teaspoon pure vanilla extract - Toppings: Granola, 1 sliced kiwi, coconut flakes, an extra handful of mixed berries, and fresh mint leaves for garnish Next, measure out each ingredient carefully. This ensures you get the right taste and texture. Now it’s time to blend! Place all the measured ingredients into your blender. Start with the mixed berries, then add the sliced banana, almond milk, chia seeds, and sweetener if you choose to use it. Don’t forget the vanilla extract for extra flavor. Blend on high speed until the mix is smooth and creamy. If it feels too thick, add a splash of almond milk. Blend again until you reach the right consistency. Once your smoothie is ready, pour it into a bowl. Aim for a nice, thick layer. Now, for the fun part—arranging the toppings! Sprinkle granola over the top. Then, add your sliced kiwi and scatter extra berries. Finish with a sprinkle of coconut flakes. Garnish with fresh mint leaves for a beautiful look. Now, dive in and enjoy your Berry Bliss Smoothie Bowl! When you pick berries, choose fresh ones. Strawberries, blueberries, and raspberries all pack a punch of vitamins. Blueberries are high in antioxidants. Strawberries offer a good dose of vitamin C. Raspberries are full of fiber. *Seasonal choices make a big difference.* In summer, you can find many berries fresh. In winter, frozen berries work just as well. They are often picked at peak ripeness and taste great. To achieve that perfect creamy texture, start with a ripe banana. Its natural sweetness helps, too. If you want it thicker, add more banana or berries. If it’s too thick for your liking, pour in a splash of almond milk. Blend it again until it’s smooth. *You can also try different liquids to mix.* Coconut milk adds a tropical twist. Yogurt can make it super creamy. Just remember that each liquid changes the taste. To adjust the sweetness, taste your blend before serving. If it needs more sweetness, add a little honey or maple syrup. Start with a small amount, then blend again. You can always add more, but it’s hard to take it out! *Consider healthy sweeteners like agave syrup or dates.* They add sweetness without refined sugars. Using ripe bananas also boosts the natural sweetness in your bowl. For the full recipe, check out the Berry Bliss Smoothie Bowl recipe above! {{image_4}} You can boost your berry smoothie bowl with fun add-ins. Adding spinach or kale is an easy way to get more nutrients. These greens mix well without changing the taste. You won’t even notice them! Nut butter is another great choice. Almond or peanut butter adds a creamy texture and rich flavor. Just a tablespoon can make your bowl feel extra special. The base of your smoothie bowl can change the taste. You can use yogurt for a thick and creamy feel. Greek yogurt adds protein too. Coconut milk is another option. It gives a tropical twist and a hint of sweetness. If you prefer non-dairy options, almond milk works great. Oat milk is another nice choice. It has a mild flavor that complements the berries well. Seasonal fruits can add fun and variety to your bowl. In summer, try using fresh strawberries, blueberries, and blackberries. They are sweet and juicy, perfect for a refreshing treat. In fall, consider adding apples or pears. You can also spice things up with a dash of cinnamon. This gives your bowl a warm, cozy feel. For the full recipe, check out the Berry Bliss Smoothie Bowl! To keep fresh berries tasty, store them in the fridge. Place them in a container with a lid. This helps keep them dry and cool. Avoid washing them until you are ready to eat. Moisture can cause mold. For almond milk, keep it in a cool place. Seal the carton tightly after each use. This prevents spoilage and keeps the milk fresh for longer. You can make smoothie packs for easy mornings. Just combine your berries, banana, and chia seeds in bags. Freeze them until you are ready to blend. In the morning, just grab a pack, add almond milk, and blend. For storing blended smoothie bowls, use an airtight container. Keep it in the fridge for up to 24 hours. The bowl may separate a bit, but a quick stir will fix that. Freezing smoothies is a great way to save time. Pour your smoothie into ice cube trays or freezer bags. This method lets you use small portions later. Smoothies can last in the freezer for up to three months. Just remember to label your bags with the date. This way, you’ll know when to use them again. For the best taste, enjoy them fresh! To make a vegan berry smoothie bowl, you can easily swap ingredients. Instead of honey, use maple syrup for sweetness. You can also replace almond milk with any plant-based milk like coconut or oat milk. These changes keep your bowl creamy and delicious. Yes, you can use yogurt instead of almond milk. This swap will make your smoothie bowl thicker and creamier. Yogurt adds a tangy flavor, which can be refreshing. If you choose yogurt, you might want to add a bit more liquid to keep it pourable. Berry smoothie bowls offer many health benefits. Berries are rich in vitamins and antioxidants. They boost your immune system and fight inflammation. Bananas add potassium, which is great for your heart. Chia seeds provide fiber and healthy fats. Overall, this bowl is not just tasty but also packs a nutritious punch. A berry smoothie bowl is simple and fun to make. You blend mixed berries, a banana, and almond milk for a tasty treat. You can add optional items like chia seeds or sweeteners. Top it off with granola, kiwi, or coconut flakes for a burst of flavor. Try different variations and enjoy what suits you best. With tips for prep and storage, you can make this bowl healthy and easy to share. Embrace the joy of creating your own smoothie bowl masterpiece!

Berry Smoothie Bowl Nourishing and Flavorful Delight

Welcome to the world of Berry Smoothie Bowls! This nourishing and flavorful delight is not only easy to make but

Older posts
Newer posts
← Previous Page1 … Page67 Page68 Page69 … Page86 Next →

dsad

© 2026 yumymoments • Built with GeneratePress

Our Policies

  • Copyright Policy
  • Cookie Policy
  • GDPR Policy
  • Privacy Policy
  • Disclaimer
  • Terms Of Use

More Information

  • Home
  • About
  • Contact
  • Appetizers
  • Dessert
  • Dinner
  • Drinks
©2026, yumymoments About Back To Top