Skip to content
DisclaimerTerms Of UseGDPR PolicyCookie Policy

yumymoments

  • Home
  • Drinks
  • Appetizers
  • Dinner
  • Dessert
  • About
  • Contact
  • Privacy Policy
DisclaimerTerms Of UseGDPR PolicyCookie Policy

NO-ING-IMG

To make the best chocolate chip banana bread, gather these ingredients: - 3 ripe bananas, thoroughly mashed - 1/2 cup unsalted butter, melted and slightly cooled - 1/2 cup firmly packed brown sugar - 1/4 cup granulated sugar - 2 large eggs, at room temperature - 1 teaspoon pure vanilla extract - 1 teaspoon baking soda - 1/4 teaspoon fine salt - 1 1/2 cups all-purpose flour, sifted - 1 cup semi-sweet chocolate chips - 1/2 teaspoon ground cinnamon (optional, but recommended) Each ingredient plays a role in making your bread tasty. Here are some notes on measurements and substitutes: - Bananas: Use very ripe bananas. They add natural sweetness and moisture. - Butter: Unsalted butter is best, but you can use coconut oil for a dairy-free option. - Sugars: You can swap brown sugar for coconut sugar for a different flavor. - Eggs: You can replace eggs with flax eggs for a vegan version. - Flour: For gluten-free bread, use almond or oat flour. The quality of your ingredients matters. Fresh, ripe bananas give flavor and moisture. High-quality chocolate chips melt beautifully, making each bite rich. Use real vanilla extract for the best taste. The butter should be fresh and unsalted to control salt levels. When you choose good ingredients, your banana bread will shine and taste amazing. This attention to quality helps create a delightful treat that everyone will enjoy. Start by preheating your oven to 350°F (175°C). This step is key. It ensures even baking. Next, grease a 9x5 inch loaf pan with butter or non-stick spray. A well-prepared pan helps the bread pop out easily later. In a large bowl, mash 3 ripe bananas until smooth. Then, add 1/2 cup of melted butter. Mix them well using a fork or whisk. This creates a creamy base. Now, stir in 1/2 cup of brown sugar and 1/4 cup of granulated sugar. Mix until the sugars dissolve. Next, add 2 large eggs, one at a time. Make sure each egg blends in fully. Finally, mix in 1 teaspoon of pure vanilla extract for flavor. Sprinkle 1 teaspoon of baking soda and 1/4 teaspoon of fine salt over the wet mix. Stir until just combined. Then, gradually add 1 1/2 cups of sifted all-purpose flour. Use a spatula to fold it in gently. Stop mixing as soon as the flour disappears. Overmixing can make the bread dense. Now, fold in 1 cup of semi-sweet chocolate chips. If you like, add 1/2 teaspoon of ground cinnamon for extra warmth. Pour the batter into your prepared loaf pan. Smooth the top with a spatula. Bake in the preheated oven for about 60 minutes. Check for doneness with a toothpick. It should come out clean or with a few moist crumbs. After baking, let the bread cool in the pan for 10 minutes. Then, transfer it to a wire rack to cool completely. This step helps prevent sogginess. When ready to serve, slice the bread. Enjoy it warm or at room temperature. For an extra treat, drizzle with melted chocolate or dust with powdered sugar. For the full recipe, check out [Full Recipe]. To get the best texture for your chocolate chip banana bread, use ripe bananas. The riper the bananas, the sweeter and softer they become. I recommend using bananas with brown spots. Mash them well, so there are no lumps. This helps create a moist and fluffy loaf. Gently mix your batter; overmixing can lead to a dense bread. Aim for a smooth blend without overworking it. Many people make the mistake of measuring flour incorrectly. Always spoon the flour into the measuring cup and level it off. Avoid packing it down. This keeps your bread light. Another mistake is not using room-temperature eggs. Cold eggs can affect how well they mix. Always crack them into a bowl first to check for freshness. Lastly, don’t skip the cooling step. Letting your bread cool in the pan for a bit helps set the structure. Want to boost the flavor of your chocolate chip banana bread? Try adding a sprinkle of ground cinnamon to the batter; it pairs perfectly with bananas. You can also mix in chopped nuts for texture. Walnuts or pecans work great. If you like a twist, add a splash of espresso or coffee to deepen the chocolate flavor. For a special touch, drizzle some melted chocolate on top after baking. It makes for a beautiful presentation and tastes amazing. For more details on how to make this delicious treat, check out the Full Recipe. {{image_4}} For those who enjoy a little crunch, try adding nuts. Chopped walnuts or pecans work wonderfully. Simply mix in about 1/2 cup of nuts along with the chocolate chips. The nuts add texture and a rich flavor that pairs well with the bananas. You can easily make this recipe vegan. Replace the eggs with flax eggs. To make a flax egg, mix 1 tablespoon of ground flaxseed with 2.5 tablespoons of water. Let it sit for a few minutes to thicken. Use plant-based butter instead of regular butter. This keeps the bread moist and delicious without any animal products. If you need a gluten-free option, swap the all-purpose flour for a gluten-free blend. Look for one that works as a 1:1 substitute. This keeps the flavor intact while making it safe for those with gluten sensitivities. Always check that your chocolate chips are also gluten-free. These variations allow you to enjoy chocolate chip banana bread in different ways. You can mix and match to find your perfect version. For the detailed recipe, refer to the Full Recipe section. After making your chocolate chip banana bread, you want to keep it fresh. To store leftovers, wrap the bread in plastic wrap or aluminum foil. Place it in an airtight container at room temperature. This keeps it soft for up to three days. If you live in a warm area, consider refrigerating it to prevent spoilage. Just remember, the fridge can dry it out a bit. Freezing is a great way to save your banana bread for later. First, let the bread cool completely. Then, slice the bread into individual pieces. Wrap each slice in plastic wrap and then place them in a freezer bag. Squeeze out any extra air before sealing. Your banana bread can last up to three months in the freezer. When you need a slice, just thaw it in the fridge overnight or at room temperature. To enjoy your chocolate chip banana bread warm, you can easily reheat it. If you have a slice, pop it in the microwave for about 15-20 seconds. For a whole loaf, preheat your oven to 350°F (175°C) and warm it for about 10-15 minutes. This helps to bring back the soft texture and melt the chocolate chips. You can also enjoy it cold, but warming it adds a cozy touch. The best bananas for banana bread are very ripe. Look for bananas with brown spots. These bananas are soft and sweet. They will make your bread moist and flavorful. If they are not ripe enough, the bread will not taste as good. You can also use frozen ripe bananas. Just thaw them and mash them well before adding. Yes, you can replace chocolate chips with nuts, dried fruit, or even peanut butter chips. Each option gives a new taste. For a nutty flavor, use walnuts or pecans. If you want more sweetness, try adding raisins or dried cranberries. Just keep the amount the same as the chocolate chips. If your banana bread is too dense, it might be due to overmixing. Mix just until the dry ingredients are combined. Another reason could be using too much flour. Make sure to measure flour correctly. If you want lighter bread, you can add a bit more baking soda or an extra egg for fluffiness. Homemade banana bread lasts about 3 to 4 days at room temperature. Keep it in a sealed container to keep it fresh. You can also store it in the fridge for about a week. For longer storage, wrap it tightly and freeze it. It can last up to 3 months in the freezer. When ready to eat, just thaw it at room temperature. Enjoy with a warm cup of tea or coffee! You learned how to make banana bread using quality ingredients and careful steps. We covered mixing, baking, and cooling for great results. I shared tips to avoid mistakes and enhance flavor. With variations like vegan and gluten-free, there's a recipe for everyone. Lastly, proper storage keeps your bread fresh longer. Enjoy the joy of baking and savor every bite of your creation!

Chocolate Chip Banana Bread Simple and Tasty Recipe

Are you craving a dessert that’s simple and full of flavor? Look no further! This Chocolate Chip Banana Bread recipe

- 1 lb chicken breast, thinly sliced - 2 cups fresh Thai basil leaves - 1 tablespoon vegetable oil - 3 cloves garlic, minced - 2-3 Thai bird's eye chilies, chopped - 1 red bell pepper, sliced - 1 tablespoon soy sauce - 1 tablespoon oyster sauce - 1 teaspoon fish sauce - 1 tablespoon sugar - Salt and pepper to taste - Cooked jasmine rice for serving When I make Spicy Thai Basil Chicken, I love how simple the ingredients are. You need fresh items to make it truly shine. The chicken breast should be sliced thin for quick cooking. Fresh Thai basil gives a fragrant kick that you cannot replace. I use vegetable oil for frying because it has a high smoke point. Garlic and chilies add heat and depth. Bird's eye chilies are small but pack a punch, so adjust them based on your taste. The red bell pepper provides a sweet crunch that balances the spice. The sauces are key to the flavor. Soy sauce adds saltiness, while oyster sauce brings umami. Fish sauce adds a unique flavor, but a little goes a long way. Sugar helps round out the dish, balancing the salty and spicy notes. Don't forget the rice! Cooked jasmine rice serves as a perfect base for this dish. It soaks up the sauce nicely. This full recipe will guide you through the cooking process to create a meal that impresses. 1. First, slice the chicken breast into bite-sized pieces. Thin slices cook faster and stay tender. 2. Next, slice the red bell pepper into thin strips. This helps them cook quickly. 3. Mince the garlic finely. You want small pieces for a strong flavor. 4. Chop the bird's eye chilies. Adjust the number based on your heat preference. 1. Heat the vegetable oil in a large skillet or wok over medium-high heat. Wait until it shimmers. 2. Add the minced garlic and chopped chilies to the skillet. Stir-fry for about 30 seconds. The garlic should turn golden and fragrant. 3. Now, increase the heat to high. Add the sliced chicken to the skillet. Stir-fry for 5 to 7 minutes. Cook until the chicken is no longer pink. It should be slightly browned. 4. Add the sliced bell pepper to the skillet. Continue cooking for 2 to 3 minutes. The peppers should soften but still be crunchy. 5. In a small bowl, mix the soy sauce, oyster sauce, fish sauce, and sugar. Whisk until the sugar dissolves. Pour this sauce over the chicken and bell pepper. Stir well to combine. Cook for an additional 2 minutes. This allows the flavors to meld. 1. Remove the skillet from the heat. Gently fold in the fresh Thai basil leaves. Stir until they just wilt. This keeps the aroma fresh. 2. Taste the dish and season with salt and freshly ground black pepper. Adjust the seasoning to suit your taste. You can find the Full Recipe for more details on measurements and cooking times. Enjoy your flavorful creation! For Spicy Thai Basil Chicken, the best cut of chicken is chicken breast. It cooks fast and stays tender. You can also use chicken thighs if you want more flavor. Both cuts work well in this dish. When it comes to Thai basil, you want to use the right type. Thai basil has a sweet, spicy taste. It’s different from sweet basil. Thai basil holds up well to heat, so don't worry about wilting. Look for fresh, vibrant leaves. Avoid any that are brown or wilted. High heat is key for great stir-fry. It cooks the chicken fast and keeps it juicy. Make sure your skillet or wok is hot before adding your ingredients. This helps to sear the chicken quickly. To achieve the perfect stir-fry, keep moving the chicken. Stir it often for even cooking. Don't overcrowd the pan. If you add too much at once, it will steam instead. Work in batches if needed to keep that high heat. Garnishes can enhance the flavors of your dish. Fresh Thai basil leaves make a lovely topping. Thinly sliced chilies add a nice kick. A squeeze of lime juice brightens up the dish too. As for accompaniments, jasmine rice pairs perfectly. You can serve it steamed or fried. You might also enjoy a light salad on the side. This adds freshness and balances the spicy flavors. For a fun twist, try serving it with a cold beer or iced tea. For the complete experience, follow the Full Recipe. Enjoy your cooking adventure! {{image_4}} If you want a vegetarian dish, you can easily swap chicken for mushrooms or eggplant. Both hold flavor well. You can also use jackfruit for a meat-like texture. Just cut it into bite-sized pieces. Cook it just like the chicken, and it will soak up the sauce nicely. For those who like seafood, shrimp works great in this recipe. Use medium or large shrimp, peeled and deveined. Cook them for about 3-4 minutes until they turn pink. Tofu is another fantastic option. Firm tofu absorbs flavors well. Cut it into cubes, and fry it until golden for the best taste. You can adjust the spice in this dish easily. For less heat, use fewer bird's eye chilies. Try one or even half a chili if you prefer it mild. If you like it spicy, add more chilies or use chili paste. The heat can change based on the type of chili you choose as well. Experiment with different amounts until you find your perfect balance. For the full recipe, check the main section! To store your Spicy Thai Basil Chicken, use airtight containers. Glass or plastic containers work well. Make sure to cool the dish to room temperature before sealing. This helps keep the chicken fresh. Store it in the fridge for up to three days. When reheating, you want to keep the flavors and texture. The best way is to use a skillet. Heat on medium and add a splash of water. Stir until heated through. This method helps maintain the dish's moisture. You can also use the microwave. Just cover it with a damp paper towel to keep it moist. Heat in short intervals, stirring in between. Check to ensure it's hot all the way through. Yes, you can freeze Spicy Thai Basil Chicken! First, let it cool completely. Then, place it in a freezer-safe container. It can last up to three months in the freezer. When ready to eat, thaw it in the fridge overnight. Reheat as mentioned above. Enjoy your meal even after a long time! Spicy Thai Basil Chicken, or Pad Krapow Gai, hails from Thailand. It's a popular street food dish. Thai cooks often make it with fresh basil, chicken, and chilies. The dish highlights the bold flavors of Thai cuisine. Street vendors serve it quickly, making it a favorite among locals. Over time, it gained fame worldwide for its spicy, savory taste. Yes, you can prepare this dish ahead of time. Cook the chicken and store it in the fridge. Reheat it before serving to keep it fresh. You can also chop the vegetables a day in advance. Store them in airtight containers to maintain their crunch. This makes meal prep easy and saves time during busy days. Spicy Thai Basil Chicken pairs well with several side dishes. Here’s a list of great options: - Steamed jasmine rice - Fried rice - Cucumber salad - Thai spring rolls - Fresh lime wedges - Iced Thai tea These sides can enhance the meal’s flavor and texture. Try serving them for a complete dining experience. Enjoy every bite! This blog post covered how to make Spicy Thai Basil Chicken. We explored the key ingredients, from chicken to Thai basil, and learned a step-by-step cooking process. I shared tips for picking the best items and cooking techniques to ensure great flavor. You can also try variations with shrimp or tofu. Finally, I provided storage tips to keep your leftovers tasty. With this knowledge, you can create a delicious dish that suits your taste. Enjoy cooking and savor the rich flavors of this meal!

Spicy Thai Basil Chicken Flavorful and Easy Recipe

Discover the vibrant flavors of Spicy Thai Basil Chicken! This dish combines tender chicken, fresh Thai basil, and bold chilies,

When making a Cinnamon Roll Casserole, you need some simple ingredients. Here’s what you will need: - 2 cans of refrigerated cinnamon roll dough (12 rolls each) - 4 large eggs - 1 cup whole milk - 1 teaspoon pure vanilla extract - 1 teaspoon ground cinnamon - 1/2 teaspoon freshly grated nutmeg - 1/4 cup packed brown sugar - 1/2 cup chopped pecans (optional for crunch) - 1/2 cup pure maple syrup - 1/2 cup powdered sugar (for icing) - 2 tablespoons milk (for icing) These ingredients make this dish a sweet and warm treat. The cinnamon rolls bring a fluffy base. Eggs and milk create a custard-like mixture. Spices add depth and warmth. Pecans give a nice crunch. Maple syrup and icing make it extra special. For the full recipe, check out the detailed instructions. Enjoy making this comforting breakfast dish! - Preheat oven to 350°F (175°C). - Grease baking dish with butter or non-stick spray. - Cut each roll into quarters. - Distribute pieces evenly in the baking dish. - Whisk together eggs, milk, vanilla, spices, and sugar. - Pour mixture over cinnamon roll pieces. - Sprinkle with pecans (if using). - Bake for 25-30 minutes until golden brown. - Prepare icing while baking. - Drizzle maple syrup and icing before serving. Follow these steps closely for a perfect dish. The cinnamon roll casserole will be soft, warm, and a delight to eat. Enjoy the sweet smell that fills your kitchen as it bakes. It’s a great way to start your day! If you want to make it even better, check out the Full Recipe for more details. - Ensure even spacing when placing cinnamon roll pieces. This helps them cook evenly. - Check for doneness with a toothpick. Insert it into the center; it should come out clean. - Serve warm with fresh berries or whipped cream. This adds a nice touch of flavor. - Dust with powdered sugar for a beautiful presentation. It makes the dish look fancy. - Overmixing the egg mixture can lead to a tough texture. Mix just until combined. - Not greasing the baking dish properly can cause sticking. Use plenty of butter or spray. These tips will help you create a perfect cinnamon roll casserole every time! For the complete details, check the Full Recipe. {{image_4}} You can make this dish even more fun with some simple twists. - Add chocolate chips or dried fruit to your mixture for extra sweetness. - Try different nuts like walnuts or almonds for a crunchy surprise. Want to tailor the recipe to fit your needs? Here’s how: - Use gluten-free dough to make it safe for gluten-free diets. - Swap regular milk and eggs with plant-based options for a dairy-free treat. Icing can change the whole vibe of your casserole! - Try cream cheese icing instead of the usual powdered sugar icing. - Add orange or lemon zest to your icing for a zesty kick. These variations keep your cinnamon roll casserole fresh and exciting. You can enjoy it your way! For the full recipe, check out the details above. Keep any leftover Cinnamon Roll Casserole in an airtight container. Place it in the refrigerator. This helps keep it fresh for 3 to 4 days. When ready to eat, you’ll enjoy every bite. To warm up your casserole, use a microwave or oven. If using the microwave, heat it in short bursts. Check every 30 seconds to avoid overheating. For the oven, set it to 350°F (175°C) and warm for about 10-15 minutes. You can freeze the uncooked mixture for later baking. Just assemble it in the dish, cover tightly, and place it in the freezer. When you’re ready to bake, thaw it in the fridge overnight. This way, you can enjoy this tasty dish anytime! Yes, you can prepare this dish and refrigerate it before baking. This makes mornings easier. Simply cover the dish and place it in the fridge overnight. When you wake up, just pop it in the oven! If you don't have nutmeg, you can skip it. The casserole will still taste great. Alternatively, you can add a bit more cinnamon to enhance the flavor. Look for a puffed-up texture and a golden-brown color on top. It should be beautiful! You can also insert a toothpick into the center. If it comes out clean, the casserole is done. Yes, you can double the recipe! Just use a larger baking dish and adjust the baking time as needed. Keep an eye on it to make sure it cooks evenly. This cinnamon roll casserole is delicious and easy to make. You learned about the simple ingredients, step-by-step instructions, and ways to avoid common mistakes. Don't hesitate to add your favorite twists or adjust the recipe for dietary needs. Remember, you can also store or freeze leftovers for later enjoyment. Enjoy warm servings with fresh toppings! Baking should be fun and creative, so make this dish your own and share it with family and friends.

Cinnamon Roll Casserole Irresistible Breakfast Treat

Are you ready to elevate your breakfast game? This Cinnamon Roll Casserole will be your new go-to morning treat. With

Let's dive into the key ingredients for your Lemon Blueberry Overnight Oats. Each element plays an important role in flavor and nutrition. - 1 cup rolled oats - 1 cup unsweetened almond milk (or milk of your choice) - 1/2 cup Greek yogurt (plain or vanilla) - 1 lemon (for zesting and juicing) - 1 tablespoon honey or maple syrup - 1/2 cup fresh blueberries - 1 tablespoon chia seeds (optional) - A pinch of salt The rolled oats serve as the base. They soak up flavors and create a creamy texture. Almond milk adds a nice, nutty taste. Greek yogurt boosts the creaminess and adds protein. Zest and juice from the lemon brighten the dish with a fresh kick. Honey or maple syrup sweetens it just right. Fresh blueberries add bursts of flavor and color. Chia seeds are optional but add fiber and help thicken the mix. Lastly, a pinch of salt enhances all the flavors. Mixing these ingredients together creates a tasty and nutritious breakfast. For the full recipe, check out the details above. Enjoy this delicious start to your day! - Start by mixing 1 cup of rolled oats with 1 tablespoon of chia seeds. - Add a pinch of salt to enhance the flavors. - In a separate bowl, whisk 1 cup of almond milk, 1/2 cup of Greek yogurt, 1 tablespoon of honey, the zest of 1 lemon, and juice from that lemon. - This mix will give your oats a creamy and zesty flavor. - Pour the wet mixture over the dry ingredients and stir well. - Gently fold in 1/2 cup of fresh blueberries, being careful not to crush them. - Divide the mix into two or three jars for easy storage. - Seal the jars tightly and place them in the refrigerator. - When you are ready to eat, stir each jar well to combine everything. - Top with extra blueberries and a sprinkle of lemon zest for a fresh finish. To get the best texture for your Lemon Blueberry Overnight Oats, adjust the almond milk. If you like thicker oats, use less almond milk. For creamier oats, add a bit more. I recommend soaking the oats for at least four hours. However, soaking them overnight gives better flavor and texture. You can add different sweeteners to your oats. Honey and maple syrup are great options. If you want something different, try agave nectar or stevia. You can also mix in extra ingredients. Consider adding nuts, seeds, or even a scoop of protein powder for a boost. For a beautiful serving, layer the oats in a clear jar. This shows off the vibrant blue of the berries. Finish with a slice of lemon for a pop of color. You can serve these oats as breakfast or a snack. They are delicious chilled or at room temperature. For the full recipe, be sure to check the earlier section! {{image_4}} You can switch up the berries in your overnight oats. Strawberries and raspberries work well. These fruits add a sweet and tart taste. You can also mix in bananas or peaches for a tropical twist. Each fruit brings its own flavor and nutrition. To boost the taste, you can add spices. A sprinkle of cinnamon gives warmth. Vanilla extract adds sweetness without sugar. You can also mix in nut butter, like almond or peanut. This makes your oats creamy and rich. If you want a vegan version, use plant-based yogurt and maple syrup. For gluten-free oats, make sure to choose certified gluten-free rolled oats. These swaps keep the dish tasty while meeting your diet needs. Feel free to explore these options. Each choice can make your Lemon Blueberry Overnight Oats unique and delicious! For the complete recipe, check the Full Recipe. Lemon blueberry overnight oats last up to five days in the fridge. Store them in airtight jars. Glass jars work best as they do not retain odors. Make sure to seal the jars tightly to keep the oats fresh. You can freeze overnight oats for up to three months. Use freezer-safe containers for best results. Leave some space in the jar for expansion. To thaw, place the jar in the fridge overnight. If you need them fast, set the jar in warm water for a few minutes. You can enjoy overnight oats cold or warm. If you prefer them warm, add a splash of milk and heat in the microwave for 30 seconds. Stir and check the temperature. Heat again if needed. Enjoy your tasty oats! Yes, you can use instant oats. However, the texture will be softer. Rolled oats give a nice chewy bite. Instant oats soak up liquid quickly. They might turn mushy if left too long. If you prefer a firmer texture, stick with rolled oats. You should soak the oats for at least 4 hours. Overnight is best for optimal flavor. This soaking time helps them absorb the liquid. It also softens the oats without cooking them. You want a creamy and thick consistency. You can use regular yogurt, dairy-free yogurt, or cottage cheese. Each option gives a different taste. For a lighter meal, try unsweetened applesauce. This keeps the oats creamy and adds flavor without the tang of yogurt. Yes, this recipe is perfect for meal prep. You can make several jars at once. Store them in the fridge for up to 5 days. Just remember to add fresh toppings right before serving. This keeps your oats looking and tasting fresh. Absolutely, adding protein powder is a great idea! It boosts the nutritional value. Mix it in with the wet ingredients. Choose a flavor that complements the lemon and blueberry. This creates a filling and balanced breakfast. Fresh fruits, nuts, and seeds are great toppings. Try more blueberries, sliced bananas, or strawberries. Chopped nuts add crunch and healthy fats. You can also drizzle honey or maple syrup for extra sweetness. Get creative and make it your own! For the full recipe, click [here](#). This blog post guides you through making delicious overnight oats. We explored the ingredients, like rolled oats, almond milk, and fresh blueberries. You learned how to prepare and combine these simple elements for a tasty meal. Don't forget the tips to perfect texture and flavor. With variations for different diets, there’s something for everyone. Now you can store, freeze, or reheat your oats as needed. This helps you enjoy healthy meals with ease. Make your mornings better with these simple steps!

Lemon Blueberry Overnight Oats Tasty and Nutritious

Start your day right with my delicious Lemon Blueberry Overnight Oats. This easy recipe is not only tasty but packed

- 2 pounds baby potatoes, halved - 4 tablespoons extra virgin olive oil - 4 cloves garlic, finely minced - 1 teaspoon dried rosemary - 1 teaspoon dried thyme - 1 teaspoon smoked paprika - Sea salt and freshly cracked black pepper to taste - Fresh parsley, finely chopped (for garnish) The key to great Garlic Herb Roasted Potatoes is using fresh, high-quality ingredients. First, choose firm baby potatoes. They roast well and have a nice creamy texture. Next, extra virgin olive oil adds rich flavor and helps the spices stick. Garlic is a must! It brings an amazing taste that pairs well with herbs. For herbs and spices, I like using dried rosemary and thyme. They provide depth and earthiness. Smoked paprika adds a hint of smokiness. Don’t forget sea salt and black pepper for balance. Adjust these to fit your taste. If you want, you can add fresh parsley at the end. It adds color and a fresh kick. These simple, fresh ingredients make this dish flavorful and inviting. For the complete recipe, check out the [Full Recipe]. Set your oven temperature to 425°F (220°C). This high heat helps the potatoes crisp up nicely. In a large mixing bowl, toss 2 pounds of halved baby potatoes with 4 tablespoons of extra virgin olive oil. Add 4 finely minced cloves of garlic, 1 teaspoon of dried rosemary, 1 teaspoon of dried thyme, 1 teaspoon of smoked paprika, sea salt, and freshly cracked black pepper to taste. Use your hands or a spatula to coat each potato half well. Spread the coated potatoes on a baking sheet lined with parchment paper. Make sure they are in a single layer for even cooking. Roast them in the preheated oven for 25-30 minutes. About halfway through, flip the potatoes with a spatula for even browning. When they are golden brown and crispy, take them out and let them cool for 5 minutes. This pause helps the flavors settle. If you want more details on the full recipe, check the recipe section. To get crispy edges on your garlic herb roasted potatoes, start by cutting them in half. This increases the surface area for roasting. Use enough oil, but not too much. The oil should coat the potatoes without making them soggy. Place the potatoes on a baking sheet with space between them. Crowding them can lead to steaming instead of roasting. Aim for at least an inch apart. This allows hot air to circulate and crisps the edges beautifully. Fresh herbs can elevate the flavor of your roasted potatoes. Consider using thyme and rosemary straight from your garden. They add a burst of freshness. You can also play with the garlic. Roasted garlic has a sweet, mellow taste. If you want a more pungent kick, use raw garlic. Just be cautious; a little goes a long way. You might even mix the two for depth of flavor. Garlic herb roasted potatoes pair well with many dishes. They complement grilled chicken, steak, or even fish. For a vegetarian option, serve them with a hearty salad or roasted veggies. Presentation matters too! Serve your potatoes in a rustic bowl for charm. Add a few sprigs of parsley on top for color. This simple touch makes your dish pop and impresses your guests. For the full recipe, check the details above. {{image_4}} You can switch up the olive oil. Avocado oil works great too. It has a mild taste and high smoke point. If you want a different texture, try sweet potatoes or Yukon gold potatoes. They add a unique flavor and sweetness to your dish. For a cheesy twist, sprinkle some parmesan cheese on top before serving. It melts nicely and adds a savory kick. You can also mix in other spices like Italian seasoning. This gives your potatoes a new flavor profile that is exciting. To make this dish gluten-free, it’s already a safe choice. All the ingredients are gluten-free, so you’re good to go. If you want a vegan version, just skip cheese or use a plant-based alternative. This way, everyone can enjoy the tasty garlic herb roasted potatoes. Check out the Full Recipe for more details on how to make this dish the best it can be! To keep your Garlic Herb Roasted Potatoes fresh, use an airtight container. Glass or plastic containers work well. Make sure they are cool before sealing. This helps prevent moisture buildup. You can store these potatoes in the fridge for up to three days. After that, they may lose flavor and texture. If you want them to last longer, consider freezing them. To reheat, use the oven for the best results. Preheat it to 375°F (190°C). Spread the potatoes on a baking sheet. Heat for about 10-15 minutes until they are warm and crispy again. You can also use an air fryer for a quick option. Just set it to 350°F (175°C) and heat for about 5-7 minutes. This keeps them crunchy and tasty. You can tell if the potatoes are done by checking their color and texture. Look for a golden brown color and a crispy surface. You can also poke them with a fork. If the fork goes in easily, they are done. Perfectly roasted potatoes have a soft inside and a crunchy outside. Yes, you can use larger potatoes. Just cut them into smaller pieces. Aim for chunks that are about the same size as the baby potatoes. This ensures they cook evenly. Larger potatoes may take a bit longer to roast, so check them often. These potatoes go well with many dishes. Try pairing them with grilled chicken or fish. They also work great with roasted veggies or a fresh salad. For a hearty meal, serve them with steak or pork chops. The flavors will complement each other nicely. You can prepare the potatoes in advance. Just cut and season them, then store them in the fridge. When you're ready to cook, just roast them as instructed. You can also roast them ahead and reheat them later. Just follow my reheating tips for the best results. For more details, check the Full Recipe. This blog post covered all you need for perfect Garlic Herb Roasted Potatoes. You learned about essential ingredients, cooking steps, and tips for great flavor. We discussed how to store leftovers and answered common questions to make cooking easier. Try new variations to suit your taste and needs. Don’t shy away from experimenting with flavors or pairings. Enjoy crispy, savory potatoes now that you have the tools to make them great. Happy cooking!

Garlic Herb Roasted Potatoes Flavorful and Easy Dish

Looking for a delicious side dish that’s quick and easy? Garlic Herb Roasted Potatoes are packed with flavor and can

- 1 cup quinoa - 2 cups vegetable broth or water - 1 tablespoon extra virgin olive oil - 1 small onion - 1 bell pepper - 1 cup fresh spinach - 2 large eggs (or preferred egg substitutes) - 1 ripe avocado - Fresh herbs for garnish - 1 teaspoon garlic powder - 1 teaspoon smoked paprika - Salt and freshly ground black pepper - Optional garnishes - Suggested complementary items Quinoa is the star of this dish. It offers a great base for your breakfast. Quinoa is high in protein and fiber. It helps you feel full and satisfied. Using vegetable broth adds flavor and depth. I love to sauté the onion and bell pepper in olive oil. This step makes your kitchen smell amazing. The vegetables become soft and sweet, enhancing the dish. Adding spinach boosts your nutrient intake. It cooks quickly and adds vibrant color. Eggs are a great protein source. You can prepare them to your liking. Sunny-side up, scrambled, or poached all work well. Avocado adds creaminess and healthy fats. Fresh herbs brighten the bowl. They also give a pop of flavor. For extra flair, consider toppings like feta cheese or hot sauce. These can take your savory bowl to another level. Enjoy the balance of flavors and textures in this nutrient-packed morning bowl. If you want the full process, refer to the Full Recipe. Start by rinsing 1 cup of quinoa under cold water. This step removes any bitterness. In a medium saucepan, combine the rinsed quinoa with 2 cups of vegetable broth or water. Bring this mixture to a boil over high heat. Once it bubbles, reduce the heat to low, cover with a lid, and let it simmer. Cook for about 15 minutes. The quinoa will become fluffy and absorb all the liquid. After cooking, remove it from heat and let it sit, covered, for 5 minutes. While the quinoa cooks, heat 1 tablespoon of extra virgin olive oil in a large skillet over medium heat. Add 1 small finely chopped onion and 1 diced bell pepper to the skillet. Sauté these for about 5 minutes until the onion turns translucent and the vegetables soften. Next, stir in 1 cup of roughly chopped spinach, 1 teaspoon of garlic powder, and 1 teaspoon of smoked paprika. Cook this mixture for an additional 2 minutes or until the spinach wilts. Season with salt and freshly ground black pepper to taste. Now, it’s time to mix everything! Add the cooked quinoa to the skillet with the sautéed vegetables. Gently fold them together until well combined and heated through. In a separate small skillet, cook 2 large eggs to your liking. You can fry them sunny-side up, scramble them, or poach them. To serve, spoon the savory quinoa mixture into bowls. Place a cooked egg on top of each bowl, add a few slices of ripe avocado, and sprinkle with fresh herbs for a beautiful finish. For full instructions, check out the [Full Recipe]. To cook quinoa just right, start by rinsing it. Rinsing removes the bitter saponins. This step makes your quinoa taste much better. Use cold water and a fine mesh strainer. Swirl it around to get all the grains clean. For fluffy quinoa, use the right water ratio. I recommend two cups of water for every cup of quinoa. This ensures it cooks evenly. After boiling, reduce the heat and cover. Let it simmer for 15 minutes. When it's done, let it sit for five minutes before you fluff it with a fork. You can boost the flavor of your quinoa with spices. Try adding cumin or chili powder for heat. Fresh herbs like basil or parsley add a bright touch. You can also use a splash of lemon juice for zest. Customize your bowl to fit your taste. If you love cheese, sprinkle some feta on top. Prefer a bit of crunch? Add nuts or seeds. Each change makes the dish your own. When serving, arrange your bowl with care. Place the eggs off-center for a nice look. Lay the avocado slices in a fan shape. This makes the dish more inviting. For extra flair, drizzle olive oil over the top. You can also sprinkle seeds or herbs for color. A pretty presentation makes your meal even more enjoyable. {{image_4}} You can easily boost the protein in your Savory Breakfast Quinoa. Adding tofu works well. Simply cube it and sauté it with your veggies. Chicken is another great option. Use cooked chicken for a quick addition. For a vegan choice, consider using chickpeas or lentils. These options pack protein and fiber. They also blend perfectly with the spices in the dish. You can switch up the veggies based on what you have. Instead of bell peppers, try zucchini or mushrooms. They both add great flavor and texture. Greens are also flexible. Use kale or Swiss chard in place of spinach. Seasonal vegetables can make your dish exciting. In summer, add fresh tomatoes or corn. In fall, use roasted butternut squash for warmth. To explore global flavors, think about Mediterranean or Asian twists. For a Mediterranean feel, add olives and feta cheese. A splash of lemon juice brightens the flavors. For an Asian flair, mix in soy sauce and sesame oil. You can also use rice instead of quinoa for a different base. Try farro or barley for hearty variations. Each option brings a unique taste to your morning bowl. For more details, you can check the Full Recipe for Savory Breakfast Quinoa Bowl. Store any leftover Savory Breakfast Quinoa in an airtight container. This keeps it fresh. You can place the bowl in the fridge for up to three days. For best results, let it cool to room temperature first. Use glass or plastic containers with tight-fitting lids. These containers help prevent moisture loss. They also minimize the risk of strong odors from other foods. To reheat, place the quinoa in a microwave-safe bowl. Add a splash of water to keep it moist. Cover the bowl with a damp paper towel. Heat it in the microwave for about one to two minutes. Stir halfway through to ensure even heating. You can also reheat on the stove. Pour the quinoa into a small saucepan over low heat. Stir occasionally until warm. This method helps retain texture. Yes, you can freeze Savory Breakfast Quinoa. It freezes well for up to three months. Use freezer-safe containers or bags to avoid freezer burn. When ready to eat, move the container to the fridge. Let it thaw overnight. For quicker thawing, place the bag in cold water for a few hours. After thawing, reheat as mentioned earlier for the best texture. Enjoy your delicious breakfast bowl even after a few weeks! Yes, you can make it ahead of time. Cook the quinoa and store it in the fridge. The veggies can also be prepped. Just sauté them when you're ready to eat. This way, you save time in the morning. Yes, quinoa is a great choice for breakfast. It is high in protein and fiber. This helps keep you full and satisfied. Quinoa also has many vitamins and minerals. These nutrients help with energy and focus throughout your day. You have many options for egg replacements. Consider using tofu for a similar texture. Chickpea flour mixed with water can also work well. Another option is silken tofu blended smooth. Each substitute will give you a different taste and texture. Making Savory Breakfast Quinoa gluten-free is simple. Quinoa itself is gluten-free. Just ensure your vegetable broth is also gluten-free. You can also add gluten-free sauces or seasonings to enhance flavor. For detailed instructions, check out the [Full Recipe](#). Savory Breakfast Quinoa is simple and tasty. We discussed easy ingredients, cooking steps, and useful tips. You learned how to make it your own with different flavors and toppings. With this dish, you can enjoy a healthy breakfast every day. I hope you feel inspired to try this recipe. It’s versatile and can suit anyone's taste. Enjoy your cooking and savor each bite!

Savory Breakfast Quinoa Nutrient-Packed Morning Bowl

Looking for a tasty way to start your day? Savory Breakfast Quinoa is your answer! This nutrient-packed bowl combines fluffy

To make creamy avocado pasta, you need a few simple ingredients. Here’s what you’ll need: - 2 ripe avocados - 3 cups cooked pasta (spaghetti or fettuccine are excellent choices) - 2 cloves garlic, minced - 2 tablespoons extra virgin olive oil - 1 tablespoon freshly squeezed lemon juice - 1/4 cup fresh basil leaves, chopped - 1/4 cup grated Parmesan cheese - Sea salt and black pepper to taste - Cherry tomatoes for garnish - Additional basil leaves for garnish These ingredients come together to create a fresh, creamy sauce. The avocados give the dish a rich flavor and a nice, smooth texture. You can use any pasta you like, but spaghetti and fettuccine work best. The garlic and lemon juice add zing, while the basil and Parmesan provide depth. This recipe is not just tasty; it's also quick and easy. You’ll have a delicious meal in no time! For the full recipe, check out the detailed instructions later on. To start, you need to boil water in a large pot. Add a pinch of salt to the water. Once it reaches a rolling boil, add your pasta. I suggest using spaghetti or fettuccine for this dish. Cook the pasta according to the package instructions. This usually takes about 8 to 10 minutes. For an al dente texture, taste the pasta a minute or two before the time is up. It should be firm but not hard. When done, reserve about 1 cup of the starchy water before draining. Use a colander to drain the pasta, then set it aside. While your pasta cooks, it's time to make the creamy avocado sauce. Grab a food processor and add the following: - 2 ripe avocados - 2 cloves garlic, minced - 2 tablespoons extra virgin olive oil - 1 tablespoon lemon juice - 1/4 cup fresh basil leaves, chopped - 1/4 cup grated Parmesan cheese Blend these ingredients until they are smooth and creamy. If the sauce is too thick, add a bit of the reserved pasta water. This will help reach your desired consistency. Next, taste the sauce. You might need to add sea salt or black pepper for extra flavor. Adjust according to your taste. In a large mixing bowl, combine your drained pasta with the creamy avocado sauce. Toss gently so the pasta gets coated evenly. To serve, dish the pasta into bowls. Garnish each bowl with halved cherry tomatoes and extra basil leaves. This adds color and a fresh touch. Enjoy this creamy avocado pasta as a quick yet satisfying meal. For the full recipe, check out the detailed instructions provided above. To keep your creamy avocado pasta smooth, use ripe avocados. They blend easier. If your sauce is too thick, add some starchy pasta water. This helps thin it out without losing flavor. For extra taste, try adding a pinch of red pepper flakes or a dash of smoked paprika. These spices can add a nice kick. A common mistake is overcooking the pasta. Always cook it al dente. This gives a great texture and helps it hold the sauce. When choosing avocados, look for ones that yield slightly to gentle pressure. If they feel hard, they are not ripe yet. Avoid any avocados with dark spots or blemishes. Serve your creamy avocado pasta in bright bowls for a fun look. You can add a sprinkle of extra Parmesan and fresh basil on top. For side dishes, a simple green salad or garlic bread pairs well. You can also roast some vegetables for added flavor. They add color and nutrition too. {{image_4}} For a vegan twist, you can replace cheese and cream easily. Use nutritional yeast instead of Parmesan. It gives a cheesy flavor without dairy. For creaminess, try adding cashew cream. Blend soaked cashews with water until smooth. This will add rich texture. To boost the flavor without animal products, add nutritional yeast. A sprinkle of lemon zest can add brightness. You might also try blending in some spinach for extra nutrients. You can customize your creamy avocado pasta with fun add-ins. For protein, consider cooked chickpeas or grilled tofu. These options are hearty and filling. Adding vegetables can make your dish colorful and healthy. Try sautéed bell peppers, zucchini, or spinach. Fresh herbs like parsley or cilantro can also enhance the taste. Mixing flavors can create a unique dish. A dash of red pepper flakes will add heat. You can even toss in roasted garlic for depth. Using seasonal produce can elevate your creamy avocado pasta. In spring, add fresh peas or asparagus. These vegetables bring a vibrant taste. In the summer, add cherry tomatoes or corn for sweetness. Using local ingredients supports your community and taste buds. Farmers’ markets often have fresh herbs and veggies. This way, you can make a dish that not only tastes great but also feels good to make. To store leftover creamy avocado pasta, place it in an airtight container. Make sure to cover it well to keep air out. You can store it in the fridge for up to two days. After that, the avocado may brown, and the pasta can dry out. Always check for any off smells before eating. When it's time to reheat, use the stovetop for the best results. Add a splash of water or extra olive oil to the pan. Heat it gently over low heat, stirring often. This keeps the pasta creamy. If the sauce has thickened, add a bit of reserved pasta water to bring it back to life. You can freeze creamy avocado pasta, but it may change in texture. To freeze, portion it into small containers. Leave some space at the top, as the pasta may expand. When you're ready to eat, thaw it in the fridge overnight. Reheat gently, adding a bit of liquid if needed. This way, you can enjoy your meal later without losing flavor. To make creamy avocado pasta, start by cooking your pasta until it's al dente. While the pasta cooks, blend ripe avocados, garlic, olive oil, lemon juice, basil, and Parmesan cheese in a food processor. Pulse until smooth. After draining the pasta, combine it with the creamy sauce. Toss well to coat, and serve with cherry tomatoes and basil on top. This recipe is easy and quick! Spaghetti and fettuccine work great with avocado sauce. These pasta types hold the creamy sauce well. You can also try penne or rotini for a fun twist. Choose your favorite pasta to make the dish your own! Yes, you can use frozen avocados for this recipe. Thaw them before blending. If the sauce feels too thick, add a bit of the reserved pasta water. This helps you achieve that creamy texture. Avocado pasta is quite healthy! Avocados are rich in healthy fats, fiber, and vitamins. They support heart health and digestion. Plus, this dish is low in saturated fat. Enjoying creamy avocado pasta gives you a tasty meal with great nutrition. This recipe has shown you how to make creamy avocado pasta. We covered the ingredients, step-by-step instructions, and tips for success. You can get creative by adding proteins or seasonal veggies. Remember, storage and reheating are key for enjoying leftovers. This dish is not just delicious but also healthy. I hope you try this simple recipe soon. Enjoy making it and sharing with others!

Creamy Avocado Pasta Simple and Delicious Meal

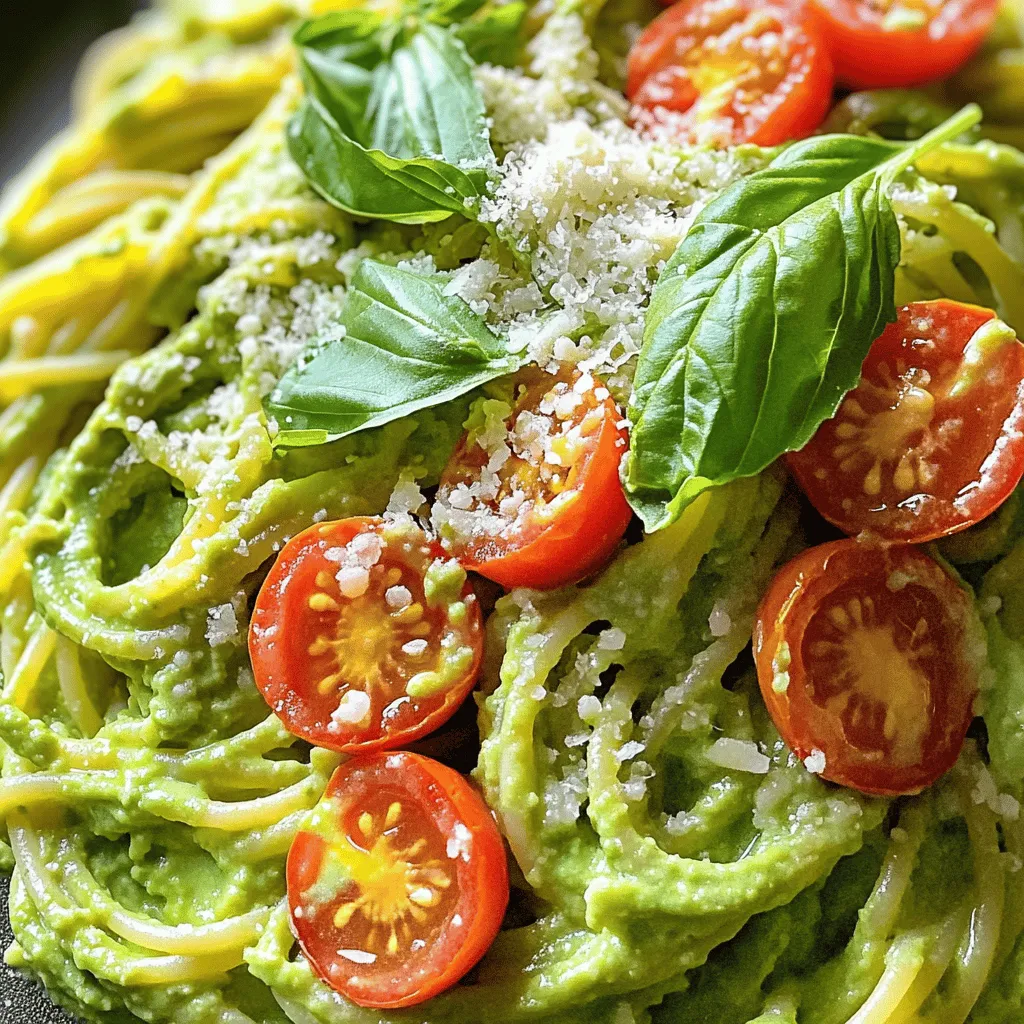
Are you craving a quick, healthy meal that’s as tasty as it is simple? This Creamy Avocado Pasta is just

- 4 cups all-purpose flour - 1 ½ cups warm water (110°F or 43°C) - 2 tablespoons extra virgin olive oil - 2 teaspoons granulated sugar - 2 teaspoons fine sea salt - 2 ¼ teaspoons active dry yeast (1 packet) You can swap all-purpose flour with other types. Whole wheat flour works well for a nutty taste. If you need gluten-free, use a blend made for pizza dough. These options let everyone enjoy homemade pizza! Using different flours changes the flavor and texture. Whole wheat gives a heartier crust. Gluten-free options can be lighter. Each choice brings a new twist to your pizza. To start, you need to activate the yeast. Take a small bowl and mix the warm water, sugar, and active dry yeast. The water must be warm, around 110°F (43°C). If the water is too hot, it will kill the yeast. Stir gently to dissolve the sugar. Let the mixture sit for 5-10 minutes. You will know it's ready when it gets bubbly and frothy. This means your yeast is active and ready to help the dough rise. In a large mixing bowl, combine 4 cups of all-purpose flour and 2 teaspoons of fine sea salt. Use a whisk or a wooden spoon to mix them well. This helps distribute the salt evenly. Next, create a well in the center of the flour mixture. Pour the frothy yeast mixture and 2 tablespoons of extra virgin olive oil into this well. This step ensures the wet ingredients mix well with the dry ingredients. Now it’s time to knead the dough. Turn the mixture out onto a lightly floured surface. Knead the dough for about 8-10 minutes. Push it down and fold it over itself repeatedly. You want the dough to become smooth and elastic. It should feel slightly tacky but not sticky. If it sticks to your hands, sprinkle a little flour on it. After kneading, place your dough in a lightly greased bowl. Cover it with a damp cloth or plastic wrap. Set the bowl in a warm area, away from drafts. Let the dough rise for about 1 hour. It should double in size. You know it's ready when it feels puffy and airy. If you gently poke it, the dough should spring back slowly. This means it has enough air for a great pizza crust. For the full recipe, check out the Perfectly Chewy Homemade Pizza Dough section. To get the best texture in your pizza dough, focus on elasticity. You want the dough to stretch without tearing. Knead the dough for 8-10 minutes. This builds gluten, giving it strength. If your dough is sticky, don’t panic. Lightly flour your hands and work surface. Add just a bit more flour, but not too much. This helps keep your dough soft and easy to work with. Sometimes, dough can rise too much. If your dough has doubled but looks too puffy, it may be over-proofed. Gently punch it down to release air. Then, reshape it and let it rise again. If your dough is too dry, it can be fixed. Mix a tablespoon of warm water into the dough. Knead it in until the dough feels soft. This can bring back that perfect texture. Making your pizza look great is key. After baking, let it cool for a minute. This helps the cheese set a bit. Then, slice it into even pieces. For a beautiful finish, add fresh basil or a drizzle of olive oil on top. These small touches make your pizza look gourmet. You can find more about enhancing your pizza experience in the Full Recipe. {{image_4}} You can enhance your pizza dough for a new taste. - Herb-infused pizza dough: Mix dried herbs like oregano or basil into the flour. This adds a nice touch. - Adding spices for an extra kick: Try adding garlic powder or red pepper flakes. This makes the dough flavorful. If you have dietary needs, you can still enjoy great pizza. - Substituting ingredients for allergies: Use plant-based oils instead of olive oil. You can also swap out sugar for agave syrup. - Incorporating nut-based oils: Almond or walnut oil gives a unique flavor. This makes the dough rich without dairy. How you shape your dough affects your pizza style. - Round vs. rectangular pizza: Round shapes are classic, while rectangular is great for slices. Choose what fits your mood. - Thin-crust vs. thick-crust styles: Roll the dough thinner for a crispy crust, or keep it thicker for a soft bite. Both styles are delicious! For the full pizza dough recipe, check out the [Full Recipe]. To keep your unused dough fresh, wrap it well. Use plastic wrap or a sealed bag. This helps avoid drying out. Store it in the fridge for up to three days. If you want to keep it longer, freeze it. To freeze, place the dough in a bag. Squeeze out the air before sealing. It can last up to three months in the freezer. When you're ready to use it, thaw it in the fridge overnight. This slow thaw helps keep the texture nice. After you enjoy your pizza, save any leftovers properly. Let the pizza cool before packing. Use an airtight container or wrap it in foil. This keeps it fresh and prevents sogginess. Store it in the fridge for up to four days. When it’s time to eat again, reheat your pizza in the oven. Set it to 375°F (190°C) and heat for about 10 minutes. This method keeps the crust crispy and the cheese melty. Enjoy your homemade pizza again! For the full recipe, check out the details above. Making homemade pizza dough takes about 1 hour and 30 minutes. This includes 15 minutes of prep and 1 hour for the dough to rise. You can enjoy fresh dough in no time! Yes, you can make the dough in advance. Store it in the fridge for up to 3 days. When you’re ready to use it, let it sit at room temperature for 30 minutes. This helps the dough come back to life. Many people forget to check if the yeast is active. If it doesn’t bubble, your dough won’t rise. Another mistake is not kneading enough. Kneading helps develop gluten, which gives the dough its structure. Lastly, avoid adding too much flour. This can make the dough tough. Yes, you can use bread flour. It will make your dough chewier and stronger. The flavor remains similar, but the texture changes. This can be a great choice for a thicker crust! You now have all the ingredients and steps to craft your perfect pizza dough. Remember to pay attention to yeast activation and dough proofing for the best results. Don't hesitate to play around with flavors and shapes. Your options are vast, from herbs to vegan swaps. Store your dough and leftovers properly to enjoy later. Making pizza at home can be fun and rewarding. You have the tools to create something tasty and unique. Enjoy the process and share your delicious pizza with others!

Homemade Pizza Dough Easy Step-by-Step Guide

Making homemade pizza dough is easier than you think! In just a few simple steps, you can create a delicious

- 1 cup rolled oats - 2 cups vegetable broth (or water) - 2 large eggs - 1 small onion, finely chopped - 2 cloves garlic, minced - 1 cup fresh spinach, roughly chopped - 1 medium tomato, diced - 1/2 teaspoon smoked paprika - Salt and freshly ground pepper to taste - Fresh herbs for garnish (such as parsley or chives) - Optional: Olive oil for drizzling Savory oatmeal is a great choice for breakfast. You can enjoy it warm and filling. Rolled oats are the base here. They give you good fiber and energy. Using vegetable broth adds rich flavor. It makes the dish taste better than water. You can easily add your favorite veggies. I love using onions and garlic for a savory kick. Fresh spinach and tomatoes add color and nutrients. Smoked paprika gives a warm flavor. Salt and pepper bring everything together. For the eggs, I prefer poached. They add creaminess on top of the oatmeal. You can also drizzle olive oil for extra richness. Fresh herbs make everything pop! For the full recipe, check out the details to get started on this delicious meal. - Step 1: Simmer the vegetable broth or water in a medium saucepan. - Step 2: Add the rolled oats to the simmering broth. Cook for about 5-7 minutes. Stir often until the oats get creamy and tender. - Step 3: In a skillet, heat olive oil over medium heat. Sauté the finely chopped onion for 3-4 minutes until soft and translucent. - Step 4: Add minced garlic and sauté for another minute until it smells great. - Step 5: Stir in the chopped spinach and diced tomato. Cook for 2-3 minutes until the spinach wilts and the tomato softens. - Step 6: Once the oatmeal is ready, mix in the sautéed veggies. - Step 7: Season with smoked paprika, salt, and pepper. Stir well to combine all the flavors. - Step 8: In a small saucepan, bring water to a light simmer. Crack each egg into a bowl and gently slide it into the water. Poach the eggs for 3-4 minutes. The whites should be set, but the yolks stay runny. - Tips for perfect poached eggs: Use fresh eggs for the best results. Don’t rush; let them cook gently for the right texture. Now you have a delicious bowl of savory oatmeal! You can find the full recipe above. For the best texture in your savory oatmeal, aim for a creamy and thick consistency. Rolled oats work great because they absorb liquid well. Cook them until they are tender but not mushy. Adjust the seasoning to suit your taste. Add a pinch of salt and pepper, then taste before serving. You can always add more if needed. Make your dish eye-catching by plating it nicely. Spoon the oatmeal into bowls, then gently place the poached egg on top. For a touch of flair, drizzle olive oil over the dish. A sprinkle of red pepper flakes adds a nice spice for those who enjoy a kick. Pairing it with crusty bread makes it even better. To take your savory oatmeal up a notch, consider adding more toppings. Chopped avocado or crispy bacon can add richness. You could also add grated cheese for extra flavor. Fresh herbs, like parsley or chives, pair well and add a burst of freshness. They also make the dish look pretty. {{image_4}} You can change the eggs in savory oatmeal to fit your taste. Tofu works well as a great substitute. It absorbs flavors well, and it adds a nice texture. Simply stir in cooked, crumbled tofu at the end. Avocado is another option. You can slice it and place it on top for creaminess. If you prefer meat, try cooked chicken or salmon. Both add protein and pair well with the oatmeal. Spices can really change the taste of your savory oatmeal. Try adding cumin for a warm flavor. Chili powder gives it a kick and makes it exciting. You can also use fresh herbs like basil or cilantro to brighten it up. For vegetables, think about bell peppers, mushrooms, or even zucchini. They add color and nutrients to your meal. You can cook your oatmeal in different ways. Baking it gives a unique texture. Just mix your ingredients in an oven-safe dish and bake until fluffy. For a quick meal, use the microwave. Combine your oats and broth in a bowl and cook for a few minutes. This makes it easy for busy mornings. You can enjoy a tasty breakfast in no time! For the full recipe, check out the earlier section. To store leftovers, let your savory oatmeal cool down. Place it in a sealed container and refrigerate. It will stay fresh for about 3 days. To keep it fresh, store it in an airtight container. This helps prevent it from drying out and absorbing other odors. You can freeze portions for later meals. Spoon your leftover oatmeal into freezer-safe containers. Make sure to leave some space at the top, as it will expand when it freezes. It can last up to 2 months in the freezer. When you're ready to enjoy it, thaw it overnight in the fridge. For reheating, you have a few options. The stove works best. Just add a splash of water to keep it creamy. Heat it on low, stirring often. You can also use a microwave. Place it in a bowl, cover it, and heat in short bursts, stirring each time. This way, your oatmeal stays smooth and delicious. You can easily make savory oatmeal dairy-free. Use vegetable broth or water as your base. Instead of butter, try olive oil for cooking. If you want creaminess, add mashed avocado or almond milk. Nutritional yeast can add a cheesy flavor without dairy. Yes, you can prepare savory oatmeal ahead of time. Cook the oats and veggies, then store them in the fridge. You can keep it for up to three days. When ready to eat, simply reheat it on the stove or in the microwave. Add fresh eggs just before serving for best results. You can mix in many fun ingredients. Try adding cooked bacon or sausage for protein. Chopped bell peppers, mushrooms, or kale add great flavor and nutrients. For a spicy kick, add hot sauce or red pepper flakes. Cheese or fresh herbs can also enhance the taste. This recipe works well for meal prep. You can double or triple the ingredients. Store each serving in an airtight container. Just remember to poach the eggs fresh when serving. This way, you keep the eggs runny and delicious. Enjoy your week with easy, tasty meals! This blog post covered a tasty and simple savory oatmeal recipe. We explored its key ingredients, step-by-step cooking instructions, and tips for perfecting flavors. You can customize it with different proteins and spices, making it versatile for any meal. Remember, you can store leftovers easily and enjoy a quick meal later. Savory oatmeal offers a healthy twist, and I hope you try it soon. Happy cooking!

Savory Oatmeal with Egg Nutritious Breakfast Idea

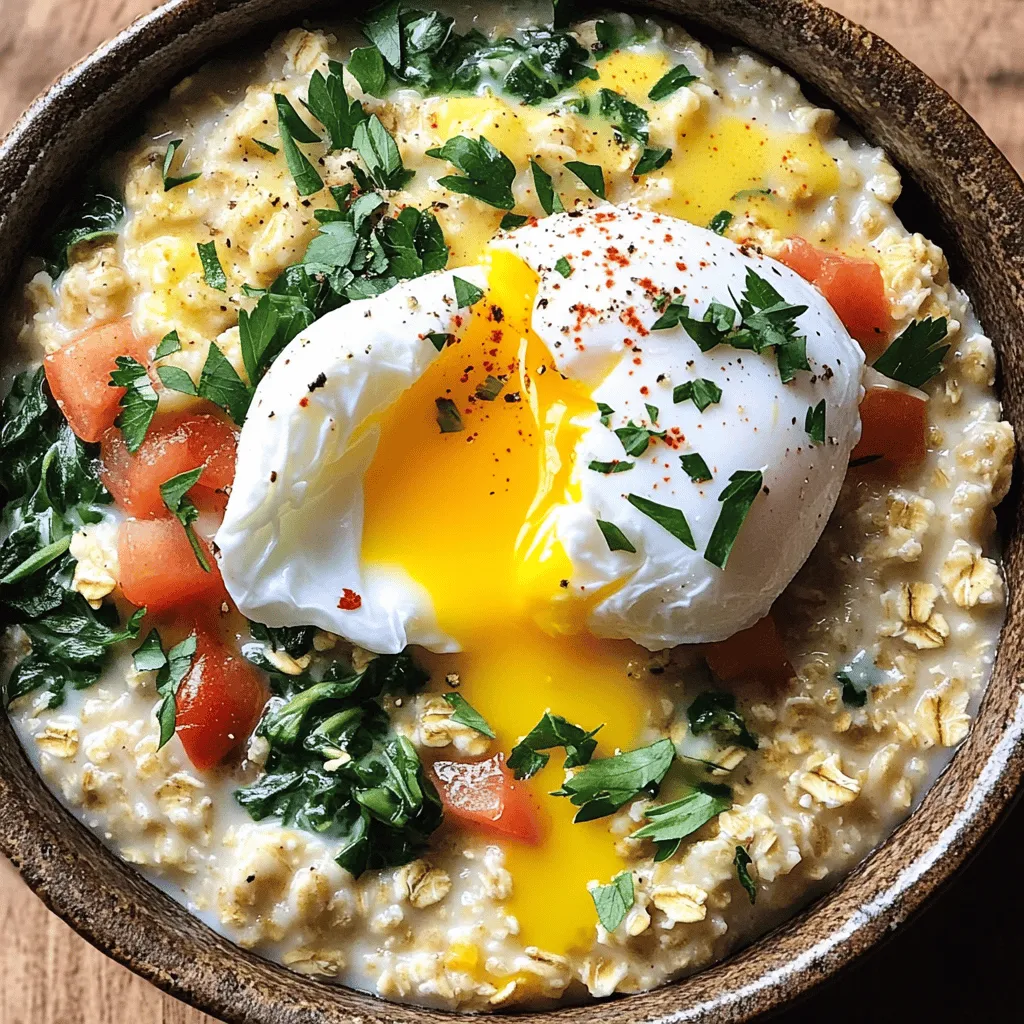
Looking for a hearty breakfast that’s both tasty and good for you? Savory oatmeal with egg is the perfect choice!

To make a rich and creamy chocolate avocado mousse, you need a few key ingredients. Here’s what you will need: - 2 ripe avocados, pitted and peeled - 1/3 cup unsweetened cocoa powder - 1/3 cup maple syrup or agave nectar - 1/4 cup almond milk (or your preferred plant-based milk) - 1 teaspoon pure vanilla extract - A pinch of fine sea salt - 1/4 cup dairy-free dark chocolate chips, melted for added richness These ingredients combine to create a smooth, decadent treat that feels indulgent. The avocados provide creaminess while the cocoa powder adds a rich chocolate flavor. Sweeteners like maple syrup help balance the taste. Garnishes can elevate your mousse and make it pop. Here are some tasty ideas: - Fresh berries (such as raspberries or strawberries) - Mint leaves Adding fresh berries not only makes the dish look beautiful but also adds a burst of freshness. Mint leaves provide a nice contrast to the rich chocolate flavor. You can get creative with your garnishes, so feel free to add your favorites. For the full recipe, refer to the section above. Enjoy your mousse creation! Start by gathering your ingredients. You need ripe avocados, cocoa powder, maple syrup, almond milk, vanilla, and salt. Cut the avocados in half and remove the pit. Scoop the green flesh into a food processor. Add the cocoa powder, maple syrup, almond milk, vanilla extract, and a pinch of sea salt. This mix forms the creamy base of your mousse. Each ingredient adds rich flavor and texture. Now it's time to blend everything together. Process the mixture on high speed until it is completely smooth. This step is key for that velvety texture. If you notice any lumps, pause and scrape down the sides of the bowl. This ensures all ingredients combine well. Keep blending until you reach a creamy consistency. You want it to be thick yet airy. Next, melt the dairy-free dark chocolate chips. You can use a microwave or a double boiler. If you microwave, heat in short bursts to avoid burning. Once melted, let it cool for about a minute. Then, add the chocolate to your avocado mixture. Blend again until the chocolate is fully mixed in. This adds depth and richness to your mousse. Taste it at this point and adjust the sweetness if needed. For the full recipe, refer to the earlier section. Choose ripe avocados for the best mousse. Ripe avocados feel soft when you gently press them. They should yield slightly but not feel mushy. Look for avocados with dark skin and no blemishes. If they are too firm, let them ripen on the counter for a few days. You can also speed up ripening by placing them in a paper bag with a banana. Achieving a smooth mousse is key. Use a good food processor to blend the ingredients. Blend until the mixture looks silky and creamy. Scrape down the sides as you blend. This helps mix everything evenly. If it’s too thick, add a splash more almond milk. This will help you get that perfect texture. The sweetness of your mousse can be adjusted. Start with the amount of maple syrup in the recipe. After blending, taste the mousse. If you want it sweeter, slowly add more maple syrup. Blend for a few seconds to mix it in. Remember, the flavor should be rich but not overpoweringly sweet. You want to enjoy the chocolate and avocado flavors together. For the full recipe, check out the section above. {{image_4}} You can easily make this mousse dairy-free. The main ingredients already include avocados and plant-based milk. For extra creaminess, use coconut cream instead of almond milk. It adds a rich flavor. You can also swap dairy-free chocolate chips for regular ones. This keeps the mousse smooth and tasty. If you want a sugar-free treat, use a sugar substitute like stevia or erythritol. These sweeteners work well in this recipe. You can adjust the amount based on your taste. Just remember to blend it well so it mixes evenly. This way, you enjoy a guilt-free dessert! To make your mousse extra special, add a pinch of cinnamon or a drop of peppermint extract. These flavors pair really well with chocolate. You can also mix in a bit of espresso powder for a coffee kick. Each of these options gives a unique twist. Feel free to get creative and find what you love best! To keep your chocolate avocado mousse fresh, store it in an airtight container. Make sure to cover the surface with plastic wrap to reduce air exposure. This helps prevent browning and keeps the mousse creamy. You can also place a piece of parchment paper directly on top before sealing. This method works wonders! Your mousse will stay tasty in the fridge for about 3 days. After that, the texture may change, and it might not taste as good. Always check for any signs of spoilage, like odd smells or changes in color. If it looks and smells fine, it should be safe to eat. If you want to save your mousse for later, freezing is a great option. Spoon the mousse into freezer-safe containers, leaving some space at the top for expansion. You can also use ice cube trays for easy portioning. When you're ready to enjoy it, just thaw it overnight in the fridge. Give it a quick blend if it seems a bit firm. Enjoy your rich and creamy delight even after freezing! For the full recipe, check out the instructions above. Yes, you can use other sweeteners. Options include honey, coconut sugar, or stevia. Each sweetener will change the taste a bit. Honey adds a floral note, while coconut sugar provides a slight caramel flavor. Stevia is very sweet, so use less. Adjust the quantity to match your taste. Experiment to find your favorite. Yes, this recipe is vegan-friendly. It uses avocados, cocoa powder, and plant-based milk. The sweeteners, like maple syrup or agave nectar, are also vegan. You can enjoy this mousse without any animal products. It's a fantastic treat for anyone on a vegan diet. To check if avocados are ripe, gently squeeze them. They should feel slightly soft but not mushy. A ripe avocado has a dark color, but not all dark ones are ripe. You can also check the stem. If it comes off easily and reveals green underneath, the avocado is ready to use. If it’s brown, it’s overripe. This post covered how to make a delicious chocolate avocado mousse. We discussed key ingredients, step-by-step instructions, and helpful tips. I shared how to choose ripe avocados and offered storage advice. Every detail helps you create a tasty treat. Remember, you can customize the mousse to fit your needs. Try dairy-free or sugar-free options for different flavors. Enjoy exploring all the variations and savoring the creamy goodness!

Chocolate Avocado Mousse Rich and Creamy Delight

If you love chocolate and want a healthy treat, you need to try my Chocolate Avocado Mousse. This rich and

Older posts
Newer posts
← Previous Page1 … Page69 Page70 Page71 … Page86 Next →

dsad

© 2026 yumymoments • Built with GeneratePress

Our Policies

  • Copyright Policy
  • Cookie Policy
  • GDPR Policy
  • Privacy Policy
  • Disclaimer
  • Terms Of Use

More Information

  • Home
  • About
  • Contact
  • Appetizers
  • Dessert
  • Dinner
  • Drinks
©2026, yumymoments About Back To Top