Skip to content
DisclaimerTerms Of UseGDPR PolicyCookie Policy

yumymoments

  • Home
  • Drinks
  • Appetizers
  • Dinner
  • Dessert
  • About
  • Contact
  • Privacy Policy
DisclaimerTerms Of UseGDPR PolicyCookie Policy

NO-ING-IMG

- Zucchini - Bell pepper - Red onion - Cherry tomatoes - Mushrooms When choosing vegetables, pick ones that you enjoy. Zucchini adds a nice crunch. Bell peppers bring sweetness, while red onion offers a bit of bite. Cherry tomatoes burst with flavor, and mushrooms give a lovely earthy taste. - Olive oil - Balsamic vinegar - Garlic powder - Dried oregano - Salt - Black pepper This marinade is the magic. Olive oil keeps the vegetables moist. Balsamic vinegar adds a tangy touch. Garlic powder and dried oregano give a burst of flavor. Salt and black pepper enhance everything. - Wooden or metal skewers - Fresh basil for garnish Do you use wooden skewers? Soak them in water for 30 minutes. This helps prevent burning on the grill. Fresh basil adds a pop of color and aroma. It makes your skewers look even more inviting. For the full recipe, follow the steps carefully to create a beautiful dish that everyone will love. If you use wooden skewers, soak them in water for at least 30 minutes. This step helps keep them from burning. It’s a simple trick that makes a big difference. In a large mixing bowl, combine your zucchini, bell pepper, red onion, cherry tomatoes, and mushrooms. This mix brings color and flavor. In another bowl, whisk olive oil, balsamic vinegar, garlic powder, dried oregano, salt, and black pepper. This will be your marinade. Drizzle it over the veggies and toss gently. Let them sit for 15-20 minutes to soak up the flavors. Preheat your grill to medium-high heat. Carefully thread the marinated vegetables onto the soaked skewers. Aim for a colorful display. Place the skewers on the grill and cook for 10-12 minutes. Turn them occasionally for even cooking. You want tender veggies with nice grill marks. Once done, let them cool for a few minutes. Garnish with fresh basil before serving. This step-by-step guide ensures your grilled vegetable skewers are a tasty and colorful delight. For the complete recipe, check the Full Recipe link. To grill vegetables well, set your grill to medium-high heat. This keeps the veggies tender without burning. Make sure to preheat the grill before adding skewers. A hot grill gives nice grill marks and helps cook evenly. Keep an eye on the heat. If it gets too hot, lower it to avoid charred pieces. Choose a mix of colorful vegetables for your skewers. Zucchini, bell peppers, and red onions work great. They cook evenly and add a nice crunch. Cherry tomatoes and mushrooms add flavor and texture. Cut all pieces to a similar size. This ensures even cooking, so you don’t have some veggies overcooked while others are underdone. To add flavor, use herbs and spices in your marinade. I love adding garlic powder and dried oregano for a fresh taste. You can also try adding fresh herbs like thyme or rosemary. For a kick, sprinkle some chili flakes. This will give your skewers a nice flavor boost that everyone will love. For the full recipe, check out the vibrant grilled vegetable skewers. {{image_4}} You can change up the veggies for your skewers. Try broccoli, asparagus, or eggplant. Seasonal vegetables add variety and flavor. Use what’s fresh to make your dish unique. Mixing different colors makes your skewers pop. Don’t be afraid to experiment and find what you love most. For a new taste, change the marinade. An Asian-inspired mix of soy sauce, ginger, and sesame oil gives a bold flavor. Mediterranean herbs like thyme and rosemary bring fresh, fragrant notes. If you like spice, add chili flakes or hot sauce to your marinade. Each option transforms your skewers into a different dish, exciting your taste buds. Serving your skewers with dips adds fun. Try hummus, tzatziki, or a spicy salsa. These dips enhance flavors and make your meal more enjoyable. Arrange the skewers on a nice platter for guests. Drizzle with extra balsamic glaze for a tasty touch. Fresh basil on top makes it look beautiful. For the full recipe, check out the vibrant grilled vegetable skewers recipe. To keep leftover skewers fresh, let them cool first. Place them in an airtight container. This helps prevent moisture loss and keeps flavors intact. You can store them in the fridge for up to three days. If you want to save space, wrap each skewer in plastic wrap before placing them in the container. This extra layer helps keep them fresh longer. When reheating skewers, aim to keep their great texture. The best way is to use your grill or an oven. Heat your grill to low and place the skewers on it for about 5 minutes. This warms them up without making them soggy. If you use an oven, preheat it to 350°F (175°C). Place the skewers on a baking sheet and heat for about 10 minutes. Either method revives the flavors. You can freeze grilled vegetable skewers to enjoy later. Start by letting them cool completely. Wrap each skewer in foil or plastic wrap tightly. Place them in a freezer-safe bag or container. They stay good for about three months. When you’re ready to eat, thaw them in the fridge overnight. Then, reheat them using the methods above for the best taste. To keep your vegetable skewers from burning, soak wooden skewers in water for at least 30 minutes. This step is key. It prevents the skewers from catching fire on the grill. If you use metal skewers, you can skip this part. Also, control your grill’s temperature. Aim for medium-high heat. Cooking at this temperature helps cook the veggies evenly without burning them. You can use frozen vegetables for skewers, but there are pros and cons. Frozen veggies are convenient and often cheaper. They are picked at peak freshness, so they can taste good. However, frozen vegetables can be soggy when thawed. They may not have the same crunch as fresh ones. If you decide to use frozen, let them thaw and pat them dry. This helps remove excess moisture. Grilled vegetable skewers pair well with many sides. Some great options include: - Quinoa salad - Couscous with herbs - Hummus for dipping - Tzatziki sauce - Pita bread or flatbread These sides add flavor and texture to your meal. You can mix and match to find your favorite combinations. Check out the full recipe for vibrant grilled vegetable skewers [here](#). In this post, we covered how to make delicious vegetable skewers. We listed key ingredients like fresh veggies and marinades. The step-by-step guide showed you how to prepare, grill, and enhance flavors. We also discussed variations and storage tips for leftovers. Grilled vegetable skewers are tasty, fun, and easy to make. Try experimenting with different flavors and enjoy your meals! Happy grilling!

Grilled Vegetable Skewers Tasty and Colorful Delight

Ready to elevate your summer barbecue? Grilled vegetable skewers are the perfect blend of taste and color. They’re easy to

To make spicy garlic edamame, gather these items: - 2 cups shelled edamame (fresh or frozen) - 3 cloves garlic, minced - 1 tablespoon olive oil - 1 tablespoon soy sauce - 1 tablespoon sriracha (adjust based on your desired spice level) - 1 teaspoon sesame oil - 1 tablespoon sesame seeds - 2 green onions, finely chopped - Salt, to taste Each ingredient plays a key part in this dish. Edamame adds a nice texture and nutty flavor. Garlic brings a strong, fragrant taste that makes the dish pop. Olive oil helps cook the garlic and adds richness. Soy sauce adds saltiness and umami, enhancing the overall flavor. Sriracha gives it a spicy kick, while sesame oil adds a hint of nuttiness. Sesame seeds provide crunch and a nice look. Finally, green onions add freshness and brightness to each bite. You can find fresh edamame at many grocery stores. Look in the frozen food aisle for frozen edamame as well. Asian markets often have fresh edamame if you want the best quality. When buying, choose vibrant green pods. If you buy fresh, they should feel firm and not mushy. Always check for any dark spots or signs of spoilage. This ensures you get the tastiest edamame for your dish! Start by boiling water in a pot. If you use frozen edamame, cook it according to the package. It usually takes about 5 minutes. The beans should be tender. Drain them and set aside. If you have fresh edamame, steam it for 5-7 minutes until soft. Fresh or frozen, both taste great! Grab a large skillet and heat some olive oil on medium heat. When the oil shimmers, add minced garlic. Sauté this for about 2 minutes. Stir it often to avoid burning. You want it fragrant and slightly golden. If it turns too brown, it may taste bitter. Now, toss the cooked edamame into the skillet. Stir well so the garlic coats every bean. Next, drizzle soy sauce, sriracha, and sesame oil over the mix. Keep stirring for 3-5 minutes. This helps the flavors blend. Once heated, sprinkle sesame seeds and chopped green onions on top. Mix everything again. Finally, taste and add salt if needed. This simple method gives you a vibrant dish that’s ready to enjoy! For a full recipe, check out the details above. To get the best garlic flavor, always use fresh garlic. Mince your garlic just before cooking. This keeps it potent. When you sauté, let the oil heat until it shimmers, then add the garlic. Stir it often. You want it fragrant and light golden. If it turns brown, it may taste bitter. Sriracha adds a nice kick. Start with one tablespoon for a mild heat. If you want more spice, add more sriracha a little at a time. This lets you control the heat level. Remember, you can always add more, but you can’t take it away. Burnt garlic ruins your dish. To avoid this, keep the heat on medium. Stir frequently while cooking. If you smell a strong aroma or see it darkening, remove it from the heat right away. You can also add the edamame sooner if you feel the garlic is close to burning. This helps cool it down and prevents burning. For a full guide on how to make this dish, check out the Full Recipe. {{image_4}} You can mix it up with fun seasonings. Try adding lime juice for a zing. Garlic powder can boost the garlic taste even more. If you like a nutty flavor, use toasted sesame seeds. For a sweet twist, add a small amount of honey or maple syrup. You can also try chili flakes for an extra kick. This recipe is already vegetarian and vegan! All ingredients are plant-based. You can enjoy this dish without any changes. It makes a great snack for everyone. Spicy garlic edamame pairs well with many dishes. Serve it as a snack or appetizer at parties. It goes great with sushi or rice bowls. You can also enjoy it with a cold drink. For a complete meal, add it to a salad or grain dish. Don't forget to check out the Full Recipe for more ideas! Store leftover spicy garlic edamame in an airtight container. Make sure it cools down first. Place the container in the fridge. It will stay fresh for about three days. Avoid leaving it out at room temperature for too long. Bacteria can grow quickly in warm foods. To reheat your edamame, use a skillet. Heat it over medium heat. Add a splash of water or olive oil to keep it moist. Stir frequently until it’s hot. You can also use the microwave. Place it in a microwave-safe bowl. Cover it with a damp paper towel. Heat in short bursts, stirring in between, until warm. This keeps the flavors fresh. Freezing edamame is easy and great for later. First, cook it as you normally would. Let it cool completely. Then, place it in a freezer bag. Remove as much air as possible before sealing. Label the bag with the date. Frozen edamame can last for up to six months. To use, just thaw it in the fridge overnight or cook it directly from frozen. Enjoy it anytime you want a quick snack! Edamame are young soybeans. They are green and found in pods. These beans are packed with protein, fiber, and vitamins. Eating edamame can improve your heart health. They also help with weight management. Edamame contain antioxidants that fight free radicals. This can lead to better skin and overall health. Plus, they are low in calories, making them a great snack. You can use dried edamame, but they need special care. Dried edamame should be soaked and cooked longer. This process takes more time than using fresh or frozen beans. Fresh or frozen edamame offers quicker prep and better texture. If you want fast and tasty edamame, stick with fresh or frozen. You can make spicy garlic edamame in just 15 minutes. The prep time is about 5 minutes. Cooking takes around 10 minutes. This quick recipe fits well into busy days. With quick steps, you can enjoy a tasty dish in no time. For the full recipe, check out the details above. This blog post covered everything you need to make spicy garlic edamame. We explored key ingredients and their roles. I shared easy steps to prepare and sauté the dish. You learned tips for perfect garlic flavor and spice adjustments. We also discussed variations and creative serving ideas. Lastly, I provided storage tips for leftovers. Enjoy making this tasty snack often. It's healthy, simple, and sure to impress!

Spicy Garlic Edamame Flavorful and Quick Delight

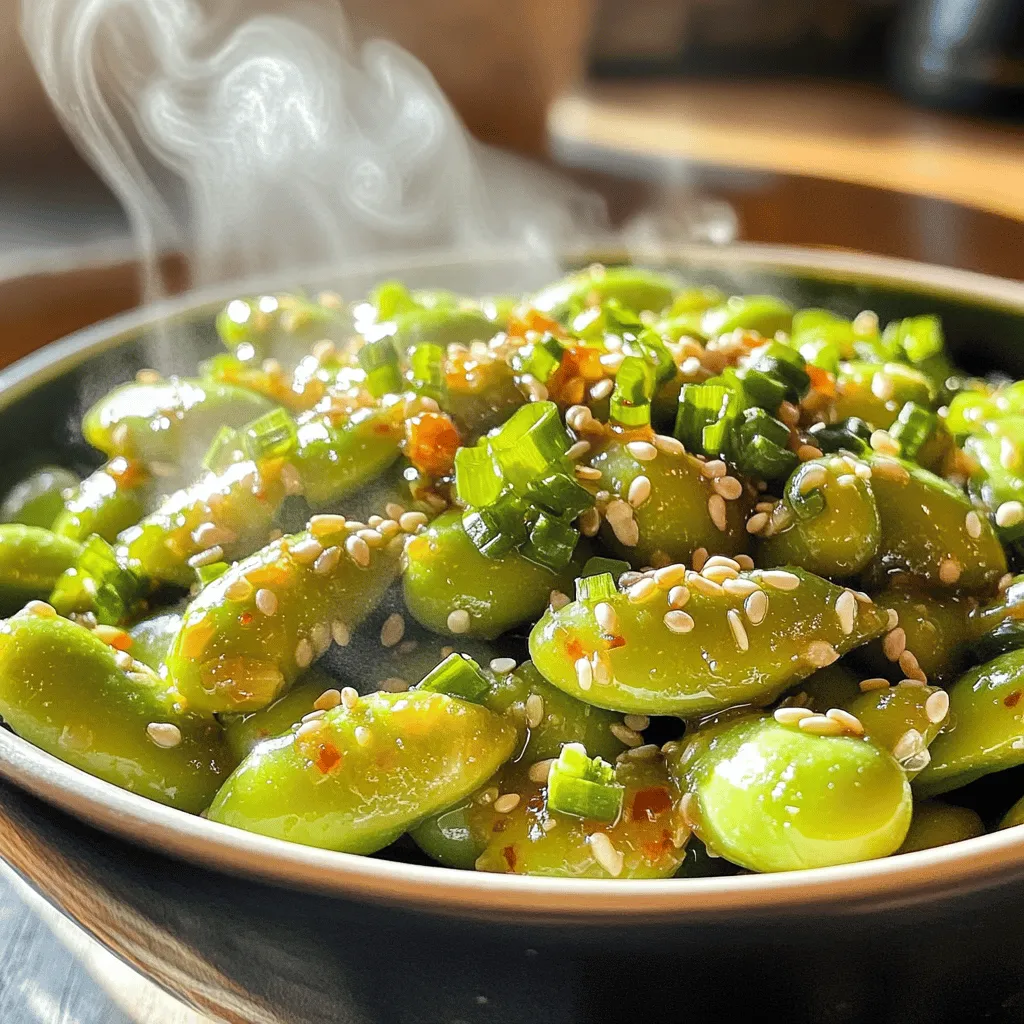
Are you ready to elevate your snack game? This Spicy Garlic Edamame recipe is not only fast but also packed

To make Nutella stuffed pancakes, you need simple ingredients. Each one plays a key role in creating this tasty treat. Here’s what you need: - 1 cup all-purpose flour - 2 tablespoons granulated sugar - 1 teaspoon baking powder - 1/2 teaspoon baking soda - 1/4 teaspoon salt - 1 cup buttermilk (or regular milk) - 1 large egg, at room temperature - 2 tablespoons unsalted butter, melted, plus extra for cooking - 1/2 cup Nutella (plus additional for drizzling) - Butter or oil for the skillet These ingredients come together to create fluffy pancakes with a gooey Nutella center. Remember to use fresh ingredients for the best taste. The combination of flour and leavening agents makes the pancakes rise well. Buttermilk adds a nice tang, while the melted butter gives richness. Nutella is the star here, adding a sweet and creamy touch. You can drizzle more on top for extra indulgence. If you want to explore a twist, feel free to mix in some vanilla or chocolate chips. For the full recipe, check the section above. This way, you can create delicious Nutella stuffed pancakes right at home. Enjoy the process and the tasty results! In a large bowl, whisk together the following dry ingredients: - 1 cup all-purpose flour - 2 tablespoons granulated sugar - 1 teaspoon baking powder - 1/2 teaspoon baking soda - 1/4 teaspoon salt Mix these well to ensure all the leavening agents blend evenly. This step helps the pancakes rise and become fluffy. In another bowl, combine these wet ingredients: - 1 cup buttermilk (or regular milk) - 1 large egg, at room temperature - 2 tablespoons unsalted butter, melted Whisk until smooth. It's key to ensure the melted butter isn’t too hot. If it is, it can cook the egg, and we want a smooth blend here. Heat a non-stick skillet over medium heat. Add a small pat of butter or a splash of oil to the skillet. For each pancake, pour about 1/4 cup of batter onto the hot skillet. Watch for bubbles forming, which should take about 2-3 minutes. As bubbles appear, add about 1 tablespoon of Nutella right in the center of the pancake. Quickly pour another 1/4 cup of batter over the Nutella. Carefully flip the pancake using a spatula and cook for another 2-3 minutes. The pancake should turn golden brown and be fully cooked. Repeat this process with the remaining batter, adding more butter or oil as needed to prevent sticking. Now you have Nutella stuffed pancakes ready to enjoy! For the full recipe, check below. To make fluffy pancakes, avoid overmixing the batter. Mix until just combined; some lumps are okay. This keeps your pancakes light and airy. For cooking, set your skillet to medium heat. This allows the pancakes to cook evenly without burning. A sprinkle of powdered sugar makes your pancakes look great. It adds sweetness without being too much. For a fun twist, drizzle extra Nutella on top. You can also add fresh fruits to brighten your dish. Slices of banana or berries pair well with Nutella. Use a good non-stick skillet for the best results. This helps prevent sticking and makes flipping easy. If you don’t have one, you can use a regular pan with butter or oil. This will also help your pancakes brown nicely. {{image_4}} You can make Nutella stuffed pancakes even better by adding a few simple ingredients. Try mixing in 1 teaspoon of vanilla extract for a lovely aroma. It adds a warm and sweet flavor that pairs well with Nutella. You can also toss in 1/4 cup of chocolate chips for extra chocolatey goodness. The more chocolate, the better, right? If you want to change things up, there are many fillings to explore. Consider using peanut butter or almond butter instead of Nutella for a nutty twist. You can also try fruit preserves like strawberry or raspberry. These fruity fillings add a bright taste that balances well with the pancakes. For those who need gluten-free options, you can swap out regular flour for almond flour or coconut flour. These flours work nicely and keep the pancakes light. If you’re dairy-free, just replace buttermilk with almond milk or oat milk. These alternatives still give the pancakes a rich taste without the dairy. Experimenting with these variations can make your Nutella stuffed pancakes even more fun and delicious. You can enjoy them in many ways! To store leftover pancakes, let them cool completely on a wire rack. This helps prevent sogginess. Place the cooled pancakes in an airtight container. You can stack them with parchment paper between each to avoid sticking. Store the container in the fridge for up to three days. If you want to keep them longer, freeze the pancakes. Wrap each pancake in plastic wrap, then place them in a freezer bag. They can last up to two months in the freezer. To reheat pancakes, the best method is the microwave. Place a pancake on a microwave-safe plate and cover it with a damp paper towel. Heat on medium for 20-30 seconds. This keeps them soft. You can also reheat in a skillet. Preheat the skillet over low heat. Add a small amount of butter, then place the pancake on it. Heat for about 1 minute on each side. This method helps to retain the pancake's texture and warmth. Enjoy your Nutella stuffed pancakes just like they were freshly made! You can make your Nutella stuffed pancakes even more fun with toppings! Here are some great ideas: - Sliced bananas: They add a fresh taste and pair well with Nutella. - Fresh strawberries: Their sweetness balances the rich chocolate. - Whipped cream: A dollop of cream makes everything feel special. - Powdered sugar: A light dusting looks pretty and adds sweetness. - Chopped nuts: Walnuts or hazelnuts give a nice crunch and flavor. Yes, you can prepare the pancake batter ahead of time! Here are some tips: - Mix the dry and wet ingredients separately. Keep them in the fridge until you're ready to cook. - Combine them just before cooking. This ensures the pancakes rise nicely. - Use it within 24 hours for the best texture. After that, the batter may lose its fluffiness. To keep the Nutella inside the pancake, use these simple techniques: - Add Nutella in the center: Don’t spread it; just drop it in the middle. - Cover it with more batter quickly: This seals it in well. - Cook on medium heat: Cooking too fast can cause the pancake to burst. - Flip gently: Use a spatula to avoid breaking the pancake apart. These tips will help you enjoy perfectly stuffed pancakes every time! For the full recipe, check out the section above. You now know how to make delicious Nutella-stuffed pancakes. We covered ingredients, step-by-step cooking, and helpful tips. I shared ideas for variations and storing leftovers. You can change flavors and make these pancakes fit your diet. Remember, cooking is fun, so feel free to experiment. Enjoy your tasty pancakes and share them with friends. Cooking together can be just as fun as eating!

Nutella Stuffed Pancakes Irresistible Breakfast Treat

Craving a breakfast that’s both fun and delicious? Look no further than Nutella stuffed pancakes! These fluffy treats are simple

- 1 cup rolled oats - 1 cup almond milk (or your preferred milk) - 1 medium carrot, finely grated - 1/4 cup Greek yogurt (or non-dairy yogurt of choice) - 2 tablespoons maple syrup (or honey) - 1/2 teaspoon ground cinnamon - 1/4 teaspoon freshly grated nutmeg - 1/4 teaspoon vanilla extract - 2 tablespoons raisins (optional) - 2 tablespoons chopped walnuts (optional) - A pinch of sea salt Gathering the right ingredients is key to making carrot cake overnight oats. Rolled oats give the dish its base. I love using almond milk, but any milk works well too. Grating the carrot finely helps it blend smoothly. Greek yogurt adds creaminess and protein, but feel free to swap it for a non-dairy option. Maple syrup or honey sweetens the mix. Ground cinnamon and nutmeg bring warmth and flavor. A splash of vanilla makes everything taste better. You can add raisins and walnuts for extra texture and taste. Lastly, a pinch of sea salt enhances all the flavors in this tasty breakfast delight. Using fresh, quality ingredients makes a big difference. I always recommend looking for organic or local produce when possible. This not only improves taste but also supports sustainable farming. For the full recipe, check out the Carrot Cake Overnight Oats 🥕. 1. First, grab a medium mixing bowl. Combine the rolled oats and finely grated carrot. 2. Next, pour in the almond milk and add Greek yogurt. Stir the mixture well. Ensure the oats soak evenly in the liquid. 3. Now, sweeten your oats. Add maple syrup, ground cinnamon, grated nutmeg, vanilla extract, and a pinch of sea salt. Mix until smooth. 4. For extra flavor, fold in the optional raisins and walnuts. Make sure they spread evenly. 5. Carefully transfer your oat mix to jars or containers. Leave some space at the top for expansion. - Soaking is key to making oats creamy and soft. It allows the oats to absorb flavors. - Refrigerate the jars overnight or for at least 4 hours. This gives the oats time to soak. - In the morning, take your jars out of the fridge. Stir the oats before serving. If you want it creamier, add a splash of almond milk. - For garnishes, sprinkle extra grated carrot, cinnamon, and chopped walnuts on top. This adds crunch and a nice look. You can find the full recipe for these delicious Carrot Cake Overnight Oats above. Enjoy your tasty breakfast delight! Choosing the right oats I always use rolled oats for overnight oats. They soften nicely and absorb flavors well. Instant oats can get mushy, while steel-cut oats need more time. Rolled oats give you that perfect creamy texture. Best practices for grating carrots When grating carrots, use a fine grater. This helps the carrots blend smoothly into the oats. Fresh carrots taste best, so try to use them instead of pre-packaged. Always wash and peel them first for the best flavor. Recommended add-ins I love to add raisins and chopped walnuts to my overnight oats. They give a lovely texture and a burst of flavor. You can also try adding shredded coconut or chopped apples for more variety. How to adjust sweetness If you want your oats sweeter, add more maple syrup or honey. Start with a little, taste, and adjust as needed. You can also use mashed banana or applesauce for a different type of sweetness. Serving ideas using jars I find that serving overnight oats in mason jars looks appealing. It gives a rustic feel and is easy to grab. You can layer the oats with fruit for a fun look. Aesthetic garnishing tips For garnish, add a sprinkle of cinnamon on top. Extra grated carrot or a few chopped walnuts also work well. A small mint leaf can add a pop of color and freshness. These details make your dish more inviting. For the complete recipe, you can refer to the section above. Enjoy making your breakfast a tasty delight! {{image_4}} You can change the spices to make your oats special. Try adding ginger or allspice for a warm kick. You could also mix in cardamom for a unique twist. Want something different? Go tropical! Add coconut and pineapple for a summer vibe. If you love chocolate, try cocoa powder or chocolate chips. These simple changes can make your carrot cake overnight oats exciting and new. If you want a dairy-free version, swap Greek yogurt with non-dairy yogurt. Almond, coconut, or soy yogurt work well. For milk, use any plant-based milk you like. Almond milk is great, but oat or cashew milk is also tasty. These swaps keep the flavor while making it suitable for everyone. Toppings can take your oats to the next level. Consider fresh fruits like bananas, berries, or apples for a pop of color. You can also sprinkle chia seeds or hemp seeds for extra nutrients. Want some crunch? Add granola or nuts. For a sweet touch, drizzle a bit of honey or maple syrup on top. Mix and match these ideas to create your own perfect bowl. For the full recipe, check out the main article! Store your carrot cake overnight oats in airtight containers. Mason jars work great for this. They keep the oats fresh and allow you to see the layers. Make sure you seal the lids tightly to avoid spills. Keep the jars in the fridge. Carrot cake overnight oats last about 3 to 5 days in the fridge. Always check for signs of spoilage. If you see any mold or an off smell, it's best to toss them. Freshness is key for taste and safety. You can enjoy overnight oats cold, but you can also warm them if you prefer. Simply transfer the oats to a bowl and heat in the microwave for about 30 seconds. Stir and check the temperature before eating. Do not heat them too long, as they can become mushy. Enjoy your tasty breakfast delight! Can I make overnight oats without yogurt? Yes, you can skip yogurt. Use more almond milk instead. This keeps it creamy. You can also add mashed banana for extra moisture and flavor. How can I meal prep with overnight oats? Meal prep is easy with overnight oats. Just make a big batch. Store them in jars. You can make up to five servings at once. This saves time during busy mornings. Are carrot cake overnight oats healthy? Yes, they are quite healthy. They have fiber, protein, and healthy fats. This mix keeps you full and happy. Oats help with digestion, and carrots provide vitamins. Nutritional benefits of each ingredient - Rolled oats: High in fiber, good for heart health. - Almond milk: Low in calories, dairy-free option. - Carrot: Packed with vitamins A and C. - Greek yogurt: Great source of protein and probiotics. - Maple syrup: Natural sweetener with antioxidants. - Cinnamon: May help lower blood sugar levels. - Nutmeg: Has anti-inflammatory properties. - Raisins: Provide natural sweetness and iron. - Walnuts: Packed with omega-3 fatty acids. Can I use instant oats instead of rolled? You can use instant oats, but the texture will change. Instant oats absorb liquid faster. This may make your oats mushy. Rolled oats stay chewier and hold up well overnight. How to modify this recipe for a single serving? To make one serving, use half the ingredients. Use 1/2 cup of rolled oats and 1/2 cup of almond milk. Adjust the sweetener and spices to taste. This makes it simple to enjoy alone. For the full recipe, please refer to the earlier sections. Carrot cake overnight oats are easy and tasty. We covered ingredients, preparation, and tips. Soaking oats overnight gives them the perfect texture. You can add your favorite spices and toppings for a twist. Remember, these oats are great for meal prep and stay fresh in the fridge. Enjoy making these delicious oats as a healthy breakfast option or snack. With a little creativity, you can make them your own!

Carrot Cake Overnight Oats Tasty Breakfast Delight

Looking for a breakfast that combines taste and health? Let me introduce you to Carrot Cake Overnight Oats. This fun

To make this fresh avocado toast with radish, you need simple and healthy ingredients. Here’s what you need: - 2 ripe avocados - 4 slices whole grain bread - 5-6 radishes, thinly sliced - 1 tablespoon lemon juice - 1 tablespoon olive oil - Sea salt and black pepper - Red pepper flakes (optional) - Microgreens or arugula for garnish Each ingredient plays a role in creating a balanced and tasty meal. Avocados bring creaminess and healthy fats. Whole grain bread adds fiber and crunch. Radishes give a nice peppery bite. Lemon juice brightens the flavor. Olive oil adds richness. Salt and pepper enhance all the tastes. If you like heat, red pepper flakes can spice things up. Lastly, microgreens or arugula add freshness and color. Using fresh ingredients makes a big difference. Choose ripe avocados for the best texture. Look for firm bread that can hold the toppings well. Fresh radishes have the best crunch. Gather these ingredients, and you are ready to make a delicious avocado toast! For the full recipe, check out the Avocado Radish Delight Toast. To start, you need to toast your bread. You can use a toaster or a grill. Both methods work well. If you use a grill, heat a dry pan on medium. Toast the bread until it is golden brown. You want it crispy on the outside but soft inside. The perfect texture makes every bite enjoyable. Next, it's time for the avocados. Cut each avocado in half lengthwise. Be careful when removing the pit. I like to use a spoon for this. Once you scoop out the flesh, place it in a bowl. Now, mash the avocado with a fork. Aim for a creamy texture. Add lemon juice and olive oil to the mix. Season with sea salt and black pepper to taste. If you want a spicy kick, add red pepper flakes. Now comes the fun part: assembling your toast. Take your crispy bread and spread a generous layer of the avocado mixture on each slice. Make sure to cover every inch for the best flavor. Next, arrange the thinly sliced radishes on top. This adds a nice crunch and a pop of color. For the final touch, sprinkle some microgreens or arugula. A little extra salt and pepper can enhance the taste. For the full recipe and more details, check out the [Full Recipe]. To make a great avocado toast, you need ripe avocados. Look for avocados that yield to gentle pressure. This means they are soft but not mushy. A dark green to almost black skin usually indicates ripeness. If they are hard, give them a few days to ripen at room temperature. Once ripe, store them in the fridge to slow down ripening. Use them within a few days for the best taste. Getting the perfect toast is key to this dish. You can use a toaster or grill your bread. For toaster use, set it to medium and toast until golden brown. If grilling, preheat a dry pan and toast each side for a few minutes. Aim for a crispy texture that holds the avocado well. This helps balance the creamy avocado and crunchy radish. Garnishes can elevate your avocado toast. Consider adding sliced cherry tomatoes, crumbled feta, or a drizzle of balsamic glaze. Microgreens and arugula add a fresh touch and color. For a beautiful plate, arrange the toast on a rustic board. You can sprinkle a bit of red pepper flakes for flair. This makes your dish not only tasty but also pleasing to the eye! {{image_4}} You can spice up your avocado toast in many ways. Adding red pepper flakes gives it a kick. You can also try smoked paprika or cayenne pepper for more heat. If you like crunch, add sliced jalapeños on top. For the bread, think outside the box! Try sourdough, rye, or even a gluten-free option. Each choice adds its own unique flavor. For a vegan twist, skip the olive oil. Use avocado oil instead for a different taste. You can also add nut-based cheese for creaminess. Blend the avocado with fresh herbs like basil or cilantro. This adds a bright flavor. You can make a unique avocado dip as well. Just mix in some garlic or sun-dried tomatoes. Seasonal ingredients can make your toast shine. In spring, add fresh peas or microgreens for a pop of color. In summer, top with juicy cherry tomatoes or corn. Fall is great for roasted pumpkin or squash slices. In winter, try adding pomegranate seeds for a sweet crunch. Always look for local produce to keep it fresh and tasty. For more ideas and details, check out the Full Recipe. To keep your leftover avocado fresh, store it with care. Here are my top tips: - Use lemon juice: Squeeze some lemon juice on the cut side. This helps slow browning. - Cover tightly: Wrap it in plastic wrap, pushing out air. An airtight container also works well. - Use onion: Place the avocado in a container with a slice of onion. It prevents browning too! When it comes to toast, it's best to eat it fresh. If you have leftovers, keep them for later. Here’s how: - Store separately: Keep the avocado spread and toast apart. This prevents sogginess. - Use foil: Wrap the toast in foil to keep it from drying out. To store prepared toast, follow these steps: - Cool completely: Let your toast cool at room temperature before storing. This keeps it crisp. - Use a paper towel: Place a paper towel in the container. It absorbs extra moisture. - Refrigerate: Store the toast in the fridge if you plan to eat it within a day. When you want to enjoy your toast again: - Reheat in a toaster: This restores its crispy texture. - Skip the microwave: Microwaving makes the toast chewy and soggy. Knowing how long each ingredient lasts helps in planning. Here’s the average shelf life: - Avocados: About 3-5 days ripe. Buy unripe ones to last longer. - Whole grain bread: Lasts about 5-7 days in the pantry. Freeze for longer storage. - Radishes: About 1-2 weeks in the fridge. Look for firm ones with no soft spots. - Lemon juice: Fresh juice lasts 3-4 days in the fridge. Bottled juice lasts longer. - Olive oil: Lasts up to 2 years if stored in a cool, dark place. For buying in bulk: - Check dates: Always check the expiration dates when buying. - Store properly: Keep items in airtight containers for freshness. Yes, you can prep parts ahead. Here are some tips: - Toast your bread: Toast bread slices and store them in a sealed bag. - Prepare avocado: Mash avocados and store them in an airtight container. - Lemon juice: Add lemon juice to mashed avocado to keep it fresh. - Assemble just before serving: Wait to top with radishes and greens until ready to eat. Avocados are rich in healthy fats. They offer many nutrients like: - Fiber: Good for digestion. - Potassium: Helps control blood pressure. - Vitamins E and C: Boost skin health and immunity. Eating avocados can support heart health and weight management. They help you feel full longer. Try adding them to your meals for a nutritious boost. To keep your avocado fresh, use these storage tricks: - Lemon juice: Brush the surface with lemon juice. - Airtight container: Store mashed avocado in one, pressing out air. - Pit in the container: Keep the pit with mashed avocado to slow browning. These methods help maintain color and flavor in your avocado dishes. In this post, I covered how to make delicious avocado toast. I shared a simple list of ingredients and step-by-step instructions. You learned about choosing ripe avocados and the best toasting methods. Variations and tips for storing leftovers were also discussed. Avocado toast is tasty and flexible. You can easily adapt it to your taste. Enjoy trying new toppings and flavors, and make this dish your own!

Avocado Toast with Radish Fresh and Nutritious Meal

Avocado toast is a trendy meal that anyone can enjoy, and adding radishes takes it to the next level. Packed

- Ripe peaches - Fresh mozzarella cheese - Fresh basil leaves For this salad, ripe peaches are key. Look for peaches that give slightly when you press them. They should smell sweet and fragrant too. Fresh mozzarella cheese adds a creamy texture. Use the best quality you can find. Fresh basil leaves bring in a burst of flavor. Try to use whole leaves for a more aromatic experience. - Balsamic glaze - Extra virgin olive oil - Sea salt and black pepper Balsamic glaze adds a sweet and tangy touch. A drizzle over the salad makes it shine. Extra virgin olive oil enriches the dish with depth. Use a good quality olive oil for the best flavor. Sea salt and black pepper enhance all the fresh tastes. A little sprinkle goes a long way. - Cutting board - Sharp knife - Serving platter You will need a cutting board to slice the peaches and cheese. A sharp knife ensures clean cuts without bruising the fruit. Finally, a serving platter will showcase your beautiful salad. Choose one that contrasts nicely with the colors of the salad. For the full recipe, check the complete guide. 1. Start by washing the peaches under cool water. 2. Slice each peach into thin wedges. Remove the pit and set the slices aside. 3. Next, slice the fresh mozzarella cheese into rounds. 4. Tuck fresh basil leaves between the peach and mozzarella slices. This adds flavor and color. 1. Take a large serving platter. Layer the sliced peaches and mozzarella cheese. Alternate them in a circular pattern, starting from the outer edge. 2. Arrange the basil leaves in between the peach and mozzarella. This makes the salad look fresh and inviting. 3. Drizzle balsamic glaze over the top. The glaze will add a sweet touch to the salad. 4. Add a drizzle of extra virgin olive oil. This enhances the richness of the dish. 1. Season the salad with sea salt and freshly cracked black pepper. This makes the flavors pop. 2. Let the salad rest for a few minutes. This helps the flavors meld together. 3. For presentation, serve on a colorful platter. Add a few extra basil leaves on top for a nice look. Enjoy your Peach Caprese Salad! For the full recipe, check the detailed instructions provided. When picking peaches, look for ripe ones. Ripe peaches feel slightly soft when you press them. Avoid peaches that are too mushy; they are overripe. I love using yellow peaches for their sweet flavor. White peaches are great too; they add a nice twist. Plating can make your salad shine. Use a large, colorful platter to show off the layers. Arrange the peaches and mozzarella in a circle. Tuck fresh basil leaves in between for pops of green. A drizzle of balsamic glaze on top adds a shiny finish. Garnish with more basil leaves or a few peach slices. This makes the salad even more inviting. Balancing flavors is key. Don't use too much balsamic glaze; it can overpower the peaches. A light drizzle works best. For a neat presentation, avoid overcrowding the platter. Space out the ingredients for a clean look. A messy salad might taste good, but it won’t look appealing. For the full recipe, check out the Peach Caprese Salad section. {{image_4}} You can switch up the cheese in your Peach Caprese salad. Try using burrata instead of mozzarella. Burrata adds a creamy texture and a rich taste. It pairs well with sweet peaches. You might also want to add other fruits. Cherry tomatoes work nicely for a burst of flavor. Strawberries can add a sweet twist, too. Mixing fruits can create a colorful and tasty dish. To elevate your salad, consider adding nuts. Pine nuts add a nice crunch and a nutty flavor. Walnuts are another great option. They bring a bold taste and pair well with the sweet peaches. You can also sprinkle some feta cheese on top. Feta brings a salty contrast to the sweetness of the peaches. This adds a delightful balance of flavors. Homemade vinaigrettes can change the salad's flavor profile. A simple mix of olive oil, vinegar, and herbs can work wonders. You can experiment with different herbs like thyme or oregano. Flavored balsamic vinegars are another great choice. They come in many flavors, like fig or raspberry. Using these can make your Peach Caprese salad truly unique. For the full recipe, check out the Peach Caprese Salad . To keep your Peach Caprese Salad fresh, store it in the fridge. Place any leftovers in a sealed container. Glass or plastic containers work well. Avoid metal containers, as they can change the taste of the salad. Your salad stays fresh for about two days in the fridge. After that, the peaches may get mushy. Look for brown spots on the peaches or wilted basil leaves. These are signs that the salad is no longer good. You can get creative with leftover ingredients! Try mixing the peaches into yogurt for a tasty breakfast. You can also chop the salad and toss it with pasta for a quick meal. This way, nothing goes to waste, and you enjoy new flavors. A Peach Caprese Salad is a fresh, colorful dish. It blends ripe peaches, creamy mozzarella, and fragrant basil. The sweet peaches pair well with the cheese's mild flavor. You can drizzle balsamic glaze for added sweetness. This salad celebrates summer with its vibrant colors and taste. Yes, you can prepare parts of the salad in advance. Slice the peaches and mozzarella a few hours before serving. Store them separately in the fridge to keep them fresh. Assemble the salad just before serving for the best taste and look. This salad pairs well with grilled meats like chicken or fish. You can also serve it with crusty bread or a light pasta dish. A glass of white wine complements the flavors nicely. These pairings create a balanced and satisfying meal. Yes, this salad is quite healthy! Peaches are rich in vitamins A and C. Mozzarella provides protein and calcium. Fresh basil adds antioxidants and flavor without extra calories. The olive oil in the dressing contains healthy fats, making this salad a nutritious option. Peach Caprese Salad combines fresh peaches, mozzarella, and basil for a tasty dish. Remember to choose ripe fruits and season well with olive oil and balsamic glaze. These simple steps ensure stunning flavors and a beautiful presentation. In the end, you can tweak this salad with different fruits or nuts. Whether you serve it as a starter or a side, this salad brings joy to any meal. Enjoy making your own Peach Caprese Salad and impress everyone with its bright flavors!

Peach Caprese Salad Fresh and Flavorful Delight

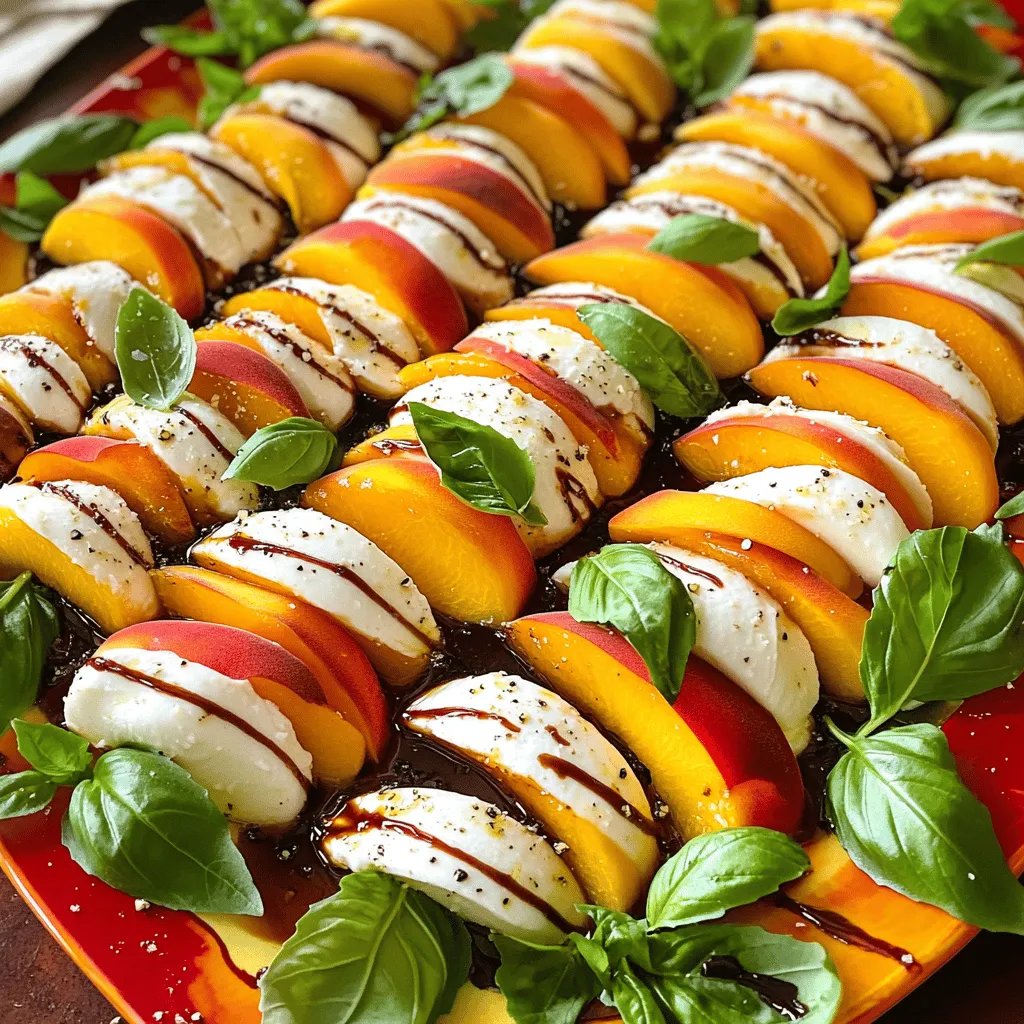
Looking for a fresh and tasty salad that shines in summer? This Peach Caprese Salad combines ripe peaches, creamy mozzarella,

- 3 medium apples (preferably Honeycrisp or Fuji) - 1 tablespoon lemon juice - 2 teaspoons ground cinnamon - 2 tablespoons granulated sugar - Optional: a pinch of sea salt When making cinnamon sugar apple chips, the right apples matter. I recommend using Honeycrisp or Fuji apples. These apples have a sweet taste and crisp texture. Look for apples that feel firm and have smooth skin. Avoid apples with bruises or soft spots. Fresh apples will make your chips taste great. If you want to switch things up, consider using alternatives to granulated sugar. You can try coconut sugar or honey for a different sweet taste. For spices, you can add nutmeg or ginger if you want to mix flavors. These changes keep the recipe fun and interesting. Check out the Full Recipe for more details! First, preheat your oven to 225°F (107°C). This low heat helps the chips dry out slowly. Next, prepare your baking sheet. Line it with parchment paper to stop the apple slices from sticking. This makes cleanup easy and keeps your chips intact. Start by washing your apples under cool water. After that, core them to remove the seeds and stem. For the best chips, slice the apples very thin. I suggest using a mandoline or a sharp knife. Aim for slices about 1/8 inch thick. Remember, thinner slices turn out crispier! Now, it’s time to arrange the apple slices. Lay them out in a single layer on the baking sheet. Make sure they do not overlap. This step is key for even cooking. Next, sprinkle the cinnamon sugar mixture all over the slices. Make sure every slice gets a nice coating! If you want to try something new, add a pinch of sea salt on top. Place the baking sheet in the oven and bake for 1.5 to 2 hours. Flip the apple slices halfway through. This helps them crisp up evenly. Keep an eye on them as they bake. The oven can vary, and thinner slices may cook faster. When the apple chips look golden brown and feel crunchy, take them out of the oven. Let them cool on the baking sheet for about 10 minutes. They’ll get even crunchier as they cool. For storage, put the cooled apple chips in an airtight container. They stay fresh at room temperature for up to a week. For the full recipe, check the section above! To get the best crunch from your apple chips, slice them evenly. Thin slices work best. I recommend using a mandoline for this task. Flipping the chips halfway through baking helps them cook evenly. This step ensures that both sides get crispy and golden. A big mistake is overlapping the apple slices on the baking sheet. When slices overlap, they steam instead of bake. This leads to soggy chips. Also, keep an eye on the baking time. Overbaking can burn them, while underbaking leaves them chewy. Trust me, aim for that perfect crunch! Don’t be afraid to play with flavors. You can add nutmeg or ginger for a spicy kick. Using flavored sugars can also add a fun twist to your chips. Try brown sugar for a deeper flavor or even vanilla sugar. The options are endless, so get creative! For the full recipe, feel free to explore new combinations and enjoy your tasty snacks. {{image_4}} You can add some spice to your apple chips! Try mixing in nutmeg or ginger with the cinnamon. Both spices give a warm taste that really shines. You can also use different sweeteners. Brown sugar adds a rich flavor, while honey or maple syrup can sweeten them naturally. Experimenting with flavors keeps the snack fun and fresh! Get creative when serving your cinnamon sugar apple chips. You can stack them in a jar for a lovely display. They taste great with dips too! Try pairing them with caramel sauce for sweetness or yogurt for a creamy contrast. You can also sprinkle them over ice cream for a crunchy topping. Apple chips are not just a snack! You can add them to salads for a sweet crunch. They work well with greens and nuts. Think about using them in trail mix too! Mix them with nuts, seeds, or even chocolate for a tasty treat on the go. There are so many ways to enjoy these crunchy delights! To keep your cinnamon sugar apple chips fresh, use airtight containers. Glass jars work great. You can also use plastic containers with tight lids. Always let the chips cool completely before storing. This step helps prevent moisture build-up, which can make them soggy. At room temperature, your apple chips can last up to a week. After that, they may lose their crunch. If you notice them feeling soft or chewy, it’s time to toss them out. Look for any signs of mold or odd smells. These are clear signs they are no longer good to eat. If your apple chips lose their crunch, you can easily fix that. Just spread them on a baking sheet. Preheat your oven to 200°F (93°C) and bake them for about 10 minutes. Keep an eye on them to avoid burning. This method can bring back their crispy texture. Always store them properly to keep them crunchy for longer. Homemade cinnamon sugar apple chips can last about one week. Store them in an airtight container at room temperature. Make sure they are completely cool before sealing. This helps keep them crunchy and fresh. Yes, you can make cinnamon sugar apple chips in an air fryer! Slice the apples thin, just like in the oven method. Set the air fryer to 300°F (150°C) and cook for 15-20 minutes. Check and shake the basket every 5 minutes. This ensures even cooking. You can find pre-made cinnamon sugar apple chips at many grocery stores. Look in the snack aisle or health food section. Brands like Bare or Apple Chips offer tasty options. Check local farmers’ markets for homemade versions too. Cinnamon sugar apple chips can be a healthy snack. They contain fiber from apples, which is good for digestion. The cinnamon adds flavor without extra calories. However, watch the sugar content if you’re monitoring your intake. Enjoy them in moderation! Making cinnamon sugar apple chips is simple and fun. We explored the best apples to use, tips for perfect slices, and how to achieve that crisp texture. You learned about substitutions to customize your flavors, as well as creative ways to serve and store your chips. In conclusion, these homemade snacks are a healthy treat you can enjoy anytime. Dive in and let your creativity shine with spices and flavors. Enjoy your tasty apple chips!

Cinnamon Sugar Apple Chips Crunchy and Tasty Snack

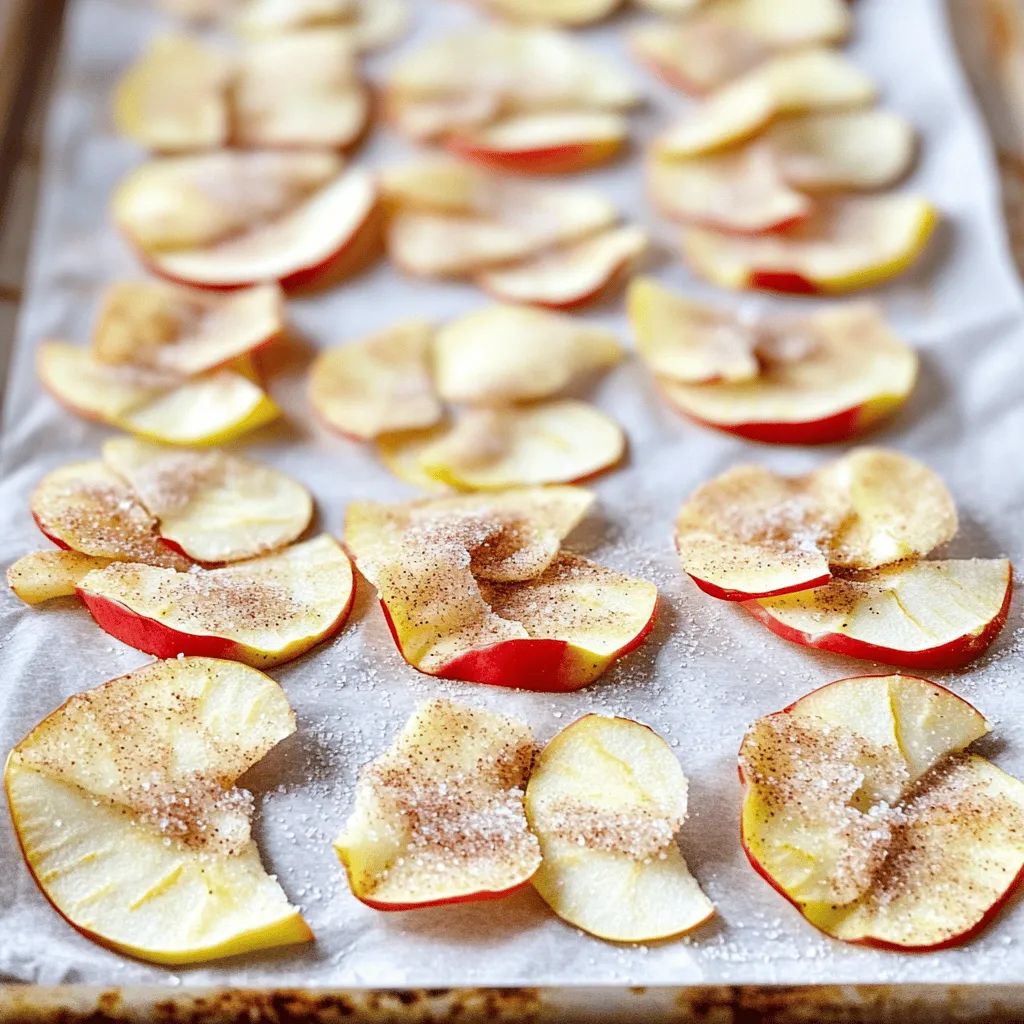
Ready to indulge in a tasty and healthy snack? Cinnamon sugar apple chips are your answer! With their crunchy texture

- 200g pasta (penne or fusilli) - 200g block of feta cheese - 500g cherry tomatoes, halved - 3 cloves of garlic, minced - 4 tablespoons extra virgin olive oil - 1 teaspoon dried oregano - 1/2 teaspoon red pepper flakes (optional) - Salt and freshly ground black pepper, to taste - Fresh basil leaves, for garnish - Grated Parmesan cheese, for serving (optional) - Red pepper flakes add heat. Use them if you like it spicy. - Grated Parmesan cheese gives extra flavor. Serve it on the side. - Use gluten-free pasta if you need. It works just as well. - Swap feta with goat cheese for a different taste. - If you don’t have cherry tomatoes, use regular tomatoes cut into pieces. This dish is all about freshness and flavor. Each ingredient plays an important role in creating a rich and tasty meal. Feel free to get creative with your substitutions! {{ingredient_image_2}} First, preheat your oven to 200°C (400°F). This step is key for a great bake. Next, grab a medium baking dish. Add the halved cherry tomatoes and minced garlic to the dish. Drizzle 2 tablespoons of olive oil over this mix. Season with salt, black pepper, dried oregano, and red pepper flakes if you like heat. Toss everything so each piece is covered well. Make a little space in the center of the dish for the feta cheese. Place the feta block there. Drizzle the remaining olive oil over it. This helps the cheese soak up all those yummy flavors. Now, put the baking dish in your preheated oven. Bake it for 25-30 minutes. You want the feta to turn golden and the tomatoes to become blistered. This step creates a perfect blend of taste and texture. While your dish bakes, fill a large pot with water and add salt. Bring it to a rolling boil. Once boiling, add the pasta. Cook according to the package instructions until it is al dente. After cooking, drain the pasta and let it sit. This helps get rid of extra water. After the baking time, carefully take the dish from the oven. Use a fork to mash the feta into the blistered tomatoes. Mix them until you have a creamy sauce. Now, add the cooked pasta right into the baking dish. Toss everything together until the pasta is fully coated with the feta and tomato sauce. Serve the pasta hot. Add fresh basil leaves on top for a lovely aroma. If you want, you can also offer grated Parmesan cheese on the side. This dish tastes great with a green salad or some toasted garlic bread. Enjoy your meal! To get the best taste from Baked Feta Tomato Pasta, use fresh ingredients. Fresh cherry tomatoes burst with flavor. When you bake them, they become sweet and juicy. Use good-quality feta cheese. A block of feta melts beautifully, making a creamy sauce. Don't skip the garlic; it adds depth. Red pepper flakes give a nice kick. Adjust the amount to your taste. Finally, add fresh basil for a fragrant finish. It brightens every bite. Many people overcook the feta and tomatoes. Keep an eye on them while they bake. If the feta gets too brown, it can become dry. Also, avoid using too much salt at the start. Feta is salty on its own. Taste your dish before adding more. Lastly, don't forget to mix the pasta well with the sauce. This ensures every piece gets coated in that delicious flavor. This dish pairs well with a crisp green salad. The freshness of the salad balances the richness of the pasta. You can also serve it with toasted garlic bread. The crunchy bread soaks up the extra sauce. For drinks, a light white wine works great. If you prefer non-alcoholic options, try sparkling water with lemon. Enjoy your meal with friends and family! Pro Tips Use Fresh Ingredients: Always opt for fresh, ripe cherry tomatoes as they will contribute to the overall flavor and juiciness of the dish. Experiment with Cheese: Try different cheeses like goat cheese or ricotta for a unique twist on the classic feta flavor. Customize the Heat: Adjust the amount of red pepper flakes depending on your preference for spice; you can also add fresh chili for an extra kick. Perfect Pasta Texture: Make sure to cook the pasta al dente to ensure it holds up well when mixed with the creamy feta and tomatoes. {{image_4}} You can easily add vegetables to this dish. Try using spinach, zucchini, or bell peppers. Just chop them into small pieces. Mix them with the tomatoes before baking. These additions boost flavor and nutrition. Plus, they add color to your plate. Feta cheese is great, but there are other options. Goat cheese adds a tangy flavor. Mozzarella gives you a stretchy texture. You can also use ricotta for creaminess. Each cheese brings its own taste, so feel free to experiment. If you need a gluten-free option, choose gluten-free pasta. Many brands offer good choices now. You can also use zucchini noodles for a fresh twist. They pair well with the sauce and keep it light. Enjoy your dish without worry! To store any leftover baked feta tomato pasta, let it cool first. Place it in an airtight container. This helps keep it fresh. Store it in the fridge for up to three days. Make sure to cover it well to avoid drying out. When you’re ready to enjoy your leftovers, you can reheat them easily. Use the microwave for quick warming. Heat on medium power for about 2-3 minutes. If you prefer the oven, preheat it to 180°C (350°F). Place the pasta in an oven-safe dish and cover it with foil. Bake for around 15-20 minutes until it's hot throughout. Freezing baked feta tomato pasta is a great way to save it for later. First, let it cool completely. Then, divide it into portion-sized containers. Make sure to use freezer-safe containers. It can last up to three months in the freezer. To reheat, thaw it overnight in the fridge before using the microwave or oven. Yes, you can use crumbled feta. It will melt into the sauce differently. You may not get the same creamy texture. However, it will still taste great. If you use crumbled feta, add it halfway through baking. This helps it blend well with the tomatoes. I love using penne or fusilli. Both shapes catch the sauce well. Penne has a nice bite, while fusilli twists hold onto the creamy mixture. You can also try other short pasta shapes if you prefer. To spice things up, add more red pepper flakes. You can start with one teaspoon and adjust to your taste. Adding a pinch of cayenne pepper also works well. Just be careful not to overdo it! You can prep the dish ahead of time. Just make the tomato and feta mixture and store it in the fridge. When you're ready to cook, bake it as usual. Cook the pasta fresh for the best texture. This dish is already vegetarian! The ingredients include pasta, tomatoes, garlic, and feta cheese. Just ensure the feta is made without animal rennet. This way, everyone can enjoy this tasty meal. In this article, I shared how to create a simple and tasty feta pasta dish. I covered the key ingredients, step-by-step instructions, and helpful tips. Remember, experimenting with flavors and variations can enhance your meal. Store leftovers properly and enjoy them later. Making this dish can be fun and rewarding. With a few tricks, you can impress your family and friends. Try this recipe, and you might discover a new favorite!

Baked Feta Tomato Pasta Simple and Tasty Dish

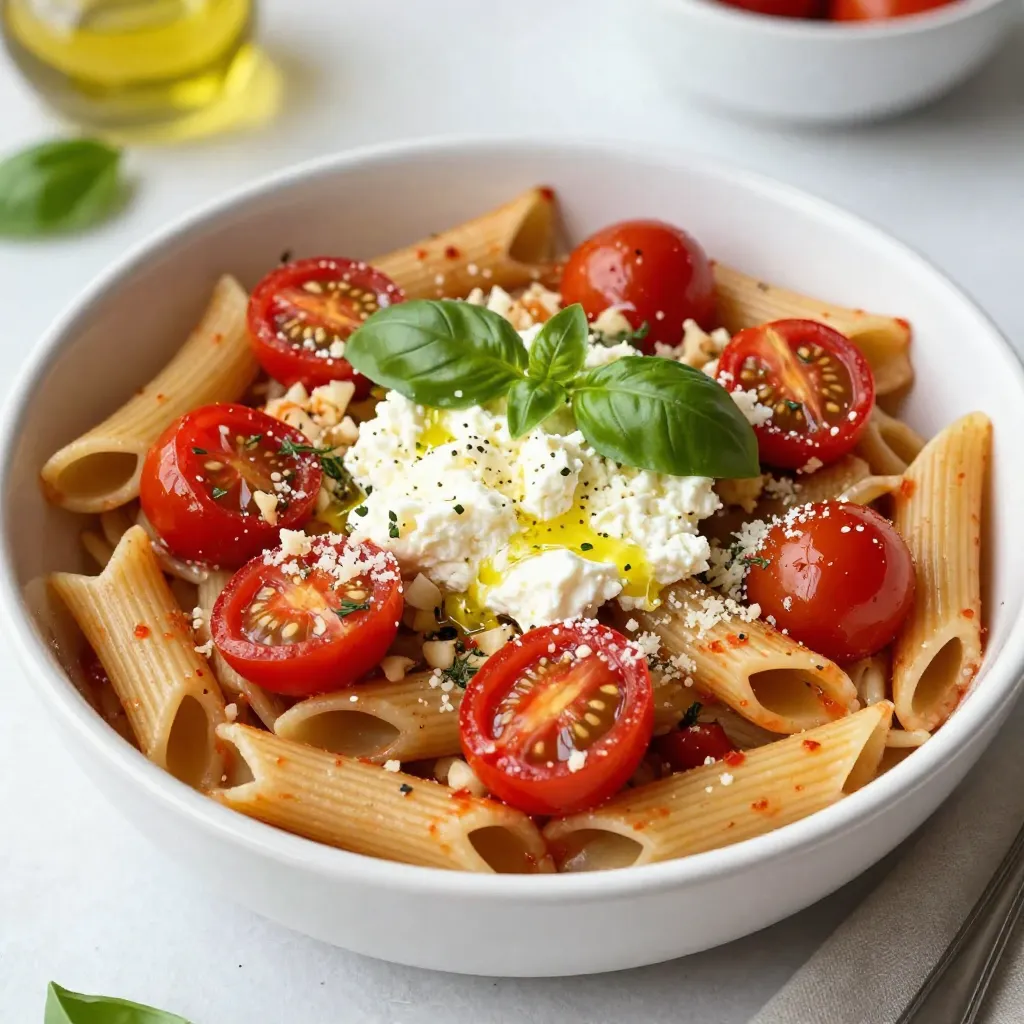
Baked Feta Tomato Pasta is a simple, tasty dish that you’ll love! In just a few steps, you can transform

- 2 medium sweet potatoes, peeled and diced into 1-inch cubes - 1 can (15 oz) black beans, thoroughly drained and rinsed - 1 can (14.5 oz) diced tomatoes, including juices - 1 medium onion, finely diced - 2 cloves garlic, minced - 1 red bell pepper, diced - 1 green bell pepper, diced - 2 tablespoons extra virgin olive oil - 2 teaspoons ground cumin - 1 teaspoon smoked paprika - 1 teaspoon chili powder - ½ teaspoon cayenne pepper (adjust to desired heat level) - 2 cups vegetable broth - Salt and freshly ground black pepper to taste - Fresh cilantro, chopped (for garnish) - Slices of avocado (for topping, optional) To start, gather all your ingredients. This makes cooking easy. Chop your sweet potatoes into 1-inch cubes. This size cooks well and adds nice texture. Dice the onion and peppers. Mince the garlic, too. All these flavors mix together in this dish. Use a large pot for cooking. Heat the olive oil on medium heat. Add the onion first. Sauté it until soft, about three to four minutes. You want it to be clear. Next, add the minced garlic. It will smell great in just one minute. Then, add the red and green bell peppers. Cook these for about five minutes until they soften. Now, it’s time for the sweet potatoes. Stir them in with the other veggies. Sprinkle the spices: cumin, smoked paprika, chili powder, and cayenne. Mix it all well. This makes each bite flavorful. Pour in the diced tomatoes and vegetable broth. Bring this mixture to a gentle boil. Once boiling, lower the heat. Cover the pot and let it simmer for 25 to 30 minutes. Stir it now and then. Check that the sweet potatoes are tender when you poke them with a fork. In the last few minutes, add the black beans. Stir them in until warmed through. This takes about three to five minutes. Let the chili sit for a few minutes before serving. This helps all the flavors blend well. This chili is not only tasty but also healthy. Sweet potatoes are rich in vitamins A and C. Black beans give you protein and fiber. A serving can provide about: - Calories: 300-350 - Protein: 12-15 grams - Carbohydrates: 50 grams - Fiber: 10-12 grams - Healthy fats: 5-7 grams This meal is filling and nutritious. Enjoy it with a sprinkle of fresh cilantro and some avocado slices on top. For the full recipe, check out the details. Making sweet potato black bean chili is simple and fun. You will create a hearty meal that satisfies. This dish is perfect for all ages. With every step, the aroma fills your kitchen. You will love how easy it is to make this chili. 1. Heat the oil: In a large pot, heat the extra virgin olive oil over medium heat. 2. Sauté the onion: Add the diced onion and cook for 3-4 minutes until soft. 3. Add garlic: Mix in the minced garlic for one minute. It should smell great! 4. Incorporate peppers: Add the diced red and green bell peppers. Cook for 5 minutes, stirring often. 5. Mix in sweet potatoes: Stir in the diced sweet potatoes with the other veggies. 6. Add spices: Sprinkle in cumin, smoked paprika, chili powder, cayenne, salt, and pepper. Stir well. 7. Pour in tomatoes and broth: Add the diced tomatoes with juices and vegetable broth. Bring to a boil. 8. Simmer: Reduce the heat, cover, and let it simmer for 25-30 minutes. Stir often. 9. Add black beans: In the last few minutes, stir in the rinsed black beans until warm. 10. Rest before serving: Remove from heat and let it sit for a few minutes. - Taste as you go: Adjust the spices to your liking during cooking. - Use fresh herbs: Fresh cilantro adds flavor and color. - Serve with toppings: Avocado slices and crusty bread enhance the dish. This chili is not only tasty but also healthy. Enjoy the full recipe for further details! To make your chili just right, adjust the spices. If you want more heat, add cayenne pepper. Start with a little. Taste as you go. If you like it milder, reduce the amount of chili powder. You can also add fresh jalapeños for a different kick. For a smoky flavor, increase the smoked paprika. Each spice brings out the sweet potato's natural sweetness. I’ve learned a few common mistakes to avoid. First, don’t skip the sauté step. This builds flavor. Second, make sure to drain and rinse the black beans. This helps remove excess sodium. Lastly, don’t rush the simmering time. Letting the chili cook longer helps the flavors blend. Taste before serving so you can adjust seasoning. You can swap ingredients to fit your taste. If you don’t have sweet potatoes, use butternut squash. Do you want a different bean? Try kidney beans or pinto beans. If you have no vegetable broth, water works too, but broth adds depth. For a richer flavor, add a splash of lime juice at the end. You can find the full recipe [here](#). {{image_4}} You can boost the taste of your sweet potato black bean chili with fun add-ins. Here are some ideas to inspire you: - Corn: Add a cup of frozen or fresh corn. It brings sweetness and texture. - Zucchini: Chop one medium zucchini and add it to the pot. It cooks well and adds nutrients. - Spinach: Stir in a couple of cups of fresh spinach toward the end of cooking. It wilts quickly and adds color. - Lime Juice: A squeeze of fresh lime juice brightens the flavors. It makes your chili taste fresh. - Hot Sauce: For heat lovers, add a few dashes of your favorite hot sauce. It can really spice things up! While black beans are great, don’t hesitate to switch things up with other beans. Here are some alternatives: - Pinto Beans: These beans are creamy and add a nice texture to your chili. - Kidney Beans: Their firm texture holds well in chili. They also add a hearty flavor. - Chickpeas: Use chickpeas for a different protein and a nutty taste. They work well with sweet potatoes. You can easily adapt this recipe to fit vegan or vegetarian diets. Here are some key points: - Vegan: This chili is already vegan! Just ensure you use vegetable broth. - Vegetarian: It’s also vegetarian-friendly as it contains no meat. You can add cheese on top if you want. - Cheese Topping: For a vegetarian option, sprinkle shredded cheese on top before serving. It melts nicely and adds richness. Feel free to follow the Full Recipe for specific details and measurements! To keep your chili fresh, let it cool down first. Then, scoop it into an airtight container. Store it in the fridge for up to five days. This helps preserve the flavor and texture. You can also portion it into smaller containers for easy meals later. If you want to save some for later, freezing is a great option. Place the cooled chili in freezer-safe bags or containers. Make sure to leave some space at the top, as the chili will expand when it freezes. You can freeze it for up to three months. When you are ready to eat, move it to the fridge to defrost overnight. To reheat, you have a couple of choices. You can use the stove or microwave. If using the stove, pour the chili into a pot over medium heat. Stir often until it is hot. If using a microwave, place it in a bowl and cover it loosely. Heat it in short bursts, stirring in between. This helps it heat evenly. Add a splash of broth if it seems too thick. Enjoy your chili just as good as when you first made it! To make the chili spicy, add more cayenne pepper. Start with ½ teaspoon and taste. If you like it hotter, add more until it meets your heat level. You can also add diced jalapeños or a splash of hot sauce for extra kick. These ingredients boost the flavor and heat of the chili, making it exciting! Yes, you can make this chili in a slow cooker! Sauté the onion and garlic first, then add all the ingredients to the slow cooker. Set it on low for 6-8 hours or high for 3-4 hours. This method allows the flavors to blend well. The slow cooker keeps your chili warm and ready to serve when you need it. I love serving this chili with crusty bread or tortilla chips. They add a nice crunch and balance the chili's warmth. You can also add toppings like avocado slices or fresh cilantro for extra flavor. A dollop of sour cream or yogurt also works well. These sides make your meal heartier and more satisfying! For the full recipe, check out the details above. This blog covers all you need to know about Sweet Potato Black Bean Chili. We explored essential ingredients, precise measurements, and their nutritional value. I shared step-by-step cooking instructions, along with tips to perfect your dish. Further, we discussed common mistakes and useful substitutions to enhance flavor. You learned about different variations and how to store leftovers properly. My final thought: this chili is flexible and fun to make. Enjoy experimenting with flavors to find what you love best!

Savory Sweet Potato Black Bean Chili Easy and Hearty

If you’re looking for a warm and filling meal, you’ve come to the right place! My Savory Sweet Potato Black

For these tasty carrot cake energy bites, gather the following ingredients: - 1 cup rolled oats - 1 cup freshly grated carrots (about 2 medium carrots) - 1/2 cup almond butter (or any preferred nut butter) - 1/4 cup honey or maple syrup (adjust based on sweetness preference) - 1/4 cup unsweetened shredded coconut - 1 teaspoon vanilla extract - 1 teaspoon ground cinnamon - 1/2 teaspoon ground ginger - 1/4 teaspoon ground nutmeg - 1/4 cup finely chopped walnuts (or pecans, if desired) - A pinch of sea salt You can easily customize these energy bites to suit your taste. Here are some fun options: - Add chocolate chips for a sweet twist. - Include raisins or cranberries for a chewy texture. - Substitute peanut butter for a different nutty flavor. - Try using sunflower seeds for a nut-free option. These variations make the bites more fun and enjoyable for everyone. Each ingredient in these energy bites brings health benefits: - Rolled oats provide fiber, aiding digestion and keeping you full. - Carrots are rich in beta-carotene, great for your vision. - Almond butter offers healthy fats and protein to fuel your day. - Honey or maple syrup gives natural sweetness and quick energy. - Coconut adds healthy fats and can support heart health. - Walnuts are packed with omega-3 fatty acids, good for brain health. These ingredients not only taste great but also support a balanced diet. For the full recipe, check out the detailed instructions to make these delicious bites. Making carrot cake energy bites is simple. You start with fresh ingredients and mix them. Gather everything you need first. This helps you stay organized. 1. In a big bowl, mix rolled oats and grated carrots. 2. Add almond butter and honey. Stir until it is smooth. 3. Now, add shredded coconut, vanilla, cinnamon, ginger, nutmeg, walnuts, and sea salt. Mix well. All ingredients should blend together nicely. 1. Wet your hands slightly to stop the mixture from sticking. 2. Take small amounts of the mixture and roll them into balls. Aim for about 1 inch in size. 3. Place each ball on a baking sheet with parchment paper. Keep space between them. 4. Chill in the fridge for at least 30 minutes to help them firm up. 5. After chilling, store them in an airtight container. They can last a week in the fridge. For the full recipe, check out the detailed steps above. Enjoy your healthy snack! When making carrot cake energy bites, avoid adding too much liquid. The mixture should be sticky but not wet. If it feels too loose, add more oats. Another mistake is skipping the chill time. Chilling helps the bites firm up and makes them easier to eat. To get the best texture, use freshly grated carrots. Fresh carrots add moisture and flavor. Also, make sure to mix well. This ensures that all the ingredients blend together. If the bites are too crumbly, try adding a bit more almond butter. This will help bind everything nicely. You can enhance the flavor by adding a pinch of sea salt. This boosts the sweetness and balances the spices. You might also consider adding a splash of orange juice for a fresh twist. For a nutty flavor, use different nuts. Pecans or hazelnuts work great too. Experiment with spices like allspice or cardamom for more depth. For the full recipe, check the [Full Recipe]. {{image_4}} If you want nut-free energy bites, swap almond butter for sunflower seed butter. This keeps the bites creamy and tasty. You can also use pumpkin seed butter. Both options give a nice flavor without nuts. You can add different flavors to your energy bites. Try mixing in some raisins or cranberries for sweetness. A tablespoon of cocoa powder can give a chocolate twist. You can also sprinkle in some chia seeds for added crunch and nutrition. These energy bites can fit many diets. For gluten-free bites, use certified gluten-free oats. To keep it vegan, replace honey with maple syrup. This keeps the bites sweet while making them plant-based. You can also use agave syrup as another sweet option. Enjoy these bites worry-free! To keep your carrot cake energy bites fresh, use an airtight container. Glass or plastic works well. Label the container with the date you made them. This way, you’ll know how long they’ve been stored. Place the container in the fridge. This method keeps them tasty for about a week. To maintain freshness, avoid leaving them out at room temperature. The warmth can make them soft and lose their bite. If you want to keep them on the counter, only do so for a few hours. For longer storage, the fridge is always best. You can freeze the energy bites for longer storage. Just place them in a freezer-safe bag or container. Make sure to separate each bite with parchment paper. This way, they won't stick together. When you're ready to eat, take out what you need. Let them thaw in the fridge or at room temperature. Enjoy your delicious snack later! For the complete recipe, check out the Full Recipe section. Carrot Cake Energy Bites can last up to a week in the fridge. Store them in an airtight container to keep them fresh. If you want to keep them longer, try freezing them. Just make sure to wrap them well. They can last for about three months in the freezer. Yes, you can use different nut butters. Peanut butter, cashew butter, and sunflower seed butter all work well. Each nut butter adds its own flavor and texture. Feel free to experiment and find your favorite one. Just keep in mind that some nut butters may be sweeter or saltier. Absolutely! Carrot Cake Energy Bites are great for kids. They are filled with healthy ingredients and are easy to make. Kids enjoy the sweet taste and fun texture. You can also get them involved in the mixing and rolling process. It’s a fun way to teach them about healthy snacks. This blog post covered how to make delicious Carrot Cake Energy Bites. We explored the ingredients, preparation steps, and tips for success. You learned about variations, storage methods, and frequently asked questions. These bites are not only tasty but also healthy. They fit different diets and are easy to customize. Try making them your own! Enjoy your carrot cake energy bites, and feel good knowing they are packed with nutrition.

Tasty Carrot Cake Energy Bites Easy and Nutritious

Looking for a tasty and nutritious snack? Carrot Cake Energy Bites are your answer! These little delights pack a punch

Older posts
Newer posts
← Previous Page1 … Page70 Page71 Page72 … Page86 Next →

dsad

© 2026 yumymoments • Built with GeneratePress

Our Policies

  • Copyright Policy
  • Cookie Policy
  • GDPR Policy
  • Privacy Policy
  • Disclaimer
  • Terms Of Use

More Information

  • Home
  • About
  • Contact
  • Appetizers
  • Dessert
  • Dinner
  • Drinks
©2026, yumymoments About Back To Top