Skip to content
DisclaimerTerms Of UseGDPR PolicyCookie Policy

yumymoments

  • Home
  • Drinks
  • Appetizers
  • Dinner
  • Dessert
  • About
  • Contact
  • Privacy Policy
DisclaimerTerms Of UseGDPR PolicyCookie Policy

NO-ING-IMG

- 1 medium head of cauliflower, grated or processed into rice-sized pieces - 1 cup of mixed vegetables (like peas, diced carrots, and corn) - 1 cup fresh spinach, roughly chopped - 2 eggs, lightly beaten (or use 1/4 cup crumbled tofu for a vegan option) - 3 green onions, thinly sliced - 2 cloves garlic, minced - 1 tablespoon fresh ginger, grated - 3 tablespoons soy sauce or tamari (for gluten-free) - 1 tablespoon sesame oil - 1 tablespoon olive oil - Salt and pepper to taste - Optional: sesame seeds for garnish Cauliflower is low in calories. It is high in fiber and vitamin C. Mixed vegetables add vitamins, minerals, and fun colors. Spinach boosts iron and vitamins A and K. Eggs provide protein and healthy fats. They also add richness. Garlic and ginger improve flavor and have health benefits. Soy sauce adds umami, while sesame oil gives a nice aroma. Olive oil has heart-healthy fats. Salt and pepper enhance overall taste. For cauliflower, I recommend Fresh Express or Green Giant. For mixed vegetables, look for Bird's Eye or Cascadian Farm. Spinach can come from Earthbound Farm, known for quality. For eggs, I like Organic Valley or Vital Farms. Use Kikkoman for soy sauce and Tamari. For sesame oil, try Kadoya or Spectrum. Lastly, for olive oil, choose brands like California Olive Ranch or Pompeian. To start, you need to prepare the cauliflower. First, remove the leaves and core. Cut the cauliflower into smaller florets. Then, use a food processor to pulse the florets until they look like rice grains. If you don't have a food processor, you can grate the cauliflower with a box grater. This gives you the same rice-like texture. Next, gather your other ingredients. Chop your mixed veggies, garlic, ginger, and green onions. This will help you cook faster and keep things organized. Have your eggs or tofu ready too. For the best flavor, use a large non-stick skillet or wok. Heat the olive oil over medium heat. Once hot, add the minced garlic and grated ginger. Sauté them for about one minute. This step makes your kitchen smell amazing. Then, add the mixed vegetables to the skillet. Stir-fry for about 3-4 minutes. You want them to soften but still be colorful. Push the veggies to one side of the pan. Pour the eggs or tofu into the empty space. Scramble them gently until fully cooked. Then mix everything together. Add the cauliflower rice next. Drizzle soy sauce or tamari over the mixture. Stir well to coat the cauliflower. Cook for another 5-7 minutes. Stir frequently until the cauliflower is tender but still has a slight crunch. Timing is key when cooking. Keep an eye on the skillet. You want to stir often to avoid burning. When you add spinach in the last minute, it wilts quickly. This step adds color and nutrients. For the best taste, season with salt and pepper after cooking. Finish with a drizzle of sesame oil for rich flavor. This simple and healthy cauliflower fried rice recipe is perfect for any meal. Enjoy your tasty creation right away! For more details, check the Full Recipe. To get the best texture, you need to process the cauliflower well. Start by breaking it into small florets. Use a food processor to pulse them into rice-sized pieces. If you don’t have a processor, a box grater works too. Aim for a fine grain, but don’t over-process. Avoid mushy cauliflower rice by cooking it just right. When cooking, keep the heat medium. This helps to retain a slight crunch in the cauliflower. Stir it often, so it cooks evenly. One common mistake is not draining excess moisture. After processing, use a clean towel to soak up any water. Too much moisture makes the rice soggy. Another mistake is overcooking the cauliflower. Cook it until it's tender but still has a bite. This keeps the dish light and flavorful. Finally, don’t skip the seasoning. Cauliflower has a mild flavor, so use soy sauce or tamari generously. If your cauliflower is overcooked, don’t fret! You can add a splash of broth or soy sauce. This adds flavor and moisture back into the dish. Another tip is to mix in some fresh spinach or greens. They can help balance the texture. If it’s really mushy, try adding a bit of cooked rice or quinoa. This gives a nice contrast and helps absorb extra moisture. For more tips and techniques, check out the Full Recipe for Cauliflower Fried Rice. {{image_4}} For a keto-friendly version, skip the grains and load up on healthy fats. Use the same ingredients from the Full Recipe, but add diced cooked bacon for extra flavor. You can also use heavy cream in place of soy sauce. This adds a rich taste without the carbs. To keep it vegetarian, simply use the eggs as stated in the Full Recipe. For a vegan twist, swap the eggs for crumbled tofu. You can also add more veggies like bell peppers or zucchini. These add color and nutrients without changing the dish's essence. You can customize your cauliflower fried rice with various proteins. Shrimp or chicken works well. Just sauté them before adding the veggies. For a spicy kick, toss in some diced jalapeños or a dash of hot sauce. You can also sprinkle some lime juice for a fresh note. To keep your cauliflower fried rice fresh, store it in an airtight container. Let it cool to room temperature before sealing. Place it in the fridge if you plan to eat it within three days. For longer storage, consider freezing it. Always label the container with the date to track freshness. When you're ready to enjoy your leftovers, reheat them on the stove. Use a non-stick skillet over medium heat. Add a splash of water or oil to prevent sticking. Stir often until it’s heated through. You can also use a microwave. Place it in a bowl, cover it, and heat for two to three minutes, stirring halfway. Cauliflower fried rice freezes well for up to three months. Portion it into freezer-safe bags or containers. Remove as much air as possible before sealing. When you're ready to eat, thaw it in the fridge overnight or place it directly in a hot skillet to cook from frozen. This keeps the texture nice! Cauliflower fried rice is a healthy twist on traditional fried rice. Instead of using regular rice, you use grated cauliflower. This makes the dish lower in carbs and calories. It is packed with veggies, protein, and flavor. You can customize it with your favorite ingredients. It’s quick to make and perfect for busy weeknights. Yes, you can make cauliflower fried rice ahead of time. Simply prepare it and let it cool. Store it in an airtight container in the fridge for up to three days. When you are ready to eat, just reheat it in a pan. You can also microwave it for a quick meal. This is great for meal prep or busy days. Cauliflower rice offers several health benefits compared to regular rice. It is lower in calories and carbs. One cup of cauliflower rice has about 25 calories, while white rice has around 200 calories. Cauliflower rice is rich in fiber, vitamins, and minerals. Plus, it has antioxidants that support overall health. Switching to cauliflower rice can help with weight loss and better blood sugar levels. Cauliflower fried rice is a tasty and healthy choice. We covered key ingredients, their benefits, and tips for best results. You learned how to prepare, cook, and store this dish easily. Remember to explore variations to keep meals fresh. Avoid common mistakes for the best texture. With the right steps, you can make a satisfying meal that's good for you. Enjoy experimenting and creating your version of cauliflower fried rice. It's a delightful way to boost your meals and impress everyone.

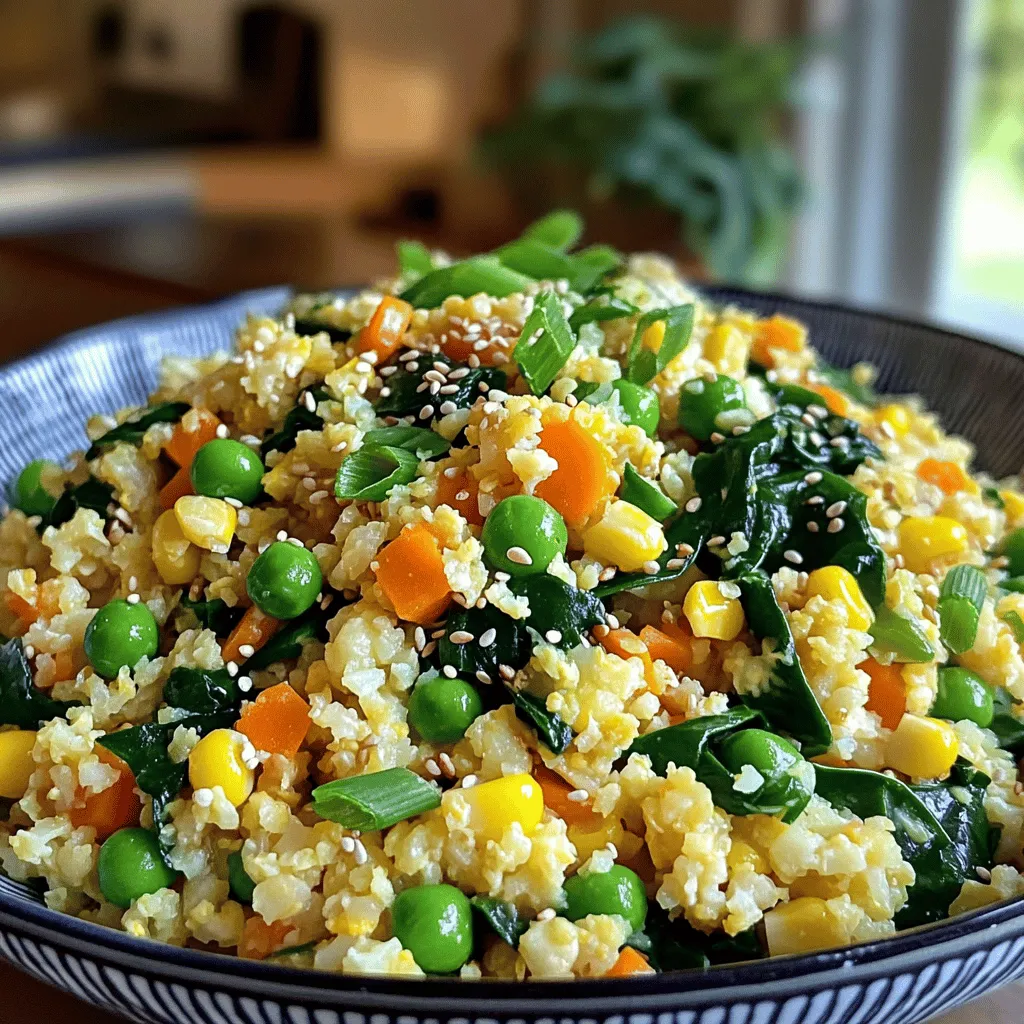
Cauliflower Fried Rice Simple and Healthy Recipe

Looking for a healthy, tasty meal? Cauliflower Fried Rice is your answer! This simple recipe packs a punch with fresh

To make spinach feta stuffed chicken breasts, gather these simple ingredients: - 4 boneless, skinless chicken breasts - 2 cups fresh spinach, finely chopped - 1 cup feta cheese, crumbled into small pieces - 1/4 cup cream cheese, softened to room temperature - 2 cloves garlic, minced - 1 tablespoon olive oil - 1 teaspoon dried oregano - Salt and freshly cracked black pepper to taste - Toothpicks or kitchen twine (for securing the chicken pocket) Each ingredient plays a vital role in flavor: - Chicken breasts: They provide a juicy and tender base. - Spinach: This leafy green adds nutrition and a fresh taste. - Feta cheese: It gives a tangy flavor that pairs well with chicken. - Cream cheese: This adds creaminess and binds the filling together. - Garlic: It enhances the overall taste with its rich flavor. - Olive oil: It keeps the chicken moist while cooking. - Dried oregano: This herb adds a touch of warmth to the dish. You can easily adjust the recipe for different diets: - Chicken: Use turkey or tofu for a different protein source. - Spinach: Kale or Swiss chard can work well too. - Feta cheese: Try goat cheese or vegan cheese for a dairy-free option. - Cream cheese: Use a dairy-free cream cheese if needed. - Garlic: Garlic powder can be a quick substitute. These adjustments keep the dish tasty while meeting various dietary needs. For the full recipe, check out the detailed instructions. Start by gathering your ingredients. You need chicken breasts, spinach, feta, cream cheese, garlic, olive oil, oregano, salt, and pepper. This recipe is simple and perfect for a weeknight dinner. 1. Preheat the Oven: Set your oven to 375°F (190°C). This helps the chicken cook evenly. 2. Prepare the Filling: In a bowl, mix the spinach, feta, cream cheese, garlic, oregano, salt, and pepper. Stir well until everything is combined. 3. Prepare the Chicken: Lay the chicken breasts flat. Use a sharp knife to cut a pocket into each breast. Be careful not to cut all the way through. 4. Stuff the Chicken: Spoon the filling into each pocket. Pack it well, then use toothpicks or kitchen twine to close the openings. 5. Sear the Chicken: Heat olive oil in an oven-safe skillet over medium-high heat. Add the stuffed chicken breasts and sear for 3-5 minutes on each side until golden brown. 6. Bake in the Oven: Transfer the skillet to the preheated oven. Bake for 20-25 minutes. The chicken should reach an internal temperature of 165°F (75°C). 7. Rest and Serve: Remove the chicken from the oven and let it rest for about 5 minutes. Take out the toothpicks or twine before serving. To check if your chicken is done, use a meat thermometer. Insert it into the thickest part of the chicken. If it reads 165°F (75°C), it is safe to eat. If not, return it to the oven for a few more minutes. Always let the chicken rest before cutting. This keeps it juicy and flavorful. To get the best results, I recommend using a sharp knife. Carefully cut a pocket in each chicken breast. Make sure you don’t cut through the other side. This allows you to fill the chicken with your tasty mixture. Pack the filling tightly to avoid any leaks while cooking. Secure the opening with toothpicks or kitchen twine. This keeps the filling inside and makes for a juicy bite. One common mistake is overcooking the chicken. Always use a meat thermometer to check the internal temperature. It should reach 165°F (75°C) for safety. Another mistake is not seasoning enough. Don’t skip the salt and pepper in the filling. This adds flavor to the chicken itself. Lastly, be careful with the filling amount. Too much filling can cause the chicken to burst open. Marinating your chicken can make a big difference. A simple marinade of olive oil, lemon juice, and herbs works well. Let the chicken sit in the marinade for at least 30 minutes. This step adds moisture and depth of flavor to your dish. You can also try yogurt-based marinades for added tanginess. The longer you marinate, the better the chicken will taste. For the full recipe, check out Spinach & Feta Delight Chicken Breasts. {{image_4}} You can change the filling to suit your taste. Try adding sun-dried tomatoes for a sweet twist. You can use goat cheese instead of feta for a creamier texture. If you love spice, mix in some chopped jalapeños for a kick. You might also enjoy adding cooked mushrooms or artichokes for more flavor. This recipe is easy to adapt for gluten-free diets. Simply ensure your feta and cream cheese are gluten-free. For a dairy-free option, swap the cream cheese for a vegan alternative. Nutritional yeast can add a cheesy flavor without dairy. Always check labels to confirm they meet your needs. You can bake or grill the chicken, depending on your preference. Baking gives a tender, juicy result. Just follow the steps in the full recipe for baking. Grilling adds a smoky flavor. For grilling, preheat your grill to medium-high and cook for about 6-8 minutes on each side. Use a meat thermometer to ensure it reaches 165°F (75°C). Both methods yield delicious results! After you cook your spinach feta stuffed chicken breasts, let them cool. Place them in an airtight container. They will stay fresh for about 3 to 4 days. Always check for any signs of spoilage before eating. To reheat, preheat your oven to 350°F (175°C). Place the chicken on a baking sheet. Cover with foil to keep it moist. Heat for about 15 to 20 minutes or until warm. If you’re short on time, you can also microwave the chicken. Just heat it in 30-second intervals until it’s warm. You can freeze the stuffed chicken for later meals. Wrap each piece tightly in plastic wrap, then place them in a freezer bag. They can last up to 3 months in the freezer. To cook, thaw them in the fridge overnight before reheating. This method helps keep the flavors intact. For the full recipe, check out the Spinach & Feta Delight Chicken Breasts 🥗. Cooking Spinach Feta Stuffed Chicken Breasts takes about 20-25 minutes in the oven. You should preheat the oven to 375°F (190°C) first. The total time, including prep, is around 45 minutes. It’s crucial to check that the internal temperature reaches 165°F (75°C). This ensures that the chicken is safe to eat and fully cooked. Yes, you can make Spinach Feta Stuffed Chicken Breasts ahead of time. Stuff the chicken breasts and store them in the fridge for up to a day. You can also freeze them for later use. If frozen, defrost them overnight in the fridge before cooking. This saves time and makes meal prep easy. You can serve many sides with Spinach Feta Stuffed Chicken Breasts. Here are some ideas: - Roasted vegetables - Quinoa or rice - A fresh green salad - Mashed potatoes These sides complement the flavors of the chicken and make a complete meal. You can mix and match to suit your taste! This blog post covered all you need to know about making Spinach Feta Stuffed Chicken Breasts. We explored key ingredients, cooking steps, and handy tips. I shared variations to fit your needs, plus storage tips to keep meals fresh. Remember, cooking is about trying new things. Don’t be afraid to experiment with flavors and fillings. With these insights, you can create a delicious meal that suits everyone's tastes. Enjoy your cooking journey!

Spinach Feta Stuffed Chicken Breasts Savory and Easy

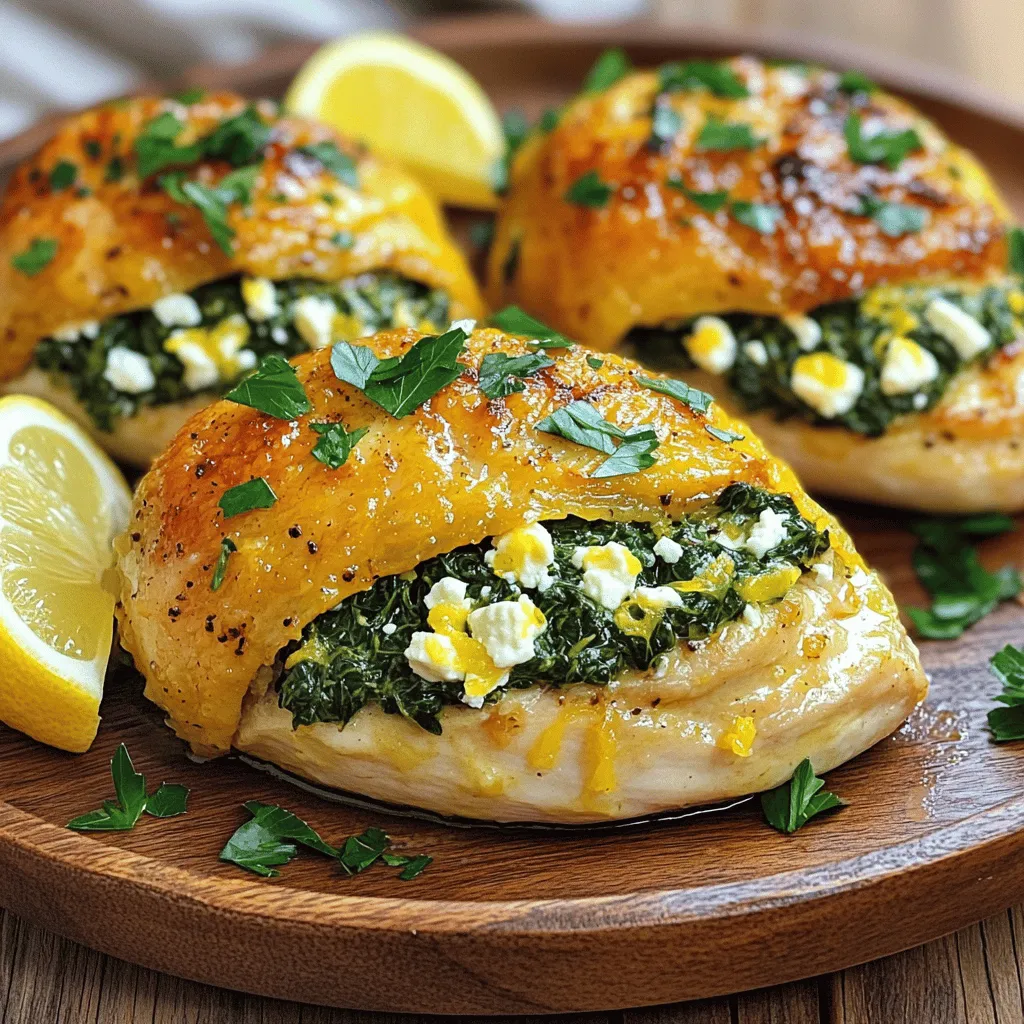
Looking for a delicious and easy recipe that impresses? Spinach Feta Stuffed Chicken Breasts are your answer! Packed with bold

- 1 cup quinoa - 1 cup cherry tomatoes, halved - 1 cucumber, peeled and diced - 1 bell pepper, diced - 1/2 red onion, finely minced - 1/2 cup Kalamata olives, pitted and halved - 1/2 cup feta cheese, crumbled (optional for a vegan variation) Quinoa acts as a base for this salad. It is high in protein and very filling. Fresh vegetables like cherry tomatoes, cucumber, bell pepper, and red onion add crunch and color. Kalamata olives bring a salty taste, while feta cheese adds creaminess. If you want a vegan option, just skip the feta. - 2 tablespoons extra virgin olive oil - 2 tablespoons fresh lemon juice - Salt and pepper to taste The dressing is simple but bright. Extra virgin olive oil provides richness. Fresh lemon juice adds zest. Salt and pepper balance out the flavors. You can adjust these to fit your taste. - Fresh herbs (parsley, mint) - Variations for dietary preferences Adding fresh herbs like parsley and mint enhances flavor. You can also modify the salad for your diet. For example, add chickpeas for protein or swap quinoa for farro. Make it your own! For the complete steps, check the Full Recipe. How do I rinse and cook quinoa perfectly? Start by rinsing the quinoa under cold water. This removes any bitter taste. Use a fine mesh strainer for best results. Then, in a medium saucepan, combine one cup of rinsed quinoa with two cups of vegetable broth or water. Bring this mixture to a rolling boil. Once boiling, turn the heat down low. Cover and let it simmer for about 15 minutes. What are some tips for achieving fluffy quinoa? After the liquid is absorbed, take it off the heat. Let it sit, covered, for an extra 5 minutes. This step helps it steam and fluff up. Finally, use a fork to gently fluff the quinoa. Set it aside to cool completely. What are the ideal chopping techniques for ingredients? While the quinoa cools, grab a large cutting board. Chop the cherry tomatoes in half and dice the cucumber and bell pepper. Mince the red onion finely. For Kalamata olives, just pit and halve them. This method ensures even bites and balanced flavor in your salad. How do I combine vegetables for balanced flavor? In a large mixing bowl, add the halved tomatoes, diced cucumber, bell pepper, minced onion, and halved olives. Stir gently to mix everything together. This mix creates a vibrant base for your salad. What is the step-by-step for combining ingredients? Once the quinoa has cooled, add it to the bowl with the vegetables. Toss all the ingredients together carefully. You want everything to be evenly mixed for the best flavor in each bite. How do I make a cohesive dressing? In a small bowl, whisk together two tablespoons of extra virgin olive oil, two tablespoons of freshly squeezed lemon juice, and a pinch of salt and pepper. Drizzle this dressing over the quinoa salad. Toss gently again to coat everything well. Now, if you want to add fresh herbs and cheese, sprinkle crumbled feta, parsley, and mint over top. Toss one last time to blend all the flavors. Enjoy your tasty Mediterranean quinoa salad! For the full recipe, check out the details provided earlier. To make your Mediterranean Quinoa Salad shine, focus on adjusting the seasoning. Taste your salad as you mix. If it seems flat, add a pinch of salt. For more flavor, sprinkle in some black pepper. You can also add fresh herbs like parsley or mint for a brighter taste. Balancing acidity and richness in your dressing is key. Use fresh lemon juice for a zingy lift. Extra virgin olive oil adds richness, making the salad taste smooth. Aim for a balance; too much of one can overpower the other. This harmony makes every bite delightful. Making this salad ahead of time is easy. Cook your quinoa and let it cool. Chop your veggies and store them separately. Combine everything the day you plan to eat. This keeps your salad fresh and crunchy. When storing leftovers, use an airtight container. This keeps moisture in and prevents sogginess. The salad stays good in the fridge for up to three days. Just give it a gentle toss before serving again. For a complete meal, pair your Mediterranean Quinoa Salad with grilled chicken or fish. These proteins complement the salad's flavors. You can also serve it with warm pita bread for a fun twist. Get creative with your presentation. Serve the salad in a large bowl, or on individual plates. Garnish with extra feta or a few mint sprigs. This makes the meal look as good as it tastes. Enjoy your fresh and colorful dish! {{image_4}} You can easily make this salad vegan. Swap the feta cheese for plant-based options. Try using crumbled tofu or cashew cheese. Both add a creamy touch without dairy. Adding protein-rich toppings makes it heartier. Chickpeas are a great choice. They boost protein and fiber. Plus, they add a nice texture. To amp up the flavor, explore different spices and dressings. For a zesty kick, add cumin or smoked paprika. You can also use tahini or a balsamic vinaigrette for a twist. Consider adding more protein sources too. Grilled chicken or shrimp can elevate the dish. They also bring in new flavors and textures. Use seasonal vegetables to keep it fresh. In the summer, add zucchini or bell peppers. In the fall, roasted squash can work wonders. Think about local produce swaps to enhance taste and support farmers. Using seasonal ingredients not only tastes better, but it also makes the dish more colorful. You can always adjust your salad based on what you find at the market. To keep your Mediterranean Quinoa Salad fresh, store it in an airtight container. Place the container in the fridge. This way, the salad stays crisp for up to three days. Make sure to cover the salad tightly to avoid air exposure. To maintain the freshness of ingredients, you can store the dressing separately. Combine it with the salad just before serving. This helps keep the vegetables crunchy and vibrant. You can freeze quinoa salad, but some ingredients might not hold up well. To freeze, pack the salad into a freezer-safe container. Leave some space at the top for expansion. When you're ready to eat, take the salad out and thaw it in the fridge overnight. For best results, do not reheat the salad. Enjoy it cold for a refreshing taste. Understanding how long your ingredients last is key. Quinoa can last up to a week in the fridge. Fresh vegetables like tomatoes and cucumbers are best used within three days. Watch out for signs of spoilage. If the salad smells sour or the vegetables look mushy, it's time to discard it. Trust your senses to keep your meals safe and enjoyable. Mediterranean Quinoa Salad is a fresh and healthy dish. It features quinoa as the star ingredient. Quinoa is a grain-like seed that cooks fluffy and light. This salad bursts with colors and flavors. The key ingredients include: - 1 cup quinoa, thoroughly rinsed - 1 cup cherry tomatoes, halved - 1 cucumber, peeled and diced - 1 bell pepper, diced - 1/2 red onion, finely minced - 1/2 cup Kalamata olives, pitted and halved - 1/2 cup feta cheese, crumbled (optional) - Fresh herbs like parsley and mint The flavors come together with olive oil and lemon juice. The combination of crisp veggies and savory olives makes every bite delightful. Yes, you can prepare Mediterranean Quinoa Salad ahead of time. It stays fresh and tasty in the fridge. To make it in advance, follow these tips: - Cook the quinoa: Allow it to cool completely before mixing. - Chop the veggies: Prepare the vegetables and store them separately until you are ready to serve. - Mix before serving: Combine the quinoa, veggies, and dressing just before serving. This keeps everything crisp. Store it in an airtight container in the fridge for up to 3 days. Yes, Mediterranean Quinoa Salad is gluten-free. Quinoa is a great choice for those avoiding gluten. It is a seed, not a grain, which makes it safe for a gluten-free diet. Always check for cross-contamination if you have a severe allergy. You have many options to customize Mediterranean Quinoa Salad. Here are some popular additions and substitutions: - Add protein: Chickpeas, grilled chicken, or shrimp can boost the protein. - Change the cheese: Use goat cheese or omit cheese for a vegan version. - Mix in nuts: Toasted pine nuts or almonds add crunch. - Swap herbs: Try basil or dill for different flavors. Feel free to experiment and make it your own! For the full recipe, check the section above. Mediterranean Quinoa Salad is a mix of healthy and tasty ingredients. You get fluffy quinoa, fresh veggies, olives, and feta. The simple dressing adds brightness. You can also customize it to fit your needs, whether vegan or gluten-free. Make it ahead for easy meals. Store it well to keep it fresh. This salad shines in every season with different veggies. Enjoy making this quick dish that’s fun and simple. Eating well has never been easier!

Mediterranean Quinoa Salad Fresh and Flavorful Dish

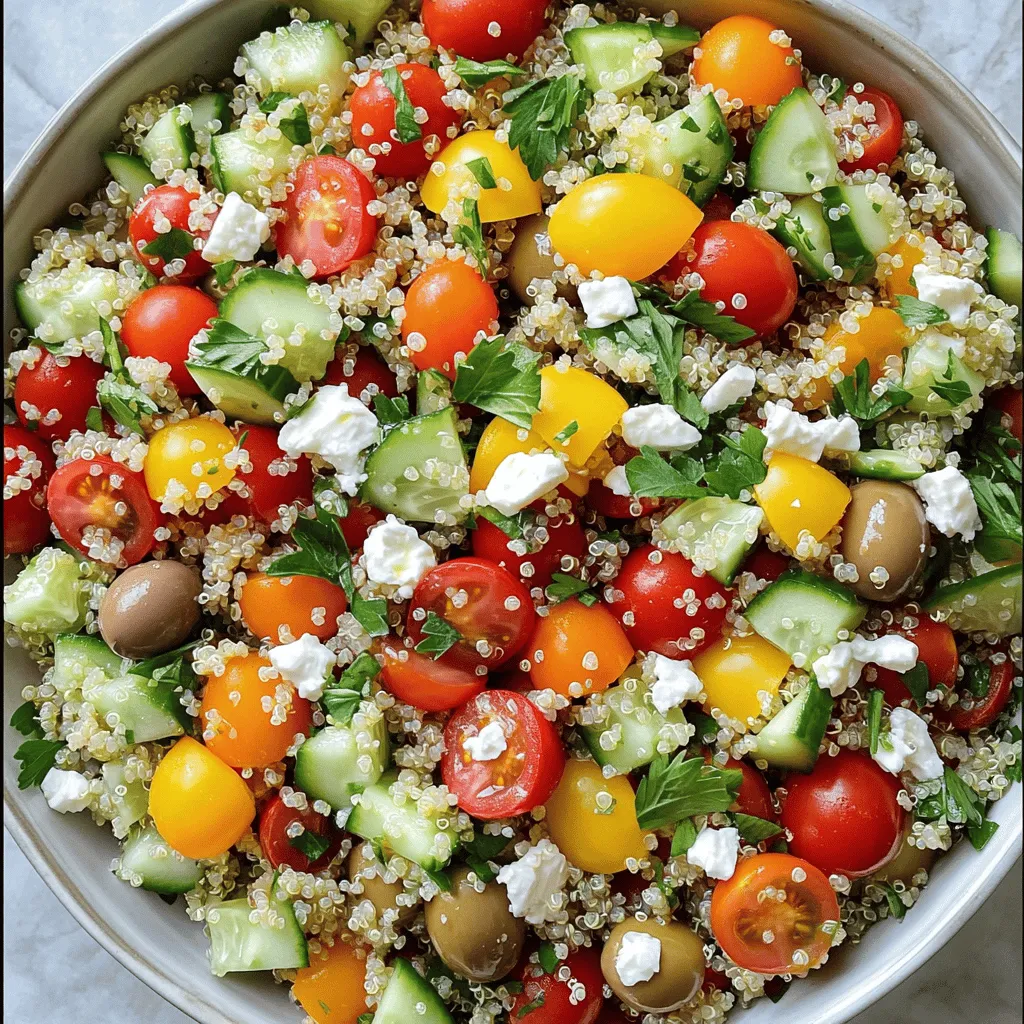
If you’re looking for a bright, healthy dish to liven up your meals, this Mediterranean Quinoa Salad is perfect for

Coconut macaroons are simple to make with just a few key ingredients. Here’s what you need: - 3 cups sweetened shredded coconut - 1 cup sweetened condensed milk - 1 teaspoon vanilla extract - 1/4 teaspoon almond extract (optional) - 2 large egg whites - 1/4 teaspoon salt - 1/2 cup semi-sweet chocolate chips (for drizzling, optional) These ingredients work together to create sweet, chewy cookies. The coconut gives a lovely texture, while the condensed milk adds rich flavor. The egg whites help the cookies rise and give them a light feel. You can make changes based on what you have. If you're out of sweetened shredded coconut, try unsweetened coconut. Just add a bit more sugar to balance the taste. For a dairy-free option, use coconut cream instead of sweetened condensed milk. This keeps the flavor rich and creamy. If you want to switch things up, consider these swaps: - Replace vanilla extract with maple syrup for a unique twist. - Use coconut extract instead of almond extract for more coconut flavor. - If you don't like chocolate, skip the drizzle or use white chocolate. These options let you customize the cookies to fit your taste. To make these cookies, gather a few tools: - Mixing bowls - Whisk or hand mixer - Spatula - Baking sheets - Parchment paper - Cookie scoop or tablespoon Having these tools ready makes the process smooth and fun. First, gather your ingredients. You will need: - 3 cups sweetened shredded coconut - 1 cup sweetened condensed milk - 1 teaspoon vanilla extract - 1/4 teaspoon almond extract (optional) - 2 large egg whites - 1/4 teaspoon salt - 1/2 cup semi-sweet chocolate chips (for drizzling, optional) Now, preheat your oven to 325°F (160°C). Line two baking sheets with parchment paper. This step helps the cookies not stick. In a large bowl, mix the shredded coconut, condensed milk, vanilla, and almond extract. Stir until the coconut is coated well. Next, take another bowl. Whisk the egg whites and salt together until soft peaks form. This will take about 2-3 minutes. The egg whites should hold their shape. Now, gently fold the whipped egg whites into the coconut mixture. Use a spatula, and be careful not to deflate the egg whites. Mix until just combined. Using a tablespoon or a cookie scoop, drop spoonfuls of the mixture onto the baking sheets. Keep them about 1 inch apart. If you like, you can use your hands to shape them into small mounds. It makes them look nice! Place the sheets in the oven and bake for 15-20 minutes. You want the edges to turn golden brown. Once they are baked, take the cookies out of the oven. Let them cool on the sheets for about 5 minutes. Then, move them to a wire rack to cool completely. If you want to add chocolate, melt the chocolate chips in a microwave-safe bowl. Heat them in 20-second increments, stirring each time until smooth. Drizzle the melted chocolate over the cooled cookies for a tasty finish. For the full recipe, just refer to the top of this section! To create light and fluffy macaroons, focus on the egg whites. Start by whisking the egg whites until they form soft peaks. This step is crucial. Soft peaks mean the whites hold shape but still have a glossy look. When folding the egg whites into the coconut mix, do it gently. Use a spatula and fold rather than stir. This keeps air in the egg whites. The mixture should be fluffy yet cohesive. Avoid overmixing the egg whites. If you mix too much, they can lose their fluff. Also, ensure you don’t pack the coconut too tightly in the measuring cup. It can make the macaroons dense. One more tip: watch the baking time closely. If you bake too long, they will become hard. You want them golden, not brown. These cookies shine on their own but can be dressed up. For a fun touch, drizzle chocolate over the cooled macaroons. Place them on a fancy plate for a nice look. You can also serve them with a scoop of vanilla ice cream. The warm cookies with cold ice cream create a tasty contrast. For a simple treat, pair them with a cup of coffee or tea. Each bite offers a sweet coconut flavor that everyone loves. {{image_4}} You can take your coconut macaroons to the next level by adding chocolate. Just melt some semi-sweet chocolate chips. After baking the cookies, drizzle the melted chocolate on top. This adds a rich, sweet contrast to the chewy coconut. You can also dip the bottom of each macaroon in chocolate. This makes a fun, tasty treat that chocolate lovers will enjoy. Want to mix things up? Try adding different flavorings to your macaroons. Almond extract gives a sweet, nutty taste. Hazelnut extract adds a rich, warm flavor. You can also mix in some finely chopped nuts. This not only changes the flavor but also adds a nice crunch. Experiment with different extracts and see what you like best. Coconut macaroons are naturally gluten-free. To make them dairy-free, use sweetened condensed coconut milk instead of regular condensed milk. This keeps the same sweet flavor while making it safe for those with dairy allergies. Always check labels to ensure your ingredients are truly gluten-free and dairy-free. For the full recipe, you can refer to the earlier section. Enjoy trying out these variations! To keep your coconut macaroons fresh, store them in an airtight container. Make sure the container is not too big, as excess air can dry them out. Layer the cookies with parchment paper to avoid sticking. If you have a lot, consider using smaller containers. Keep them in a cool, dry place away from sunlight. This will help maintain their texture and flavor. Freezing coconut macaroons is easy and smart. First, let the cookies cool completely after baking. Then, place them in a single layer on a baking sheet. Freeze them for about an hour until they are solid. After that, transfer the cookies to a freezer-safe bag or container. Remove as much air as possible to prevent freezer burn. They can last for up to three months in the freezer! Coconut macaroons can stay fresh for about a week at room temperature. To enjoy them longer, store them in the fridge. They can last for about 10 to 14 days when refrigerated. If you notice any changes in smell or texture, it's best to toss them. For the best taste, consume them within a week. For those who want to try making these delicious treats, refer to the Full Recipe for step-by-step guidance. No, you cannot make macaroons without coconut. Coconut is the main ingredient. It gives these cookies their unique taste and texture. If you leave it out, you won't have macaroons at all. You could try other ingredients, but they would be different cookies. The key to chewy macaroons is the right balance of coconut and moisture. Sweetened condensed milk helps keep them soft and chewy. Also, be careful not to overbake them. When the edges are golden, they are ready. Take them out right away. Coconut macaroons last about five days at room temperature. Store them in an airtight container. If you want them to last longer, you can freeze them. They freeze well for up to three months. Just make sure to wrap them tightly! For the full recipe, check out the earlier section. To make great coconut macaroons, we covered many key points. You learned about ingredient choices, tools, and step-by-step baking instructions. With helpful tips, you can avoid common mistakes and make them fluffy. You also discovered fun variations and how to store them right. Coconut macaroons are easy to make and enjoy. With your new skills, you can impress friends and family. Happy baking!

Coconut Macaroon Cookies Simple and Tasty Treat

If you love sweet treats, you’ll adore these Coconut Macaroon Cookies! They are easy to make and packed with delicious

Here’s what you need for the perfect pumpkin spice latte cupcakes: - 1 ½ cups all-purpose flour - 1 teaspoon baking powder - ½ teaspoon baking soda - ½ teaspoon fine salt - 2 teaspoons pumpkin spice - 1 cup brown sugar, packed - ½ cup granulated sugar - ½ cup vegetable oil - 2 large eggs - 1 cup canned pumpkin puree - 1 teaspoon pure vanilla extract - ½ cup brewed espresso or strong coffee, cooled to room temperature - 1 cup heavy whipping cream - 2 tablespoons powdered sugar - Extra pumpkin spice for dusting These simple ingredients come together to create a rich, flavorful treat. The pumpkin puree keeps the cupcakes moist. The espresso adds that lovely coffee kick, making them perfect for autumn. Using pumpkin spice gives each bite a warm, cozy taste. I always recommend using high-quality ingredients. Fresh spices can make a big difference. If you want, you can even make your own pumpkin spice mix at home. Just blend cinnamon, nutmeg, and ginger. This ensures you get a fresh flavor profile. For the frosting, heavy whipping cream is a must. It whips up beautifully and adds a fluffy texture. The added powdered sugar sweetens it just right. Dusting with extra pumpkin spice gives a lovely finish. You can find the full recipe [here]. Enjoy baking these delightful cupcakes! - Preheat oven to 350°F (175°C) - Line muffin tin with cupcake liners Start by preheating your oven. This step is key for even baking. Line each muffin tin cup with a cupcake liner. This will make it easy to remove the cupcakes later. - Whisk together flour, baking powder, baking soda, salt, and pumpkin spice Next, grab a medium bowl. In it, whisk all-purpose flour, baking powder, baking soda, fine salt, and pumpkin spice. This blend gives your cupcakes that cozy fall flavor. Make sure there are no lumps. - Mix brown sugar, granulated sugar, and vegetable oil until smooth - Incorporate eggs and pumpkin puree along with vanilla extract In a large bowl, combine brown sugar, granulated sugar, and vegetable oil. Use a whisk or mixer to get a smooth mix. Then, add the eggs one by one. Mix well after each egg. Gently fold in canned pumpkin puree and pure vanilla extract. This adds moisture and flavor. - Gradually combine dry ingredients with wet ingredients and brewed espresso Now, it's time to mix! Slowly add the dry ingredients to the wet mix. Alternate with cooled brewed espresso. Start and end with the flour mix. Stir gently until just combined. This helps keep your cupcakes light and fluffy. - Fill cupcake liners and bake for 18-20 minutes - Cool in pan for 5 minutes before transferring to a wire rack Spoon the batter into the cupcake liners, filling each about two-thirds full. This allows room for rising. Bake in the preheated oven for 18-20 minutes. To check, insert a toothpick into the center. If it comes out clean, they are done! Let them cool in the pan for 5 minutes. Then, move them to a wire rack to cool completely. - Whip heavy cream with powdered sugar until stiff peaks form - Top cupcakes with whipped cream and a sprinkle of pumpkin spice While your cupcakes cool, make the topping. In a mixing bowl, whip heavy cream with powdered sugar until stiff peaks form. Once the cupcakes are cool, generously dollop or pipe the whipped cream on top. Finish with a light sprinkle of extra pumpkin spice. This adds a lovely touch and extra flavor. For the full recipe, check out the earlier section. - Avoid overmixing batter for light cupcakes. Overmixing can make them dense. - Use room temperature ingredients for better incorporation. This helps mix everything smoothly. - Use a piping bag for a more elegant whipped cream topping. It makes cupcakes pretty and fun. - Add caramel drizzle or chocolate shavings for extra flavor. These toppings give a nice crunch too. - Experiment with different spices or flavored extracts. Try adding a hint of vanilla or almond for a twist. - Add chocolate chips or nuts for crunch. These add texture and make each bite exciting. {{image_4}} Vegan Pumpkin Spice Latte Cupcakes are a great choice for plant-based eaters. To make these, you can: - Substitute eggs with flax eggs. To make a flax egg, mix 1 tablespoon of ground flaxseed with 2.5 tablespoons of water. Let it sit for a few minutes until it thickens. - Use almond milk in place of regular milk for the batter. - Replace heavy cream with coconut cream for the topping. This adds a rich flavor while keeping it vegan. For those who need a gluten-free option, simply use a gluten-free flour blend in the recipe. This allows everyone to enjoy these delicious treats without worry. You can also play with cupcake sizes. Make mini cupcakes for bite-sized treats. These are perfect for sharing at parties. Alternatively, you can create jumbo cupcakes for a larger serving. They are great for when you want a big, indulgent dessert. These variations let everyone enjoy the delightful flavors of pumpkin spice latte cupcakes! For more details on the recipe, check out the Full Recipe. Store your leftover cupcakes in an airtight container. You can keep them at room temperature or in the fridge. However, I find that they taste best when eaten within three days. After that, the cupcakes may lose their moistness and flavor. If you want to save some for later, freeze the unfrosted cupcakes. Lay them in a single layer on a baking sheet. Once frozen, transfer them to a freezer bag. When you are ready to enjoy them, just thaw the cupcakes before frosting and serving. This keeps them fresh and delicious! Yes, but ensure it is well-pureed and drained for best results. Fresh pumpkin has great flavor and texture. Just remember to remove excess water after cooking. Combine 1 teaspoon cinnamon, ½ teaspoon nutmeg, and ½ teaspoon ginger. This blend gives your cupcakes that warm fall flavor we all love. Yes, any brewed coffee can work, but espresso enhances the flavor. Espresso adds a rich depth that pairs perfectly with pumpkin. Make sure to measure ingredients accurately and avoid overmixing. Overmixing can lead to dense cupcakes, which may sink. Substitute all-purpose flour with a gluten-free blend. Many blends work well, ensuring your cupcakes remain fluffy and delicious. Pair with a warm cup of coffee or chai tea for a delightful experience. The warmth of the drinks complements the cupcakes perfectly. Enjoy your treat with friends! These cupcakes combine rich flavors like pumpkin, spices, and coffee. You learned how to mix, bake, and top them perfectly. Remember, small tweaks can make a big difference. You can try vegan or gluten-free options for more variety. Store leftovers right, and they'll stay fresh longer. Enjoy these cupcakes with friends or family. They’re best with a warm drink. Happy baking!

Pumpkin Spice Latte Cupcakes Delightful Fall Treat

Fall is here, and it’s time to indulge in delicious treats! Imagine biting into a soft, moist cupcake that captures

- 1 cup unsalted butter - 1 cup granulated sugar - 1 cup packed brown sugar - 4 large eggs - 1 teaspoon vanilla extract - 1 cup all-purpose flour - 1 cup cocoa powder - 1 teaspoon baking powder - 1/2 teaspoon salt - 1 cup crushed pretzels (plus extra for garnish) - 1 cup salted caramel sauce (store-bought or homemade) - Flaky sea salt (for topping) The first step in making these brownies is gathering your ingredients. You need unsalted butter for richness. The mix of granulated and brown sugar gives sweetness and depth. You will use four large eggs to bind everything together and add moisture. Vanilla extract brings out the flavors in your batter. For the dry mix, all-purpose flour and cocoa powder are key. Baking powder adds lift, while salt enhances taste. Crushed pretzels give a salty crunch that pairs well with sweetness. You can use store-bought salted caramel sauce or make your own for extra flair. Don't forget flaky sea salt to sprinkle on top for a savory finish. With these ingredients, you’ll create a treat that balances sweet and salty perfectly. Each bite is a delightful mix of flavors and textures. {{ingredient_image_2}} Start by preheating your oven to 350°F (175°C). Next, take a 9x13 inch baking pan. Grease it well or line it with parchment paper. This makes it super easy to remove the brownies later. In a large mixing bowl, melt 1 cup of unsalted butter. You can do this in the microwave or on the stovetop. Let the butter cool a bit, so it does not cook the eggs. Whisk in 1 cup of granulated sugar and 1 cup of packed brown sugar. Make sure the mixture is smooth. Then, add 4 large eggs one at a time. Mix well after each egg. Finally, stir in 1 teaspoon of vanilla extract until blended. In a separate bowl, sift together 1 cup of all-purpose flour, 1 cup of cocoa powder, 1 teaspoon of baking powder, and 1/2 teaspoon of salt. Gradually add this dry mix into the wet ingredients. Stir gently until just combined. Be careful! Overmixing can make brownies dense. Fold in 1 cup of crushed pretzels into the batter. Save a small handful for later. Pour half of the brownie batter into your prepared pan. Spread it evenly. Drizzle half of the salted caramel sauce over this layer. Pour the remaining brownie batter on top, covering the caramel. Drizzle the rest of the salted caramel sauce over this layer. Now, sprinkle the reserved crushed pretzels on top for a crunchy finish. Use a knife or toothpick to gently swirl the caramel into the brownie batter. Bake these brownies for 25-30 minutes. Check if they are ready by inserting a toothpick. It should come out with moist crumbs, not wet batter. Once baked, sprinkle flaky sea salt on top while they are still warm. Let them cool in the pan for at least 30 minutes. Now, cut them into squares and enjoy! To get soft and chewy brownies, follow these tips. Use unsalted butter for a rich flavor. Melt it gently; do not let it boil. Combine both sugars well with the butter for a smooth mix. Add eggs one at a time, mixing each in fully. Sift the dry ingredients to avoid lumps. Mix just until combined, as overmixing makes brownies dense. For a stunning look, drizzle caramel carefully. Pour half of the batter, then use half the caramel. Spread the second layer evenly, then drizzle again. Take a knife or toothpick and swirl gently. Don’t mix too much; you want swirls, not a blend. This keeps the caramel distinct in each bite. Here are some tools that make baking easier: - Mixing bowls - Measuring cups and spoons - Whisk for blending - Sifter for dry ingredients - Rubber spatula for folding - 9x13 inch baking pan - Parchment paper for easy removal - Knife or toothpick for marbling Serve these brownies on a rustic wooden board for charm. Drizzle extra salted caramel on top for more flavor. Add a sprinkle of crushed pretzels on the side for crunch. You can also pair them with vanilla ice cream for a treat. Enjoy them warm for the best experience! Pro Tips Use Room Temperature Ingredients: Allow your eggs and butter to come to room temperature before mixing. This helps to create a smoother batter and leads to better incorporation of ingredients. Don’t Overmix: Once you add the dry ingredients to the wet mixture, mix just until combined. Overmixing can lead to dense brownies rather than the desired fudgy texture. Check for Doneness: Instead of relying solely on baking time, check your brownies a few minutes before the recommended time. A toothpick should come out with a few moist crumbs for perfectly baked brownies. Store Properly: To keep your brownies fresh and fudgy, store them in an airtight container at room temperature. You can also freeze them for longer storage, just make sure to wrap them well. {{image_4}} You can make these brownies your own with fun add-ins. Try adding nuts like walnuts or pecans for crunch. Mini chocolate chips can add extra sweetness. Want a kick? A touch of espresso powder can enhance the chocolate flavor. If you love peanut butter, swirl it in with the caramel for a rich taste. To make these brownies gluten-free, use a gluten-free flour blend. Many brands work well in baking. For a dairy-free version, replace the butter with coconut oil or a vegan butter. Use a dairy-free caramel sauce to keep the flavor intact. These swaps help everyone enjoy this treat. Get creative with your toppings! Instead of just flaky sea salt, try crushed pretzels mixed with toffee bits. Drizzle melted chocolate over the top for a sweet touch. You could even add a scoop of ice cream on top when serving. Each option brings a new layer of flavor and fun. To keep your salted caramel pretzel brownies fresh, store them in an airtight container. This helps prevent them from drying out. Place a piece of parchment paper between layers if stacking. Store them at room temperature for up to four days. If you want to keep them longer, refrigeration is an option. Just remember, cold brownies can become a bit firmer. Freezing brownies is simple and effective. First, let them cool completely. Then, cut them into squares. Wrap each square tightly in plastic wrap. You can also place them in a freezer-safe bag for extra protection. When stored this way, they can last up to three months. To enjoy, just thaw them in the fridge overnight or at room temperature for a few hours. When you want to enjoy your brownies again, reheating is key. Preheat your oven to 350°F (175°C). Place the brownies on a baking sheet and cover them with foil. Heat for about 10-15 minutes. This warms them up while keeping them soft. If you prefer the microwave, heat them in short bursts of 10 seconds. This way, you avoid overheating and can enjoy the gooey goodness without losing texture. You can use butterscotch sauce or chocolate sauce. These options will add sweetness. You might also try making your own caramel. Just melt sugar until golden, then mix in cream. This gives a fresh taste to your brownies. These brownies last about five days when stored properly. Keep them in an airtight container at room temperature. You can also refrigerate them for up to a week. Just let them warm up before eating for the best taste. Yes, you can make these brownies a day or two in advance. Just store them as mentioned above. This allows the flavors to meld together. They taste even better after a day! Use a sharp knife for the best cuts. Dip the knife in hot water, then wipe it dry. This helps make clean edges. Cut the brownies while they are cool, but not cold. Absolutely! These brownies are a crowd-pleaser. Their sweet and salty combo is hard to resist. Serve them on a platter, and watch everyone enjoy. They add a fun touch to any event. Salted caramel pretzel brownies combine sweet and salty in every bite. You learned about the essential ingredients, such as unsalted butter and crushed pretzels. We covered step-by-step baking instructions to guide you through the process. Tips helped you achieve the perfect texture and marbling with caramel. You also explored variations and storage methods. Enjoy making your brownies, and remember, you can customize them to fit your taste!

Salted Caramel Pretzel Brownies Irresistible Delight

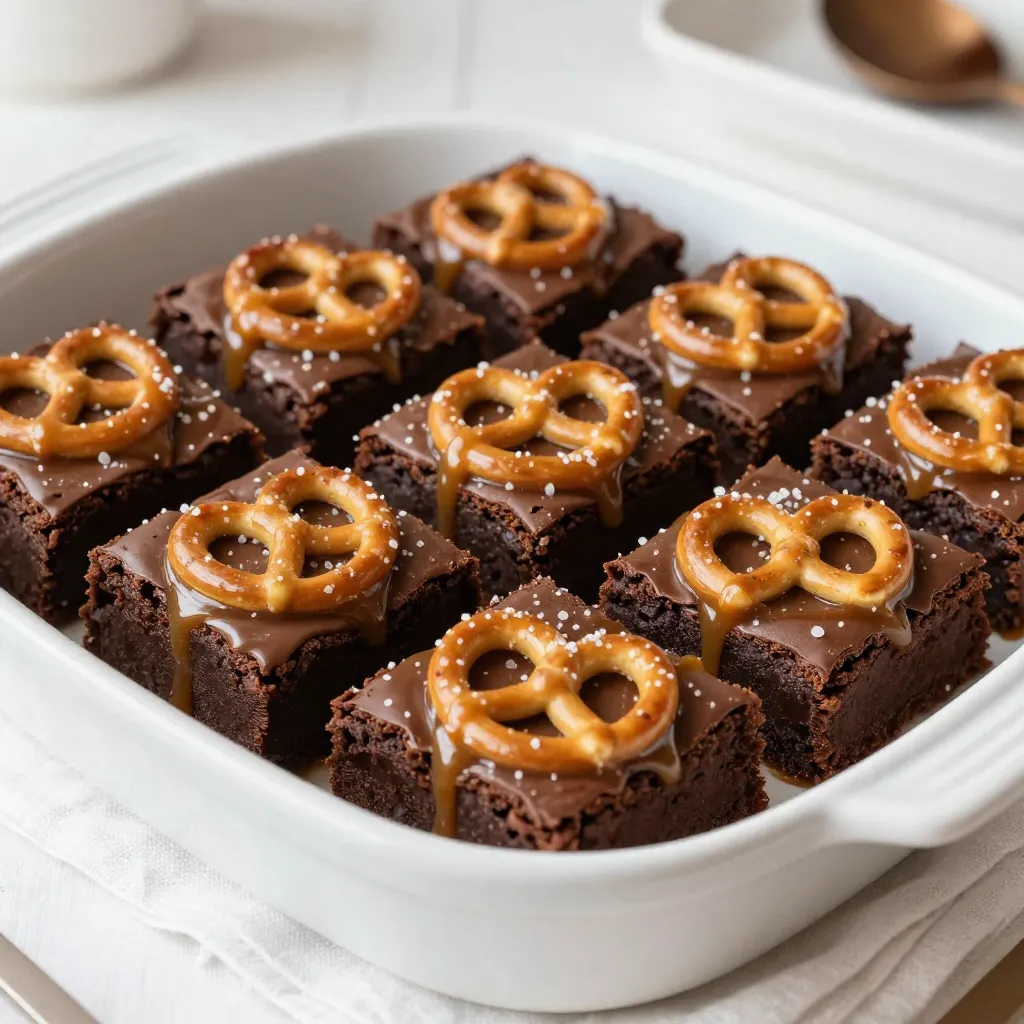
Are you ready to indulge in a sweet treat? Salted Caramel Pretzel Brownies are a must-try! With rich chocolate, crunchy

- Eggplants: You need 2 large eggplants. Slice them into 1/4-inch rounds. This thickness helps them cook evenly and absorb flavors well. - Cheese varieties: Use 2 cups of shredded mozzarella and 1 cup of grated Parmesan cheese. These cheeses melt beautifully and add rich flavors. - Marinara sauce: You will need 2 cups of marinara sauce. Choose a good-quality sauce for the best taste. Homemade sauce works great, too! - Flour: Use 1 cup of all-purpose flour. This helps the eggplant hold the coating well. - Eggs: You need 3 large eggs, beaten. The eggs help the breadcrumbs stick to the eggplant. - Breadcrumbs: Use 1 cup of Italian seasoned breadcrumbs. They add a nice crunch and flavor. - Olive oil: Use 1 tablespoon of olive oil. Drizzle it on the eggplant to help it crisp up in the oven. - Dried herbs: Use 1 teaspoon of dried basil and 1 teaspoon of dried oregano. These herbs add a burst of flavor to your dish. - Fresh basil: For garnish, use fresh basil leaves. They add a lovely touch and enhance the dish's aroma. For the complete recipe, check out the Full Recipe. Enjoy your cooking! Salting the eggplants Start by slicing the eggplants into 1/4-inch rounds. Place them in a colander and sprinkle with salt. This step removes bitterness and moisture. Let them sit for about 30 minutes. Afterward, rinse the slices under cold water. Pat them dry with paper towels. Setting up the breading station Prepare three shallow bowls. Fill one with flour, another with beaten eggs, and the last with breadcrumbs. This setup helps you coat the eggplants easily and quickly. Dredging in flour Take each eggplant slice and first coat it in flour. Make sure it’s fully covered. The flour helps the egg stick better. Coating with eggs and breadcrumbs Next, dip the floured slice into the beaten eggs. Allow any extra egg to drip off. Finally, coat it thoroughly with breadcrumbs. Place the breaded slices on a lined baking sheet for baking. Initial baking instructions Drizzle the breaded eggplant slices with olive oil. This step adds crispiness. Bake them in a preheated oven at 375°F (190°C) for 25-30 minutes. Flip the slices halfway through for even browning. Layering in the baking dish In a large baking dish, pour a layer of marinara sauce. Then, add a layer of baked eggplant slices. Sprinkle mozzarella and Parmesan cheese on top. Add a little dried basil and oregano. Repeat this layering until all ingredients are used, ending with cheese on top. Baking until bubbly Place the assembled dish in the oven. Bake for another 25-30 minutes or until the cheese is bubbling and golden brown. Cooling and serving preparation Once baked, remove the dish from the oven. Let it cool for a few minutes. This helps the layers firm up before slicing. Serve with fresh basil leaves on top for a lovely touch. To make your Baked Eggplant Parmesan sing with flavor, start with good seasoning. I recommend using salt and fresh herbs. A sprinkle of garlic powder also adds a nice touch. When it comes to sauce, choose a quality marinara. A rich, homemade sauce will elevate your dish. If you use store-bought, look for one with fresh ingredients and no added sugars. Getting crispy eggplant is key to this dish. After salting, be sure to pat the eggplant slices dry. This step removes excess moisture. For best results, coat them well in breadcrumbs. A drizzle of olive oil before baking helps too. When layering, start with sauce, then eggplant, and follow with cheese. Repeat this pattern, but finish with a cheese layer. This ensures the top gets nice and melty. For serving, I like to use rustic plates. Drizzle some extra marinara around the edges for color. You can also add a sprig of fresh basil on top. This not only looks nice but adds a fresh scent. Serve with a side salad or garlic bread for a complete meal. Enjoy the beauty before you dig in! {{image_4}} You can easily make your Baked Eggplant Parmesan even better. First, add more vegetables. Sliced zucchini or bell peppers work great. They add color, flavor, and nutrients. You can also mix in sautéed spinach or mushrooms for added depth. If you need a gluten-free version, swap the breadcrumbs. Use gluten-free breadcrumbs or ground almonds. Both will give you a nice crunch without the gluten. Want to spice things up? Try adding spices like crushed red pepper or garlic powder. These will give your dish a nice kick. You can also mix fresh herbs like parsley or thyme for a fresh taste. Cheese lovers can experiment too. Instead of just mozzarella and Parmesan, try provolone or gouda. Each cheese adds a unique flavor that can enhance your dish. To make a complete meal, pair your Baked Eggplant Parmesan with sides. A simple salad with mixed greens and a light vinaigrette works well. Garlic bread is another great choice for a comforting meal. For a fun twist, serve the eggplant on pasta. This adds a filling element and makes a hearty dish. You can also serve it with a side of roasted vegetables for a colorful plate. Exploring these variations can enhance your cooking and impress your guests. For the full recipe, be sure to check out the details above! Store your baked eggplant parmesan in the fridge. Use an airtight container to keep it fresh. A glass or plastic container works well. Let it cool to room temperature before sealing. This helps avoid moisture build-up. To freeze leftovers, cut the dish into portions. Wrap each portion tightly in plastic wrap. Then, place them in a freezer bag. Remove as much air as possible. When ready to eat, thaw it in the fridge overnight before reheating. In the fridge, your eggplant parmesan lasts about 3-5 days. In the freezer, it stays good for up to 3 months. Look for signs of spoilage, like a sour smell or mold. If you see these, it’s best to discard it. Enjoy your delicious meal safely! To make Baked Eggplant Parmesan, follow these steps: 1. Preheat your oven to 375°F (190°C). 2. Slice two large eggplants into 1/4-inch rounds. 3. Sprinkle the slices with 1 teaspoon of salt and let them sit in a colander for 30 minutes. 4. Rinse the eggplant and pat dry with paper towels. 5. Set up a breading station with three bowls: one with 1 cup of flour, one with 3 beaten eggs, and the last with 1 cup of Italian seasoned breadcrumbs. 6. Dredge each eggplant slice in flour, then dip in eggs, and coat with breadcrumbs. 7. Place the slices on a lined baking sheet and drizzle with 1 tablespoon of olive oil. 8. Bake for 25-30 minutes, flipping halfway, until golden brown. 9. In a baking dish, layer marinara sauce, eggplant slices, and cheeses. Repeat until all ingredients are used. 10. Bake for another 25-30 minutes until the cheese bubbles and turns golden. Key ingredients include: - Eggplants - Marinara sauce - Mozzarella cheese - Parmesan cheese For the full recipe, refer to the earlier sections. Yes, you can prepare Baked Eggplant Parmesan in advance. Here are the best practices: - Slice and salt the eggplant a day ahead. - Bread the eggplant and store it in the fridge. - Assemble the dish up to 24 hours in advance. Cover it tightly. - When ready to bake, let it sit at room temperature for 30 minutes before cooking. I suggest serving Baked Eggplant Parmesan with: - A fresh green salad with vinaigrette. - Garlic bread for a crunchy side. - Roasted vegetables for extra flavor. - A simple pasta tossed with olive oil and herbs. To make the eggplant not bitter, follow these steps: 1. Slice the eggplants and sprinkle salt on both sides. 2. Let them sit for 30 minutes. The salt draws out moisture and bitterness. 3. Rinse the eggplants under cold water to remove the salt. 4. Pat them dry with paper towels before breading. Baked Eggplant Parmesan can be healthy. Here are some nutritional benefits: - Eggplant is low in calories and high in fiber. - It provides vitamins and minerals like potassium and vitamin C. - Using less oil and cheese can make it lighter. - Adding fresh herbs boosts flavor without extra calories. To reheat Baked Eggplant Parmesan, follow these methods: - Preheat your oven to 350°F (175°C). - Place slices in an oven-safe dish. - Cover with foil to retain moisture. - Heat for 20-25 minutes or until warm. You can also use a microwave for quick reheating but avoid sogginess by covering it lightly. Baked Eggplant Parmesan combines eggplants, cheese, and marinara for a tasty dish. You learned the best ways to prepare, bread, and bake the eggplant. We also explored variations and important storage tips. With simple steps, you can make a delicious meal at home. Remember to enhance the flavor and achieve a great texture. This dish is versatile and can fit into many diets. Enjoy your cooking and the delight of sharing this meal with others!

Baked Eggplant Parmesan Delightfully Easy Recipe

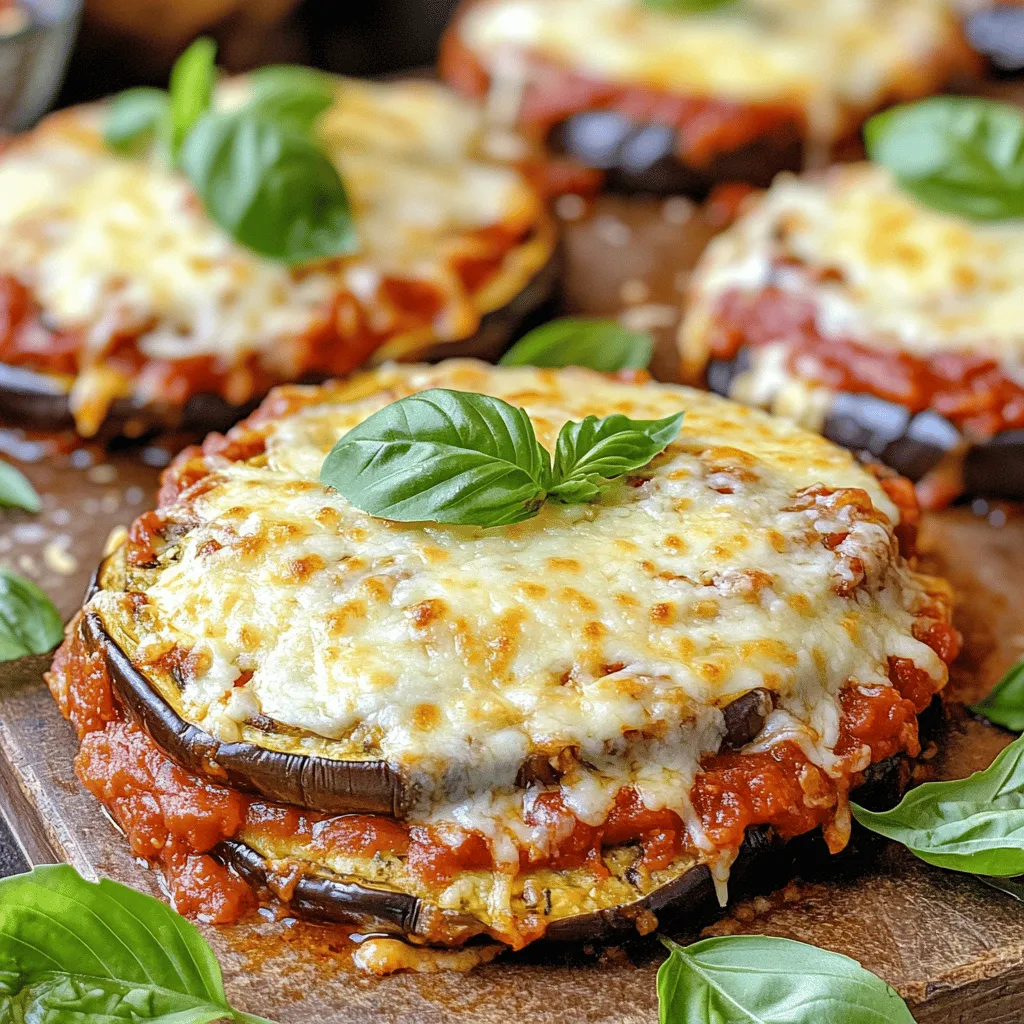
Are you ready to dive into a delicious world of flavors? My Baked Eggplant Parmesan recipe is not just easy;

To make a great Margherita pizza, you need just a few key ingredients. Here’s what you need: - All-purpose flour: This forms the pizza crust. It gives the base a nice texture. - Fine sea salt: Salt enhances flavor and controls yeast growth. - Granulated sugar: Sugar feeds the yeast and helps the dough rise. - Instant yeast: This makes the dough rise quickly. It is easy to use. - Warm water: It activates the yeast to make the dough grow. - Extra virgin olive oil: This adds flavor and keeps the crust soft. - Tomato sauce: Use high-quality or homemade sauce for the best taste. - Fresh mozzarella cheese: This melts beautifully and adds rich creaminess. - Fresh basil leaves: They bring freshness and aroma to the pizza. - Extra virgin olive oil for drizzling: A light drizzle adds flavor and shine. - Freshly ground black pepper: This adds a touch of spice. Quality ingredients matter. Fresh basil and good mozzarella make a big difference. They elevate your pizza, adding authentic Italian flavor. Choose ingredients that you love. This way, your pizza will taste amazing. Measuring ingredients correctly is key. Use a kitchen scale for flour. It ensures you have the right amount. If you don’t have a scale, use dry measuring cups. Spoon the flour into the cup, then level it off with a knife. For liquid ingredients, use a liquid measuring cup. Always measure warm water using a thermometer. Aim for 110°F (43°C) for best results. When preparing fresh ingredients, wash basil leaves gently. Pat them dry with a paper towel. Slice mozzarella cheese into even rounds. This helps it melt evenly on the pizza. Following these tips will help you create a delicious Margherita pizza. For the full recipe, check out the details above. To start, mix the flour, salt, sugar, and yeast in a large bowl. Use a whisk to blend them well. This helps to evenly distribute the yeast. Next, slowly add the warm water and olive oil. Stir with a wooden spoon until a shaggy dough forms. Now, transfer the dough to a floured surface. Knead the dough for about 8 to 10 minutes. You want it to be smooth and slightly tacky. If the dough sticks to your hands too much, sprinkle a little more flour. When the dough is ready, form it into a ball. Place it in a lightly greased bowl. Cover it with a towel and let it rise in a warm spot for about 1 hour. It should double in size. After the dough has risen, gently punch it down to release the air. Move it to a floured surface. Roll out the dough to your desired thickness. For a classic Margherita pizza, aim for a thinner crust. This gives it the perfect balance of crispiness and chew. Once rolled out, carefully lift the dough. Place it on a piece of parchment paper. This makes it easier to transfer to the oven later. Now, it’s time to add the toppings. Use a ladle or spoon to spread your tomato sauce on the base. Leave about a half-inch border around the edges. This helps to keep the crust intact. Next, place the sliced mozzarella cheese evenly over the sauce. Make sure each piece gets some sauce. Preheat your oven to 475°F (245°C). If you have a baking stone, put it in the oven to heat for about 30 minutes. If using a baking tray, place it in the oven as it preheats. Once your pizza is topped, carefully transfer it (with the parchment) onto the preheated stone or tray. Bake for about 10 to 12 minutes. Look for a golden brown crust and bubbling cheese. After baking, remove the pizza from the oven. Scatter fresh basil leaves on top and drizzle with olive oil. Let it cool for a minute before slicing. Enjoy your Classic Margherita Pizza! For the complete guide on making this dish, check out the Full Recipe. To create a crispy crust, I recommend a few key techniques. Start by using high-protein flour. This flour helps the crust rise well and gives it a chewy texture. Knead the dough enough to develop gluten. This step is essential for a strong structure. Preheat your oven to its highest setting. An oven at 475°F (245°C) works well. If you have a baking stone, place it in the oven as it heats. This stone absorbs heat and gives your crust a nice crunch. Enhancing flavor in your Margherita pizza is simple. Always use fresh ingredients, especially tomatoes and basil. A pinch of sea salt in your sauce can brighten the flavors. Drizzle extra virgin olive oil on top before serving. This step adds richness and depth to your pizza. Balance is key. Ensure you have enough sauce and cheese. Too much sauce can make the pizza soggy. Aim for a thin layer of sauce and a good amount of cheese. This gives you that classic Margherita taste. Many home cooks make a few common mistakes. One frequent issue is over-kneading or under-kneading the dough. If your dough is too sticky, add a bit more flour. If it’s too dry, add a small amount of water. Another mistake is not preheating the oven long enough. If the oven isn't hot, the crust won't cook well. You may end up with a soft, doughy bottom. Lastly, avoid overcrowding your pizza with toppings. Too many toppings can lead to uneven cooking. Stick to the classic combination for the best results. If you follow these tips, you'll create a pizza that shines! For the full recipe, check out the [Full Recipe]. {{image_4}} The classic Margherita pizza is simple. It has fresh mozzarella, basil, and tomato sauce. But modern twists bring fun flavors. You can add truffle oil for a rich taste. Different cheeses like burrata or goat cheese can change the game. Each twist makes the pizza unique. You can easily make a vegetarian Margherita pizza. Just keep the cheese and sauce. For a gluten-free dough, look for almond or cauliflower flour. Many stores sell gluten-free mixes, too. These options let everyone enjoy a slice. Seasonal toppings can elevate your Margherita pizza. Try adding fresh tomatoes in summer or roasted squash in fall. Mix and match toppings like arugula or olives. These ingredients can add color and flavor. Be creative and enjoy the fun of making your pizza. For a full recipe, check out the detailed guide! To keep your leftover pizza fresh, store it in the fridge. Use an airtight container or wrap it tightly in plastic wrap. This keeps out air and moisture. You can enjoy your pizza for up to three days this way. When reheating pizza, avoid the microwave. It can make the crust soggy. Instead, use an oven or skillet. Preheat your oven to 375°F (190°C). Place the pizza on a baking sheet and heat for about 10 minutes. This method keeps the crust crispy and the cheese melty. Freezing pizza is a great option. To freeze, wrap each slice in plastic wrap. Then, place them in a freezer bag. Remove as much air as possible. For best results, freeze the pizza right after it cools. You can also freeze the dough. Shape it into a ball, wrap it well, and place it in the freezer. When you're ready to use it, thaw the dough in the fridge overnight. To reheat frozen pizza, preheat your oven to 400°F (200°C). Bake the pizza for about 15-20 minutes. This method ensures you get great taste and texture. Enjoy your tasty Margherita pizza anytime! Margherita pizza comes from Naples, Italy. It dates back to the late 1800s. A chef named Raffaele Esposito created it for Queen Margherita of Savoy. He used simple toppings: tomato sauce, mozzarella, and basil. These colors represent the Italian flag: red, white, and green. This pizza shows how simple food can be delicious and beautiful. It reflects Italian pride and culinary tradition. Yes, you can use store-bought dough. It saves time and effort. Many stores offer good-quality pizza dough. However, there are pros and cons. Pros: - Quick and easy to use - No need to knead or rise Cons: - May lack fresh flavor - Might not rise as well as homemade dough If you want to save time, store-bought dough is fine. But making your own dough gives better taste and texture. To keep your pizza from losing shape, follow these tips: - Roll it out evenly: Make sure the dough is the same thickness. This helps it cook evenly. - Use parchment paper: Place the pizza on parchment. It makes moving the pizza easy. - Don’t overload with toppings: Too many toppings make the pizza heavy. Stick to a few key ingredients. With these tips, your pizza will hold its shape and look great when cooked. Enjoy your Margherita pizza! For a detailed recipe, check the Full Recipe. Classic Margherita pizza is a true delight. We explored the essential ingredients, proper preparation, and step-by-step instructions to ensure success. Remember to focus on quality ingredients for the best results and avoid common mistakes. Experiment with variations to keep things exciting and suit your taste. With the storage tips shared, you can enjoy your pizza for days. Keep this guide handy for a perfect pizza every time. Enjoy the art of making Margherita pizza and share it with those you love.

Classic Margherita Pizza Delightful and Simple Recipe

Craving a pizza that’s bursting with flavor yet simple to make? Look no further! In this blog, I’ll guide you

- 4 large egg whites - 1 cup superfine sugar - 1/4 teaspoon cream of tartar - 1 teaspoon vanilla extract - 1/4 teaspoon almond extract - 1 cup mixed fresh fruits (such as strawberries, raspberries, and kiwi), finely chopped - A pinch of salt - Optional: Edible flowers for a decorative garnish I use superfine sugar for meringues. It dissolves better than regular sugar. This helps create a smooth texture. The cream of tartar stabilizes the egg whites. It ensures they hold their shape. Vanilla and almond extracts add a rich flavor. Together, they make each bite delightful. For the fruit, I love using strawberries, raspberries, and kiwi. They add color and flavor. You can also try blueberries or chopped peaches. Mix and match for your own twist. Make sure to chop the fruit finely. This helps them sit on the meringues without sliding off. Enjoy the balance of sweet and tart flavors with each bite. Start by preheating your oven to 200°F (90°C). Line two baking sheets with parchment paper. This setup helps the meringues bake evenly. Next, take your clean mixing bowl and add 4 large egg whites and a pinch of salt. Beat the egg whites on medium speed until they form soft peaks. This step usually takes about 2-3 minutes. Now, it’s time to add the sugar. Gradually mix in 1 cup of superfine sugar, one tablespoon at a time. Make sure each spoonful dissolves fully before adding the next. Increase your mixer speed to high. Beat for about 5-7 minutes until the meringue looks glossy and forms stiff peaks. Add 1/4 teaspoon of cream of tartar, 1 teaspoon of vanilla extract, and 1/4 teaspoon of almond extract. Mix until the meringue stays firm when you lift the beater. Transfer the meringue into a piping bag fitted with a round tip. If you don’t have a piping bag, you can use a spoon. Pipe or spoon the meringue onto the parchment paper in small mounds or swirls. Make sure to leave space between each one, as they will grow a bit while baking. Carefully place the baking sheets in the preheated oven. Bake for about 1.5 to 2 hours. The meringues are done when they feel dry and lift off the parchment easily. Once baked, turn off the oven. Leave the meringues inside to cool with the oven door slightly ajar. This helps prevent cracking. Once your meringues cool, it’s time to get creative! Take your cup of mixed fresh fruits, like strawberries, raspberries, and kiwi, and chop them finely. Use a spoon to place a small amount of the fruit on top of each meringue. The bright colors of the fruit will make your treat look beautiful. For an extra touch, sprinkle some edible flowers on top just before serving. This will make your cookies look fancy and inviting. You can find the full recipe and more tips on making these lovely meringue cookies. To make great meringue cookies, you need the right texture. Start with clean, dry bowls and beaters. This keeps the egg whites from collapsing. Whisk the egg whites on medium speed until soft peaks form. Then add sugar slowly. This helps the sugar dissolve well. Beat until you see stiff peaks, meaning the meringue holds its shape. The mix should look glossy and smooth. If you see any graininess, keep beating until it disappears. Many home cooks face issues while making meringue. One common mistake is using old eggs. Fresh eggs whip better and give more volume. Another mistake is rushing the sugar. Always add it a bit at a time. If you add it too fast, the meringue can turn runny. Avoid mixing on high speed right from the start; this can lead to over-whipping. Finally, don’t open the oven door too soon while baking. This can cause cracks in your meringues. Presentation matters with meringue cookies. Serve them on a nice platter to show off their beauty. Top each meringue with fresh fruit just before serving. This keeps them looking fresh and vibrant. For a special touch, sprinkle edible flowers on top. They add color and elegance. Arrange the meringues in groups or in a circle. This draws the eye and makes your dessert table shine. For the full recipe, check out the details above. {{image_4}} You can mix and match fruits for your meringue cookies. Try strawberries, blueberries, or kiwi. Each fruit adds its own flavor and color. You can also use bananas, peaches, or mangoes. Fresh fruit makes each bite pop. For a tangy twist, add some citrus fruits like orange or lemon. They balance sweetness and give a burst of flavor. Want to elevate your meringues? Add flavor infusions! Try adding lemon zest or grated lime to the mix. You can also stir in cocoa powder for a chocolate twist. Another great idea is to mix in finely chopped nuts, like pistachios or almonds. These add crunch and depth. If you love spices, a pinch of cinnamon can warm up the taste. Not a fan of regular sugar? You can use other sweeteners. Try coconut sugar for a hint of caramel. Honey can also work, but it may change the texture slightly. Agave syrup is another option that keeps things sweet. Just remember, different sweeteners can change the final result, so experiment to find your favorite! For more details on making these delightful treats, check the Full Recipe. To keep your meringue cookies fresh, store them in an airtight container. This helps to keep moisture out. Place a piece of parchment paper between layers of cookies to prevent them from sticking together. Make sure the container is in a cool, dry place. Avoid storing them in the fridge, as the moisture can ruin their crispness. Meringue cookies can last up to two weeks when stored properly. If you want to keep them longer, freezing is a great option. Place the cookies in a single layer on a baking sheet and freeze them for about 2 hours. Once frozen, transfer them to an airtight bag. They can last up to three months in the freezer. Just remember to thaw them at room temperature before serving. If your meringues become soft or chewy, you can re-crisp them. Preheat your oven to 200°F (90°C) and place the cookies on a baking sheet. Bake them for about 10-15 minutes. Keep an eye on them to avoid browning. This will help restore their crunchy texture without losing their flavor. You can tell meringue cookies are done when they feel dry to the touch. They should lift off the parchment paper easily. The outside will be crisp, and the inside will remain soft. If you tap them gently, they should not stick. Yes, meringue cookies can be made in advance. They store well in an airtight container. Keep them at room temperature to maintain their crisp texture. Avoid refrigerating them, as humidity can make them soft. The best fruits for meringue cookies are fresh and colorful. I love using strawberries, raspberries, and kiwi. You can also try blueberries or peaches for variety. Choose fruits that are not too watery to keep the meringues crisp. For a fun touch, add some edible flowers for color and style. Get creative with your fruit choices! For the full recipe, check out the Cloud-Kissed Meringue Cookies with Fruit. Meringue cookies are simple and fun to make. We covered key ingredients and the right sweeteners. I shared tips for perfect meringue and ways to serve them. You can play with fruit choices and storage methods. Meringue cookies allow for creativity and can satisfy any sweet tooth. Now, it's your turn to try! Enjoy making your meringue cookies and discover your favorite combinations.

Meringue Cookies with Fruit Simple and Delicious Treat

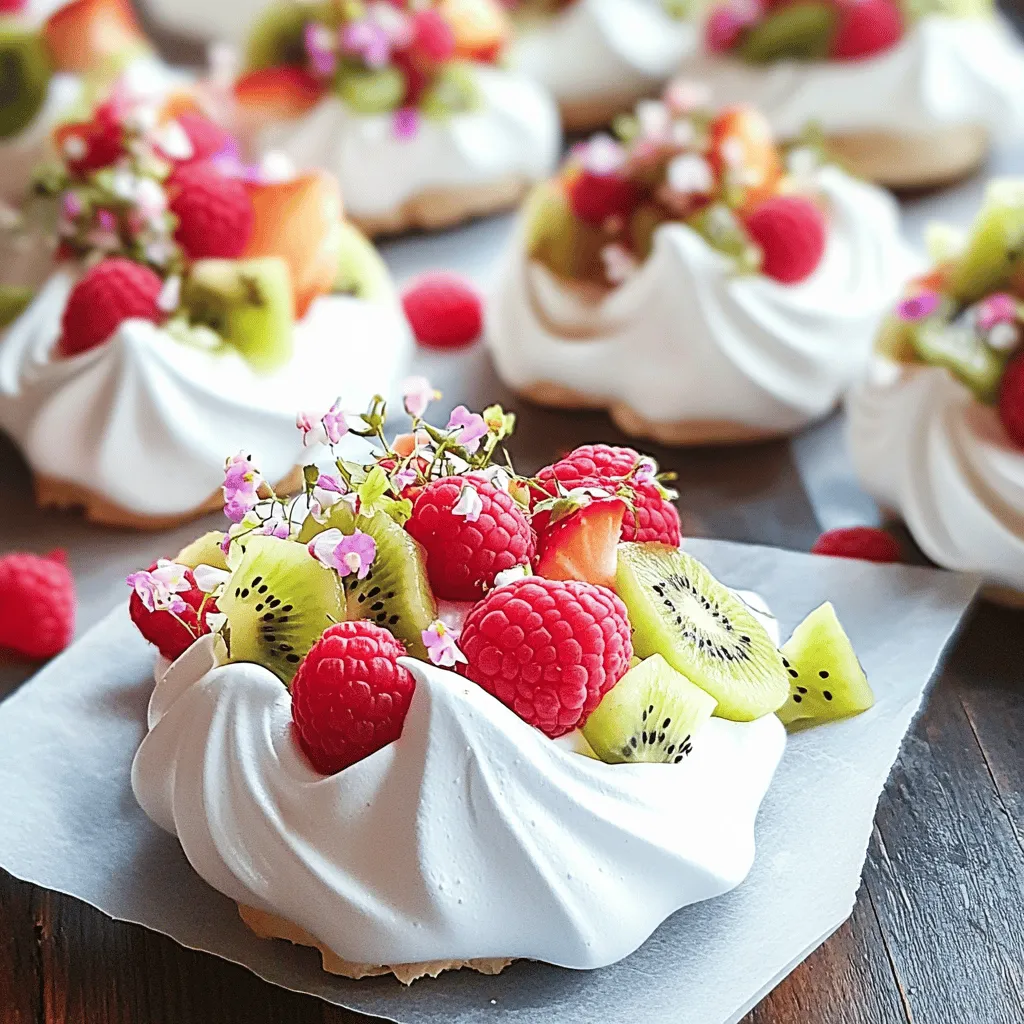
Meringue cookies with fruit are a treat that anyone can make. They’re light, crispy, and full of flavor. Whether you

- 1 cup frozen mixed berries (strawberries, blueberries, raspberries) - 1 ripe banana, sliced - 1/2 cup Greek yogurt (or any dairy-free yogurt alternative) - 1/2 cup almond milk (or your preferred milk) These main ingredients create a tasty and smooth base for your smoothie bowl. Frozen mixed berries bring bright flavors and vibrant color. The ripe banana adds natural sweetness and creaminess. Greek yogurt boosts protein and makes it thick. Almond milk helps blend everything smoothly. - 2 tablespoons chia seeds - 1 tablespoon honey or maple syrup (optional for sweetness) - Toppings: a handful of fresh mixed berries, additional sliced banana, crunchy granola, toasted coconut flakes, and fresh mint leaves for garnish Optional ingredients let you personalize your bowl. Chia seeds add fiber and omega-3s. Honey or maple syrup can sweeten your bowl if you like it sweeter. Toppings make your smoothie bowl fun and pretty. Fresh berries, granola, and coconut flakes add crunch and flavor. Mint leaves give a nice pop of color and a fresh taste. For the full recipe, you can check the Berry Bliss Smoothie Bowl 🥥 section. To start, gather your ingredients. You need frozen mixed berries, banana, Greek yogurt, and almond milk. I use a mix of strawberries, blueberries, and raspberries for a sweet taste. Slice the ripe banana for easy blending. In a high-speed blender, add the frozen berries and banana. Then, scoop in the Greek yogurt. You can use any dairy-free yogurt if needed. Next, pour in the almond milk. This helps blend everything well. Blend the mixture on high until smooth. If it feels thick, add a splash more almond milk. This will help you achieve the right texture. I like my smoothie bowl thick and creamy. You may want to stop and check the texture as you blend. For extra creaminess, consider using full-fat yogurt. This choice adds richness and taste. Once blended, carefully pour the smoothie into a bowl. Spread it evenly for a nice base. It should look inviting and vibrant. Now comes the fun part: adding toppings! Scatter fresh berries and banana slices on top. A sprinkle of crunchy granola adds a nice texture. You can also add toasted coconut flakes for extra flavor. For a touch of freshness, add mint leaves. This adds color and a lovely aroma. Dive in and enjoy every bite of your berry smoothie bowl! Don't forget to check out the Full Recipe for more details. To make your berry smoothie bowl healthy, add protein and fiber. Greek yogurt packs protein, while chia seeds add fiber. Both help keep you full longer. A scoop of protein powder can boost nutrition even more. This makes it great for breakfast or a post-workout snack. Chia seeds are tiny but mighty. They swell up in liquid, giving your bowl a thicker texture. They are high in omega-3 fatty acids and antioxidants. These nutrients help keep your heart healthy. So, don’t skip these little gems when making your smoothie. A berry smoothie bowl should look as good as it tastes. Use various colored berries to create a rainbow effect. Strawberries, blueberries, and raspberries add bright colors. Layering your toppings adds a fun touch. Start with the smoothie base, then add toppings like sliced bananas and crunchy granola. This makes your bowl pop with color and texture. Try to mix and match berries based on their colors. For example, pair dark blueberries with bright strawberries. This creates a stunning visual that makes it even more enjoyable to eat. Berry smoothie bowls are best enjoyed fresh. They make a quick breakfast or a light snack. Serve them in the morning to kickstart your day. You can also enjoy them after a workout for a healthy boost. Pair your smoothie bowl with a side of whole-grain toast or a handful of nuts. This adds extra fiber and healthy fats. For a sweet treat, consider a small piece of dark chocolate. It balances the fruity flavors and makes your meal feel special. For the full recipe, check out the Berry Bliss Smoothie Bowl recipe above. {{image_4}} Using seasonal berries is a fun way to change your smoothie bowl. You can mix blackberries, raspberries, and strawberries for great taste. Each season brings unique flavors. In summer, try fresh blueberries. In fall, add some cranberries for a tart kick. You can create themed smoothie bowls by season. For a winter bowl, consider adding pomegranate seeds. They add color and crunch! If you want vegan and dairy-free options, swap Greek yogurt with coconut or almond yogurt. Use any plant milk you love! This keeps your bowl creamy and tasty. For a low-sugar option, skip honey or maple syrup. You can also use a ripe banana for natural sweetness. If you need more protein, add protein powder or Greek yogurt. This makes your bowl filling and nutritious. Adding spices can elevate your smoothie bowl. A pinch of cinnamon gives warmth and flavor. Vanilla extract adds a lovely aroma, too. If you love creaminess, incorporate nut butters like almond or peanut butter. This not only adds taste but also healthy fats. You can mix and match these enhancements to make your bowl your own. For more ideas, check out the Full Recipe. To keep leftover smoothie bowls fresh, first cover them tightly. I recommend using a glass container with a lid. This helps seal in flavor and keeps your smoothie bowl smooth. You can store it in the fridge for one to two days. For easy blending, prep mixed berry bags. Gather your berries and portion them into bags. You can freeze these bags to use later. When you want to blend, just grab a bag and blend it right from frozen. To thaw, place the bag in the fridge overnight. If you're in a hurry, you can use the microwave. Set it to defrost for a few minutes to keep the berries intact. Berries last about five to seven days in the fridge. Keep an eye out for mold or mushy spots, as these are signs of spoilage. Greek yogurt can last up to two weeks when stored properly. Look for any off smells or changes in texture to know if it’s gone bad. To learn how to make a delicious berry smoothie bowl, refer to the Full Recipe. You can easily customize your berry smoothie bowl. Swap out the mixed berries for your favorite fruits. Use mango or peaches for a tropical twist. You can also change the yogurt type. Non-dairy yogurt works great for a vegan option. Want more protein? Add a scoop of protein powder. If you like it sweeter, try adding a bit more honey or maple syrup. Yes, you can make your smoothie bowl ahead of time. Prepare the smoothie base and store it in the fridge. It will stay fresh for up to a day. Just remember, the longer it sits, the thicker it gets. You may need to stir in some almond milk before serving. Toppings can make your smoothie bowl special. Fresh berries add color and taste. Sliced bananas or kiwi give a nice touch. Granola adds crunch and fiber. Try toasted coconut flakes for a tropical flair. For a fresh burst, add mint leaves. Each topping brings fun flavors and nutrients. This recipe is great for meal prep. You can portion it out into jars. Each jar can hold one serving for easy grab-and-go meals. Store them in the fridge for up to three days. Just add your toppings fresh before eating. This keeps everything tasty and crunchy. This blog post covers how to create a delicious berry smoothie bowl. We discussed key ingredients like frozen berries, bananas, and yogurt. You learned to blend the base for smooth texture and how to layer toppings nicely. Tips for making it nutritious and visually appealing were shared too. In closing, smoothie bowls offer endless fun and healthy options. Get creative with flavors and enjoy a tasty treat any time!

Berry Smoothie Bowl Energizing and Nutritious Treat

Are you ready to fuel your day with a delicious treat? A Berry Smoothie Bowl is not just tasty; it’s

Older posts
Newer posts
← Previous Page1 … Page72 Page73 Page74 … Page86 Next →

dsad

© 2026 yumymoments • Built with GeneratePress

Our Policies

  • Copyright Policy
  • Cookie Policy
  • GDPR Policy
  • Privacy Policy
  • Disclaimer
  • Terms Of Use

More Information

  • Home
  • About
  • Contact
  • Appetizers
  • Dessert
  • Dinner
  • Drinks
©2026, yumymoments About Back To Top