Skip to content
DisclaimerTerms Of UseGDPR PolicyCookie Policy

yumymoments

  • Home
  • Drinks
  • Appetizers
  • Dinner
  • Dessert
  • About
  • Contact
  • Privacy Policy
DisclaimerTerms Of UseGDPR PolicyCookie Policy

NO-ING-IMG

To make Zesty Cilantro Lime Rice, gather these simple items: - 1 cup basmati rice - 2 cups vegetable broth (or substitute with water) - 1 tablespoon extra-virgin olive oil - Zest and juice of 1 medium lime - 1/2 cup fresh cilantro, finely chopped - 1/2 teaspoon garlic powder - 1/4 teaspoon ground cumin - Salt, to taste These ingredients work together to create a bright and fresh flavor. You can switch some ingredients if you need to. Here are a few options: - Use jasmine rice instead of basmati for a slightly different flavor. - Chicken broth can replace vegetable broth for a richer taste. - If you don’t have fresh cilantro, try parsley for a different herb flavor. - Lime juice can be swapped with lemon juice in a pinch. These substitutions help keep the recipe flexible and easy. This dish serves four people. Here’s a basic look at the nutrition per serving: - Calories: 210 - Protein: 4g - Carbohydrates: 37g - Fat: 6g - Fiber: 1g Zesty Cilantro Lime Rice provides a tasty side that fits well in many meals while keeping things light and fresh. Start by rinsing the basmati rice. Use cold water and let it run over the rice. Rinse until the water runs clear. This is key to removing extra starch. Less starch means fluffier rice. Next, gather your ingredients. You will need: - 1 cup basmati rice - 2 cups vegetable broth (or substitute with water) - 1 tablespoon extra-virgin olive oil - Zest and juice of 1 medium lime - 1/2 cup fresh cilantro, finely chopped - 1/2 teaspoon garlic powder - 1/4 teaspoon ground cumin - Salt, to taste In a medium saucepan, heat the olive oil over medium heat. Add the rinsed rice to the pan. Sauté the rice for about 2-3 minutes. Stir it occasionally. This lightly toasts the rice. It enhances the nutty flavor. Pour in the vegetable broth or water. Bring this mixture to a boil. Once it boils, reduce the heat to low. Cover the saucepan with a lid. Let it simmer for 15 minutes. This allows the rice to absorb all the liquid. After cooking, remove the pan from heat. Keep it covered for 5 more minutes. This steams the rice, making it even fluffier. Now, it’s time to fluff the rice. Use a fork to gently fluff it up. Add the lime zest and lime juice. Then, stir in the finely chopped cilantro. Next, add garlic powder and ground cumin. Season with salt to taste. Use a folding motion to mix everything. This ensures the flavors spread evenly. Each bite of rice will be zesty and fresh. For the full recipe, check the [Full Recipe]. Enjoy your zesty cilantro lime rice! Rinsing rice is a key step. It removes extra starch. This helps the rice stay fluffy. To rinse rice, place it in a fine mesh strainer. Run cold water over the rice. Stir it gently with your hand. Do this until the water runs clear. This usually takes about 1-2 minutes. Rinsing helps your rice cook better. You can make zesty cilantro lime rice with many rice types. Basmati rice is great for its fluffy texture. Jasmine rice adds a sweet note. Brown rice is a healthy option. For brown rice, increase the cooking time to around 45 minutes. Use 2.5 cups of water instead of 2 cups. Adjust water ratios for each rice type you choose. Want to boost the flavor? Consider adding extras. A pinch of chili flakes adds heat. Try mixing in diced bell peppers for color and crunch. You can also add cooked black beans for protein. For a richer taste, use coconut milk instead of water. This will give a creamy texture and unique flavor. Feel free to play with these ideas to make the dish your own. {{image_4}} You can easily boost the protein in your zesty cilantro lime rice. Adding grilled chicken or shrimp works well. For chicken, use boneless, skinless pieces. Season them with lime juice, salt, and pepper. Grill or sauté until cooked through. Mix the cooked protein into the rice right before serving. This adds flavor and makes the dish heartier. This rice is a great base for vegetarian and vegan meals. Add black beans or chickpeas for a protein kick. You can also toss in sautéed vegetables like bell peppers or corn. These options add texture and color. For a fresh touch, sprinkle some diced avocado on top before serving. This keeps the dish light and tasty. You can change the flavor of your zesty cilantro lime rice easily. To make it spicy, add diced jalapeños or a pinch of cayenne pepper while cooking. For an herbaceous twist, mix in parsley or green onions along with cilantro. You can also try using different citrus. Lemon or orange juice brings a new taste. Experiment with these ideas to find your favorite version of this dish. You can find the Full Recipe for a detailed guide on making this flavorful rice! Store the cooled rice in an airtight container. It stays good in the fridge for up to 4 days. Make sure to let it cool down before sealing. This helps keep the texture nice. If it sits too long, it can lose its zesty flavor. You can freeze leftover rice for up to 3 months. Use freezer bags to save space. Make sure to label the bags with the date. When you freeze rice, it’s best to portion it out. This way, you can take out just what you need later. To reheat, add a splash of water to the rice. This helps the rice stay moist. You can use a microwave or a stovetop. If using the microwave, heat in 30-second bursts, mixing in between. On the stovetop, warm on low heat. Stir it gently until hot. This keeps the flavors fresh and tasty, just like the first time. Yes, you can use brown rice. Brown rice has more fiber and a nutty taste. However, it needs more water and a longer cooking time. Use 2.5 cups of water for 1 cup of brown rice. Cook it for about 40-45 minutes. The result will be a heartier dish, but the lime and cilantro flavors will still shine through. To add spice, mix in chopped jalapeños or a dash of cayenne pepper. You can also use spicy garlic powder for extra heat. Another option is to add a splash of hot sauce just before serving. Adjust the spice level to your taste. This way, you can enjoy the zesty flavors with a kick. Cilantro lime rice pairs well with many dishes. It complements grilled chicken, shrimp tacos, and black beans. You can also serve it with fajitas or alongside a fresh salad. The bright flavors enhance any meal. Try it with your favorite protein or as a base for a colorful bowl. For the full recipe of Zesty Cilantro Lime Rice, check out the detailed cooking steps. In this post, we explored how to make perfect cilantro lime rice. We discussed the key ingredients and their substitutions. I shared step-by-step instructions, tips, and various cooking options. You learned how to store leftovers properly and saw some common questions answered. Overall, this recipe is simple and flexible. With practice, you'll master it in no time. Enjoy adding your twists to make it your own!

Zesty Cilantro Lime Rice Flavorful and Simple Recipe

If you crave a burst of flavor in your meals, you’ll love my Zesty Cilantro Lime Rice recipe. This dish

To create a tasty quinoa vegetable pilaf, gather these ingredients: - 1 cup quinoa, well-rinsed - 2 cups vegetable broth - 1 medium onion, finely diced - 2 cloves garlic, minced - 1 medium carrot, diced - 1 bell pepper, chopped (any vibrant color) - 1 medium zucchini, diced - 1 cup green peas (fresh or frozen) - 1 teaspoon ground cumin - 1 teaspoon smoked paprika - 2 tablespoons extra-virgin olive oil - Salt and freshly ground black pepper to taste - Fresh parsley, chopped, for garnish 1. Quinoa: This grain offers complete protein. It has all nine essential amino acids. Quinoa is also high in fiber, which aids digestion. 2. Vegetable broth: It adds flavor without many calories. It also provides hydration and nutrients. 3. Onion: Onions are rich in antioxidants. They can help reduce inflammation and support heart health. 4. Garlic: Garlic enhances flavor and has immune-boosting properties. It can lower blood pressure and improve cholesterol levels. 5. Carrot: Carrots are high in beta-carotene. This nutrient turns into vitamin A, which is good for vision. 6. Bell pepper: These peppers are full of vitamins A and C. They support skin health and the immune system. 7. Zucchini: Zucchini is low in calories and high in vitamins. It helps keep you hydrated and supports digestion. 8. Green peas: Peas have protein and fiber. They help keep you full and support muscle health. 9. Ground cumin: This spice aids digestion and adds flavor. It may also have anti-inflammatory properties. 10. Smoked paprika: This spice gives a rich color and flavor. It is high in antioxidants. 11. Olive oil: Extra-virgin olive oil is healthy fat. It supports heart health and adds richness to dishes. 12. Salt and black pepper: These enhance the overall taste. Use them to balance flavors. 13. Fresh parsley: This herb adds freshness. It is also high in vitamins and can aid digestion. If you need to change some ingredients, here are some ideas: - Quinoa: Use brown rice or farro for a different grain. - Vegetable broth: Water or chicken broth works as an alternative. - Onion: Leeks or shallots can be used instead. - Garlic: Garlic powder can replace fresh garlic. - Carrot: Sweet potatoes or butternut squash can add sweetness. - Bell pepper: Use any color pepper or even diced tomatoes. - Zucchini: Yellow squash or eggplant can be good swaps. - Green peas: Corn or diced green beans can replace peas. - Ground cumin: Use coriander or curry powder for a different flavor. - Smoked paprika: Regular paprika can work, though it will lack smokiness. - Olive oil: Any cooking oil, like canola or avocado oil, can be used. - Fresh parsley: Chopped cilantro or basil can add fresh flavor. Feel free to mix and match based on what you have at home! For the complete instructions, check the Full Recipe. First, gather all your ingredients. You need quinoa, broth, onion, garlic, and various veggies. Rinsing the quinoa removes its bitter coating. Dice the onion and garlic finely. Chop the carrot, bell pepper, and zucchini into small pieces. This helps them cook evenly. Set everything aside to have it ready when you start cooking. Heat the olive oil in a medium pot over medium heat. Start by adding the onion. Sauté it for 3-4 minutes until it turns soft and clear. Then, add the garlic and diced veggies. Cook them for 5-7 minutes, stirring often. This helps them soften and release their flavors. After that, sprinkle in cumin and smoked paprika. Toast these spices for 1-2 minutes to bring out their rich scents. Next, mix in the well-rinsed quinoa. Stir it well with the veggies so every grain absorbs the flavor. Now, pour in the vegetable broth. Add salt and black pepper to taste. Bring it to a boil over high heat. Once boiling, lower the heat to a simmer and cover the pot. Cook for about 15 minutes until the quinoa is fluffy. To make this dish even better, keep a few tips in mind. Make sure to sauté the onion until it's truly soft. This step builds a great base for your pilaf. When adding spices, always toast them first. This step unlocks their full flavor potential. Lastly, don’t forget to fold in the peas during the last minutes of cooking. They add a sweet pop of flavor and color. For the final touch, garnish with fresh parsley. This simple step makes your dish look vibrant and inviting. For the full recipe, check out the details above. Happy cooking! When making quinoa vegetable pilaf, avoid these common errors: - Not rinsing quinoa: This can lead to a bitter taste. Always rinse it well before cooking. - Using too much liquid: Stick to the 2:1 ratio of broth to quinoa. Too much broth makes it soggy. - Skipping the resting time: This helps the quinoa fluff up. Don't rush this step. - Overcooking the vegetables: Cook them just until tender. You want them to keep some crunch and color. To boost the flavor of your pilaf, try these tips: - Add herbs: Fresh thyme or rosemary can elevate the taste. Stir them in during cooking. - Use homemade broth: If possible, make your own vegetable broth for richer flavor. - Incorporate citrus: A squeeze of lemon or lime juice before serving brightens the dish. - Experiment with spices: Try adding turmeric for a warm color or cayenne for heat. Quinoa vegetable pilaf pairs well with many dishes. Here are some ideas: - Serve alongside grilled meats: The lightness of the pilaf balances rich flavors. - Top with roasted nuts: Almonds or walnuts add crunch and protein. - Add a side salad: A fresh green salad complements the pilaf's warmth. - Enjoy as a main dish: Add cooked chickpeas or beans for extra protein. For the full recipe, check out my detailed instructions above. Enjoy your cooking! {{image_4}} Quinoa vegetable pilaf is a great dish for everyone. It is naturally vegetarian and vegan. You can keep it simple or change it up. For a vegetarian twist, add cheese like feta or goat cheese. If you’re vegan, skip the cheese or use a plant-based option. You can also add a splash of lemon juice. This adds a nice zing to the dish. If you want more protein, add legumes or nuts. Chickpeas and black beans work well in this pilaf. They add texture and taste. You can mix in some cooked lentils too. For nuts, almonds or walnuts add a nice crunch. Just chop them and sprinkle on top before serving. This makes the dish heartier and keeps you full longer. Using seasonal vegetables makes this dish even better. In spring, try asparagus or radishes. In summer, use fresh tomatoes or corn. Fall brings squash or sweet potatoes. In winter, think about carrots and parsnips. Each season changes the flavors. This keeps the dish fresh and fun. You can also use leftover veggies to clean out your fridge. Just chop and toss them in. For the full recipe, check out Quinoa Vegetable Pilaf . To keep your quinoa vegetable pilaf fresh, store it in an airtight container. Make sure it cools down before sealing it. This helps avoid moisture build-up, which can make your dish soggy. It will stay good in the fridge for about 3 to 5 days. If you notice any off smells or changes in texture, it's best to throw it out. When you're ready to enjoy your pilaf again, reheating it is easy. You can use a microwave or a stovetop. For the microwave, place your pilaf in a bowl and cover it with a damp paper towel. Heat it for 1 to 2 minutes, stirring halfway. On the stovetop, add a splash of vegetable broth or water in a pan. Heat on low, stirring gently until warmed through. This keeps the quinoa fluffy and prevents it from drying out. If you want to save your pilaf for a longer time, freezing it works well. Place the cooled pilaf into freezer-safe bags or containers. Make sure to remove any air before sealing. You can freeze it for up to 3 months. When you're ready to eat it, thaw it overnight in the fridge. Reheat it using the stovetop method. This keeps the flavors intact and lets you enjoy a quick, healthy meal later. For the full recipe, check the details above. Quinoa is a tiny seed that cooks like a grain. It has a nutty flavor and fluffy texture. Quinoa is very good for you. It is high in protein, fiber, and vitamins. Unlike many grains, quinoa has all nine essential amino acids. This makes it a complete protein. It’s also gluten-free, which is great for people with gluten issues. Plus, quinoa contains important minerals like magnesium and iron. Eating quinoa may help with heart health and weight management. Yes, you can prepare Quinoa Vegetable Pilaf ahead of time. Cook it fully and let it cool. Store it in a sealed container in the fridge. It will stay fresh for about 3-5 days. This makes it easy for meal prep. When you are ready to eat, reheat it on the stove or in the microwave. You can also add a splash of broth or water to keep it moist when reheating. To make more servings, simply multiply the ingredients. If you want to serve eight people, double everything. Use two cups of quinoa and four cups of broth. Adjust the vegetables as needed, too. If you have a large pot, you can cook it all at once. Just keep an eye on cooking times. The quinoa may need a bit more time to cook when you make a bigger batch. Follow the steps in the Full Recipe to ensure great results every time. This blog post covered all you need to know about quinoa vegetable pilaf. We explored the key ingredients, their benefits, and how to make smart substitutions. The step-by-step guide showed you simple cooking methods and flavor tips. I shared common mistakes and serving ideas to help you succeed. We also looked at variations, storage tips, and answered common questions. In summary, this dish is healthy, adaptable, and easy to prepare. Enjoy experimenting and making this pilaf your own!

Quinoa Vegetable Pilaf Flavorful and Healthy Dish

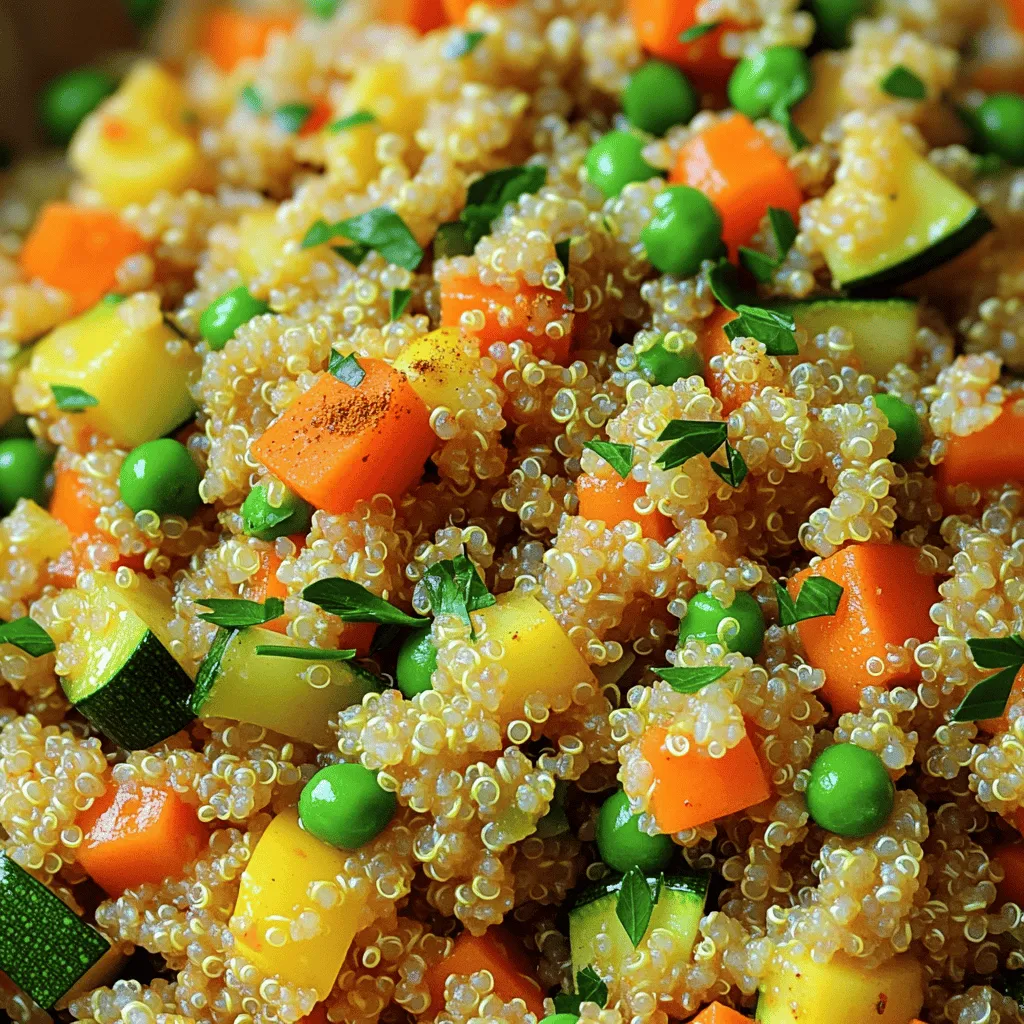
Are you ready to discover a dish that is both tasty and good for you? My Quinoa Vegetable Pilaf is

To make creamy avocado pasta, gather these fresh ingredients: - Ripe avocados - Garlic cloves - Fresh lemon juice - Basil leaves - Extra virgin olive oil - Sea salt and black pepper - Pasta selection (spaghetti or preferred shape) - Cherry tomatoes for garnish - Optional: crushed red pepper flakes These ingredients blend together to create a rich and silky sauce. Start with ripe avocados; they should feel soft to the touch. Garlic adds flavor, while lemon juice brightens the dish. Fresh basil gives it a lovely aroma. The extra virgin olive oil enhances the creaminess. Sea salt and black pepper are key for seasoning. Choose your favorite pasta shape, but spaghetti pairs best with this sauce. Cherry tomatoes add color and a fresh taste, making it visually appealing. If you like heat, sprinkle in some crushed red pepper flakes for a spicy kick. For the complete recipe, refer to the [Full Recipe]. To start, fill a large pot with water. Add a generous amount of salt to the water. Bring it to a rolling boil. Once the water boils, add 12 ounces of spaghetti. Cook it according to the package instructions. You want the pasta to be al dente, which usually takes 8 to 10 minutes. Before draining, remember to save half a cup of pasta water. Drain the spaghetti and set it aside in a large mixing bowl. Next, it's time to make the creamy avocado sauce. Grab a food processor and add the halved avocados, minced garlic, lemon juice, basil leaves, olive oil, sea salt, and black pepper. Blend the mixture on high speed. You want it to be smooth and creamy. If the sauce feels too thick, slowly add some of that reserved pasta water. Keep blending until you reach your desired creamy texture. Now, let's bring it all together. With the spaghetti still warm, pour the creamy avocado sauce over it in the mixing bowl. Toss the pasta gently. Ensure that every strand is coated with the sauce. If the pasta seems dry, add small amounts of the reserved pasta water. This will help achieve a silky texture that clings perfectly to the spaghetti. Enjoy the wonderful mix of flavors in your creamy avocado pasta. For the full recipe, you can refer to the earlier section. To get that perfect creamy texture, always reserve some pasta water. This water has starch that helps the sauce stick to the pasta. After blending your avocado sauce, add pasta water slowly until it feels just right. Next, balance the flavors with fresh lemon juice. The lemon adds a bright taste and lifts the dish. A pinch of salt and pepper also brings out the best in your sauce, making each bite delicious. When serving your creamy avocado pasta, consider garnishing with halved cherry tomatoes. Their bright color makes the dish pop. You can also add fresh basil leaves for a lovely touch. A drizzle of extra virgin olive oil before serving adds richness and makes the dish shine. These simple steps elevate your meal and impress your guests. You will need a few kitchen tools for this recipe. A good food processor is key for blending the avocado sauce smoothly. A large pot is also essential for cooking the pasta. For storage, keep leftovers in an airtight container in the fridge. This way, you can enjoy your creamy avocado pasta later without losing its great taste. {{image_4}} You can change the main ingredients for more variety. If you're out of avocados, use peas. They give a creamy texture too. You could also add Greek yogurt for a tangy twist. For herbs, try cilantro or parsley instead of basil. If you want heat, add a pinch of cayenne or smoked paprika. If you need gluten-free options, use rice or corn pasta. These work well with the sauce. For a healthier choice, consider zucchini noodles. They add a fresh crunch and lower carbs. You can spiralize zucchini easily at home. Another option is whole grain pasta for more fiber. To make a complete meal, serve the pasta with a light salad. A simple arugula salad pairs nicely. You can add a lemon vinaigrette for brightness. For wine lovers, a chilled Sauvignon Blanc complements the dish perfectly. It balances the creaminess of the pasta and adds a refreshing twist. To store leftover creamy avocado pasta, place it in an airtight container. This helps keep it fresh. You can refrigerate it for up to three days. To maintain texture and flavor, avoid mixing in extra sauce. Instead, store the sauce separately if you have any left. When you're ready to eat, simply combine them again. Can creamy avocado pasta be frozen? It’s not the best option. The avocado sauce can change in texture. However, if you must freeze it, make sure to use it within one month. Guidelines for thawing and reheating include placing it in the fridge overnight. When you reheat, do so gently on low heat. Add a splash of pasta water to help restore its creamy texture. For the best results, serve it fresh! To make creamy avocado pasta vegan, simply use plant-based ingredients. Start with ripe avocados. Replace the olive oil with a nut or seed oil if desired. You can skip the cheese or use a vegan cheese alternative. This dish remains creamy and rich without animal products. Yes, you can make the avocado sauce ahead of time. Store it in an airtight container in the fridge. To keep it from browning, add a bit more lemon juice on top. When you are ready to eat, just stir it to refresh the flavor. To boost nutrition, consider adding some veggies. Spinach or kale can blend well into the sauce. You can also top it with nuts or seeds for extra protein. Cherry tomatoes add vitamins and color, making the dish more appealing. In this blog post, we explored how to make creamy avocado pasta. We covered key ingredients, step-by-step cooking instructions, and helpful tips for the perfect dish. You learned about variations and storage options, ensuring a tasty meal every time. Remember, cooking is a fun way to express yourself. Don't hesitate to get creative with flavors and ingredients. Enjoy your time in the kitchen and savor every bite of this delicious dish!

Creamy Avocado Pasta Simple and Flavorful Dish

If you’re craving a quick and delicious meal, look no further! Creamy Avocado Pasta is a simple dish packed with

To make Vegan Cauliflower Buffalo Wings, you’ll need: - 1 large head of cauliflower, cut into bite-sized florets - 1 cup all-purpose flour (or opt for gluten-free flour for a GF version) - 1 cup non-dairy milk (almond or soy milk are excellent choices) - 1 teaspoon garlic powder - 1 teaspoon onion powder - 1 teaspoon smoked paprika - Salt and fresh cracked pepper, to taste - 1 cup buffalo sauce (choose store-bought or whip up your own) - 2 tablespoons coconut oil or vegan butter, melted - Fresh parsley, chopped, for garnish If you want to mix things up, you can switch some ingredients. Use chickpea flour instead of all-purpose flour for added protein. You can also try oat milk if you want a creamier texture. For added flavor, try adding a dash of cayenne pepper or chili powder. If buffalo sauce is too spicy, you can use BBQ sauce instead. These wings taste amazing with a cool vegan ranch dressing. Crispy celery sticks bring a nice crunch. You can also serve them with carrot sticks for a fresh bite. For a fun twist, pair them with a light salad. Enjoy the mix of flavors and textures! First, preheat your oven to 450°F (230°C). This step is key for a nice crisp. Next, line a baking sheet with parchment paper. This helps the wings not stick. In a large bowl, mix the dry ingredients. Combine the flour, garlic powder, onion powder, smoked paprika, salt, and pepper. Whisk them together until they blend well. Then, slowly add the non-dairy milk. Keep whisking until you have a smooth batter. It should feel like pancake batter. This will coat the cauliflower well. Take your cauliflower florets and dip each one into the batter. Make sure they are fully coated. Place them on your baking sheet in a single layer. This helps them bake evenly. Now, bake the cauliflower for about 20 minutes. You want them to turn golden and a bit crispy. Keep an eye on them. This is where the magic happens! While they bake, prepare your buffalo sauce. In a separate bowl, mix the buffalo sauce with melted coconut oil or vegan butter. Stir until they are well combined. This glaze adds a nice kick. After 20 minutes, take the baking sheet out of the oven. Grab a brush or spoon to coat each floret with the buffalo sauce mixture. Make sure they are well covered. For a more even glaze, toss them gently in a bowl. Return the cauliflower to the oven for another 10-15 minutes. Watch them until they are crispy and the glaze sets nicely. The aroma will drive you wild! Once done, take them out and let them cool for a few minutes. They will be too hot to eat right away. Enjoy your tasty Vegan Cauliflower Buffalo Wings as a perfect snack! To get that perfect crunch on your cauliflower wings, follow these tips: - Coat Well: Ensure each floret is fully coated in batter. This helps create a barrier for moisture. - High Heat: Bake at a high temperature of 450°F (230°C). This makes them crispy. - Single Layer: Spread the florets in a single layer on the baking sheet. This allows hot air to circulate. Baking times can vary based on your oven and the size of your florets. Here are some adjustments: - Smaller Florets: If your cauliflower pieces are smaller, reduce the initial baking time by 5 minutes. - Larger Florets: For bigger pieces, add a few extra minutes to ensure they cook through. - Check for Browning: Always check for a nice golden color before glazing for the best texture. To boost the flavor of your wings, try these ideas: - Add Spices: Mix in cayenne or chili powder to the batter for extra heat. - Herbs: Fresh herbs like rosemary or thyme can add depth to the flavor. - Different Sauces: Experiment with barbecue or teriyaki sauce instead of buffalo. This brings new tastes to your snack. For the complete recipe, check out the Full Recipe section. {{image_4}} You can easily make these Vegan Cauliflower Buffalo Wings gluten-free. Instead of all-purpose flour, use gluten-free flour. Almond flour or chickpea flour works well. This change keeps the flavor and texture while being safe for those with gluten allergies. If buffalo sauce isn't your thing, try other sauces. BBQ sauce adds a sweet twist. Teriyaki sauce offers a rich, savory flavor. You can mix sriracha for heat or a creamy vegan ranch for a cool dip. The options are endless, so feel free to experiment! You can enhance these wings with various seasonings. Try adding cumin for warmth or lemon zest for brightness. Smoked paprika gives a deep, smoky flavor. For a spicy kick, add cayenne pepper to the batter. This variety keeps the dish exciting and fun to make! To keep your Vegan Cauliflower Buffalo Wings fresh, store them in an airtight container. Make sure they cool down before sealing. They will stay good in the fridge for up to three days. If you want them to last longer, freezing is a great option. When you're ready to enjoy your wings again, preheat your oven to 350°F (175°C). Place the wings on a baking sheet and heat for about 10-15 minutes. This will help them regain their crispiness. You can also use an air fryer for a quicker option. Just cook them at 375°F (190°C) for about 5-7 minutes. You can freeze your wings if you have leftovers. Place them in a freezer-safe bag or container. They can last up to three months in the freezer. To reheat, let them thaw in the fridge overnight. Then follow the reheating instructions to bring back the crunch. Enjoy every bite! Yes, you can make these wings ahead of time. Prepare the cauliflower and coat it in the batter. Bake the wings for 20 minutes, then cool them completely. Store them in the fridge. When you're ready to eat, just coat them with buffalo sauce and bake again. Making homemade buffalo sauce is easy and fun. You need just a few ingredients. Start with 1 cup of hot sauce. Add 1/2 cup of melted vegan butter. Mix in a dash of garlic powder and a pinch of salt. Adjust the heat by adding more hot sauce if you like it spicier. These wings pair nicely with many sides. I love serving them with celery sticks and carrots. A creamy vegan ranch dressing is also a great dip. You could add some crunchy chips or a fresh salad for a full meal. Absolutely! These wings are great for meal prep. You can make a big batch and store them. Just reheat them in the oven when you want a snack. They stay tasty and crispy, making them a perfect grab-and-go treat. For the full recipe, check out the instructions above. In this post, we covered everything about making delicious vegan cauliflower buffalo wings. We went through the key ingredients, offering useful swaps and pairings. I shared clear steps for preparation, baking, and coating. You learned tips for crispiness and flavor enhancements. We also explored gluten-free options and storage methods. These wings are tasty, easy to make, and perfect for sharing. Enjoy crafting and personalizing them to suit your taste!

Vegan Cauliflower Buffalo Wings Tasty and Simple Snack

Craving a tasty snack that’s healthy and vegan? Look no further! My Vegan Cauliflower Buffalo Wings are simple to make

Creating a Strawberry Shortcake Trifle is fun and simple. Here’s what you need: - 2 cups fresh strawberries, hulled and sliced - 1/4 cup granulated sugar - 1 lemon, zested and juiced - 1 cup heavy whipping cream - 1/3 cup powdered sugar - 1 teaspoon pure vanilla extract - 1 pound sponge cake or angel food cake, cut into 1-inch cubes - 1 cup vanilla pudding (store-bought or homemade) - Fresh mint leaves, for garnish These ingredients work together to create layers of flavor and texture. The fresh strawberries bring brightness, while the cream adds richness. You can choose between sponge cake and angel food cake, depending on your preference. Both options are light and airy, making them perfect for layering. The combination of lemon zest and juice adds a refreshing twist. It balances the sweetness of the strawberries and cream. For an extra special touch, garnish your trifle with fresh mint leaves. They add a pop of color and a hint of herbal freshness. This recipe is perfect for gatherings or a special treat at home. Start with these ingredients, and you're on your way to a delightful dessert! For the complete recipe, check out the full recipe section. To start, you need to macerate the strawberries. Take two cups of fresh strawberries, hull them, and slice them. In a medium bowl, mix the strawberries with 1/4 cup of granulated sugar, the zest and juice of one lemon. Stir gently to coat the strawberries. This step is crucial. Allow them to sit for 15-20 minutes at room temperature. They will release their juices and create a sweet syrup. This syrup adds flavor and moisture to your trifle. Next, you will whip the cream. Pour 1 cup of heavy whipping cream into a bowl. Use an electric mixer or a whisk to whip the cream until soft peaks form. This means the cream should hold a shape but still be soft. Then, slowly add in 1/3 cup of powdered sugar and 1 teaspoon of pure vanilla extract. Keep whipping until you reach stiff peaks. This means the cream will hold its shape well and not fall flat. Now, it’s time to assemble your trifle. Choose a large glass trifle dish or individual serving glasses. Start by placing half of the sponge cake or angel food cake cubes at the bottom. Next, spoon half of the vanilla pudding over the cake layer. Follow this with half of the macerated strawberries and their syrup. Then, add half of the whipped cream on top. Repeat this layering with the remaining ingredients. Finish with a layer of whipped cream and garnish with fresh strawberries and mint leaves. Cover the trifle and chill it in the refrigerator for at least 2 hours. This helps all the flavors meld together. You’ll love the sweet layers! For the full recipe, check out the instructions above. Using clear glass for your trifle is key. It lets you show off the beautiful layers. Each layer tells a story of flavor and texture. You can also use individual glasses. This makes serving easy and fun. Garnish with mint leaves for a pop of color. A few fresh strawberries on top adds charm. This small touch makes a big difference. Chilling time is very important. It allows the flavors to blend and develop fully. Aim for at least two hours in the fridge. This rest time helps everything come together. For the cream, whip it until you see stiff peaks. This means it holds its shape well. If it’s too soft, it won’t layer nicely. Using cold bowls and utensils helps the cream whip better. Keep it simple; the goal is a light, airy texture. {{image_4}} You can switch things up for a lighter version of the strawberry shortcake trifle. Here are two easy swaps: - Using Greek yogurt instead of whipped cream: Greek yogurt adds creaminess and tang. It cuts fat and boosts protein. Use plain yogurt for a subtle taste. You can sweeten it with honey or maple syrup if you like. - Sugar substitutes for strawberries: If you want less sugar, use a sugar substitute. Options like stevia or agave syrup work well. They sweeten the berries without adding too many calories. Adjust to taste, as some substitutes may be sweeter than sugar. Get creative with flavors to make your trifle unique. Here are two fun ideas: - Adding other fruits like blueberries or raspberries: Mix in fresh blueberries or raspberries with the strawberries. They add vibrant color and a tangy twist. Layer different fruits for a burst of flavor in every bite. - Infusing flavors with mint or citrus: Add fresh mint leaves for a refreshing touch. You can also zest some lime or orange into the whipped cream. This will brighten the trifle and give it a zesty kick. Feel free to explore these variations to suit your taste. You can find the full recipe [here]. To keep your strawberry shortcake trifle fresh, store it in the fridge. Use an airtight container or cover it tightly with plastic wrap. This helps prevent the trifle from drying out. You can keep it in the fridge for about 2 to 3 days. After that, the layers may start to blend together, losing their distinct look. Can you freeze trifle? It's best not to freeze it. The cream and fresh fruit may change texture when thawed. If you freeze it, the whipped cream might become watery, and the strawberries could turn mushy. That said, you can freeze the sponge cake separately. Just let it cool completely, wrap it well, and it will last for up to 3 months. When you are ready, thaw it and assemble your trifle using the [Full Recipe]. Yes, you can make the trifle a day ahead. In fact, making it early helps the flavors blend well. Just assemble the trifle and cover it tightly. Store it in the fridge until you are ready to serve. This way, you save time and impress your guests. You can use frozen strawberries. Thaw them in the fridge overnight for the best flavor. Drain excess liquid before adding them to the trifle. This keeps the dessert from getting too soggy. You can also add a little sugar to enhance their sweetness after thawing. Both sponge cake and angel food cake work well. Sponge cake is richer and denser. It absorbs the juices well, making it soft and flavorful. Angel food cake is lighter and fluffier. It is great for a less heavy dessert. Choose based on your taste. You can add unique flavors to your trifle. Try mixing in different fruits like blueberries or raspberries. You can also add a splash of citrus juice for brightness. Experiment with flavored pudding or whipped cream. Each twist makes your trifle special and fun to enjoy. For the full recipe, check out Strawberry Shortcake Trifle Delight. This blog post covered making a delicious fruit trifle. We explored key ingredients like strawberries and whipped cream, step-by-step instructions, and helpful tips for presentation. You learned how to create layers that look great and taste amazing. Remember, you can customize the trifle with various fruits and healthier options. Enjoy experimenting with flavors and techniques! Your trifle will impress everyone and be a real treat. Keep these ideas in mind, and enjoy your tasty creation!

Strawberry Shortcake Trifle Delightful Layered Treat

Welcome to the sweet world of Strawberry Shortcake Trifle! This delightful layered treat combines juicy strawberries, fluffy cream, and cake

For this savory treat, you’ll need a few key ingredients: - 1 sheet of puff pastry, thawed - 2 cups fresh spinach, chopped - 1 cup feta cheese, crumbled - 1/4 cup cream cheese, softened - 1/4 cup grated Parmesan cheese - 1 clove garlic, minced - 1/2 teaspoon onion powder - 1/4 teaspoon black pepper - 1 egg, for egg wash - 1 tablespoon olive oil - Salt to taste These ingredients come together to make a delicious filling. The puff pastry will provide a flaky, crispy shell while the combination of cheeses gives a rich and creamy texture. If you want to mix things up, you can make some easy changes: - Cheese swaps: Try goat cheese or ricotta for a different flavor. - Serving sizes: You can use more or less filling based on how many you want to make. If you need six servings, stick to the recipe. If you need more, double the ingredients. Feel free to experiment with these ingredients to suit your taste! For the full recipe, check out the detailed steps above. 1. Preheating the oven and preparing the workspace First, preheat your oven to 400°F (200°C). This step is key for baking. While the oven heats, clear your workspace. Gather your ingredients and tools. You'll need a skillet, mixing bowl, and a rolling pin. 2. Cooking the spinach filling In a large skillet, heat 1 tablespoon of olive oil over medium heat. Add 1 clove of minced garlic. Sauté it for about 1 minute until it smells great. Then, add 2 cups of chopped spinach. Cook it for 2-3 minutes until it wilts. After that, remove the skillet from the heat and let it cool for a few minutes. 1. Rolling out the dough and cutting pastry squares On a lightly floured surface, roll out 1 sheet of thawed puff pastry. Aim for a thickness of about 1/8 inch. Use a sharp knife or pastry cutter to slice it into squares. Each square should be about 4 inches by 4 inches. 2. Filling and sealing the pastries Spoon a good amount of your spinach and feta filling into the center of each pastry square. Be careful not to overfill. Fold the corners over to seal the filling inside. Press the edges firmly to keep them closed. Place the filled pastries on a parchment-lined baking sheet. 1. Baking time and temperature Place the baking sheet in your preheated oven. Bake the pastries for 20-25 minutes. They should rise and turn golden brown. 2. Tips for achieving the perfect golden brown finish To get that lovely color, brush the tops with an egg wash made from 1 beaten egg. This makes them shiny and golden. Keep an eye on them while they bake. If they brown too fast, you can cover them loosely with foil. For more details, check out the Full Recipe. To avoid soggy pastry bottoms, follow these steps. First, always use a parchment paper lining on your baking sheet. This will help the heat circulate and keep the bottom crisp. Second, pre-bake the pastry squares for about 5 minutes before adding the filling. This step creates a barrier against moisture. To ensure even cooking and puff, keep the pastry thickness uniform. Roll it out to about 1/8 inch thick. If some areas are thicker, they may not cook evenly. Lastly, give each pastry enough space on the baking sheet. This allows them to puff up freely and not stick together. You can easily boost the flavor of your spinach and feta puff pastry. Consider adding spices like nutmeg or cayenne pepper for a kick. Fresh herbs such as dill or thyme can also add depth. Mix them into the filling for a unique touch. For pairing suggestions, serve your pastries with a tangy yogurt dip or a rich, creamy sauce. A side of marinara sauce can also bring a nice contrast to the savory flavors. These dips will enhance the overall taste and make each bite special. For the full recipe, don't forget to check the complete steps. {{image_4}} You can switch up the cheese for fun. Goat cheese adds a tangy flavor. Ricotta gives a creamy texture. Both work well with spinach. You can also add meats, like cooked chicken or ham. For a heartier dish, try diced bell peppers or mushrooms. Each change brings new tastes. If you need a gluten-free option, use gluten-free puff pastry. You can find it in most grocery stores. For a vegetarian option, just stick to spinach and cheese. To make it vegan, use plant-based cheese and skip the egg wash. You can brush the pastries with a splash of almond milk instead. These changes keep the dish tasty for everyone. To keep your savory spinach and feta puff pastry fresh, follow these tips: - Refrigeration: Place leftovers in an airtight container. This method helps keep the pastries moist and prevents them from drying out. - Freshness: For best taste, eat leftovers within 3 days. After this time, they may lose their flavor and texture. When you want to enjoy your leftovers, you have two main options: the oven or the microwave. - Oven: Preheat your oven to 350°F (175°C). Place the pastries on a baking sheet. Heat for about 10-15 minutes. This method keeps them crispy. - Microwave: If you’re in a hurry, use the microwave. Place pastries on a microwave-safe plate. Heat in short bursts of 30 seconds. However, this may make the pastry less crunchy. To maintain crunchiness, always consider reheating in the oven. It brings back that perfect flaky texture. Can I freeze these pastries? Yes, you can freeze these pastries. Once you prepare them, place them on a baking sheet. Freeze them until solid. Then, transfer them to a freezer bag. They can stay frozen for up to three months. When you want to enjoy them, bake directly from the freezer. You may need to add a few extra minutes to the baking time. How long do they last in the fridge? These pastries last about three days in the fridge. Store them in an airtight container to keep them fresh. Reheat them in the oven for the best taste. You can also warm them in the microwave, but the pastry may lose its crispness. What to do if the pastry doesn’t puff up? If the pastry doesn’t puff up, check your oven temperature. It should be hot enough at 400°F (200°C). Also, ensure you use fresh puff pastry. Thaw it properly in the fridge. Overworking the dough can also prevent puffing, so handle it gently. How can I prevent the filling from leaking? To prevent leaking, avoid overfilling your pastries. Seal the edges tightly by pressing them together. You can also use a fork to crimp the edges well. If you see excess moisture in your filling, drain it before using. This will help keep your pastries neat and tidy. In this article, we explored how to make delicious spinach and feta puff pastries. We discussed the key ingredients, from puff pastry to the savory spinach filling. You learned about prep steps, assembly, and how to bake them perfectly. We also shared tips for enhancing flavors and variations for different diets. Finally, we covered storage and reheating methods to keep your pastries fresh. Enjoy the tasty results and feel confident customizing your puff pastries with your favorite flavors!

Savory Spinach and Feta Puff Pastry Delight Recipe

Are you ready to elevate your snack game? This Savory Spinach and Feta Puff Pastry Delight recipe is a crowd-pleaser,

To make this delightful mousse, you need: - 2 ripe avocados - 1/2 cup unsweetened cocoa powder - 1/3 cup maple syrup (or agave syrup for a vegan twist) These main ingredients create a creamy, rich base. Ripe avocados give the mousse its smooth texture and healthy fat. Unsweetened cocoa powder adds that deep chocolate flavor. Maple syrup or agave syrup sweetens it just right. For a smooth blend, you can use: - 1/2 cup almond milk - Other alternatives like soy, coconut, or oat milk Almond milk works well, but feel free to choose any non-dairy milk you like. Each type adds a unique flavor. Coconut milk can give a tropical touch, while oat milk brings a creamier feel. You can dress up your mousse with: - Coconut whipped cream - Dark chocolate shavings - Fresh berries These toppings not only enhance the look but also add fun flavors. Coconut whipped cream adds a light sweetness. Dark chocolate shavings give a rich crunch. Fresh berries bring a burst of color and a hint of tartness. For the full recipe, check out the section above. To start, you must get ripe avocados. Look for ones with a slight give when gently squeezed. They should not be too hard or overly soft. How to slice and scoop: - Cut the avocado in half lengthwise. - Twist the two halves apart to separate them. - Use a spoon to scoop out the rich, green flesh. Now it’s time to blend! The order of additions matters. Start by adding the avocado first. Then, pour in the cocoa powder, maple syrup, almond milk, vanilla extract, and a pinch of sea salt. Importance of texture: Blend on high speed until smooth. You may need to pause to scrape the sides. If it’s too thick, add more almond milk, one tablespoon at a time. The goal is a creamy, dreamy mousse. You need to chill the mousse for at least 30 minutes. This step helps the flavors meld together. Best practices for serving presentation: Spoon the mousse into clear glass cups for a tempting look. Top with coconut whipped cream, dark chocolate shavings, or fresh berries. Add a mint leaf for color. This elevates your dessert and makes it even more inviting. To get the right texture for your mousse, use almond milk. If your mousse is too thick, add almond milk a little at a time. Blend it well after each addition. This will help it become smooth and creamy. For extra creaminess, blend until you can’t see any lumps. A high-powered blender works best for this. You can adjust the sweetness to your taste. If you want it sweeter, add more maple syrup. Blend it again to mix it well. You can also add fun flavors. A teaspoon of coffee or a drop of almond extract adds a nice twist. Try different flavors to find your favorite. Make your mousse look special with easy garnishes. Top it with coconut whipped cream or dark chocolate shavings. Fresh berries add color and taste, making it pop. Serve in clear cups to show off its rich color. You can even add a mint leaf for an extra touch. This makes the dessert look fancy for any occasion. {{image_4}} For a vegan or paleo mousse, you can easily change some ingredients. Use agave syrup instead of maple syrup. This keeps your mousse sweet and vegan-friendly. Choose coconut milk or cashew milk for a richer taste. If you want it paleo, avoid processed sugars. Use raw honey or date syrup instead. Focus on natural sweeteners to keep it clean. You can make your mousse unique with fun add-ins. Adding nut butters like almond or cashew gives it a creamy twist. You can also mix in spices like cinnamon or nutmeg for warmth. Want to swap flavors? Use dark chocolate instead of cocoa powder. This gives a deeper chocolate taste. You can even add a splash of espresso for a coffee kick! Seasonal fruits can make your mousse even better. In summer, top it with fresh berries like strawberries or raspberries. Fall calls for sliced apples or pears with a dash of cinnamon. For a holiday theme, try adding pumpkin spice or peppermint extract. These flavors can create a festive vibe for any gathering. Remember, you can find the full recipe [Full Recipe]. To keep your dairy-free chocolate avocado mousse fresh, store it in the fridge. Use an airtight container to prevent drying. If you have leftover mousse, cover it tightly with plastic wrap. This keeps air out and helps maintain its creamy texture. For freezing, place the mousse in an airtight container. Leave some space at the top. It may expand as it freezes. To thaw, move it to the fridge for a few hours. Stir well before serving. When stored properly in the fridge, the mousse lasts about 3 to 5 days. After this time, it may lose its flavor and texture. If you notice any discoloration or a sour smell, it’s best to toss it. These signs indicate spoilage. Leftover mousse can shine in other recipes. Use it as a filling for cakes or cupcakes. It also makes a great dip for fruit. You can layer it in parfaits with granola and berries. Get creative and enjoy every last bit! For the full recipe, check back to make this tasty treat. Yes, you can make this mousse ahead of time. In fact, it tastes better after chilling. To store it, place the mousse in airtight containers. Cover the tops with plastic wrap to prevent browning. Store in the fridge for up to three days. If you want to keep it longer, freeze it for about a month. Just remember to thaw in the fridge before serving. Avocados are nutrient-rich. They provide healthy fats, fiber, and vitamins. They are high in potassium, which helps regulate blood pressure. The healthy fats in avocados support heart health. Using them in desserts adds creaminess without dairy. Plus, they can help you feel full longer, making this mousse a smart choice. Yes, this mousse is great for kids! It’s naturally sweet and creamy. Plus, it has good fats from avocados. Kids often love the chocolate flavor. Be mindful of any allergies, especially to nuts in almond milk. This mousse can fit various dietary needs, making it a tasty treat for everyone. For the full recipe, check out the complete guide. This blog post showed you how to make a delicious avocado mousse. We explored the best ingredients, like ripe avocados and cocoa powder, that create a rich flavor. You learned about blending techniques and how to chill the mousse for perfect texture. Don't forget the fun tips for customizing your dessert with toppings or seasonal ingredients. Try different variations to keep it exciting. This mousse is easy to store and great for sharing. Enjoy this treat that is tasty, healthy, and fun to make!

Dairy-Free Chocolate Avocado Mousse Easy Delight

Looking for a tasty dessert that’s both creamy and dairy-free? Try my easy Dairy-Free Chocolate Avocado Mousse! With ripe avocados

- 12 oz (340 g) fettuccine or spaghetti - 2 tablespoons extra virgin olive oil - 1 small onion, finely chopped - 3 cloves garlic, minced - 8 oz (225 g) assorted mushrooms (cremini, shiitake, and button), sliced - 4 cups vegetable broth - 1 cup heavy cream or coconut cream (for a dairy-free option) - 1 teaspoon dried thyme - 1 teaspoon dried oregano - Salt and black pepper to taste - 1/2 cup grated Parmesan cheese (optional; omit for a nut-free version) - Fresh parsley, chopped, for garnish You can change this dish! Add more veggies like spinach or cherry tomatoes. For extra flavor, try adding a splash of white wine. If you want protein, grilled chicken or shrimp works great. You can even make it spicy with red pepper flakes. To make this creamy pasta, you need a large, deep pot. A sharp knife and cutting board help with prep. A wooden spoon is perfect for stirring. Lastly, a measuring cup and spoons ensure you get the right amounts. This simple dish is fun to make, and it tastes amazing! Check out the Full Recipe for complete instructions. Start by heating the olive oil in a large pot over medium heat. Once hot, add the finely chopped onion. Sauté it for about 5 minutes. You want the onion to look soft and clear. Next, add the minced garlic. Stir it in for about a minute. The smell will be amazing! Now, it’s time for the mushrooms. Add the sliced mushrooms to the pot. Stir them often for about 5 to 7 minutes. They should become soft and turn golden brown. After that, mix in the fettuccine or spaghetti. Pour in the vegetable broth and sprinkle the thyme, oregano, salt, and black pepper. Stir everything well. Increase the heat to a boil, then lower it to a gentle simmer. Cover the pot and let it cook for 10 to 12 minutes. Stir it occasionally to avoid sticking. When the pasta is just right, lower the heat again. Slowly stir in the heavy cream. If you prefer dairy-free, use coconut cream. Heat it for 2 to 3 minutes while stirring. If you want a richer taste, add the grated Parmesan cheese now. Stir until it melts into the sauce. Taste it and add more salt or pepper if needed. Finally, remove the pot from heat. Serve it hot and sprinkle fresh parsley on top for a nice touch. For the full recipe, check above. To get a rich and creamy texture, keep the heat moderate. Start with medium heat when cooking the onions and garlic. This helps build flavor without burning. Once you add the broth and pasta, bring it to a boil. Then, lower the heat to a gentle simmer. This way, the pasta cooks evenly and absorbs all the flavors. Stir often to avoid sticking. If the sauce seems too thick, add a bit more broth or cream. Mushrooms add depth to your dish. I love using a mix of cremini, shiitake, and button mushrooms. Cremini mushrooms offer a nice earthy taste. Shiitake mushrooms add a rich umami flavor. Button mushrooms are mild and soft. Choose fresh mushrooms that are firm and dry. Avoid any that look slimy or dark. For extra flavor, slice them thick. This way, they hold their shape during cooking. Serve this dish hot in shallow bowls. Top it with fresh parsley for color. You can also sprinkle extra Parmesan cheese on top. Pair it with a simple green salad for a well-rounded meal. A glass of white wine complements this pasta perfectly. If you want a crunch, add toasted pine nuts or walnuts. For a twist, serve with a side of garlic bread. You can find the full recipe above to create this tasty meal! {{image_4}} You can easily make this dish gluten-free. Use gluten-free pasta instead of regular. Brown rice or quinoa pasta works well. For a dairy-free version, switch heavy cream for coconut cream. It adds a nice flavor and keeps the dish creamy. You can also skip the cheese or use a dairy-free cheese. This way, everyone can enjoy the meal. Want to add protein? Chicken, shrimp, or tofu are great choices. If you use chicken, sauté it first until fully cooked. For shrimp, add them after the mushrooms. They cook fast and blend well with the flavors. Tofu is a great plant-based option. Just cube it and sauté with the mushrooms. This adds texture and makes the dish more filling. Adding seasonal veggies boosts the dish's color and nutrition. Think about spinach, peas, or bell peppers. You can stir them in when you add the pasta. They cook quickly and add freshness. Try to choose veggies that are in season for the best taste. This makes your creamy mushroom pasta not just delicious but also colorful and fun. For the full recipe, check out the provided link. To keep your creamy mushroom pasta fresh, store it in an airtight container. Let it cool before sealing. Place the container in the fridge. It will last for about three days. If you want to enjoy it later, freezing is a great option. When reheating, add a splash of vegetable broth or cream. This helps restore the creamy texture. Heat the pasta in a pan over low heat. Stir gently to mix in the liquid. You can also use a microwave; just cover it loosely. Heat in short bursts, stirring in between. To freeze, portion the pasta into smaller containers. Leave some space at the top, as it will expand. Wrap each container tightly with plastic wrap. Label them with the date. When ready to eat, thaw in the fridge overnight. Reheat on the stove or microwave, adding a bit of broth or cream for creaminess. Enjoy the flavors anytime! For the full recipe, check out the earlier sections of this article. Yes, you can use any pasta you like. I often use penne or fusilli. These shapes hold sauce well and add texture. Just remember to adjust the cooking time based on the type of pasta you choose. For example, thinner pastas like angel hair cook faster than fettuccine. To add heat, try using red pepper flakes. Start with a pinch and adjust to taste. You can also add diced jalapeños or crushed chili peppers. These will bring extra flavor as well as spice. Experiment with how much heat you like. If you want a lighter option, use coconut cream or almond milk. Both provide a creamy texture. You can also use Greek yogurt for a tangy twist. Just be careful with the heat, as yogurt can curdle if it gets too hot. For the best results, add it at the end and stir gently. For the Full Recipe, check out the ingredients and instructions above. Enjoy cooking! This article showed you how to make one-pot creamy mushroom pasta. We covered main and optional ingredients, plus the tools you need. I shared step-by-step instructions for cooking and added useful tips to get the best flavors. You can customize the dish and store it for later. Now, you can create a tasty meal with ease. Enjoy trying different ingredients or variations. Cooking should be fun, so get creative!

One-Pot Creamy Mushroom Pasta Simple and Delicious Dish

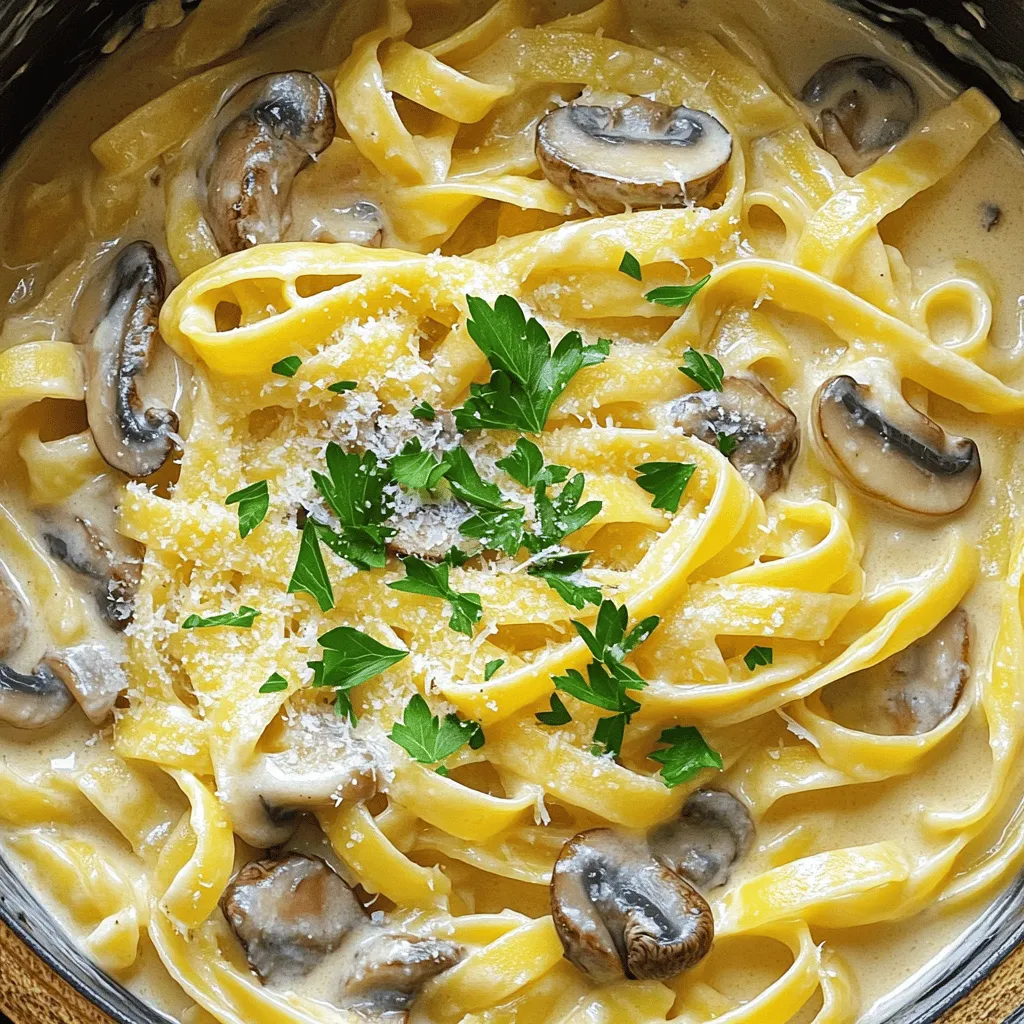
If you’re craving a warm, creamy dish that’s easy to make, look no further. This One-Pot Creamy Mushroom Pasta is

Let's dive into the fresh and vibrant ingredients for Zucchini Noodles with Pesto. Each item plays a key role in creating a dish that's both tasty and healthy. - 3 medium zucchinis, spiralized - 1 cup fresh basil leaves, packed - 1/4 cup pine nuts, lightly toasted - 1 clove garlic, minced - 1/4 cup extra virgin olive oil - 1/4 cup grated Parmesan cheese (or nutritional yeast for a vegan option) - Sea salt and freshly cracked black pepper, to taste - 1 cup cherry tomatoes, halved (for garnish) - Additional pine nuts, for garnish Each ingredient adds its unique flavor. Zucchini serves as a light base, while basil brings a fresh taste. Pine nuts add a nutty crunch, and garlic gives a hint of warmth. Olive oil enriches the dish, and Parmesan cheese provides a savory kick. The salt and pepper enhance all the flavors. Finally, the cherry tomatoes brighten up the plate, making it inviting. For the full recipe, you can refer to Zesty Zucchini Noodles with Basil Bliss . This dish is not just easy; it also highlights the beauty of fresh ingredients. Enjoy making it! To start, grab three medium zucchinis. Use a spiralizer to turn them into long, noodle-like strands. This process is fun and easy! Once you spiralize all the zucchinis, place them in a colander. Set the colander over the sink or a bowl. This lets the excess moisture drain out while you prepare your pesto. Next, let’s make the pesto. In a food processor, add one cup of fresh basil leaves, a quarter cup of lightly toasted pine nuts, and one clove of minced garlic. Pulse these ingredients until they are finely chopped. Then, with the food processor running, slowly drizzle in a quarter cup of extra virgin olive oil. This step gives the pesto its creamy texture. Finally, add a quarter cup of grated Parmesan cheese or nutritional yeast. Also, add a pinch of sea salt and freshly cracked black pepper. Pulse a few more times to mix everything well. Now it’s time to cook the zucchini noodles. Heat a large skillet over medium heat. Add the spiralized zucchini and sprinkle with a little sea salt. Sauté them for about 2 to 3 minutes. You want them to soften but still have a slight crunch. After cooking, remove the skillet from the heat. Add your prepared basil pesto to the noodles. Gently toss everything together until the noodles are well coated in the bright green pesto. For a beautiful presentation, mound the zucchini noodles on each plate. Garnish with halved cherry tomatoes and additional toasted pine nuts. This dish not only tastes great but looks amazing too! For the full recipe, check out the details above. To avoid sogginess, first drain your spiralized zucchini. Place them in a colander for a few minutes. This helps remove extra moisture. You can also sprinkle a little sea salt to draw out more water. For the best cooking time, sauté the noodles for just 2-3 minutes. You want them to be tender but still have a nice crunch. Overcooking can make them mushy, which we want to avoid. To add extra flavors to your pesto, consider a splash of lemon juice. It brightens the taste and adds freshness. Nutritional yeast also brings a cheesy flavor, perfect for vegan diets. If you have allergies, you can swap pine nuts for sunflower seeds or walnuts. And if you need a cheese substitute, nutritional yeast works great for a vegan option. For serving, use a wide, shallow dish. This allows the vibrant colors to shine and makes it look appealing. You can pair the zucchini noodles with grilled chicken, shrimp, or roasted vegetables for added protein. A light salad on the side also complements this dish well. If you're looking for the full recipe, check out the [Full Recipe]. {{image_4}} You can switch up the nuts in your pesto. Try using walnuts or cashews instead of pine nuts. Each nut adds a unique flavor and texture. You can also change the greens. Spinach or arugula work well in place of basil. These swaps keep the dish fresh and exciting. Want a spicy kick? Add red pepper flakes to your pesto. This small change can bring big flavor. You can also add seasonal veggies like roasted bell peppers or zucchini. Mixing these in boosts the nutrition and taste of your dish. You can serve your zucchini noodles raw for a crunchy bite. This keeps the noodles fresh and full of nutrients. If you prefer a softer texture, lightly cook them in a skillet. For a different twist, consider an oven-baked version. Bake the noodles with pesto for a warm, comforting meal. Each method offers a new way to enjoy this classic dish. For the full recipe, check out the link! To keep your zucchini noodles fresh, place them in an airtight container. Store them in the fridge for up to three days. If you have leftover pesto, it can also go in a separate container. For reheating, use a skillet over low heat. This warms the noodles without making them mushy. Stir gently to mix in the pesto again. If you want to freeze zucchini noodles, first blanch them in boiling water for one minute. Then, cool them in ice water and drain well. Place the noodles in freezer bags, squeezing out air. You can freeze pesto too! Pour it into ice cube trays and freeze until solid. Once frozen, pop the cubes into a bag for easy use later. Your zucchini noodles with pesto can stay fresh for about three days in the fridge. Look for any signs of spoilage, like a sour smell or slimy texture. If you see these signs, it’s best to throw it away. Always trust your senses when checking for freshness. Zucchini noodles, often called "zoodles," are made from fresh zucchini. I spiralize the zucchini to create long, noodle-like shapes. They are low in carbs and calories, making them a great pasta alternative. Zoodles are rich in vitamins A and C. They also add a nice crunch to dishes. You can enjoy them raw or cooked. Their mild taste pairs well with many sauces. Yes, you can easily make this dish vegan. Instead of Parmesan cheese, use nutritional yeast. It gives a cheesy flavor without dairy. You can also swap the olive oil with avocado oil if you prefer. The rest of the ingredients, like fresh basil and garlic, are already vegan-friendly. This keeps the dish light and flavorful. To make a healthier pesto, you can reduce the olive oil to cut fat. Use less cheese or skip it entirely. You can add more greens like spinach or kale. These add nutrients without many calories. Blend in some lemon juice for a fresh taste. This will brighten the flavors while keeping it healthy. Zucchini noodles with pesto go well with many sides. Try a simple green salad with lemon dressing. Roasted vegetables also match nicely. Grilled chicken or shrimp can add protein. If you want something lighter, serve it with a bowl of soup. These options bring out the flavors in your dish and make a complete meal. This blog post covered how to make delicious zucchini noodles with pesto. We explored the fresh ingredients, step-by-step instructions, and helpful tips. You learned ways to customize your dish with variations. We also discussed storage methods to keep your meal fresh. Enjoying healthy meals can be easy and fun. I hope you try this recipe and make it your own!

Zucchini Noodles with Pesto Fresh and Flavorful Dish

Looking for a fresh and tasty dish? Zucchini noodles with pesto are a game changer! This light meal packs flavor

To make peanut butter chocolate chip blondies, gather these items: - 1 cup creamy peanut butter - 1/2 cup packed brown sugar - 1/4 cup granulated sugar - 1/2 cup coconut sugar (or substitute with additional brown sugar) - 2 large eggs, at room temperature - 1 teaspoon pure vanilla extract - 1 teaspoon baking powder - 1/2 teaspoon baking soda - 1/4 teaspoon sea salt - 1 cup all-purpose flour - 1/2 cup semisweet or dark chocolate chips - Optional: 1/4 cup chopped nuts (such as walnuts or peanuts) Choosing quality ingredients makes a big difference. Here are some tips: - Peanut Butter: Use creamy peanut butter for smooth texture. Natural brands work, but check for added sugar. - Sugars: Using a mix of sugars adds depth. Brown sugar gives moisture, while granulated sugar adds crispness. - Chocolate Chips: Select your favorite chocolate type. Dark chocolate adds richness, while semisweet is classic. - Eggs: Room temperature eggs blend better. They help to create a fluffy blondie. You can swap ingredients if needed: - Peanut Butter: Use almond or cashew butter for a different flavor. - Sugars: If you don’t have coconut sugar, just use more brown sugar. - Flour: For a gluten-free option, use a gluten-free flour blend. - Eggs: Use flax eggs (1 tablespoon flaxseed meal + 2.5 tablespoons water = 1 egg) for a vegan choice. - Add-ins: Feel free to add dried fruits or seeds for a healthy twist! These choices help you tailor the recipe to your taste and needs. For the full recipe, check out the linked section. First, set your oven to 350°F (175°C). This step ensures your blondies bake evenly and rise well. Grab an 8x8 inch baking pan. You can grease it lightly or line it with parchment paper. Lining helps you remove the blondies easily later. In a large bowl, mix the creamy peanut butter, packed brown sugar, granulated sugar, and coconut sugar. Use a spatula or an electric mixer to blend until smooth. Next, add the eggs one at a time. Make sure to mix well after each egg. Then, stir in the pure vanilla extract. In another bowl, whisk the baking powder, baking soda, sea salt, and all-purpose flour together. This step helps distribute the dry ingredients evenly. Gradually add this dry mixture to the peanut butter mixture. Stir gently until combined, but don't overmix. The batter should stay soft and tender. Finally, fold in the chocolate chips and nuts if you want. Pour the blondie batter into your prepared pan. Use a spatula to smooth the top. Place the pan in the oven and bake for 20-25 minutes. Check if they are done by inserting a toothpick in the center. It should come out mostly clean; a few crumbs are okay. After baking, let the blondies cool in the pan for about 10 minutes. Then, move them to a wire rack to cool completely. Slice into 16 squares when they are cool. Enjoy your delicious treat! For the full recipe, check the details above. To get the best texture in your blondies, remember a few key points. First, use creamy peanut butter for smoothness. This gives your blondies a rich, velvety feel. Next, mix the batter just until combined. Overmixing can make them tough. Lastly, bake them until the edges are golden brown. If they are too soft in the middle, they will firm up as they cool. These blondies are great warm or at room temperature. For a fun twist, top them with a scoop of vanilla ice cream. Drizzle warm chocolate sauce on top for extra sweetness. You can also sprinkle some crushed peanuts for a nice crunch. Serve them at parties or enjoy them as an afternoon snack. Sometimes, blondies can turn out too dry or too gooey. If they are dry, check your oven temperature. Ovens can vary, and they may bake faster than you think. For gooey blondies, ensure you bake them a bit longer. A toothpick should come out with a few moist crumbs, not wet batter. If they puff up too much, reduce the baking powder slightly in your next batch. For the full recipe, you can check the specific steps to make these delicious treats! {{image_4}} To boost the flavor, try adding a pinch of cinnamon or nutmeg. These spices blend well with peanut butter. You can also switch the chocolate chips for white chocolate or butterscotch chips. Both add a nice twist to the blondies. For an extra kick, mix in a tablespoon of instant coffee or espresso powder. This gives a rich depth to the taste. You can easily make these blondies vegan. Replace the eggs with flax eggs. Mix one tablespoon of ground flaxseed with three tablespoons of water. Let it sit for five minutes until it thickens. For a gluten-free option, substitute the all-purpose flour with a gluten-free blend. Make sure the baking powder is gluten-free too. Get creative with your add-ins! You can mix in chopped nuts like walnuts or pecans for a crunch. Dried fruit, like cranberries or cherries, adds a sweet and tangy twist. Top the blondies with sea salt right before baking for a sweet-salty combo. For serving, consider drizzling with melted chocolate or a scoop of ice cream. These simple touches make the blondies even more special. For the full recipe, check out the details above. To keep your peanut butter chocolate chip blondies fresh, store them in an airtight container. This helps them stay moist and soft. You can place a piece of parchment paper between layers to prevent sticking. Store them at room temperature for up to three days. If you want them to last longer, refrigerate them for up to a week. To enjoy warm blondies, reheat them in the microwave. Place one blondie on a microwave-safe plate. Heat it for about 10-15 seconds. Check to see if it's warm enough. Avoid overheating, or the blondie could become tough. You can also warm them in the oven. Preheat the oven to 350°F (175°C). Place the blondies on a baking sheet for about 5-7 minutes. These blondies can last up to a week in the fridge. For longer storage, you can freeze them. Wrap each blondie tightly in plastic wrap, then place them in a freezer bag. They can stay fresh for about three months in the freezer. When you're ready to enjoy one, let it thaw overnight in the fridge. You can also warm it up afterward. For more detailed instructions, check the Full Recipe. Yes, you can use natural peanut butter. Natural peanut butter has less sugar and no added oils. This might change the texture a bit. Your blondies may be a little drier. To fix this, add a bit more sweetener or oil. I enjoy using natural peanut butter for its pure taste. You can tell when your blondies are done by checking the edges. They should be lightly golden. Insert a toothpick into the center. If it comes out mostly clean, they are ready. Some moist crumbs are okay for a fudgy texture. Keep an eye on the time. Check around 20 minutes. Yes, you can make these blondies ahead of time. They taste great after a day or two. Just store them in an airtight container at room temperature. You can also freeze them for later. They stay fresh for up to three months. Just let them cool completely before wrapping. For the full recipe, refer to the recipe section. In this post, we explored how to make delicious blondies. We discussed the right ingredients and tips for choosing them. You learned step-by-step how to bake, cool, and serve them perfectly. We also shared ways to add flavors and adapt them for diets. Remember, storing blondies properly ensures they stay fresh longer. Follow these steps for sweet treats your friends will love. Enjoy baking and sharing your creations!

Peanut Butter Chocolate Chip Blondies Simple Treat

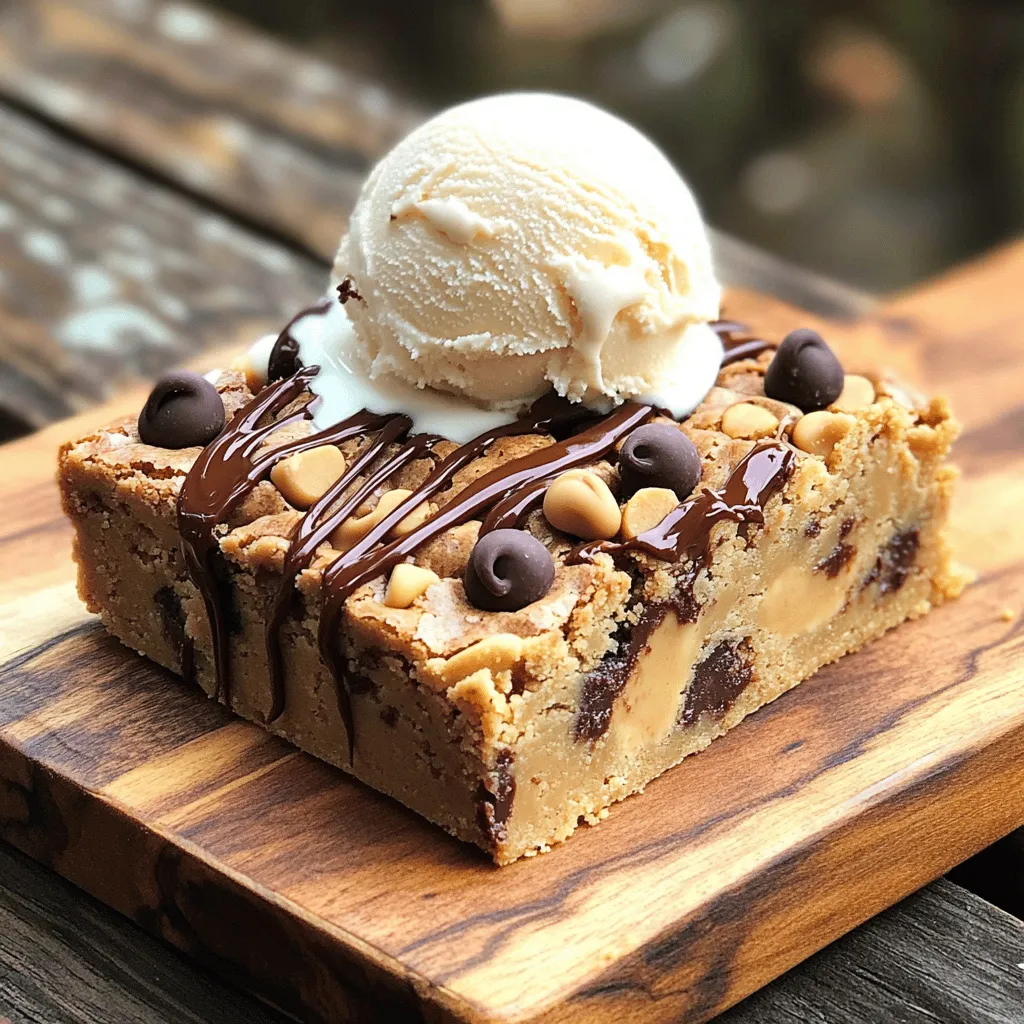
Craving a sweet treat that’s both easy and delicious? You’re in the right place! My Peanut Butter Chocolate Chip Blondies

Older posts
Newer posts
← Previous Page1 … Page73 Page74 Page75 … Page86 Next →

dsad

© 2026 yumymoments • Built with GeneratePress

Our Policies

  • Copyright Policy
  • Cookie Policy
  • GDPR Policy
  • Privacy Policy
  • Disclaimer
  • Terms Of Use

More Information

  • Home
  • About
  • Contact
  • Appetizers
  • Dessert
  • Dinner
  • Drinks
©2026, yumymoments About Back To Top