Skip to content
DisclaimerTerms Of UseGDPR PolicyCookie Policy

yumymoments

  • Home
  • Drinks
  • Appetizers
  • Dinner
  • Dessert
  • About
  • Contact
  • Privacy Policy
DisclaimerTerms Of UseGDPR PolicyCookie Policy

NO-ING-IMG

- 8 ounces elbow macaroni - 2 tablespoons unsalted butter - 2 tablespoons all-purpose flour - 2 cups whole milk - 1 cup sharp cheddar cheese, freshly grated - 1 cup Gruyère cheese, freshly grated - ½ cup Parmesan cheese, freshly grated - 1 teaspoon garlic powder - 1 teaspoon onion powder - ½ teaspoon smoked paprika - Salt and black pepper to taste - ½ cup panko breadcrumbs - 2 tablespoons olive oil - Fresh chives, finely chopped for garnish - Additional cheese varieties - Spicy ingredients (e.g., jalapeños) - Protein additions (e.g., bacon or chicken) When making the best mac and cheese, using fresh, quality ingredients is key. The elbow macaroni serves as a great base, holding the cheese sauce well. I always choose sharp cheddar for its bold flavor, but Gruyère adds a nutty twist. Parmesan gives it depth, too. For the sauce, I start with butter and flour. This creates a roux, which thickens the sauce. Whole milk makes it rich and creamy. I also love to add garlic and onion powders for flavor. A sprinkle of smoked paprika adds warmth without too much heat. Don’t forget about the crunchy topping! Panko breadcrumbs mixed with olive oil create a golden crust that contrasts with the creamy pasta. You can also mix in some fresh chives for color and taste. Feel free to get creative! You can add different cheeses, spicy elements, or proteins to make it your own. For the full recipe, check out the Ultimate Gourmet Mac & Cheese. - Preheat the oven to 350°F (175°C). - Cook the pasta according to package instructions. - Create the roux and add milk. - Incorporate cheeses and seasonings. To create the roux, melt the butter in a medium saucepan over medium heat. Once melted, whisk in the flour. Cook this mixture for about one to two minutes. It should turn slightly golden and smell nice. Next, pour in the whole milk slowly while whisking. This helps avoid lumps. Keep stirring until the sauce starts to simmer and thickens. This should take about three to five minutes. Now, take the saucepan off heat and add the cheeses. Stir in sharp cheddar, Gruyère, and Parmesan until they melt into a creamy sauce. Finally, mix in garlic powder, onion powder, smoked paprika, salt, and black pepper. Adjust the seasoning to suit your taste. - Mix pasta with cheese sauce. - Prepare the crunchy topping. - Bake until golden brown. Gently fold the cooked macaroni into the cheese sauce. Make sure every piece of pasta gets coated in that rich cheese goodness. For the crunchy topping, combine panko breadcrumbs and olive oil in a small bowl. Mix until the breadcrumbs are fully coated. This will add a nice crunch when baked. Pour the macaroni and cheese mixture into a greased 9x13 inch baking dish. Spread it out evenly. Next, sprinkle the panko topping over the mac and cheese for a crispy finish. Now, place the dish in your preheated oven. Bake for 20 to 25 minutes. You want the top to turn golden brown and for the mac and cheese to bubble. Let it cool slightly after baking. This will make serving easier. You can garnish with freshly chopped chives for extra flavor and a pop of color. For the complete dish, check out the Full Recipe. To make a smooth cheese sauce, start with a good roux. Melt the butter in a pan over medium heat. Whisk in the flour until it looks golden. Cook this mixture for just a couple of minutes. This helps avoid lumps later. When you add milk, pour it in slowly while whisking. This keeps the sauce creamy. Stir until it thickens. Aim for a sauce that coats the back of a spoon. Adding herbs and spices can boost flavor. Try mixing in a pinch of thyme or a dash of cayenne for warmth. You can also use garlic powder or onion powder for depth. For cheese, blend sharp cheddar, Gruyère, and Parmesan. This mix offers rich taste and great melt. Feel free to swap in your favorites, like mozzarella or pepper jack, for new twists. Presentation matters! For a gourmet touch, serve mac and cheese in small ramekins. Top each with extra cheese or herbs for a pop of color. Pair it with a fresh salad or roasted veggies. These sides add balance to the rich dish. You can also serve crusty bread for dipping. It makes the meal feel cozy and complete. For the complete recipe, check the Full Recipe section! {{image_4}} The main difference between classic and gourmet mac & cheese lies in the cheese choices. Classic recipes often use American cheese, which melts well but lacks depth. Gourmet versions use a blend of cheeses like sharp cheddar, Gruyère, and Parmesan. This mix adds rich flavors and a creamy texture. For dietary preferences, you can find gluten-free pasta made from rice or corn. It works well with any cheese sauce. If you want vegan mac & cheese, use cashew cheese or nutritional yeast. Both options give a great cheesy taste without dairy. To elevate your mac & cheese, consider popular add-ins. Ingredients like crispy bacon, sautéed mushrooms, or fresh spinach can enhance flavor. You might also try mixing in roasted garlic or caramelized onions for added depth. For unique flavor combinations, experiment with jalapeños for spice or sun-dried tomatoes for a tangy twist. Each addition brings something special, making your dish stand out. Mac & cheese comes in many styles worldwide. Classic American mac & cheese is creamy and cheesy, often baked with a golden crust. In the South, you might find it made with Velveeta for a smooth texture. In Italy, a similar dish called "pasta al forno" features pasta baked with béchamel sauce and cheese. The British version, "macaroni cheese," often includes a breadcrumb topping. Each style showcases local flavors and culinary traditions, giving you plenty of ways to enjoy this comfort food. To store leftover mac & cheese, let it cool first. Place it in an airtight container. This keeps it fresh and tasty. In the fridge, it lasts about 3 to 5 days. If you want to keep it longer, think about freezing. To freeze mac & cheese, use a freezer-safe container. Make sure to leave some space for expansion. You can freeze it for up to 3 months. When you're ready to eat, move it to the fridge to thaw overnight. To reheat mac & cheese, use the oven or stovetop. If you use the oven, preheat it to 350°F. Cover the dish with foil to keep moisture in. Bake for about 20 minutes. For stovetop reheating, add a splash of milk and stir over low heat. This helps keep it creamy. If it gets too thick, add a bit more milk. Enjoy your cozy comfort food! To make your mac and cheese creamier, use more dairy. You can add extra whole milk or cream. Cream cheese also adds a rich texture. Mixing in sour cream gives a nice tang. For a cheesy boost, sprinkle in more shredded cheese. These options will make your dish silky and smooth. Yes, you can use many types of pasta. Bowtie, penne, or shells work well. Choose a shape that holds the cheese sauce. Each type adds a unique twist to your mac and cheese. Just make sure to cook it al dente. Sharp cheddar is popular for its strong flavor. Gruyère adds a nutty taste, while Parmesan gives a savory kick. You can also mix cheeses for more depth. Try mozzarella for stretchiness or pepper jack for heat. Combining different cheeses enhances the dish. Reheat your mac and cheese slowly. Use low heat on the stove or microwave. Add a splash of milk to keep it creamy. Stir often to avoid burning. If using the oven, cover it with foil to keep moisture in. Yes, you can make mac and cheese gluten-free. Use gluten-free pasta made from rice or quinoa. Be sure to check all other ingredients. Some cheeses and sauces may contain gluten. Always read labels to ensure your dish is safe to eat. For the full recipe, check out the Ultimate Gourmet Mac & Cheese! In this guide, we explored how to make the perfect mac and cheese. You learned about the key ingredients, from pasta to various cheeses, and discovered step-by-step instructions. Tips for enhancing flavor and serving ideas added flair to the dish. We also covered delicious variations and storage tips. Whether you enjoy classic or gourmet styles, there’s a way for you to elevate your mac and cheese experience. Now, it’s time to gather your ingredients and create a comforting meal that everyone will love. Enjoy cooking!

The Best Mac & Cheese Flavorful Comfort Food Recipe

Who doesn’t love a warm, cheesy bowl of mac and cheese? In this post, I’ll share my favorite recipe that

To make this 30 Minute Tomato Gnocchi with Burrata, you will need the following items: - 1 pound gnocchi (store-bought or homemade) - 2 cups cherry tomatoes, halved - 3 cloves garlic, finely minced - 2 tablespoons extra virgin olive oil - 1 teaspoon red pepper flakes (optional for heat) - Sea salt and freshly cracked black pepper to taste - 1 cup fresh basil leaves, torn into pieces - 8 ounces burrata cheese, at room temperature - 2 tablespoons balsamic glaze (optional for garnish) You can swap some ingredients if needed. Here are some ideas: - Use regular pasta instead of gnocchi. - Any tomato variety works if you lack cherry tomatoes. - Minced shallots can replace garlic for a milder taste. - Olive oil can be switched with avocado oil for a different flavor. - Skip the red pepper flakes if you want a milder dish. - Use mozzarella if burrata is hard to find. Fresh ingredients make a big difference in flavor. Here’s why they matter: - Fresh tomatoes burst with flavor and sweetness. - Fresh garlic adds a strong, vibrant taste. - Fresh basil brings a fragrant, herbal note. - Burrata offers a creamy texture that elevates the dish. - Using fresh ingredients also supports local farmers and markets. - They help you create a meal that looks and tastes amazing. For the full recipe, check out [Full Recipe]. To start, I boil salted water in a large pot. When it reaches a rolling boil, I add the gnocchi. If you use store-bought gnocchi, they usually float within 2-3 minutes. This means they are ready. I drain them in a colander and set them aside. This step ensures the gnocchi is soft and light for the dish. Next, I heat extra virgin olive oil in a large skillet over medium heat. I add minced garlic and red pepper flakes for a kick. I let this cook for about 30 seconds until the garlic gets fragrant. I then toss in the halved cherry tomatoes. I season them with sea salt and black pepper. I cook this mixture for about 5-7 minutes, stirring often. The goal is to soften the tomatoes and let them release their juices, forming a nice sauce. Once the tomatoes are ready, I gently fold in the drained gnocchi. I make sure every piece is coated in that tasty tomato sauce. I keep cooking for another 2 minutes just to warm everything through. After that, I remove the skillet from the heat. I add torn basil leaves for a fresh touch. I then serve the gnocchi into plates and top each with a generous piece of burrata cheese. This creamy cheese melts into the warm gnocchi, making every bite rich and flavorful. You can drizzle balsamic glaze for a sweet finish if you want. For the full recipe, check out the [Full Recipe]. To get perfect gnocchi, use plenty of water and salt. Bring your pot to a rolling boil. Add the gnocchi gently to avoid splashing. They cook fast, usually in 2-3 minutes. Once they float, they’re ready. Drain them well to keep them from becoming soggy. Presentation matters! Serve your gnocchi in shallow, wide bowls. This lets the burrata shine on top. Add fresh basil leaves around the dish for color. A drizzle of balsamic glaze adds elegance and flair. These small touches make your meal look gourmet. Want to boost the flavor? Start with quality ingredients. Use fresh, ripe cherry tomatoes for sweetness. Add a pinch of sea salt to bring out their natural taste. A splash of balsamic glaze gives a tangy twist. If you like spice, don’t skip the red pepper flakes! They add warmth and depth. For a creamy finish, let the burrata melt into the gnocchi. These tips will take your dish from good to incredible. For a full recipe, check out the 30 Minute Tomato Gnocchi with Burrata Delight. {{image_4}} If you want to switch up the cheese, try mozzarella or ricotta. Both melt well and add creaminess. You could also use goat cheese for a tangy flavor. This option gives your dish a unique twist. Grate some parmesan on top for extra richness. Each cheese brings its flavor, so feel free to get creative. To make this dish more filling, add protein. Grilled chicken or shrimp works great. You can also use cooked sausage for a savory kick. Just sauté your protein in the skillet before adding the tomatoes. This adds depth to the dish and makes it a complete meal. You’ll love the added texture and flavor boost. Incorporating seasonal veggies can enhance your gnocchi. Add zucchini or bell peppers for a fresh crunch. You might also use spinach or kale for extra greens. Just toss them into the skillet with the tomatoes. They will cook down nicely and blend with the sauce. Seasonal veggies make your dish colorful and nutritious. For the full recipe, check out the 30 Minute Tomato Gnocchi with Burrata Delight. To keep your tomato gnocchi fresh, store leftovers in an airtight container. Let the dish cool to room temperature before sealing. This method keeps the flavors intact and prevents sogginess. Store in the fridge for up to three days. When you are ready to enjoy your gnocchi again, reheat it gently. Use a skillet over medium heat with a splash of olive oil. This method revives the sauce and keeps the gnocchi tender. Stir frequently to heat evenly. You can also microwave it, but be sure to cover it. This prevents drying out. Heat in short bursts, stirring in between. If you want to save your gnocchi for later, freezing is a great option. First, cool the dish completely. Then, place it in a freezer-safe container or bag. Remove as much air as possible to prevent freezer burn. Tomato gnocchi can last up to three months in the freezer. To reheat, thaw in the fridge overnight and use the skillet method. This keeps it delicious! For the full recipe, check out my 30 Minute Tomato Gnocchi with Burrata Delight. To make homemade gnocchi, you need just a few simple ingredients. Start with 2 cups of mashed potatoes. Mix in 1 cup of flour and 1 egg. Add a pinch of salt. Knead the dough until smooth. Roll it into ropes and cut small pieces. Press each piece with a fork for texture. Cook them in boiling water until they float. This shows they are ready! Yes, you can use other cheeses. Fresh mozzarella works well for a similar texture. Ricotta adds creaminess but is less firm. Parmesan gives a nice salty flavor. Feta can add a tangy twist. Choose a cheese that you love! Tomato gnocchi pairs great with many side dishes. A simple green salad adds freshness. Garlic bread brings a nice crunch. Roasted vegetables add color and taste. You can also serve a light soup as a starter. Enjoy mixing and matching! For more details on making this dish, check out the Full Recipe. This blog post covered the key elements to make delicious tomato gnocchi. We examined important ingredients, ideal cooking steps, and handy tips for great flavor. We also explored variations to keep your meals fresh and exciting. Lastly, we discussed how to store and reheat gnocchi for later enjoyment. Enjoy the process of cooking and don’t be afraid to experiment. Fresh ingredients and your personal touch will always make the dish better. Happy cooking!

30 Minute Tomato Gnocchi with Burrata Flavor Rich Dish

If you’re craving a quick and tasty meal, this 30-Minute Tomato Gnocchi with Burrata is for you! With fresh ingredients

For a tasty Crockpot Loaded Steak and Potato Bake, you will need: - 1.5 lbs flank steak, cut into 1-inch pieces - 4 medium potatoes, peeled and diced - 1 cup carrots, peeled and diced - 1 cup bell peppers, diced (choose any combination of red, yellow, or green) - 1 medium onion, finely chopped - 4 cloves garlic, minced - 2 cups beef broth - 1 tablespoon Worcestershire sauce - 1 teaspoon smoked paprika - 1 teaspoon dried thyme - Salt and freshly ground black pepper to taste - 1 cup shredded sharp cheddar cheese - 1/2 cup sour cream - Chopped green onions for garnish You can make this dish your own by adding or changing some ingredients: - Additional veggies like zucchini, mushrooms, or corn - Different seasoning options like chili powder or Italian herbs - Cheese variations such as Monterey Jack or pepper jack for a kick These ingredients let you create a dish that fits your taste. Dive into the Full Recipe to see how to combine these flavors! First, wash all your veggies well. This step is key for clean, tasty food. Peel the potatoes and carrots, then dice them into small, bite-sized pieces. Next, wash and dice the bell peppers, chop the onion finely, and mince the garlic. Having everything ready makes cooking easy and fun. Heat a splash of olive oil in a skillet over medium heat. Add the flank steak pieces to the pan. Sear them for about 5-7 minutes until they are nicely browned on all sides. This browning step adds great flavor to the steak. It makes your dish taste rich and savory. In your crockpot, start by layering half of the diced potatoes at the bottom. Spread them evenly. Add the diced carrots, bell peppers, and chopped onion on top of the potatoes. Then, place the seared steak pieces over the vegetables. This order helps everything cook evenly. In a separate bowl, mix the beef broth with Worcestershire sauce, minced garlic, smoked paprika, dried thyme, and a good sprinkle of salt and pepper. Stir well to combine all the flavors. Carefully pour this mixture evenly over the contents of the crockpot. Cover it with a lid and set your crockpot to low for 6-8 hours or high for 4-5 hours. This slow cooking makes the steak and potatoes tender and full of flavor. About 15 minutes before serving, stir in the shredded cheddar cheese into the crockpot. Let it melt and mix with the other ingredients. This adds a creamy touch that everyone will love. Once done, scoop generous portions into bowls. Top each serving with a dollop of sour cream and a sprinkle of chopped green onions for a fresh finish. Enjoy your Crockpot Loaded Steak and Potato Bake! For the complete details, check out the Full Recipe. When cooking in a crockpot, you can choose between high and low settings. The low setting takes about 6-8 hours. This slow method lets the flavors blend well. If you're short on time, use the high setting. It cooks in about 4-5 hours but may not be as tender. Adjust your cooking time based on your schedule. For tender steak and potatoes, cut your steak into 1-inch pieces. This size helps them cook evenly. Searing the steak first adds depth to the flavor. Make sure to layer the potatoes well in the crockpot. Place them on the bottom for best results. This helps them absorb the juices from the meat as they cook. To enhance the taste, consider adding herbs and spices. Smoked paprika gives a rich, smoky flavor. Thyme adds a nice earthiness. You can also sprinkle in some garlic powder for extra kick. Fresh herbs like parsley or rosemary can brighten the dish right before serving. Experiment with your favorite flavors to create a dish you'll love. For the full recipe, check out the details above. {{image_4}} You can switch out the flank steak for other meats. Try chicken, pork, or even turkey. Each meat brings a new taste. You can also add different veggies. Consider zucchini, mushrooms, or sweet potatoes. This keeps the dish fresh and exciting. Feel free to mix and match! If you need gluten-free options, use gluten-free broth. Many broths are safe for celiacs. For low-carb diets, skip the potatoes. Instead, use cauliflower or turnips. These veggies are low in carbs but still tasty. Always check labels to ensure your ingredients are safe. You can make this dish in the oven or on the stovetop. For the oven, preheat to 350°F. Layer the ingredients in a baking dish. Cover it tightly with foil. Bake for about 2 hours or until everything is tender. For stovetop cooking, use a large pot. Sear the meat first, then add the rest. Simmer on low heat until cooked through. Each method changes the texture but keeps the flavor. For those interested in the full process, be sure to check the [Full Recipe] for step-by-step details! To store leftovers from your Crockpot Loaded Steak and Potato Bake, let the dish cool. Use airtight containers to keep it fresh. You can keep it in the fridge for up to three days. Make sure to label your containers with the date. This helps you track how long it has been stored. When you are ready to enjoy your leftovers, reheat them gently. You can use a microwave or a stovetop. If using a microwave, place the food in a bowl and cover it with a damp paper towel. This keeps moisture in. Heat in short bursts, stirring in between. If using the stovetop, add a splash of broth to keep it moist. Heat on low, stirring often. You can freeze this dish for longer storage. To do this, let it cool completely. Then, place it in freezer-safe containers or bags. Remove as much air as possible to prevent freezer burn. It will stay good for up to three months. When you’re ready to eat it, thaw it in the fridge overnight. Reheat as mentioned before to enjoy a warm meal. For the full recipe, check the earlier sections. Yes, you can prepare this meal in advance. Chop the veggies and meat a day before. Store them in the fridge. When you are ready, layer everything in the crockpot. This saves time and keeps your meal fresh. To boost the broth's taste, use homemade beef broth if possible. Add a splash of soy sauce or a teaspoon of garlic powder for extra depth. You can also toss in fresh herbs like rosemary or bay leaves. These additions create a rich, savory base. This dish pairs well with simple sides. Try a fresh green salad or steamed green beans for a nice contrast. Garlic bread is also a great choice, as it soaks up the flavorful broth. You can even serve with roasted vegetables for added color. Yes, you can swap the flank steak for chuck roast or sirloin. Both cuts work well in a crockpot. Just remember that cooking times may adjust slightly. Chuck roast tends to be more tender and flavorful after long cooking. We covered the key ingredients for a delicious crockpot meal, from flank steak to vibrant veggies. I shared detailed steps to help you prepare, cook, and finish your dish while ensuring great flavor. You also learned tips for customizing the recipe and making it your own, along with storage methods. Cooking can be simple and satisfying. With these tools, you can create tasty meals that fit your tastes and needs. Now, go cook and enjoy your culinary adventure!

Crockpot Loaded Steak and Potato Bake Flavor Packed Dish

Are you ready to impress your family with a fantastic meal? My Crockpot Loaded Steak and Potato Bake packs flavor

To make Keto Cheddar Biscuits, gather these simple ingredients: - 1 ½ cups shredded sharp cheddar cheese - 4 large eggs - ½ cup finely ground almond flour - 2 teaspoons baking powder - ½ teaspoon garlic powder - ½ teaspoon onion powder - 1 teaspoon dried oregano - Salt and black pepper to taste - 2 tablespoons cream cheese, softened to room temperature - Optional: Fresh chives, finely chopped, for garnish These ingredients work together to create a fluffy, cheesy biscuit. The sharp cheddar adds a bold flavor, while almond flour keeps it Keto-friendly. Each biscuit contains about: - Calories: 90 - Protein: 6g - Fat: 7g - Carbohydrates: 2g - Fiber: 1g This makes the biscuits a great option for a low-carb diet. The high protein content helps keep you full, while the healthy fats provide energy. You can switch out some ingredients for different tastes: - Cheese: Use mozzarella for a milder flavor. - Flour: Coconut flour can replace almond flour, but use less. - Eggs: Chia seeds can replace eggs for a vegan option. - Spices: Add your favorite herbs like thyme or basil for new flavors. These substitutions help customize the biscuits to your liking. Feel free to experiment! {{ingredient_image_2}} Start by preheating your oven to 400°F (200°C). This helps the biscuits rise well. Line a baking sheet with parchment paper. This keeps the biscuits from sticking. In a large bowl, mix together 1 ½ cups of shredded sharp cheddar cheese and ½ cup of finely ground almond flour. Stir well until they are combined. In another bowl, whisk together 4 large eggs and 2 tablespoons of softened cream cheese until smooth. Then, add 2 teaspoons of baking powder, ½ teaspoon of garlic powder, ½ teaspoon of onion powder, 1 teaspoon of dried oregano, and a pinch of salt and black pepper. Mix until everything is well combined. Fold the egg mixture into the cheese and almond flour mix. Do this gently until you get a sticky dough. Using a cookie scoop or a large spoon, drop equal-sized portions of the dough onto the lined baking sheet. Make sure to leave about 2 inches between each scoop. This space allows the biscuits to expand while baking. Place the baking sheet in your preheated oven. Bake for 12-15 minutes. The biscuits should turn golden brown and feel firm when done. Carefully take them out of the oven and cool them on the baking sheet for a few minutes. To get the best texture, make sure your cheese is freshly shredded. Pre-shredded cheese often contains anti-caking agents, which can affect the dough. Also, avoid over-mixing the dough. Gently fold the ingredients until just combined. This keeps your biscuits light and fluffy. For a pop of flavor, you can sprinkle some finely chopped fresh chives on top before serving. Enjoy your Keto Cheddar Biscuits warm! When making Keto Cheddar Biscuits, avoid overmixing the dough. This makes biscuits tough. Do not skip the baking powder; it helps the biscuits rise. If your oven runs hot, check the biscuits early. They can burn quickly. Lastly, make sure to use fresh cheese for the best flavor. To boost flavor, try adding cayenne pepper or smoked paprika for heat. Fresh herbs, like rosemary or thyme, also add depth. Consider using different cheeses, such as gouda or pepper jack, to mix it up. A sprinkle of nutritional yeast can create a cheesy, nutty taste. These biscuits pair well with soups like broccoli cheddar or tomato basil. Serve them alongside a fresh salad for a light meal. You can also enjoy them with a dollop of sour cream or an avocado spread. For a fun twist, use them as a base for mini sliders! Pro Tips Cheese Selection: Use a sharp cheddar for a more pronounced flavor in your biscuits. Egg Temperature: Make sure your eggs are at room temperature for better incorporation with the other ingredients. Baking Time: Keep an eye on the biscuits while baking; they should be golden brown but not overdone. Storage Tips: Store any leftovers in an airtight container in the fridge for up to a week, or freeze for longer storage. {{image_4}} You can switch up the cheese in this recipe for fun flavors. Try using mozzarella for a stretchy texture. Monterey Jack adds a mild taste that works well too. If you want a stronger bite, go for Gouda or blue cheese. Each cheese gives a unique twist to your biscuits. Changing herbs and spices can make your biscuits stand out. Add fresh rosemary for a woodsy flavor. You can also mix in some thyme for a nice touch. If you like heat, try adding a pinch of cayenne pepper. Experimenting with flavors helps keep things fresh and exciting. Almond flour is already a great gluten-free choice. But, if you want alternatives, try coconut flour. Just remember that coconut flour absorbs more liquid. You may need to adjust the egg or cream cheese for the right dough. These swaps keep your biscuits tasty and safe for gluten-free diets. After you make your Keto Cheddar Biscuits, you may have some left. Let them cool first. Then, place them in an airtight container. Store them in the fridge. They will stay fresh for about 3 days. If you want them to last longer, consider freezing instead. When you're ready to enjoy leftover biscuits, preheat your oven to 350°F (175°C). Place the biscuits on a baking sheet. Heat for about 5-10 minutes. This will make them warm and tasty again. You can also use a microwave. Heat for 20-30 seconds, but they might not be as crispy. To freeze your biscuits, let them cool completely. Place them in a single layer on a baking sheet. Freeze for about 1 hour. Then, transfer them to a freezer-safe bag. They will keep well for up to 3 months. When you want to eat them, just reheat as mentioned above. Enjoy your biscuits anytime! Yes, you can make these biscuits ahead of time. Bake them and let them cool. Store them in an airtight container for up to three days. When you are ready to eat, just warm them in the oven for a few minutes. The heat brings back their fresh taste and texture. Absolutely! These biscuits are great for meal prep. They freeze well too. After baking, let them cool completely. Place them in a freezer bag. They can last up to three months in the freezer. Just thaw and reheat when you need a quick snack or side dish. To adjust the recipe, simply halve the ingredients. Use three eggs instead of four. For cheese, use three-quarters of a cup. This way, you can make six biscuits instead of twelve. Just keep an eye on the baking time, as smaller biscuits may bake faster. This post gave you all the steps to make great Keto Cheddar Biscuits. We covered simple ingredients, detailed instructions, and helpful tips. You learned how to avoid common mistakes and enhance the flavor. We also shared variations, storage tips, and answered common questions. Now you’re ready to bake delicious biscuits with ease. Enjoy your cooking and share these treats with others. Happy baking!

Keto Cheddar Biscuits Tasty and Easy Recipe Guide

If you’re looking for a delicious snack that fits your keto diet, you’re in the right place! I’m excited to

- 1 ½ cups all-purpose flour - 1 cup granulated sugar - 1 teaspoon baking powder - 1 teaspoon baking soda - ½ teaspoon salt - 2 teaspoons pumpkin pie spice - ½ cup unsalted butter, softened - 2 large eggs - 1 cup canned pumpkin puree - ½ cup strong brewed coffee, cooled - 1 teaspoon vanilla extract - Optional: Cream cheese frosting for topping The key to a great pumpkin spice latte cupcake lies in the ingredients. - Pumpkin puree: This adds moisture and a rich pumpkin taste. Use canned for ease. - Coffee: Strong brewed coffee enhances the flavor of the spices. It adds depth. - Pumpkin pie spice: This blend brings the warm flavors of fall. It usually includes cinnamon, nutmeg, and ginger. - Unsalted butter: Softened butter makes the cupcakes light and fluffy. It helps bind the ingredients well. You can easily swap some ingredients to fit your needs. - Flour: Use a gluten-free blend if needed. It works well in this recipe. - Sugar: Coconut sugar or a sugar substitute may work, but it may change the taste slightly. - Butter: You can use margarine or a dairy-free butter. Just ensure it is softened. - Eggs: For a vegan option, replace eggs with flax eggs or applesauce. One egg equals one tablespoon of flaxseed meal mixed with three tablespoons of water. - Coffee: If you want a caffeine-free version, use decaf coffee or a strong herbal tea. {{ingredient_image_2}} Start by preheating your oven to 350°F (175°C). This step ensures even baking. Next, line a cupcake tin with paper liners. This makes it easy to remove the cupcakes later. In a large mixing bowl, combine these dry ingredients: - 1 ½ cups all-purpose flour - 1 cup granulated sugar - 1 teaspoon baking powder - 1 teaspoon baking soda - ½ teaspoon salt - 2 teaspoons pumpkin pie spice Whisk them together until they blend well. This helps spread the flavors evenly. In another bowl, cream together ½ cup of softened unsalted butter. Use an electric mixer to make it light and fluffy. Add in 2 large eggs, one at a time. Mix until each one fully blends. Now, stir in 1 cup of canned pumpkin puree, ½ cup of cooled brewed coffee, and 1 teaspoon of vanilla extract. Mix until smooth. Slowly add the dry ingredients to the wet mix. Fold them gently until just combined. Be careful not to overmix. This keeps the cupcakes light and fluffy. Use a scoop or spoon to fill each liner about two-thirds full. Place the cupcake tin in the preheated oven. Bake for 18 to 20 minutes. To check if they are done, insert a toothpick into a cupcake. If it comes out clean, they are ready. After baking, let the cupcakes cool in the tin for 5 minutes. Then, transfer them to a wire rack to cool completely. Enjoy the rich aroma as they cool! To make fluffy cupcakes, start with room temperature butter. This helps trap air when you cream it. Cream the butter until it looks light and fluffy. Add eggs one at a time, mixing well. This step adds more air to your batter. When you mix the dry and wet ingredients, fold gently. Overmixing can cause dense cupcakes. Keep an eye on baking time. Check with a toothpick early to avoid overbaking. Store your cupcakes in an airtight container. This keeps them fresh longer. If you used frosting, place wax paper between layers. This prevents sticking. Cupcakes stay good at room temperature for up to three days. For longer storage, put them in the fridge. They can last about a week there. You can also freeze them. Just wrap each cupcake well in plastic wrap and foil. They can last up to three months in the freezer. For a lovely finish, use cream cheese frosting. It pairs well with pumpkin spice flavors. You can sprinkle a bit of pumpkin pie spice on top for flair. Try adding caramel drizzle for extra sweetness. Consider topping with chocolate-covered espresso beans for crunch. You can also use small candy pumpkins for a fun touch. Arranging your cupcakes on a nice platter makes them more appealing. Add some cinnamon sticks or small pumpkins for a festive look. Pro Tips Use Fresh Ingredients: Always opt for fresh pumpkin puree and high-quality spices to enhance the flavor of your cupcakes. Don't Overmix: When combining the wet and dry ingredients, mix just until incorporated to ensure light and fluffy cupcakes. Cool Completely: Allow your cupcakes to cool completely before frosting them to prevent the frosting from melting and sliding off. Experiment with Flavors: Feel free to add chocolate chips or nuts to the batter for an extra flavor twist and texture in your cupcakes. {{image_4}} You can change the frosting to make these cupcakes special. Try using chocolate ganache for a rich touch. You can also use whipped cream for a light and fluffy topping. If you love caramel, drizzle it over the cupcakes. Each option adds a new twist to the classic flavor. If you want to mix things up, try adding chocolate chips to the batter. They bring a nice sweetness to the pumpkin flavor. You can also add nuts for crunch, like walnuts or pecans. For a spicier kick, increase the pumpkin pie spice. These small changes let you create your perfect cupcake. Serve these cupcakes on a pretty platter for a festive look. Add some cinnamon sticks or mini pumpkins around them for decoration. Pairing these cupcakes with a warm cup of coffee makes for a cozy treat. You can also enjoy them with a scoop of vanilla ice cream for a delightful dessert. To keep your pumpkin spice latte cupcakes fresh, store them in an airtight container. This helps maintain their moisture and flavor. If you use cream cheese frosting, ensure it stays cool. Keep the container in the fridge if your kitchen is warm. When stored properly, these cupcakes last about 3 to 4 days at room temperature. If you keep them in the fridge, they can last up to a week. Always check for any signs of spoilage before enjoying them! You can freeze these cupcakes for later enjoyment. Make sure they are completely cooled before freezing. Wrap each cupcake tightly in plastic wrap. Place them in a freezer bag or container. They can last up to three months in the freezer. When you're ready to eat, just thaw them in the fridge overnight. Yes, you can make these cupcakes gluten-free. Use a gluten-free all-purpose flour blend instead of regular flour. Make sure the blend has a binding agent, like xanthan gum. This helps the cupcakes rise and stay together well. If you want to skip the coffee, use brewed tea or hot chocolate. You can also use milk or a milk alternative for a milder flavor. Just keep the same amount as the coffee in the recipe. To make these cupcakes vegan, swap eggs for flax eggs. Mix 1 tablespoon of flaxseed meal with 2.5 tablespoons of water for each egg. Use a plant-based butter or oil instead of unsalted butter. For milk, use almond milk or coconut milk. These swaps will keep the cupcakes moist and tasty. You learned about making delicious pumpkin spice latte cupcakes. We covered ingredients, tips, variations, and storage. Each step helps you create soft and fluffy treats. Remember, you can change flavors and use different frosting. These cupcakes are fun to share or enjoy alone. Use the answers to FAQs for more help. I hope you feel ready to bake and explore your creativity. Enjoy the process and have fun!

Pumpkin Spice Latte Cupcakes Delightful Fall Treat

Get ready to fall in love with these Pumpkin Spice Latte Cupcakes! They blend the warm flavors of pumpkin and

- 4 large bell peppers (any vibrant color) - 1 lb ground turkey - 1 cup cooked quinoa - 1 small onion, finely chopped - 2 cloves garlic, minced - 1 can diced tomatoes - 1 cup corn - 1 teaspoon ground cumin - 1 teaspoon smoked paprika - 1 cup shredded cheese - Fresh cilantro for garnish When making stuffed bell peppers, I love using ingredients that shine. The bell peppers serve as a colorful and tasty base. You can pick any bright color like red, yellow, or orange. Each adds a sweet touch. Ground turkey is my protein of choice. It cooks up lean and flavorful. Quinoa brings a nice fluffiness that pairs well with the turkey. Chopping up a small onion and mincing garlic adds a wonderful aroma. These aromatics create a base flavor that makes the dish come alive. For seasoning, I use diced tomatoes and corn for sweetness. Ground cumin and smoked paprika add depth and warmth to the filling. Don't forget the cheese! It melts beautifully on top, creating a rich layer. Fresh cilantro as a garnish gives your dish a fresh finish. This mix of ingredients creates a balanced meal that is both healthy and satisfying. For the full recipe, check out the vibrant stuffed bell peppers with turkey and quinoa. - Preheat the oven to 375°F (190°C). - Slice the tops off each bell pepper. - Remove the seeds and white ribs inside. - Stand the peppers upright in a baking dish. - Heat a drizzle of olive oil in a skillet. - Add the finely chopped onion and cook for 3-4 minutes. - Stir in the minced garlic and cook for 1 more minute. - Add the ground turkey and break it up with a spatula. - Cook until the turkey is brown and no longer pink. - Mix in cooked quinoa, diced tomatoes, corn, cumin, and paprika. - Season with salt and black pepper to taste. - Stir well and heat the mixture for another 2-3 minutes. - Remove from heat and fold in half of the shredded cheese. - Spoon the turkey-quinoa mix into each bell pepper, packing it down. - Sprinkle the remaining cheese on top of each pepper. - Cover the baking dish with aluminum foil tightly. - Bake for 25 minutes to soften the peppers. - Remove the foil and bake for another 10 minutes. - The cheese should melt and become bubbly. - Let the peppers cool for 5 minutes before serving. - Garnish with fresh cilantro for a pop of color. For a detailed guide, check the Full Recipe. To make the filling even better, you can use leftover ingredients. If you have some cooked rice or beans, add them in. This boosts flavor and saves waste. Adjusting seasonings is key too. Taste the filling while cooking. If it seems bland, add a little more salt or spices. This will make each bite more delicious. When serving, use a colorful platter. A bright dish makes the peppers pop. For garnishing, sprinkle fresh cilantro on top. You can also drizzle olive oil for a nice touch. This will make your dish look fancy without much effort. Ensure the turkey is cooked well for safety. Use a meat thermometer; the turkey should reach 165°F (74°C). To make the peppers tender, bake them covered first. This traps steam inside. After 25 minutes, remove the foil to let the cheese brown. The peppers will be soft and flavorful. For the full recipe, check out the section above. {{image_4}} When it comes to stuffed bell peppers, the options are endless. You can change the protein, the grains, and the cheese to fit your taste. Let’s explore some fun variations. You can easily switch the ground turkey for other proteins. Lean ground beef or chicken work well. They provide a different taste but keep the dish hearty. For a lighter option, you might try ground chicken. If you want to go meatless, beans or lentils make a great substitute. These options are full of protein and flavor. The filling can also change based on what you like. You can use different grains like rice, couscous, or farro. Each grain offers a unique texture and flavor. Add more veggies to the mix, too. Chopped spinach, zucchini, or mushrooms can add great taste. The more colors you add, the more fun your dish will be. Cheese is a star in this dish. You can try many cheese blends. Cheddar, Monterey jack, or even feta can add a tasty twist. If you want a vegan version, dairy-free cheese works well. It melts nicely and keeps everything creamy. You can even skip the cheese if you prefer. The peppers will still be delicious! Feel free to mix and match these ideas for a stuffed pepper that fits your mood. For the full recipe, check out the complete guide! To store your stuffed peppers, let them cool first. Place the peppers in an airtight container. Keep them in the fridge for up to four days. This helps maintain their freshness and taste. You can enjoy them later or share them with friends. When it’s time to eat again, reheat the peppers gently. Use the oven for the best results. Preheat it to 350°F (175°C). Place the peppers in a baking dish and cover them with foil. Heat for about 20 minutes. This keeps them moist. If you need a quicker option, use the microwave. Heat for 2-3 minutes, checking often so they don’t dry out. If you freeze the peppers, wrap each one tightly in plastic wrap. Then, place them in a freezer bag. They can last up to three months. To thaw, move them to the fridge overnight before reheating. You can prepare the stuffed peppers ahead of time. Make the filling a day or two in advance. Store it in the fridge until you are ready to stuff the peppers. This saves time on busy nights. You can also stuff the peppers and freeze them before baking. Just remember to bake them straight from the freezer. Add about 10-15 extra minutes to the cooking time. That way, they will be hot and delicious. For more details, check the full recipe. To keep stuffed bell peppers firm, you can pre-cook the peppers. Start by briefly boiling them in water for 3-5 minutes. This step softens them slightly without making them mushy. After boiling, let them cool and dry. When you fill them, don't overstuff. Use just enough filling to pack them, but leave a little space at the top. Yes, you can freeze stuffed bell peppers both ways. If you freeze them before cooking, wrap them tightly in plastic wrap and place them in a freezer bag. This keeps them fresh. If you prefer to freeze them after cooking, allow them to cool first. Then, store them in airtight containers. They will last for about three months. If you want a different grain, you can use rice, farro, or bulgur. For a gluten-free option, try using cauliflower rice. These will give you a nice texture and flavor. Each option adds its own twist to the dish, so feel free to experiment! The stuffed peppers are done when they are tender and the cheese is bubbly. You can check them by inserting a fork. If it goes in easily, they are ready. The internal temperature should reach 165°F (74°C) for safe eating. Absolutely! You can prepare the filling and stuff the peppers a day ahead. Store them in the fridge until you are ready to cook. When you are ready, just pop them in the oven. This makes for an easy, quick dinner after a long day. For the full recipe, check the earlier sections. Stuffed bell peppers are a simple dish packed with flavor and nutrition. We covered the main ingredients, step-by-step instructions, tips for perfecting your filling, and variations to keep meals exciting. Don't forget storage methods for leftovers and meal prep options, so you can enjoy these tasty peppers throughout the week. With these tips, you can make stuffed peppers your own. Mix, match, and have fun in the kitchen! Enjoy your cooking adventure!

Stuffed Bell Peppers with Ground Turkey Delightful Dish

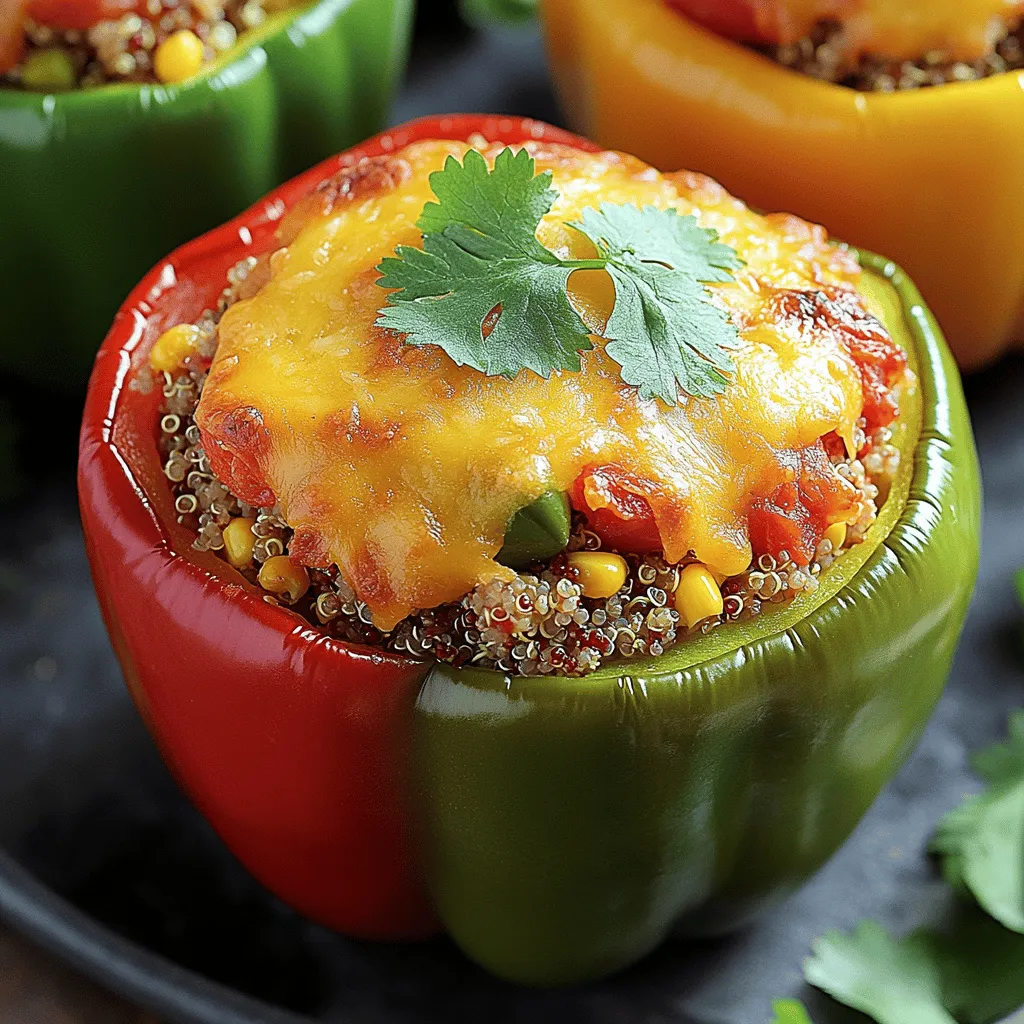
Are you looking for a flavorful, healthy meal that’s easy to make? Stuffed bell peppers with ground turkey might be

To make this creamy tomato basil soup, gather these simple ingredients: - 4 cups canned whole tomatoes (including the juice) - 1 medium onion, finely chopped - 3 cloves garlic, minced - 2 cups vegetable broth - 1 cup heavy cream (or use coconut cream for a dairy-free option) - 1 tablespoon extra-virgin olive oil - 1 teaspoon sugar (to balance acidity) - Salt and fresh ground black pepper, to taste - 1/2 cup fresh basil leaves, chopped - 1 teaspoon dried oregano - Croutons or toasted crusty bread, for serving These ingredients create a rich and comforting bowl of soup. You can easily modify the recipe to fit your needs. Here are some ideas: - For a vegan option, replace heavy cream with coconut cream or a nut milk. - If you are gluten-free, choose gluten-free croutons or skip them entirely. - Use low-sodium vegetable broth if you need to watch your salt intake. - Fresh tomatoes work if you prefer them over canned, just adjust the cooking time. Using high-quality ingredients makes a big difference. Here are some tips: - Choose organic canned tomatoes for better flavor and fewer additives. - Fresh basil should be vibrant and fragrant; this will enhance the soup's taste. - Opt for homemade vegetable broth when possible; it adds a rich depth. - Always use fresh garlic and onion for the best aroma and taste. These small changes can elevate your creamy tomato basil soup to a whole new level! Start by heating the extra-virgin olive oil in a large pot over medium heat. Once the oil is hot, add the finely chopped onion. Sauté the onion for about 5 minutes. You want it to be soft and clear. Next, add in the minced garlic and dried oregano. Cook these for 1-2 minutes. You will smell their wonderful aroma fill the air. Now it’s time to add the star ingredients. Pour in the canned whole tomatoes along with their juice. Next, add the vegetable broth. Stir everything well to mix. Bring the mixture to a gentle simmer. Let it simmer for about 15-20 minutes. This will deepen the flavors and blend the ingredients nicely. After simmering, grab your immersion blender. Carefully blend the soup until it is smooth and creamy. If you use a countertop blender, let the soup cool a bit before blending. This keeps you safe from hot splashes. Once blended, return the soup to low heat. Stir in the heavy cream or coconut cream. Add a teaspoon of sugar to balance the acidity. Season with salt and fresh ground black pepper to taste. Finally, fold in the chopped fresh basil and let it simmer for another 5 minutes. For the full recipe, check out the guide above. When making creamy tomato basil soup, some errors can spoil the taste. Here are some to watch for: - Overcooking the garlic: This can make it bitter. Always sauté until fragrant, not browned. - Skipping the sugar: It balances the soup's acidity. Never skip it for a well-rounded flavor. - Not blending enough: Leave some chunks, and your soup may taste uneven. Aim for a smooth, creamy texture. To make the best soup, follow these simple tips: - Use quality canned tomatoes: Look for whole tomatoes packed in juice, not sauce. They offer the best flavor. - Sauté the onions long enough: They should be soft and translucent. This builds a strong flavor base. - Add basil at the end: Fresh basil loses flavor if cooked too long. Add it just before serving for a burst of freshness. Want to elevate your soup? Here’s how: - Experiment with spices: Adding a pinch of red pepper flakes can add warmth. - Incorporate fresh herbs: Besides basil, try a touch of thyme or parsley for added depth. - Drizzle with olive oil: A bit of high-quality olive oil on top gives a rich finish. For more details, check out the Full Recipe to create your own creamy tomato basil bliss! {{image_4}} You can make this soup dairy-free with coconut cream. This keeps the soup rich and creamy. Use the same amount of coconut cream as heavy cream. It brings a nice, subtle sweetness. If you want to skip cream altogether, try cashew cream. Soak cashews in water, blend until smooth, and stir it in at the end. You can boost nutrition by adding more vegetables. Carrots and celery work well. Sauté them with the onion at the start. Spinach or kale can be stirred in at the end. They wilt quickly and add a lovely green color. These veggies also add flavor and texture to the soup. Want to spice up your soup? Try adding red pepper flakes for heat. A pinch of smoked paprika gives a nice depth. You can also use fresh herbs like thyme or rosemary. They add unique flavors that brighten the dish. Experiment with different herbs to find your perfect blend. To keep your creamy tomato basil soup fresh, let it cool down first. Then, pour it into an airtight container. This method keeps the soup tasty and safe. Store it in the fridge for up to five days. If you can't eat it all, you can freeze the leftovers too. When you want to enjoy your soup again, reheat it gently. You can use a pot on low heat or the microwave. If using the microwave, heat it in short bursts. Stir between intervals. This helps warm it evenly and avoids hot spots. To freeze your soup, let it cool fully before placing it in a freezer-safe container. Leave some space at the top, as the soup will expand when frozen. You can keep it in the freezer for up to three months. When you're ready to eat, thaw it in the fridge overnight. Then, reheat it as mentioned above. This way, you’ll have a delicious meal ready whenever you crave it. For the full recipe, check out the details above. Yes, you can use fresh tomatoes. Start with about 2 pounds of ripe tomatoes. Remove their skins by blanching them in boiling water for a minute. Then, chop them up and add them to the pot. Fresh tomatoes will give the soup a bright flavor. However, you may need to add a bit more broth to reach the right consistency. To spice up your soup, add red pepper flakes or fresh chopped chili peppers. Start with a small amount. You can always add more, but it’s hard to remove spice once it’s in. Another option is to mix in some hot sauce before serving. It adds depth and heat. I love serving this soup with croutons or toasted bread. They add a nice crunch. A light green salad pairs well too, balancing the meal. You can also try a grilled cheese sandwich on the side. The melty cheese complements the soup’s creaminess. For the full recipe, check out the details above! In this blog post, we explored making creamy tomato basil soup from scratch. I shared a full list of ingredients, along with easy substitutes for dietary needs. You learned step-by-step instructions for cooking and blending the soup. We also covered tips to avoid common mistakes and ways to make unique variations. Finally, you discovered how to store leftovers and enjoyed answers to common questions. Now, grab your ingredients and begin your cooking adventure! You won’t regret it.

Creamy Tomato Basil Soup Fresh and Flavorful Delight

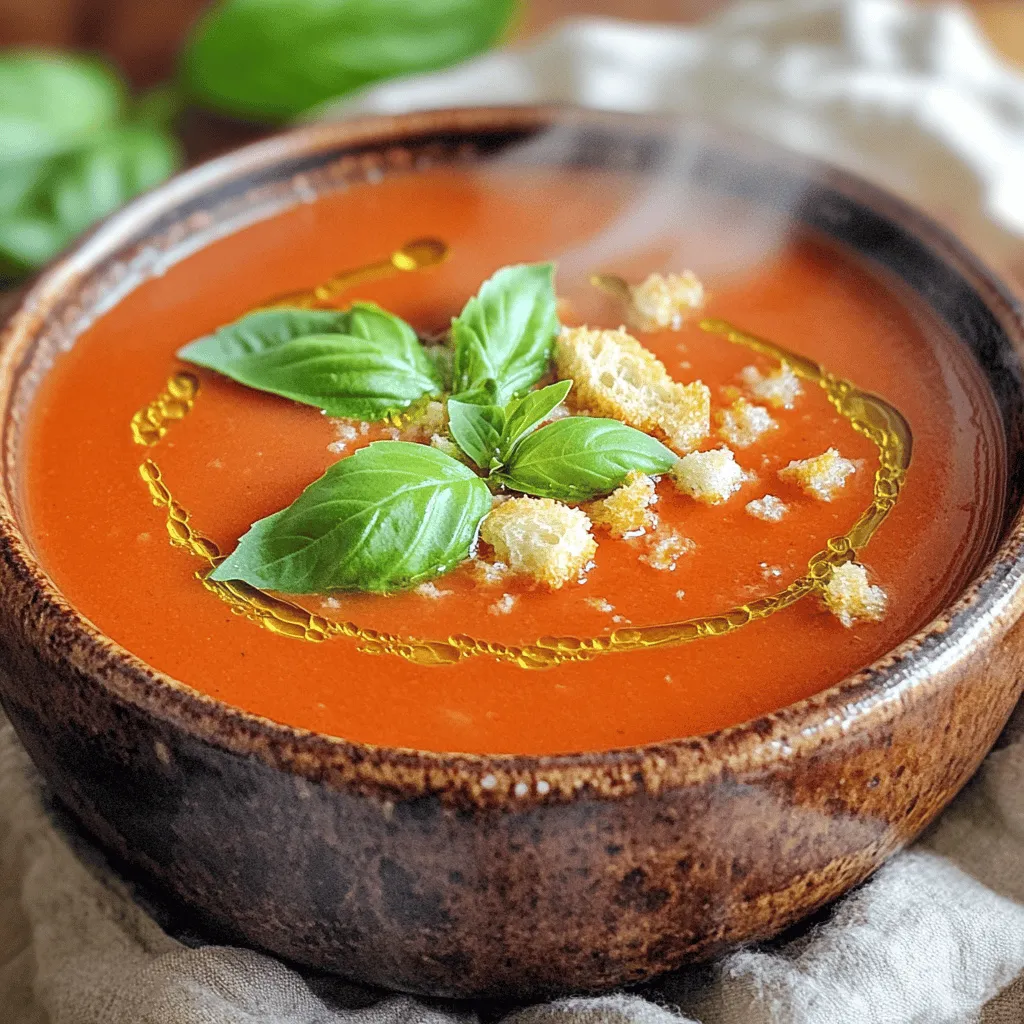
Are you ready to make a warm bowl of creamy tomato basil soup? This tasty dish is both fresh and

To make a tasty chocolate banana smoothie, gather these simple ingredients: - 2 ripe bananas, peeled and frozen - 1 tablespoon unsweetened cocoa powder - 1 cup almond milk (or your preferred milk) - 1 tablespoon almond butter - 1 teaspoon honey or maple syrup (optional) - 1/2 teaspoon pure vanilla extract - A pinch of ground cinnamon - Ice cubes (optional, for added thickness) These ingredients create a rich and creamy drink. The frozen bananas add a nice chill, while the cocoa powder brings a deep chocolate flavor. Almond milk makes it smooth and light. Almond butter gives a satisfying texture and nutty taste. You can choose to sweeten your smoothie with honey or maple syrup. This choice is optional and should fit your taste. The vanilla extract and cinnamon enhance the flavor. They add warmth and depth to the mix. Feel free to play with the ingredients. You can swap almond milk for any milk you like. If you want more protein, add yogurt. The options are endless, and that makes it fun! You can find the full recipe below. First, peel the bananas. They should be ripe and sweet. Look for bananas with lots of brown spots. These spots mean the fruit is sweet. Next, cut them into small chunks. Place the chunks in a freezer bag. Freeze the bananas for at least two hours. This step adds creaminess to your smoothie. Now, gather your ingredients. You need the frozen bananas, cocoa powder, almond milk, and almond butter. If you want some sweetness, add honey or maple syrup. Pour everything into your blender. Blend on high speed. Keep blending until it is smooth and creamy. If it seems too thick, you can add a bit more almond milk. After blending, taste your smoothie. If you want it sweeter, add more honey or syrup. Blend again for a few seconds. If you'd like a thicker texture, toss in some ice cubes. Blend again until mixed well. This will make your smoothie even more enjoyable! To make a great smoothie, blend with care. Start by adding your wet ingredients first. This helps the blades move better. Next, add the solids. For the best texture, use frozen bananas. They make your smoothie creamy and cold. A ripe banana gives your drink natural sweetness. You can spice up your smoothie easily. Try adding a dash of nutmeg for warmth. A sprinkle of cayenne pepper adds heat. You can also mix in protein powder for extra benefits. Adding spinach can boost nutrients without changing the taste. Presentation matters. Serve your smoothie in chilled glasses for style. Top it with cocoa powder and banana slices for a pop of color. Pair your smoothie with healthy snacks like nuts or whole-grain toast. For a fun treat, serve it with dark chocolate chips on the side. This approach makes your Chocolate Banana Smoothie fun and nutritious. For the full recipe, check out the details above! {{image_4}} If you want a dairy-free or vegan smoothie, you can easily swap out the milk. Here are a few ideas: - Coconut milk: This gives a creamy texture and a hint of tropical flavor. - Oat milk: It’s smooth and has a mild taste, making it a great choice. - Soy milk: High in protein, soy milk adds a nice richness. For almond butter, try these substitutions: - Peanut butter: It offers a strong flavor and is widely loved. - Sunflower seed butter: Great for nut allergies, it adds a unique taste. - Cashew butter: This has a mild flavor and a creamy texture. Want to boost your smoothie’s nutrition? Here are a couple of easy ways: - Greens: Adding a handful of spinach makes it healthier. Spinach blends well and doesn’t change the taste much. - Protein: You can add Greek yogurt or protein powder. This helps you feel full and satisfied. Mix things up with different flavors and tastes. Here are some fun ideas: - Berries: Toss in strawberries or blueberries. They add sweetness and color. - Nutmeg: A sprinkle of nutmeg gives a warm spice that pairs nicely with chocolate. - Flavored syrups: Use vanilla or hazelnut syrup for a sweet twist. These variations allow you to customize your smoothie to fit your tastes. Enjoy experimenting! To keep your smoothie fresh, store it in the fridge. Use an airtight container to prevent air from spoiling it. Smoothies last about one day in the fridge. To enjoy them later, shake or stir well before drinking. This helps mix any separation that may occur. Yes, you can freeze smoothies! This is a great way to save extra smoothie for later. Pour the smoothie into freezer-safe containers, leaving some space at the top. Smoothies expand when frozen. To defrost, place the container in the fridge overnight. If you need it fast, use the microwave on low power. After thawing, blend the smoothie again for a smooth texture. You may need to add a splash of milk to bring it back to life. For more details on making this smoothie, check the Full Recipe. To make a chocolate banana smoothie, follow these simple steps: 1. Peel and break two frozen bananas into chunks. 2. Add these chunks to your blender. 3. Scoop in one tablespoon of unsweetened cocoa powder. 4. Pour in one cup of almond milk or your choice of milk. 5. Add one tablespoon of almond butter and one teaspoon of honey or maple syrup, if you like it sweet. 6. Toss in half a teaspoon of pure vanilla extract and a pinch of ground cinnamon. 7. Blend on high until smooth and creamy. For a thicker drink, add ice cubes and blend again. 8. Taste the smoothie. Adjust sweetness if needed, then pour into glasses and enjoy. Yes, you can mix in other fruits! Here are some great options: - Strawberries add a fresh, sweet flavor. - Avocado makes the smoothie creamy without changing the taste. - Spinach can boost nutrients without adding much flavor. - Peanut butter pairs well with banana and chocolate for a rich taste. Feel free to experiment to find your favorite blend! You can store a chocolate banana smoothie in the fridge for up to 24 hours. To keep it fresh: - Use an airtight container to prevent oxidation. - Give it a quick shake before drinking, as separation may occur. If you wait too long, the taste may change, and it may not be as creamy. A chocolate banana smoothie is quite healthy! Here’s why: - Bananas provide potassium and fiber, which help digestion. - Cocoa powder is rich in antioxidants and may boost mood. - Almond milk is low in calories and is dairy-free. - Almond butter adds healthy fats and protein. Together, these ingredients make a tasty drink that fuels your body! You learned how to make a tasty chocolate banana smoothie with simple ingredients. We covered prep, blending tips, and variations to suit your taste. Remember to use frozen bananas for creamy texture and try fun flavor twists. Enjoy this healthy drink as a snack or meal boost. Your smoothie journey starts here, and it's delicious!

Chocolate Banana Smoothie Tasty and Nutritious Drink

If you crave something sweet yet healthy, a Chocolate Banana Smoothie is your answer! This creamy drink blends ripe bananas,

- 3 medium zucchinis, spiralized into noodles - 1 cup of fresh bean sprouts - 1 red bell pepper, thinly sliced - 1 large carrot, julienned - 3 green onions, chopped (whites and greens separated) - 1/4 cup roasted peanuts, roughly chopped - 2 tablespoons vegetable oil (or your preferred cooking oil) - 3 cloves garlic, minced - 2 large eggs, lightly beaten - 4 tablespoons soy sauce (or tamari for a gluten-free option) - 1 tablespoon fresh lime juice - 1 teaspoon brown sugar - 1/2 teaspoon red chili flakes (adjust according to your spice preference) - Fresh cilantro leaves for garnish If you want a gluten-free option, you can swap regular soy sauce for tamari. For a vegan version, skip the eggs and add more veggies or tofu instead. You can also use coconut aminos for a sweeter taste without soy. This recipe serves four people. Each serving contains about 250 calories. You get 10 grams of protein and 25 grams of carbs. The dish has around 10 grams of fat, making it a balanced choice that is both light and filling. Tools Needed - Spiralizer - Paper towels - Cutting board - Sharp knife To start, grab your spiralizer. This tool turns zucchinis into fun noodles. Cut the ends off each zucchini before spiralizing. This helps the noodles form better. Once you spiralize all three zucchinis, lay the noodles on paper towels. This step is key. It helps remove extra moisture. Too much water makes the dish watery. Tips to Avoid Watery Noodles - Use fresh zucchinis. Older zucchinis have more water. - Salt the noodles lightly. Let them sit for 10 minutes, then pat dry. Ingredients to Combine - 4 tablespoons soy sauce - 1 tablespoon lime juice - 1 teaspoon brown sugar - 1/2 teaspoon red chili flakes In a small mixing bowl, combine the soy sauce, lime juice, brown sugar, and chili flakes. Whisk these together until the sugar dissolves. This sauce adds great flavor to your dish, so don’t skip this step! Tips for Flavor Enhancement - Use fresh lime juice for a brighter taste. - Adjust chili flakes to fit your spice level. Stir-Fry Sequence and Timing - Heat 2 tablespoons of vegetable oil in a large skillet over medium heat. - Add 3 cloves of minced garlic and sauté for 30 seconds. Once the garlic is fragrant, add your red bell pepper and carrot. Stir-fry these for about 3-4 minutes. You want them tender but still crunchy. This gives the dish a great texture. Scrambling the Eggs - Push the cooked veggies to one side of the skillet. - Pour in 2 beaten eggs into the clear space. Scramble the eggs for about 1 minute. They should be just set. Once cooked, fold the eggs into the vegetable mix. This adds protein and richness to your dish. Now you are ready to combine everything. Add the zucchini noodles and sauce to the skillet. Toss well to coat. Cook for another 3-4 minutes, so the noodles soften a bit. Finish by stirring in the bean sprouts and green onions. Cook for one more minute to warm everything through. For the full recipe, don’t forget to check the complete details! To boost the flavor of your Zucchini Noodle Pad Thai, try adding some extras. You can use: - Sesame oil for a nutty taste. - Fish sauce for depth and umami. - Chili paste for a spicy kick. - Fresh herbs like basil for a fragrant finish. These additions can lift your dish from good to great! Stir-frying zucchini noodles takes practice. Here are some tips for the best texture: - Dry the noodles: After spiralizing, pat the noodles with a paper towel. This step helps avoid a soggy dish. - High heat: Use a hot skillet or wok. This helps the noodles cook quickly and stay crisp. - Don’t overcrowd: Cook in batches if needed to allow enough space for even cooking. These techniques keep your noodles crunchy and enjoyable. How you serve your Zucchini Noodle Pad Thai can make it more fun. Here are some ideas: - Use large bowls: This adds a nice touch and makes it easy to mix. - Layer ingredients: Create a colorful display with the noodles, veggies, and garnishes. - Add lime wedges: Placing lime wedges on the side allows guests to add extra zest. These serving tips can make your meal look as good as it tastes! {{image_4}} You can add different proteins to your Zucchini Noodle Pad Thai. Chicken, tofu, and shrimp are great options. For chicken, use boneless breasts or thighs. Dice them and cook until golden. Tofu is a fantastic choice for a meatless dish. Press and cube it, then fry until crispy. Shrimp cooks quickly and adds a nice touch. Just toss them in when the veggies are almost done. Feel free to customize your veggies. You can add snap peas, mushrooms, or broccoli. Each veggie gives a different taste and texture. Try adding bok choy or baby corn for crunch. Carrots add sweetness, while bell peppers bring color. Mix and match to suit your tastes. To enhance the Thai flavors, use fresh herbs. Thai basil or mint can brighten up the dish. You can add fish sauce for a salty kick. It gives depth to your Pad Thai. Another option is using tamarind paste. This adds a tangy flavor that is classic in Thai cuisine. Don’t forget to sprinkle some crushed peanuts on top for crunch! To keep your Zucchini Noodle Pad Thai fresh, store leftovers in an airtight container. Ensure the noodles are dry before storing. Excess moisture can make them soggy. Place the container in the fridge. Consume within three days for the best taste. To reheat, use a skillet over medium heat. Add a splash of oil to avoid sticking. Stir the noodles gently for about three to five minutes. This method keeps the texture and flavor intact. You can also use a microwave. Heat in short bursts. Stir between each burst to avoid hot spots. If you want to freeze Zucchini Noodle Pad Thai, first cool it completely. Then, place it in a freezer-safe bag or container. Remove as much air as possible. You can freeze for up to two months. When you're ready to eat, thaw it overnight in the fridge. Reheat in a skillet to restore its original texture. Using zucchini noodles offers many benefits. First, they are low in carbs. This makes them a great choice for those watching their carb intake. Zucchini is also rich in vitamins and minerals. It provides vitamin C, potassium, and antioxidants. These nutrients support overall health and wellness. Zucchini noodles have a light taste. They soak up flavors well from sauces and spices. This means you can enjoy your favorite dishes without the heaviness of traditional noodles. They are also very low in calories, which helps if you aim for a lighter meal. Plus, zucchini is high in water content, keeping you hydrated. Yes, you can prepare Zucchini Noodle Pad Thai in advance. Meal prep is easy with this dish. Just spiralize the zucchini and chop the veggies ahead of time. Keep them in airtight containers in the fridge. This way, they stay fresh for up to three days. When you are ready to cook, follow the recipe steps. You might want to cook the zucchini noodles just before serving. This keeps them crisp and flavorful. If you make the sauce ahead, store it separately. Mix it in just before serving for the best taste. To make Zucchini Noodle Pad Thai vegan, swap out the eggs. You can use tofu instead. Press and cube firm tofu before cooking. Add it to the stir-fry after the veggies. Cook until golden brown for a great texture. You should also check the soy sauce. Make sure it's vegan-friendly. Some brands may add fish sauce or other animal products. Finally, you can add a splash of coconut aminos for added flavor. This keeps the dish tasty and plant-based. In this blog post, we explored a delicious zucchini noodle Pad Thai recipe. I shared a complete list of ingredients, helpful tips for preparation, and nutritious options. We also discussed how to enhance flavors and presented various variations based on your taste. Lastly, I provided storage tips to keep leftovers fresh. Zucchini noodles offer a healthy, low-carb alternative that anyone can enjoy. By following these steps and suggestions, you can create a tasty dish that suits your preferences. Enjoy cooking and experimenting with these flavors!

Zucchini Noodle Pad Thai Flavorful and Simple Recipe

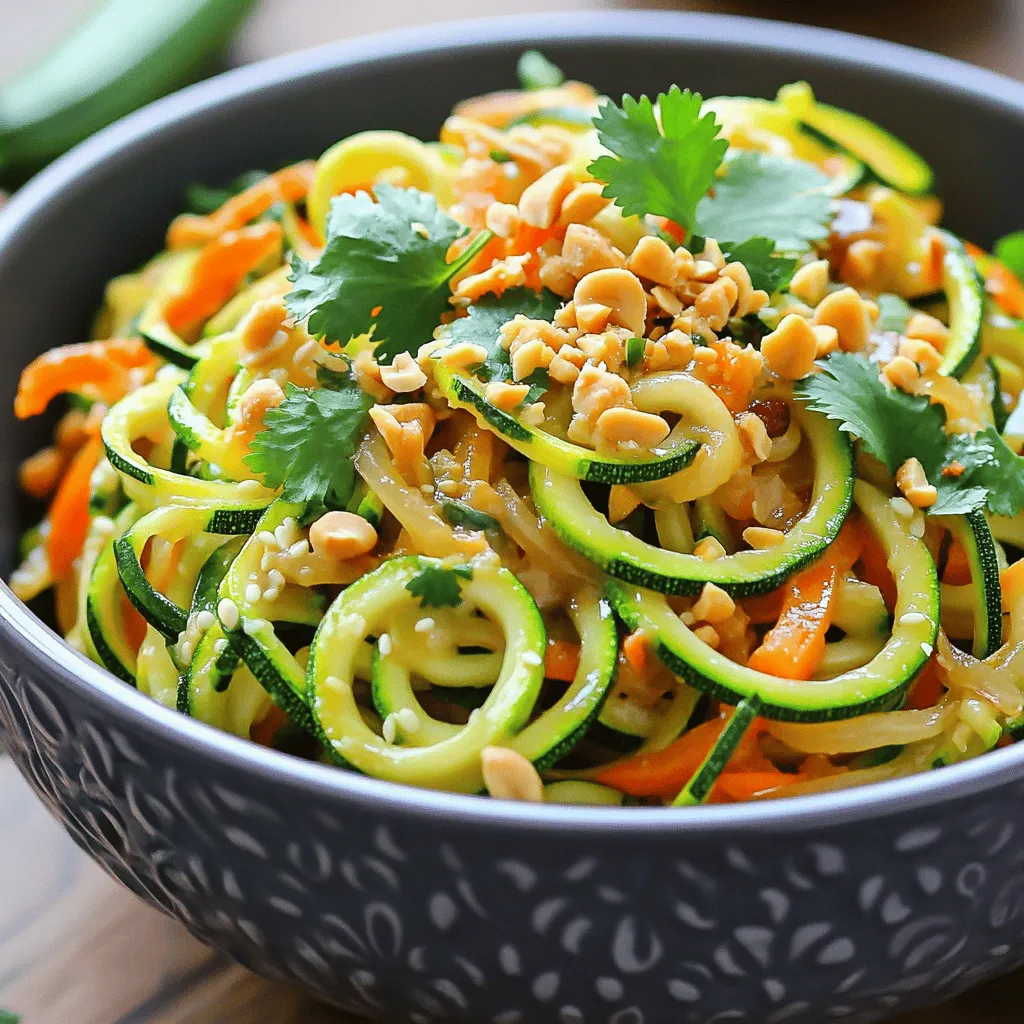
Are you ready to enjoy a fresh twist on a classic dish? My Zucchini Noodle Pad Thai recipe is both

- Chicken and Marinade Components - 1 lb (450g) boneless, skinless chicken thighs, sliced into strips - 3 tablespoons honey - 4 cloves garlic, minced - 2 tablespoons soy sauce - 1 tablespoon rice vinegar - 1 tablespoon cornstarch - Salt and pepper to taste - Vegetables Needed - 1 bell pepper (any color), sliced into thin strips - 1 cup broccoli florets, washed - 1 carrot, julienned - 2 green onions, sliced diagonally - Optional Garnishes - Sesame seeds for garnish Gathering these ingredients is key to making your honey garlic chicken stir-fry. The chicken thighs give a juicy bite and soak up the marinade well. Honey and garlic create a sweet and savory mix. Soy sauce adds depth, while rice vinegar offers zing. Cornstarch helps the sauce cling to the chicken and veggies. The vegetables bring color and crunch. Bell peppers add sweetness, broccoli offers nutrition, and carrots add a nice texture. Green onions add a fresh touch when you serve the dish. You can sprinkle sesame seeds for flavor and style. For the full recipe, check out the detailed cooking steps. Enjoy making this quick and flavorful meal! Start by making the marinade. Grab a medium bowl and whisk together three tablespoons of honey, four minced garlic cloves, two tablespoons of soy sauce, and one tablespoon of rice vinegar. Add one tablespoon of cornstarch and a pinch of salt and pepper. Mix until it’s smooth. Next, slice your chicken thighs into strips and add them to the bowl. Stir well to coat the chicken. Cover the bowl and let it sit for at least 15 minutes. This lets the chicken soak up those tasty flavors. After the chicken has marinated, it’s time to cook. Heat one tablespoon of vegetable oil in a large skillet or wok over medium-high heat. Wait until the oil shimmers. Carefully add the marinated chicken in a single layer. Cook it for about 5 to 7 minutes. Turn the chicken occasionally to ensure it browns nicely. It should be golden and reach an internal temperature of 165°F (75°C) when done. While the chicken cooks, prepare your vegetables. Slice a bell pepper into thin strips, wash one cup of broccoli florets, and julienne one carrot. Set these aside. Once your chicken is cooked, add the sliced bell pepper, broccoli florets, and carrot to the pan. Stir-fry everything for 3 to 5 minutes. You want the veggies to be tender-crisp and colorful. Now, it’s time to bring it all together. Pour any remaining marinade over the chicken and vegetables in the pan. Stir gently to coat everything evenly. Let it cook for one more minute to thicken the sauce. This step will enhance the flavors even more. Once done, remove the pan from heat. Sprinkle with sliced green onions and sesame seeds for a nice crunch. Serve your honey garlic chicken stir-fry hot over steamed rice or noodles for a delightful meal. For the full recipe, refer to the instructions above. The marinade makes this dish special. Use fresh garlic for the best taste. Honey adds sweetness, while soy sauce gives a savory touch. Mix these ingredients well. Let the chicken sit in the marinade for at least 15 minutes. This helps the flavors soak in. For extra flavor, try adding ginger or chili flakes. Heat your pan well before cooking. A hot pan helps the chicken brown nicely. Add the chicken in one layer. This keeps it from steaming and helps it cook evenly. Stir the chicken often to avoid burning. When the chicken is golden brown, it’s ready for veggies. Add them quickly to keep the crunch. Serve your Honey Garlic Chicken Stir-Fry over rice or noodles. This absorbs the yummy sauce. You can also add a side salad for freshness. Top with green onions and sesame seeds for a nice look. This dish tastes great the next day, too. Keep it in the fridge and enjoy later. For the full recipe, check the details above. {{image_4}} You can change the protein in this dish. Chicken is great, but try shrimp or tofu. Both options work well with the honey and garlic sauce. Shrimp cooks fast and adds a nice texture. Tofu soaks up flavors and is a healthy choice. Use the same marinating method to keep it simple. Feel free to swap out the veggies. Use snap peas, zucchini, or mushrooms if you prefer. These vegetables add different tastes and textures. You can also mix in baby corn or bok choy for more crunch. Just make sure to cut them into similar sizes for even cooking. You can tweak the sauce to match your taste. Want it spicier? Add red pepper flakes or sriracha. If you like sweeter flavors, increase the honey a bit. For a tangy twist, use lime juice instead of rice vinegar. Each small change can make a big difference in flavor. Explore what you enjoy the most! After you enjoy your Honey Garlic Chicken Stir-Fry, store any leftovers in an airtight container. Place it in the fridge within two hours of cooking. It stays fresh for about three to four days. When you want to eat it again, just grab it from the fridge. You can freeze this stir-fry too. Let it cool completely before you pack it up. Use a freezer-safe container or a zip-top bag. Make sure to remove as much air as possible. This dish can last for about three months in the freezer. When you’re ready, thaw it in the fridge overnight. To reheat, you have a few choices. You can use the microwave or the stovetop. If using the microwave, heat it in short bursts, stirring in between. This helps it warm evenly. If you prefer the stovetop, heat it gently in a pan over low heat. Add a splash of water or broth to keep it moist. Enjoy it warm for a tasty meal again! For the full recipe, check out the complete article on Honey Garlic Chicken Stir-Fry. You can make Honey Garlic Chicken Stir-Fry healthier by using lean chicken breast instead of thighs. You can also reduce the amount of honey and soy sauce. Opt for low-sodium soy sauce to cut down on salt. Adding more vegetables boosts fiber and nutrients. Try adding spinach, snap peas, or zucchini for extra color and taste. Yes, you can use other sauces in this recipe. If you want a different flavor, try teriyaki or sweet chili sauce. You can also use hoisin sauce for a richer taste. Mixing in some sriracha adds a spicy kick. Just keep the balance of sweet and savory to maintain the dish's essence. Honey Garlic Chicken Stir-Fry is great for meal prep. You can cook a larger batch and store it in the fridge. It keeps well for about three to four days. Just make sure to cool it down before storing. Reheat it in a pan or microwave when you're ready to eat. This way, you enjoy a quick, tasty meal anytime. This blog post covered key steps to make a tasty Honey Garlic Chicken Stir-Fry. We discussed the ingredients needed, from chicken and marinade to veggies and garnishes. I shared simple, clear instructions for marinating, cooking, and serving. You also learned helpful tips, variations for your dish, and ways to store leftovers. In conclusion, making this stir-fry is easy and fun. Enjoy customizing it to fit your taste. Your kitchen will fill with great aromas and flavors. Dive in and start cooking!

Honey Garlic Chicken Stir-Fry Flavorful and Quick Meal

Ready for a quick and tasty dinner? Honey Garlic Chicken Stir-Fry is the perfect choice! This dish is packed with

Older posts
Newer posts
← Previous Page1 … Page76 Page77 Page78 … Page86 Next →

dsad

© 2026 yumymoments • Built with GeneratePress

Our Policies

  • Copyright Policy
  • Cookie Policy
  • GDPR Policy
  • Privacy Policy
  • Disclaimer
  • Terms Of Use

More Information

  • Home
  • About
  • Contact
  • Appetizers
  • Dessert
  • Dinner
  • Drinks
©2026, yumymoments About Back To Top