Skip to content
DisclaimerTerms Of UseGDPR PolicyCookie Policy

yumymoments

  • Home
  • Drinks
  • Appetizers
  • Dinner
  • Dessert
  • About
  • Contact
  • Privacy Policy
DisclaimerTerms Of UseGDPR PolicyCookie Policy

NO-ING-IMG

To make this creamy spinach artichoke dip, you need the following: - 1 cup frozen spinach, thawed and drained well - 1 cup artichoke hearts, chopped finely - 1 cup cream cheese, softened - 1/2 cup sour cream - 1/2 cup mayonnaise - 1 cup shredded mozzarella cheese - 1/2 cup grated Parmesan cheese - 2 cloves garlic, minced - 1 teaspoon onion powder - 1 teaspoon dried oregano - Salt and black pepper to taste These ingredients create a rich and creamy base. The spinach and artichokes add a nice flavor and texture. You can add a few things to make it even better. Some ideas include: - Chopped fresh herbs like parsley or basil for freshness - A pinch of red pepper flakes for a kick - Cooked bacon bits for a smoky flavor - A squeeze of lemon juice to brighten the taste Feel free to mix and match these optional additions based on what you like. If you don’t have some of these ingredients, don’t worry! Here are some easy swaps: - Use fresh spinach instead of frozen. Just cook it down first. - Swap cream cheese with Greek yogurt for a lighter dip. - For a dairy-free option, try using cashew cream instead of cheese. - Use different cheeses, like cheddar or pepper jack, for a unique flavor. These substitutions allow you to customize the dip to your taste or dietary needs. Check out the Full Recipe for all the details! First, gather all your ingredients. This makes cooking easy and fun. You will need: - 1 cup frozen spinach, thawed and drained - 1 cup chopped artichoke hearts - 1 cup softened cream cheese - 1/2 cup sour cream - 1/2 cup mayonnaise - 1 cup shredded mozzarella cheese - 1/2 cup grated Parmesan cheese - 2 cloves minced garlic - 1 teaspoon onion powder - 1 teaspoon dried oregano - Salt and pepper to taste Make sure to thaw and drain the spinach well. This keeps the dip from being watery. Chop your artichoke hearts finely. This helps them mix well in the dip. In a large bowl, mix the cream cheese, sour cream, and mayonnaise. Use a hand mixer or spatula. Blend until smooth. This step gives your dip a creamy base. Next, gently fold in the spinach and artichokes. Then, add the mozzarella and Parmesan cheese. Stir until everything is well combined. Now, add the minced garlic, onion powder, and oregano. Season with salt and pepper to taste. This step adds flavor to every bite. Mix thoroughly to ensure all the flavors blend together. Transfer the dip mixture into a baking dish. Smooth the top with a spatula. Preheat your oven to 350°F (175°C). Bake for 25-30 minutes. You want it to bubble and turn golden brown on top. After baking, carefully take it out. Let it cool for 5-10 minutes. This helps the flavors meld. Serve it warm with toasted baguette slices or crispy tortilla chips. Enjoy every creamy bite of your delicious dip! For the full recipe, check the section above. To get the right creamy texture, start by thawing the frozen spinach. Drain it well. You want no extra water. Mix your cheeses together first. This helps them blend smoothly. If you want it extra creamy, use more cream cheese. For a thicker dip, add less sour cream. Always fold in the spinach and artichokes gently. This keeps the dip fluffy. Serve your dip warm for the best taste. Pair it with toasted baguette slices or crispy tortilla chips. Fresh veggies like carrots and bell peppers work great too. For a fancy touch, sprinkle extra Parmesan on top. You can also add fresh herbs like parsley. They make your dip look colorful and fresh. To boost the flavor, add more garlic or even some red pepper flakes. A squeeze of lemon juice brightens the taste too. For a unique twist, try adding sun-dried tomatoes. They add a nice tartness. You can also experiment with different cheeses. Try using goat cheese for a tangy kick. Remember, the key is to balance the flavors. Taste as you go! For the full recipe, check out Creamy Spinach Artichoke Bliss Dip. {{image_4}} You can make a tasty dairy-free version of this dip. Swap out the cream cheese, sour cream, and mayonnaise for plant-based options. Use cashew cream for creaminess. Silken tofu also works well. For a tangy taste, try coconut yogurt. These swaps keep the dip rich and creamy without dairy. If you love heat, add some spice to your dip! Mix in diced jalapeños or a dash of hot sauce. You can also add a sprinkle of red pepper flakes. For a smoky flavor, try using chipotle peppers. This adds a nice kick and makes your dip stand out. Cheese lovers can boost the flavor even more. Add extra cheese like cheddar or gouda for a unique taste. You can also mix in crumbled feta for a tangy twist. For a gourmet touch, consider a sprinkle of blue cheese. These cheesy additions create layers of flavor in your dip. For the full recipe, check out the Creamy Spinach Artichoke Bliss Dip. After you make the creamy spinach artichoke dip, let it cool. Store it in an airtight container. It will stay fresh in the fridge for up to four days. Make sure to cover it well to keep the flavors intact. When you're ready to enjoy it again, just take it out of the fridge. You can freeze this dip if you want to save it for later. First, let it cool completely. Then, place it in a freezer-safe container. Seal it tightly to prevent freezer burn. This dip can last for about three months in the freezer. To use, thaw it in the fridge overnight before reheating. Reheating the dip is easy. If you stored it in the fridge, you can warm it in the microwave. Heat it in short bursts, stirring in between, until it’s hot. If it's frozen, first thaw it in the fridge. Then, you can reheat it in the oven at 350°F (175°C) for about 15-20 minutes. This will help it regain its creamy texture. Always check that it’s heated all the way through before serving. Enjoy your creamy spinach artichoke dip with your favorite snacks! Yes, you can make this dip ahead of time. Prepare it a day in advance and store it in the fridge. Just cover the baking dish tightly with plastic wrap. When you are ready to enjoy it, remove the wrap and bake. This makes it easy for parties or gatherings. The flavors meld together nicely when it sits overnight. You have many tasty options to serve with this dip. Here are a few ideas: - Toasted baguette slices - Crispy tortilla chips - Fresh vegetable sticks like carrots, celery, and bell peppers - Pita chips or crackers Each option adds a unique crunch and flavor. You can mix and match to please your guests. You will know the dip is done when it is bubbly and golden brown on top. This usually takes about 25-30 minutes in the oven at 350°F (175°C). Keep an eye on it to avoid over-baking. A toothpick inserted in the center should come out clean. Let it cool for a few minutes before serving. This allows the flavors to come together and makes it easier to scoop. Enjoy every creamy bite! This blog post covered how to make creamy spinach artichoke dip from start to finish. We explored the main ingredients and shared optional options and substitutions. You learned step-by-step instructions for prepping, mixing, and baking. We offered tips to perfect the texture and ideas for serving it. Variations for dairy-free and spicy options were included, plus storage and reheating tips. With these details, you can create a fantastic dip. Enjoy sharing it with friends or family!

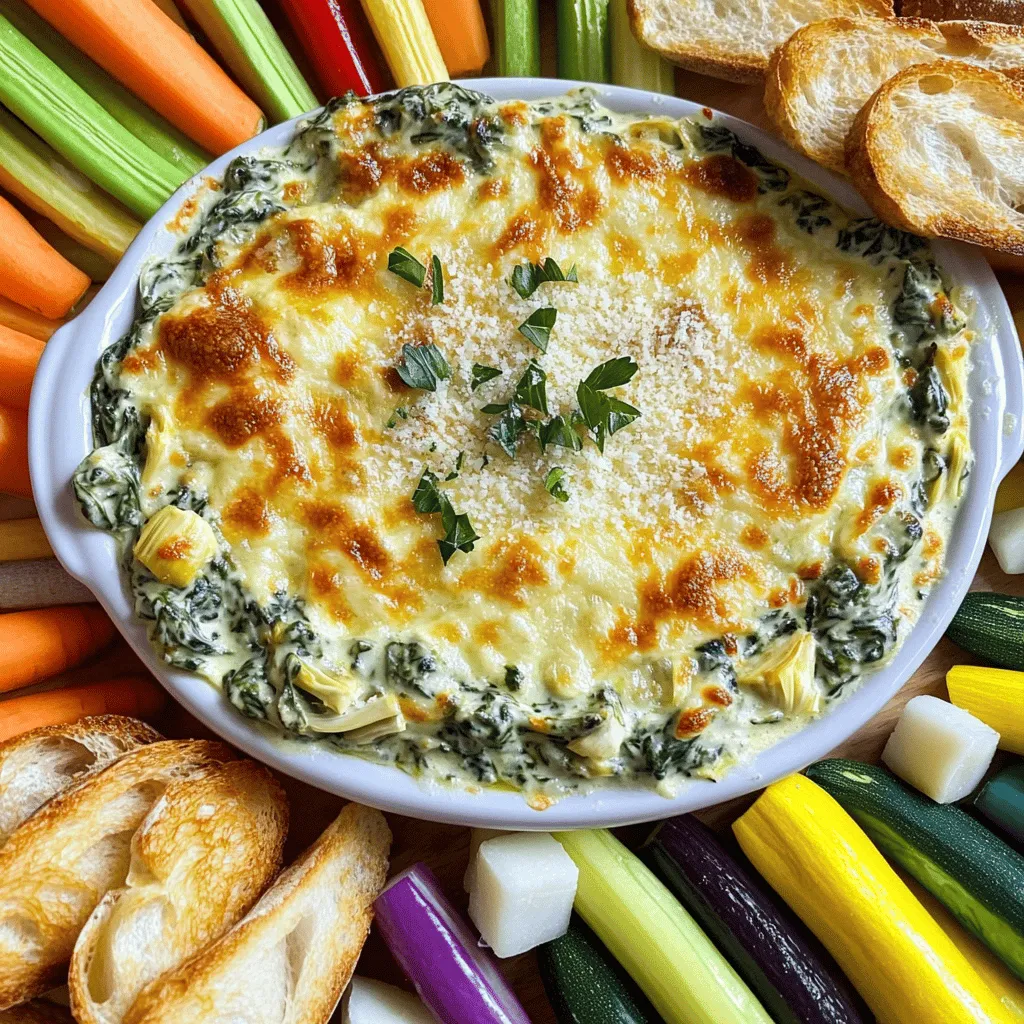
Creamy Spinach Artichoke Dip Rich and Flavorful Treat

If you love dips that are rich and flavorful, you’re in for a treat! Creamy Spinach Artichoke Dip is a

To make delicious apple cinnamon overnight oats, gather these simple items: - 1 cup rolled oats - 1 ½ cups almond milk (or any milk of your choice) - 1 medium apple, diced (I recommend Fuji or Honeycrisp for sweetness) - 1 teaspoon ground cinnamon - 2 tablespoons maple syrup (or honey for a natural sweet touch) - ¼ cup Greek yogurt (optional, adds creaminess) - 2 tablespoons chopped walnuts or pecans (for a nice crunch) - A pinch of salt - Additional apple slices and a sprinkle of cinnamon for topping You can easily swap some ingredients if you need to: - Instead of almond milk, use oat milk or cow's milk. - Any apple can work, but sweeter ones taste best. - Swap maple syrup for agave nectar or brown sugar. - If you don't have Greek yogurt, regular yogurt works too. - Use any nuts you prefer, like almonds or hazelnuts, for crunch. Toppings make your oats even better. Here are some tasty ideas: - More apple slices for extra fruitiness. - A sprinkle of nutmeg for a warm spice. - A dollop of yogurt for added creaminess. - A drizzle of honey or maple syrup for extra sweetness. - Shredded coconut for a tropical twist. These tips and ideas help you make the best apple cinnamon overnight oats. Enjoy! To start, gather your ingredients. You will need rolled oats, almond milk, a medium apple, cinnamon, maple syrup, and optional Greek yogurt. You can also have nuts for crunch. Choose a mixing bowl or a mason jar for this recipe. 1. Add 1 cup of rolled oats to your bowl or jar. 2. Pour in 1 ½ cups of almond milk. 3. Dice your apple and add it in. 4. Sprinkle in 1 teaspoon of cinnamon and 2 tablespoons of maple syrup. 5. If you want creaminess, add ¼ cup of Greek yogurt. 6. Lastly, toss in a pinch of salt. Use a spoon to mix all the ingredients well. Make sure the oats soak up the flavors. You want every bite to be tasty. If you see any dry oats, give them a little extra love with your spoon. Cover your bowl or seal the jar. Place it in the fridge for at least 6 hours, or overnight. Soaking helps the oats become soft and yummy. In the morning, take out your oats. Give them a good stir. If they feel thick, add a splash of milk to thin them out. Serve the oats in bowls. Top with extra apple slices, a sprinkle of cinnamon, and chopped nuts for crunch. This makes your breakfast look great and taste even better. For the full recipe, check out the details above! To boost flavor, select ripe apples like Fuji or Honeycrisp. Their natural sweetness shines. Add spices like nutmeg or ginger for a warm twist. A hint of vanilla extract can elevate the taste. Use fresh ingredients for the best results. Toppings like chopped nuts or seeds provide crunch and flavor. For creamy oats, use enough milk. Start with 1 ½ cups, but adjust as needed. If the oats are thick in the morning, add a splash of milk. Stir well to combine. If you prefer a thicker texture, reduce the milk slightly. Consistency can vary based on the oat brand, so feel free to experiment. Make a big batch for easy breakfasts. Prepare several jars at once. Just multiply the ingredients by the number of servings you want. Store them in the fridge for up to five days. This makes morning meals quick and easy. You can even layer different fruits in each jar for variety. For the full recipe, check the detailed instructions for making Apple Cinnamon Overnight Oats. {{image_4}} You can change the fruit in your apple cinnamon overnight oats. Try using ripe bananas for a sweet touch. Berries, like strawberries or blueberries, add a burst of color and flavor. Chopped peaches or pears also work well. Just remember, use what you enjoy. Each fruit brings its own taste and texture. Mixing in different nuts can change the crunch and taste. Almonds, pecans, or hazelnuts all add great flavor. You can also add seeds like chia or flax for extra nutrition. If you want more spice, add nutmeg or ginger. A dash of vanilla can give your oats a warm, inviting flavor. To keep it vegan, use almond milk or coconut milk instead of dairy milk. Skip the Greek yogurt or swap it for a plant-based yogurt. Maple syrup is a great sweetener. It’s vegan and adds a nice flavor. This way, you enjoy healthy oats without dairy. To store your apple cinnamon overnight oats, use an airtight container. A mason jar works great. Make sure the lid seals tightly. This keeps the oats fresh and tasty. If you make a batch for the week, you can separate them into individual jars. This makes it easy to grab a quick breakfast. Your overnight oats will last in the fridge for up to five days. After that, the oats may get mushy. If you want to keep them longer, freeze them. You can freeze the mixture in jars or freezer bags. Just leave a little space at the top since the oats will expand. They can stay frozen for up to three months. If you prefer warm oats, you can reheat them. Just add a splash of milk to the jar. This helps keep the oats from drying out. Heat them in the microwave for about one minute. Stir well and check the temperature. You want it warm but not hot. Enjoy your warm apple cinnamon oats! For the full recipe, check out the details above. Rolled oats are best for overnight oats. They absorb liquid well. They turn soft but still hold some shape. Quick oats can get mushy. Steel-cut oats take longer to soften. Stick with rolled oats for a perfect texture. Yes, you can use water instead of milk. However, using milk adds creaminess and flavor. Almond milk, oat milk, or regular milk works well. If you want a lighter option, water is fine. Just remember it may taste less rich. To make overnight oats creamier, add Greek yogurt. It boosts creaminess and adds protein. You can also use more milk or add nut butter. Mixing in mashed banana can help too. Adjust the liquid to get your desired texture. Yes, overnight oats are healthy. They are full of fiber and keep you full. Oats support heart health and digestion. Adding fruits and nuts boosts nutrients. Use natural sweeteners like maple syrup for flavor. Overall, they make a balanced breakfast option. We explored everything you need for perfect overnight oats. You learned about key ingredients, substitutions, and tasty toppings. I shared step-by-step instructions and cooking tips for flavor and consistency. We discussed fun variations and how to store them to keep them fresh. Remember, overnight oats are simple, healthy, and customizable. Experiment with fruits and flavors that you love. With these insights, you can create a dish that suits your tastes and needs. Enjoy your delicious, quick breakfasts!

Apple Cinnamon Overnight Oats Easy and Healthy Recipe

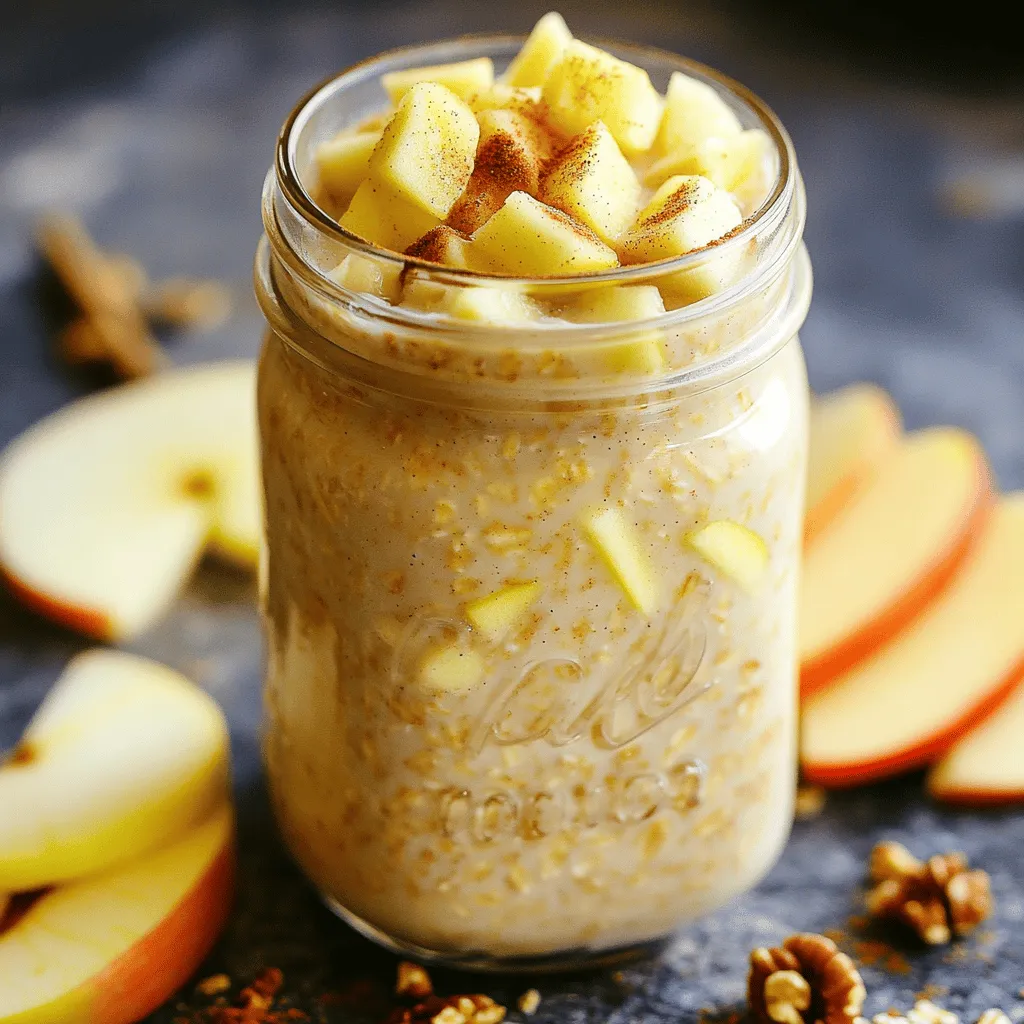
You deserve a tasty, easy breakfast that makes your mornings bright. Apple Cinnamon Overnight Oats are just that! In this

- 1 ¾ cups graham cracker crumbs - ½ cup unsweetened cocoa powder - ½ cup unsalted butter, melted - 1 cup Nutella - 16 oz cream cheese, softened at room temperature - ½ cup powdered sugar - 1 teaspoon pure vanilla extract - 1 cup heavy whipping cream The main ingredients create a rich and creamy cheesecake. The graham cracker crumbs form a crunchy base. Nutella adds that delicious chocolate-hazelnut flavor. Cream cheese provides smoothness and richness. - Chocolate shavings - Hazelnuts for garnish Optional ingredients can enhance your cheesecake. Adding chocolate shavings gives it a fancy touch. Chopped hazelnuts add crunch and flavor. You can skip these if you want a simpler look. For small servings, you can cut the recipe in half. Use ½ cup graham cracker crumbs and ¼ cup Nutella. For larger servings, double the amounts. This way, you can serve more friends and family. Adjust the portions depending on your gathering size. Experiment with the ratios to find what works best for you. For the Full Recipe, check the instructions above. Enjoy making your cheesecake! To start, you need to make the crust. In a medium bowl, combine graham cracker crumbs and cocoa powder. This mix gives your crust a rich chocolate flavor. Next, pour in melted unsalted butter. Mix well until the texture feels like wet sand. Now, it’s time to form the crust. Press this mixture firmly into the bottom of a 9-inch springform pan. Use the back of a measuring cup or your fingers to compact it tightly. Make sure it’s even so it holds together well. Place the pan in the refrigerator to chill while you prepare the filling. Next, let’s make the filling. In a large bowl, beat the softened cream cheese. Use an electric mixer on medium speed until it is smooth and creamy. Add in Nutella, powdered sugar, and pure vanilla extract. Keep mixing until everything is well blended and creamy. Now, we need to whip the cream. In a separate bowl, whip the heavy whipping cream until it forms soft peaks. This step is key for a fluffy cheesecake. Carefully fold the whipped cream into the Nutella mixture. Be gentle to keep the filling light and airy. It’s time to assemble the cheesecake. Pour the Nutella filling over the chilled crust in the springform pan. Use a spatula to smooth the top into an even layer. Now, cover the springform pan tightly with plastic wrap. Refrigerate the cheesecake for at least 4 hours. For the best flavor and texture, chill it overnight. After it sets, the cheesecake will be ready to serve. To get the best flavor and texture, start by ensuring your cream cheese is at room temperature. Cold cream cheese can create lumps in your filling. It’s best to leave it out for about an hour before you make the cheesecake. This small step makes a huge difference in how smooth your cheesecake turns out. When making the filling, gently fold in the whipped cream. This keeps the mixture light and airy. If you stir too hard, you risk losing that fluffy texture. Use a spatula to carefully combine the whipped cream with the Nutella mixture. For the best experience, serve your cheesecake with fresh fruit. Berries like strawberries or raspberries add a nice contrast to the rich filling. You can also pair it with a scoop of vanilla ice cream for an extra treat. For presentation, try serving slices on colorful plates. Top each slice with a dollop of whipped cream and a drizzle of Nutella. Chocolate shavings or chopped hazelnuts also add a nice touch. These details make each serving feel special. One common mistake is overmixing the filling. This can make your cheesecake dense instead of creamy. Mix just until the ingredients are combined, and then stop. Another mistake is skipping the chilling period. It’s tempting to cut into the cheesecake right away, but this is crucial. Let your cheesecake chill for at least four hours, or better yet, overnight. This allows the flavors to meld and the texture to set properly. For the full recipe, check the details earlier in the article. {{image_4}} You can change the flavor of your cheesecake by using different spreads. For example, swap Nutella for peanut butter. This gives a new taste while keeping it creamy. You can also add flavored extracts. A little almond or hazelnut extract can enhance the Nutella flavor. These small changes can make a big difference in taste. If you need a gluten-free version, use gluten-free graham cracker crumbs. This swap ensures everyone can enjoy the dessert. For a vegan alternative, use plant-based cream cheese and whipped cream. This keeps the texture rich while being dairy-free. There are many options to fit different diets without losing flavor. Seasonal fruits can be a fun way to adapt the cheesecake. Top it with fresh strawberries in spring or pumpkin in fall. You can also create themed decorations for holidays. For Halloween, add spooky chocolate designs; for Christmas, use festive sprinkles. These touches make your cheesecake special for any occasion. Explore the [Full Recipe] to create your perfect no-bake Nutella cheesecake. Your no-bake Nutella cheesecake lasts in the fridge for about five days. To keep it fresh, wrap it tightly with plastic wrap or cover it with a lid. This helps prevent it from picking up other flavors from the fridge. You can also place it in an airtight container for extra protection. For long-term storage, you can freeze the cheesecake. First, let it set in the fridge for at least four hours. Then, slice it into pieces and wrap each slice in plastic wrap. After that, place the wrapped slices in a freezer bag. This way, you can enjoy a slice whenever you want. To thaw, simply move a slice to the fridge for several hours or overnight. After storage, the cheesecake may lose some of its creamy texture. To bring back its flavor and creaminess, simply let it sit at room temperature for about 30 minutes before serving. This helps restore its smoothness. If needed, add a dollop of whipped cream or a drizzle of Nutella on top before serving. This adds a fresh touch and makes it more enjoyable! A no-bake cheesecake needs at least 4 hours to set. For the best results, chill it overnight. This longer time helps the flavors blend and the texture firm up. If you cut it too soon, it may be too soft. Waiting ensures a perfect slice every time. You can use low-fat cream cheese, but the texture may change. Low-fat cream cheese often feels less creamy. This might affect the rich taste of your cheesecake. For the best flavor and smoothness, I recommend using full-fat cream cheese. To cut a no-bake cheesecake neatly, use a warm knife. Dip your knife in hot water, then wipe it dry. This helps create clean slices. After each cut, warm the knife again. This way, each piece looks perfect on the plate. Yes, you can make this cheesecake ahead of time. It’s actually better to make it a day in advance. This gives the flavors time to develop. Just store it tightly wrapped in the fridge. You’ll have a delicious dessert ready to impress your guests. You now have all the steps for a tasty no-bake cheesecake. Remember the key ingredients: graham cracker crumbs, Nutella, and cream cheese. Follow the simple instructions for a smooth crust and creamy filling. Use the tips to avoid pitfalls and get perfect results. Don't be afraid to try variations for different flavors or dietary needs. Store the cheesecake properly to keep it fresh. This dessert is sure to impress anyone who tries it. Enjoy making and sharing this delicious treat!

No-Bake Nutella Cheesecake Easy and Creamy Treat

Are you craving a sweet treat that’s both easy and delicious? Look no further! This No-Bake Nutella Cheesecake is the

- 4 boneless, skinless chicken breasts - 4 cloves of garlic, finely minced - 1/4 cup fresh lemon juice (about 2 lemons) - 1 teaspoon fresh lemon zest - 1/4 cup extra virgin olive oil - 2 teaspoons dried oregano - 2 teaspoons dried thyme - 1 teaspoon sweet paprika - Salt and freshly ground black pepper to taste - Fresh parsley, finely chopped (for garnish) The key ingredients in this recipe work well together. The chicken breasts are the main part. Each breast should be about 6 ounces for best results. Use 4 cloves of garlic for strong flavor. The lemon juice adds brightness and tang, so use 1/4 cup for a balanced taste. The olive oil helps keep the chicken moist. Using 1/4 cup of oil is perfect. Dried oregano and thyme give a nice herb taste. Two teaspoons of each is just right. For a hint of sweetness, add one teaspoon of sweet paprika. Season with salt and black pepper to taste. Choose fresh chicken breasts for the best flavor. Look for breasts that are plump and pink. Fresh garlic adds a strong taste. Use lemons that feel heavy for their size; they will be juicy. Extra virgin olive oil should smell fresh and fruity. Dried herbs should be stored in a cool, dark place. Check the date on the jar to ensure they are not old. Fresh parsley should be bright green and crisp. This way, it will add great color and taste to your dish. For the full recipe, follow the steps closely to ensure a delicious result. To start, gather your ingredients. You'll need garlic, lemon juice, lemon zest, olive oil, oregano, thyme, paprika, salt, and pepper. In a medium bowl, mix the minced garlic, lemon juice, lemon zest, olive oil, dried oregano, dried thyme, paprika, salt, and pepper. Whisk it all together until smooth. This marinade gives the chicken a bright, fresh flavor. Next, take your chicken breasts. Place them in a large resealable bag or a shallow dish. Pour the marinade over the chicken. Make sure each piece is coated well. Seal the bag tightly or cover the dish. Refrigerate for at least one hour. For the best taste, marinate for up to four hours. This step helps the chicken soak up all the tasty flavors. Now, it’s time to grill. Preheat your grill to medium-high heat. This helps get nice grill marks. Remove the chicken from the fridge. Let any extra marinade drip off. Place it on the hot grill. Cook for about 6-7 minutes on each side. Check the chicken’s temperature; it should be 165°F (75°C). The outside should look golden brown. After grilling, let the chicken rest for five minutes. This keeps it juicy when you slice it. Before serving, sprinkle fresh parsley on top for a pop of color. For the full recipe, check the section above. To get those perfect grill marks, preheat your grill well. A hot grill sears the chicken and creates those lovely lines. Place the chicken on the grill without moving it for the first few minutes. This helps form a nice crust. After three to four minutes, rotate the chicken 90 degrees. This gives you that crosshatch look. Flip the chicken only once to keep it juicy and tender. Cooking time depends on the thickness of your chicken breasts. Thin breasts cook fast, about 5-6 minutes per side. Thicker ones may need 7-8 minutes. To be sure, use a meat thermometer. The chicken should reach 165°F (75°C) inside. If you don't have one, cut into the thickest part. The juices should run clear, not pink. After grilling, let the chicken rest for 5 minutes. This step is key for juicy chicken. Resting lets the juices redistribute. If you cut too soon, the juices escape, making the chicken dry. Cover it loosely with foil to keep it warm. This small step makes a big difference in flavor. For the complete cooking process, check out the Full Recipe. {{image_4}} You can change the flavor of your grilled chicken with different citrus fruits. Try lime or orange juice instead of lemon. Each fruit adds its unique taste. You can also mix herbs. Use fresh basil or cilantro for a fresh twist. These changes keep the meal fun and new. If you don’t have a grill, don’t worry! You can cook this chicken in the oven or on the stovetop. For the oven, preheat it to 400°F (200°C). Place the marinated chicken on a baking sheet. Bake it for about 20-25 minutes. Check that it reaches 165°F inside. If using the stovetop, heat a skillet over medium-high heat. Add a little oil and cook the chicken for 6-7 minutes on each side. Both methods give you tasty results. Once your chicken is grilled, it’s time to serve! I love to place the chicken on a large platter. Add fresh lemon wedges and a sprinkle of parsley for color. You can pair it with grilled veggies or a fresh salad. For a comforting side, serve it with rice or mashed potatoes. These options make your meal feel complete and satisfying. Check out the Full Recipe for more ideas to impress your guests! After enjoying your Lemon Garlic Herb Grilled Chicken, store leftovers in an airtight container. Keep it in the fridge for up to three days. Make sure the chicken cools down first. This keeps it fresh and tasty for your next meal. To reheat the chicken, use a microwave or oven. If using a microwave, place the chicken on a microwave-safe plate. Heat it for about 1-2 minutes. Check if it's warm throughout. For the oven, preheat to 350°F (175°C). Wrap the chicken in foil and heat for 10-15 minutes. This helps keep it juicy and flavorful. If you want to save some chicken for later, freezing is a great option. Place the cooked chicken in a freezer-safe bag. Remove as much air as possible before sealing. You can freeze it for up to three months. When you're ready to eat, thaw it in the fridge overnight. Then, reheat it as mentioned above. Enjoy that delicious flavor anytime! For the full recipe, check out the Lemon Garlic Herb Grilled Chicken details above! You can serve Lemon Garlic Herb Grilled Chicken with many sides. I love pairing it with grilled vegetables, like zucchini or bell peppers. A fresh salad with greens and a light vinaigrette also works well. Rice or quinoa can add a nice touch, too. You might even try garlic bread for a hearty meal. These sides bring out the chicken's bright lemon flavor. Yes, you can use different meats if you like. This marinade is great on chicken thighs or pork chops. You can also try it on fish, like salmon or tilapia. Just keep in mind that cooking times may change based on the meat you choose. Always check the internal temperature to ensure it’s safe to eat. To know if your chicken is done, use a meat thermometer. The internal temperature should reach 165°F (75°C). You can also check the juices; they should run clear, not pink. The chicken should look golden brown and have nice grill marks. Let it rest for five minutes after grilling to keep it juicy. In this post, we covered the key ingredients for Lemon Garlic Herb Grilled Chicken and how to prepare them. We explored step-by-step instructions for marinating and grilling. You learned tricks for perfect grill marks and proper cooking times. We discussed variations, including cooking methods and serving ideas, and wrapped up with storage tips. Grilled chicken can be simple and delicious with the right approach. Try these methods to enjoy your meals even more. Enjoy experimenting with flavors and cooking styles!

Lemon Garlic Herb Grilled Chicken Simple and Tasty Meal

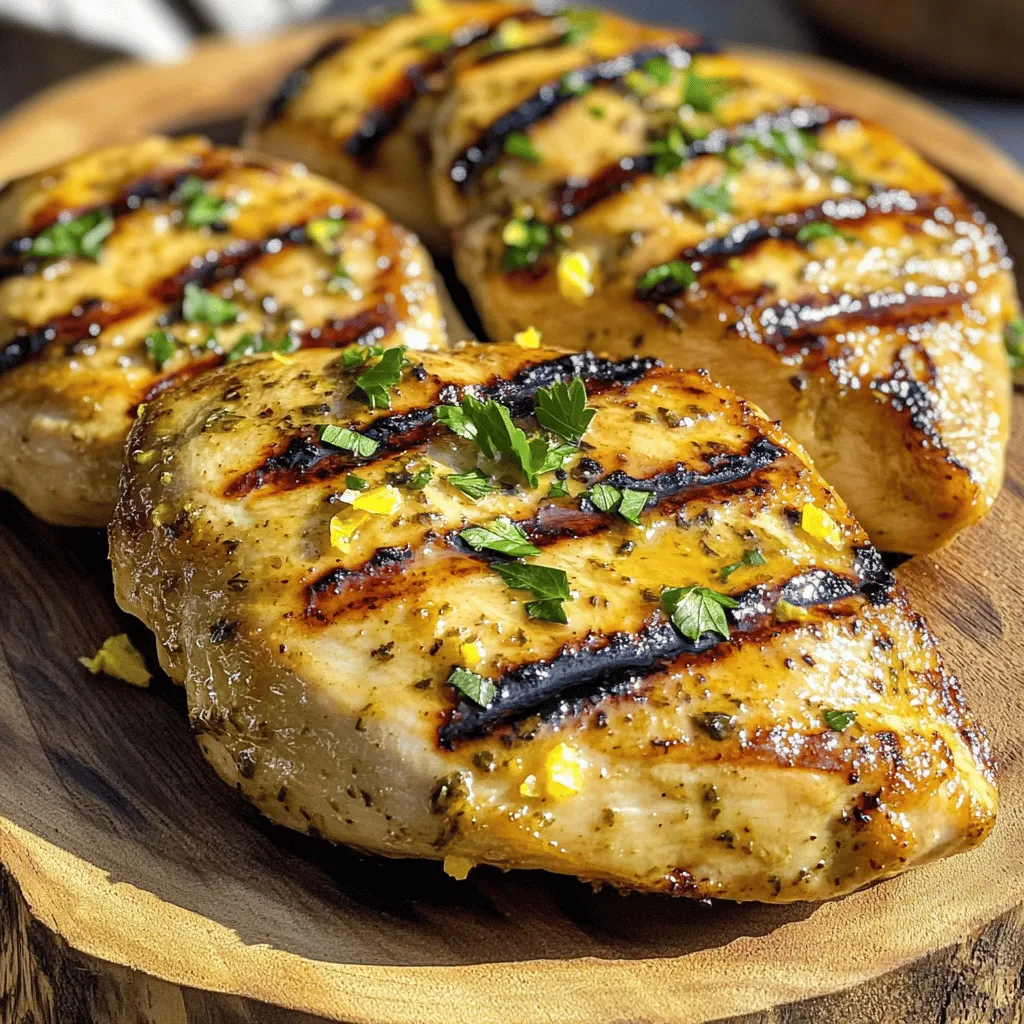
Are you ready to learn how to make Lemon Garlic Herb Grilled Chicken? This simple and tasty meal packs a

To make these tasty chocolate chip cookie dough bites, gather these items: - 1 cup all-purpose flour (heat-treated for safety) - 1/2 cup packed brown sugar - 1/4 cup granulated sugar - 1/2 cup unsalted butter, softened to room temperature - 1 teaspoon pure vanilla extract - 2 tablespoons milk (or dairy-free alternative, like almond or oat milk) - 1/2 cup semi-sweet chocolate chips - 1/4 teaspoon fine sea salt - 1/4 cup mini chocolate chips (for coating) If you want to make some changes, here are a few ideas: - For gluten-free bites, use almond flour or gluten-free flour blends. - For a vegan option, swap the butter for coconut oil and use dairy-free chocolate chips. - Use maple syrup instead of granulated sugar for a different flavor. Heat-treating flour makes it safe to eat raw. Raw flour can carry germs like E. coli. To heat-treat, spread flour on a baking sheet and bake it for 5-7 minutes at 350°F (175°C). Let it cool before using it in your recipe. This step ensures that your cookie dough bites are safe and delicious! To start, we need to heat-treat the flour. Preheat your oven to 350°F (175°C). Line a baking sheet with parchment paper. Spread the all-purpose flour evenly on the sheet. Bake it for about 5-7 minutes. This step helps kill any harmful bacteria. Once done, let the flour cool completely. Next, mix the base. In a large bowl, cream the softened butter with both sugars using an electric mixer or a sturdy spatula. Beat until light and fluffy, which takes about 2-3 minutes. This step is key for a smooth texture. Now, pour in the vanilla extract and milk. Mix until just combined. You want everything well blended but don’t overdo it. Slowly add the cooled flour and fine sea salt. Stir gently until a thick, sticky dough forms. When adding the flour, do it slowly. This helps prevent clumps. Use a spatula to fold in the semi-sweet chocolate chips. This way, they spread evenly throughout the dough. If you mix too much, the dough can become tough, so be careful. Once you have your dough ready, it’s time to form the bites. Use a cookie scoop or your hands to make small balls, around 1 inch in diameter. Place them on a clean surface. Next, roll each ball in mini chocolate chips for a fun coating. Now, chill the bites. Arrange them on a parchment-lined baking sheet and refrigerate for about 30 minutes. This step helps them firm up. When you serve them, try using a pretty plate. Add a sprinkle of sea salt or a drizzle of melted chocolate for a nice touch. Enjoy your tasty treat! You can find the full recipe at the start of the article. One common mistake is using raw flour. Always heat-treat your flour first. This step keeps you safe from germs. Another mistake is overmixing the dough. Mix until just combined to keep the bites tender. Lastly, don’t skip the chilling step. Chilling helps the bites hold their shape and taste better. To get that nice, soft texture, use room-temperature butter. This makes it easier to blend with the sugars. Make sure your dough is thick but still slightly sticky. This helps keep the bites chewy. If the dough feels too dry, add a bit more milk. You can change up the flavors easily. Try adding a pinch of cinnamon for warmth. Want a nutty taste? Mix in some chopped walnuts or pecans. For a fun twist, use dark chocolate chips or even white chocolate. You can also roll the bites in crushed nuts instead of mini chocolate chips. Each variation brings a new flavor adventure to your cookie dough bites! For the full recipe, check out the details above! {{image_4}} To keep your chocolate chip cookie dough bites fresh, use an airtight container. This helps prevent them from drying out or absorbing other odors in your fridge. If you prefer, you can also wrap each bite in plastic wrap for extra protection. Make sure to keep them cool and away from heat sources. In the fridge, your cookie dough bites last about one week. They stay tasty and safe to eat. If you want to save them longer, freeze them! In the freezer, they can last for up to three months. Just remember, always label your containers with the date to track freshness. To thaw frozen cookie dough bites, simply move them to the fridge for a few hours. This way, they soften slowly and keep their texture. If you’re in a hurry, you can let them sit at room temperature for about 30 minutes. Once thawed, enjoy them as is or give them a quick chill before serving for that perfect bite! You can easily make vegan chocolate chip cookie dough bites. Simply swap the butter for coconut oil or a plant-based butter. Use a non-dairy milk, like almond or oat milk. For sweetness, agave syrup or maple syrup works well in place of brown sugar. Follow the same steps from the Full Recipe, and enjoy a delicious vegan treat! For a gluten-free version, use gluten-free all-purpose flour. Many brands offer blends that work well in recipes. Ensure your chocolate chips are gluten-free too. This way, you can still enjoy the same flavor and texture. Just remember to heat-treat the flour as mentioned earlier for safety. Get creative with flavors! Try adding peanut butter for a nutty twist. Just mix in half a cup of creamy peanut butter with your butter and sugar. For a minty kick, add a few drops of mint extract to the dough. You can also fold in crushed cookies or sprinkles for extra fun! Each variation brings a new taste to your cookie dough bites. Yes, you can eat raw cookie dough if it is made safely. Use heat-treated flour to kill harmful bacteria. This way, you can enjoy the dough without worry. It tastes great and satisfies your sweet tooth. Always check the ingredients to ensure safety. Chocolate chip cookie dough bites last about a week in the fridge. Store them in an airtight container. For longer storage, you can freeze them. Frozen bites can last for up to three months. Just thaw them in the fridge before enjoying. You can find pre-made chocolate chip cookie dough bites at many grocery stores. Look in the freezer section or the snack aisle. Some brands offer ready-to-eat options. You can also check local bakeries or specialty food shops for fresh bites. This blog post covered key aspects of making chocolate chip cookie dough bites. You learned about ingredients, substitutions, and the need for heat-treated flour. Step-by-step instructions guided you through preparation and serving tips. I shared common mistakes and ways to enhance flavors too. We discussed how to store these bites and explored variations like vegan and gluten-free options. Now’s the time to make your own delicious cookie dough bites! Experiment with flavors and enjoy your tasty creations.

Chocolate Chip Cookie Dough Bites Tasty Sweet Treat

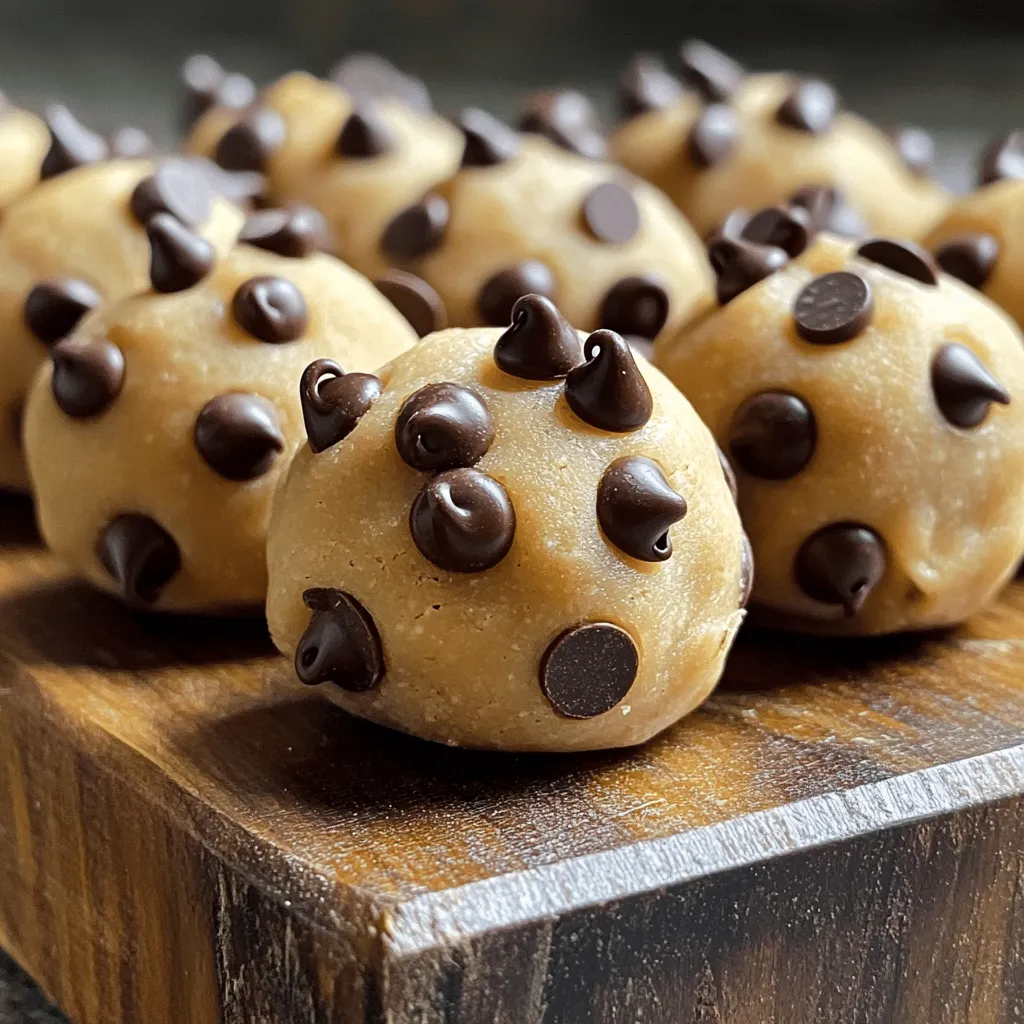
If you love sweet treats, you’ll adore my Chocolate Chip Cookie Dough Bites! These no-bake goodies combine creamy cookie dough

- 1 cup strawberries, hulled and halved - 1 cup blueberries - 1 cup raspberries - 1 ripe banana, sliced - 1 cup Greek yogurt - 1/4 cup honey - 1 tablespoon freshly squeezed lemon juice When you need to convert measurements, use simple math. For example, 1 cup equals 8 ounces. You can easily adjust the recipe for your needs. If you have dietary restrictions, you can make swaps. Use coconut yogurt instead of Greek yogurt for a dairy-free option. Maple syrup can replace honey for a vegan choice. Want to enhance the flavor? Add a splash of vanilla extract or a dash of cinnamon. These small changes can make a big difference. If you want to add greens, try a handful of spinach. It blends well and adds nutrients without a strong taste. This recipe is flexible. You can mix and match your favorite fruits too. Use mango or peaches for a twist. Enjoy the process of making these popsicles, and feel free to experiment! Remember to check the Full Recipe for more details. To make your berry smoothie mixture, start with fresh fruit. Use 1 cup of hulled strawberries, 1 cup of blueberries, and 1 cup of raspberries. Add 1 ripe banana, sliced. These fruits give a sweet and tangy flavor. Next, pour in 1 cup of Greek yogurt. You can choose either vanilla or plain. For sweetness, add 1/4 cup of honey. Adjust this to your taste. Finally, add 1 tablespoon of freshly squeezed lemon juice. This will brighten the flavors. When using a blender, make sure to blend on high. Stop to scrape down the sides if needed. This helps blend everything well. Taste the mixture. If you want it sweeter, add more honey and blend again. Carefully pour the smoothie mixture into popsicle molds. Fill each one about three-quarters full. This allows space for the popsicles to expand as they freeze. When inserting popsicle sticks, place them in the center. This helps them stay balanced. Place the filled molds in the freezer. Let them freeze for at least 4 to 6 hours. The popsicles need to be completely solid. To check if they are ready, gently wiggle a mold. If the popsicle moves easily, it is ready. If not, let them freeze longer. Enjoy your berry smoothie popsicles! For the full recipe, click here. To get a creamy texture in your popsicles, use ripe bananas. They add natural creaminess. Greek yogurt also helps to create that smooth feel. Blend your ingredients well. Stop to scrape down the sides of the blender. This ensures all ingredients mix together well. Common mistakes include over-blending or under-blending. If you blend too long, the mixture may become too thin. If you don’t blend enough, lumps may remain. Adjusting sweetness is simple. Start with the honey amount in the recipe. After blending, taste the mixture. If you want it sweeter, add more honey slowly. Blend briefly after each addition. For natural sweeteners, try maple syrup or agave nectar. These can replace honey and offer different flavors. Remember, the sweetness can change based on the fruit's ripeness. For a stunning display, use colorful molds. Once frozen, arrange popsicles on a bright platter. Scatter fresh berries around them for a fun look. You can also add mint leaves for a pop of green. This not only looks great, but it also adds freshness. Serve them with small cups to catch drips. This way, everyone can enjoy them mess-free. {{image_4}} You can mix different berries for fun flavors. Try using blackberries or cranberries. Each berry brings a unique taste. You can also add greens like spinach or kale. They blend well and add nutrients without changing the taste much. Just a handful will do! You don’t have to stick with Greek yogurt. Coconut yogurt works great, too. It adds a tropical twist. If you want vegan popsicles, use almond milk or oat milk. These options still give you that creamy texture you love. Add granola or chia seeds for a nice crunch. They make your popsicles even more fun to eat. You can also try mixing in other fruits. Peaches or mangoes can add sweetness and flavor. Just chop them small before blending! To keep your berry smoothie popsicles fresh, store them in airtight containers. Use silicone molds or freezer-safe bags to prevent freezer burn. If using molds, cover them with plastic wrap before freezing. This adds an extra layer of protection. Make sure to label the containers with the date. This helps you track freshness. Berry smoothie popsicles can last up to three months in the freezer. After this time, they may lose flavor and texture. Check for signs of freezer burn, which appears as white or gray spots. If you see these, it's best to discard the popsicles. Spoiled popsicles may also have an off smell or taste. Thawing should be done slowly to maintain texture. Place the popsicle in the fridge for about 15 minutes. This method prevents quick melting. If you're in a hurry, run warm water over the outside of the mold. Avoid using a microwave, as this can melt them unevenly. Enjoy your delicious treat without any melting mishaps! Berries are small but mighty! They are packed with vitamins and antioxidants. Here are some key benefits: - Strawberries: High in vitamin C, they help boost your immune system. They also support heart health and improve skin quality. - Blueberries: These fruits are known for their brain-boosting properties. They may improve memory and cognitive function. - Raspberries: Rich in fiber, they aid digestion and help keep you full longer. They also have anti-inflammatory effects. These tiny fruits can make your popsicles not just tasty, but good for you too! Yes, you can! Here are some natural ways to sweeten your popsicles: - Banana: The ripe banana in the recipe adds sweetness without extra sugar. - Honey: You can use less honey or skip it altogether if you prefer. - Maple syrup: This is a great alternative for a different flavor. - Agave nectar: It has a mild taste and mixes well with the other ingredients. Feel free to adjust sweetness to your liking! Absolutely! These berry smoothie popsicles are kid-friendly. Here’s why: - Healthy ingredients: Kids get vitamins and nutrients with every bite. - Fun to eat: The bright colors and fruity flavors attract kids. - Easy to make: Kids can help with blending and pouring into molds. These popsicles are a great way to cool off while enjoying a healthy treat. Check out the Full Recipe if you want to make them at home! These berry smoothie popsicles are simple and fun to make at home. We covered ingredients, measurements, and step-by-step instructions. You learned how to achieve great texture and get creative with flavors. Storage tips help keep them fresh for longer. In the end, these popsicles are a tasty, healthy treat. Enjoy making them with your favorite berries!

Berry Smoothie Popsicles Refreshing Summer Treat

Looking for the perfect way to keep cool this summer? Dive into these Berry Smoothie Popsicles! Bursting with fruits like

To make herbed lemon grilled chicken, you need a few key ingredients. Each one adds its own flavor and makes the dish special. - Chicken - 4 boneless, skinless chicken breasts - Marinade Components - 1/4 cup extra virgin olive oil - 3 tablespoons freshly squeezed lemon juice - Zest of 1 medium lemon - 3 cloves garlic, finely minced - 2 teaspoons dried oregano leaves - 2 teaspoons dried thyme leaves - 1 teaspoon finely chopped fresh rosemary - 1 teaspoon sea salt - 1/2 teaspoon freshly cracked black pepper - Garnishing Elements - Fresh parsley, coarsely chopped Each ingredient plays a role in making the chicken juicy and flavorful. The olive oil adds richness. Lemon juice brings bright acidity. Fresh herbs give that lovely aroma. I love using fresh garlic in my marinade. It adds a punch of flavor. If you have fresh herbs, feel free to swap them in for dried ones. Just remember to use more of them since fresh herbs are less potent. When you gather your ingredients, make sure they are all high quality. This choice will shine through in the final dish. For the best results, follow the Full Recipe to guide you through the cooking process. Start by gathering your ingredients. You need olive oil, lemon juice, lemon zest, garlic, oregano, thyme, rosemary, salt, and black pepper. In a large bowl, mix the olive oil, lemon juice, and zest. Add the minced garlic, oregano, thyme, rosemary, salt, and pepper. Whisk everything together until smooth. This marinade gives the chicken a fresh, zesty flavor. Take the chicken breasts and place them in the bowl with the marinade. Make sure each piece is fully coated. Cover the bowl with plastic wrap or a lid. Let the chicken marinate in the fridge for at least 30 minutes. If you have time, let it sit for up to 4 hours. The longer it marinates, the better the flavor will be. Preheat your grill to medium-high heat, around 375°F to 400°F. After marinating, take the chicken out of the bowl. Allow any excess marinade to drip off. Carefully place the chicken on the hot grill. Cook each side for 6-8 minutes. The chicken is done when it reaches an internal temperature of 165°F. The juices should run clear. Once cooked, let the chicken rest for 5 minutes before slicing. This helps keep it juicy. For a nice touch, sprinkle chopped parsley on top before serving. For the full recipe, check the details above. To make the best marinade, use fresh ingredients. Fresh herbs add strong flavor. Mix lemon juice, zest, and olive oil well. I like to whisk until smooth. Let the chicken soak in the marinade. If you can, marinate for four hours. This gives the chicken a rich taste. Don't skip the garlic; it adds depth. Use sea salt and fresh pepper for the best results. Preheat your grill to medium-high heat. This is key for great grilling. Place the chicken on the grill and don't move it too soon. Cook for about 6-8 minutes on each side. You want clear juices when it’s done. Use a meat thermometer to check for 165°F. After cooking, let the chicken rest for five minutes. This keeps it juicy and tender. To serve, slice the chicken and arrange it on a platter. Add fresh parsley on top for color. Serve with lemon wedges for a bright touch. You can pair it with grilled veggies or a fresh salad. This meal is vibrant and tasty. For a full recipe, check the details above. Enjoy your creation with family and friends! {{image_4}} You can switch herbs to change the flavor of your herbed lemon grilled chicken. If you love basil, use it instead of oregano. Fresh dill gives a nice twist too. For a Mediterranean vibe, try using rosemary and thyme together. Each herb brings its own taste, so feel free to experiment. You might find a new favorite! Grilling is fun, but you can also bake or pan-sear the chicken. If you bake, set your oven to 375°F (190°C). Cook for about 25 to 30 minutes. For pan-searing, heat a skillet with a little oil. Cook the chicken for 6-8 minutes on each side. Both methods keep the chicken juicy and full of flavor. For extra flavor, add other ingredients to your marinade. A splash of honey can balance the lemon's tartness. You can also mix in some red pepper flakes for a spicy kick. If you like smoky flavors, try adding smoked paprika. These small changes can lead to a big taste difference. Check out the Full Recipe for more ideas! After cooking, let your herbed lemon grilled chicken cool. Place it in an airtight container. Store it in the fridge for up to four days. To keep it fresh, make sure the container is sealed tight. If you see any moisture, use a paper towel to soak it up before sealing. If you want to save some for later, freezing is a great option. First, let the chicken cool completely. Wrap each piece tightly in plastic wrap. Then, place the wrapped chicken in a freezer-safe bag. Remove as much air as possible to prevent freezer burn. You can freeze it for up to three months. When you’re ready to eat, just thaw it in the fridge overnight. To reheat your chicken, avoid the microwave if you can. Instead, use the oven. Preheat your oven to 350°F (175°C). Place the chicken on a baking sheet and cover it with foil. Heat it for about 15-20 minutes or until it's hot all the way through. If you like, you can add a splash of lemon juice to keep it juicy. Enjoy your flavorful meal! For the full recipe, check out the Zesty Herb-Infused Grilled Chicken. You should marinate the chicken for at least 30 minutes. This time allows the flavors to soak in. For the best taste, I recommend marinating for up to 4 hours. The longer the chicken sits in the marinade, the more intense the flavor will be. Yes, you can use bone-in chicken. Bone-in chicken adds extra flavor as it cooks. Just remember that it will take longer to grill than boneless pieces. Make sure to check the internal temperature to reach 165°F (75°C). Herbed lemon grilled chicken pairs well with many sides. Here are some great options: - Grilled vegetables like zucchini, peppers, and asparagus - A fresh mixed salad with a light vinaigrette - Garlic mashed potatoes for a comforting touch - Quinoa or rice for a healthy base Explore these pairings to create a balanced meal with the full recipe. This blog post covered easy steps to make herbed lemon grilled chicken. We looked at key ingredients, including chicken, marinade, and garnishes. We outlined simple methods for preparing the marinade, marinating, and grilling. I shared tips for perfecting flavor and suggested ways to serve the dish. You can also explore variations to keep meals exciting. Remember to follow storage tips for best results. Now, enjoy making this tasty dish for friends and family. It'll become a favorite!

Herbed Lemon Grilled Chicken Fresh and Flavorful Meal

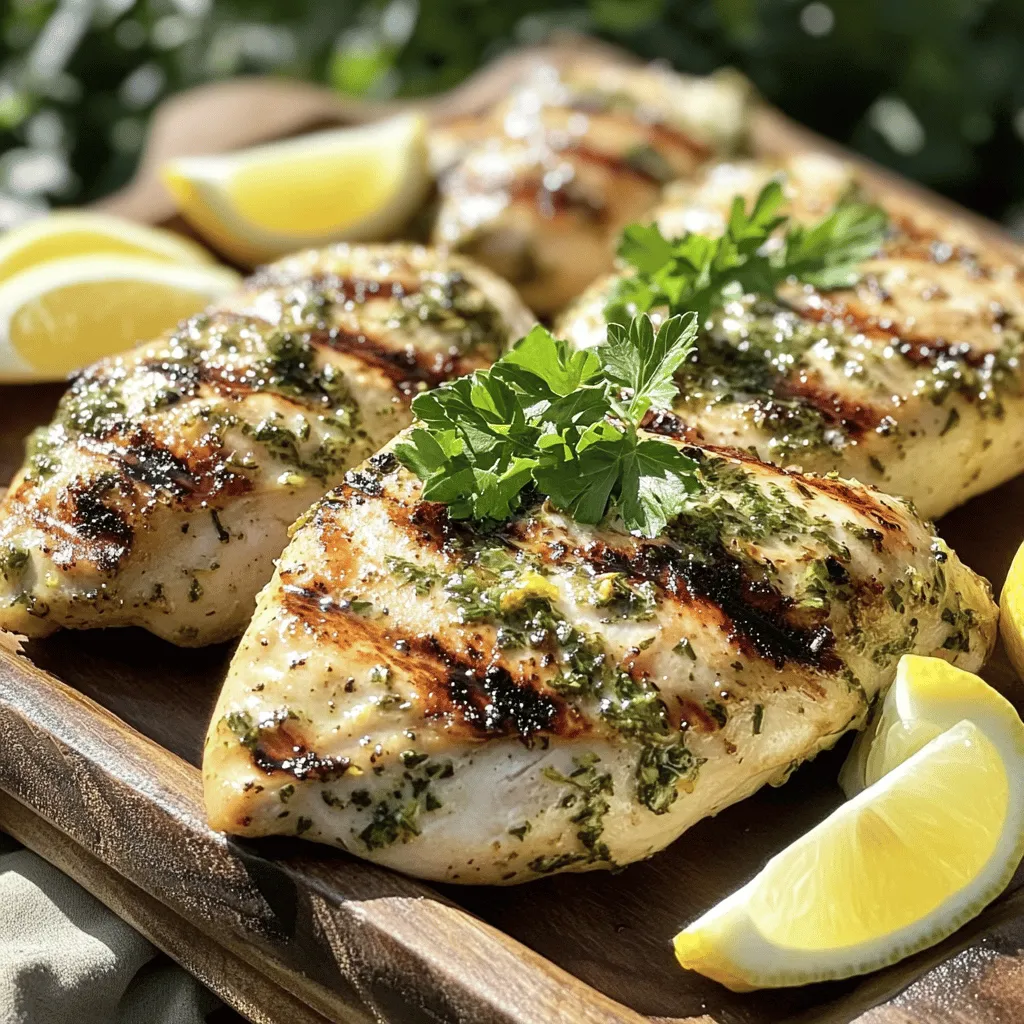
Are you ready to fire up your grill for a fresh and flavorful meal? Herbed lemon grilled chicken is a

- 1 medium head of cauliflower, riced (or 4 cups pre-riced cauliflower) - 2 tablespoons sesame oil - 1 small onion, finely chopped - 2 cloves garlic, minced - 1 cup mixed vegetables (such as carrots, peas, and corn) - 2 large eggs, lightly beaten - 3 green onions, sliced - 3 tablespoons soy sauce (or tamari for a gluten-free option) - 1 teaspoon fresh ginger, grated - Salt and pepper to taste Riced cauliflower is the star of this dish. It gives you that rice-like texture without the carbs. You can make your riced cauliflower from scratch or buy it pre-riced. This saves time and effort. Next, you have the aromatics. The onion, garlic, and ginger bring a lot of flavor. Sauté them until they smell great. They form the base of your dish. Eggs add protein and richness. They help bind everything together, giving your meal a nice texture. The mixed vegetables add color and nutrients. Feel free to use frozen or fresh veggies based on your preference. - 1 tablespoon sriracha for a spicy kick - Additional seasonings as desired Sriracha is a fun addition if you like heat. It adds a nice zing to the dish. You can also play with other seasonings. Try adding some herbs or spices to suit your taste. - Low-Carb - Keto-Friendly - Gluten-Free Options Cauliflower fried rice is a great low-carb option. It fits well into a keto diet too. If you need gluten-free meals, just swap regular soy sauce for tamari. This dish allows you to enjoy fried rice without the extra carbs. It’s a tasty and healthy choice for everyone! For the full recipe, check out the details above. Ricing Techniques To start, take your head of cauliflower. Remove the leaves and stem. Cut it into smaller florets. Use a food processor to pulse the florets until they resemble rice. Do this in small batches for the best results. If you want a quicker option, you can buy pre-riced cauliflower. Just measure out four cups and set it aside. Using Pre-Riced Cauliflower Using pre-riced cauliflower saves time. It is a great option if you want to skip the ricing step. Just make sure to check your package for freshness. Importance of Temperature Heat a large skillet or wok over medium heat. Add one tablespoon of sesame oil. This oil gives the dish a nice flavor. Cooking Time for Onions Once the oil is hot, add the finely chopped onion. Sauté for three to four minutes. You want the onion to become soft and translucent. This adds great flavor to your dish. Cooking Sequence After the onion is ready, stir in minced garlic and grated ginger. Cook these for one to two minutes until they are aromatic. Then, add your mixed vegetables to the skillet. Stir and cook for another three to four minutes. This ensures the veggies are heated through. Achieving Ideal Texture Next, push the veggie mix to one side of the skillet. Pour the two beaten eggs into the clear side. Scramble the eggs until they are fully cooked. Mix the scrambled eggs back into the vegetables. Now, add the riced cauliflower and soy sauce. Stir everything well, cooking for five to seven minutes. The cauliflower should be tender yet still a bit crisp. For the full recipe, check out the [Full Recipe]. Cooking Time Guidelines To get the best texture, cook the cauliflower for about 5 to 7 minutes. You want it tender but still a bit crunchy. If you cook it too long, it can turn mushy. Avoiding Sogginess To avoid soggy cauliflower rice, make sure to use high heat. This helps steam escape. Also, do not overcrowd the pan when cooking. If needed, cook in batches. Using Fresh Herbs Fresh herbs can boost the flavor of your dish. I love adding chopped cilantro or basil at the end. They give a bright taste. Try different herbs to find your favorite mix! Spice Adjustments If you want more heat, add fresh chili or sriracha. Start with a little and taste as you go. You can always add more, but it’s hard to take spice out! Serving Ideas Serve your Cauliflower Fried Rice in colorful bowls. This makes the dish pop. You can also add a side of lime wedges for a fresh burst. Garnishing Tips Garnish with extra sliced green onions and sesame seeds. A drizzle of sesame oil adds a nice touch. These small details make your dish look even more inviting. {{image_4}} You can easily add protein to your cauliflower fried rice. Chicken, shrimp, or tofu all work great. For chicken, use boneless pieces. Cook them first in the skillet, then set aside. For shrimp, toss them in until they turn pink. Tofu is a fantastic plant-based option. Cube it and sauté until golden brown. Adding protein makes the dish filling and nutritious. Feel free to swap in seasonal vegetables. Fresh bell peppers, zucchini, or broccoli add color and taste. If you need other options, choose veggies like spinach or snap peas. This lets you cater to dietary needs. For example, if you want a low-carb meal, stick with leafy greens. Each vegetable brings a unique flavor and benefits. Want a twist? Change the flavor profile easily. For an Asian-inspired dish, stick with soy sauce and sesame oil. You can even add a bit of rice vinegar for tang. If you crave something different, try a Mexican fusion. Use lime juice and chopped cilantro for brightness. For an Indian twist, add curry powder and peas. These changes make the dish exciting and fun to eat. For a detailed cooking guide, check out the Full Recipe. To keep your cauliflower fried rice fresh, use airtight containers. Glass or plastic containers work well. Make sure the lid seals tightly to keep out air. Your fried rice will stay good in the fridge for about 3 to 5 days. If you want to save some for later, freezing is great. First, cool the fried rice completely. Then, portion it into freezer-safe bags. Try to remove as much air as possible. This helps prevent freezer burn. You can freeze it for up to 3 months. When you’re ready to eat, there are a few good ways to reheat it. Use the microwave for quick heating. Just cover it with a damp paper towel to keep it moist. You can also use a skillet over low heat. This helps keep the texture nice. Stir it often to heat evenly and avoid clumping. Yes, you can easily make cauliflower fried rice vegan. - Egg Substitutes: Instead of eggs, use scrambled tofu. It adds protein and blends well. You can also use a mix of chickpea flour and water for a similar texture. - Other Vegan-Friendly Ingredients: Add more veggies like bell peppers, zucchini, or spinach. You can also use nutritional yeast for a cheesy flavor without dairy. To keep your cauliflower fried rice from turning mushy, follow these tips. - Key Cooking Techniques: Ensure your cauliflower is dry before cooking. Use a clean kitchen towel to remove excess moisture after ricing. Cook in a hot pan for a quick stir-fry. Avoid overcrowding the pan, as this traps steam and leads to sogginess. - Timing Tips: Stir-fry the cauliflower for only 5-7 minutes. You want it tender but still firm. If you see water in the pan, increase the heat to evaporate it. Boosting flavor in your cauliflower fried rice is easy with a few additions. - Additional Sauces and Seasonings: Add soy sauce or tamari for a savory taste. Sriracha gives a spicy kick. You can also try hoisin sauce for a sweet touch. - Suggestions for Garnishes: Top your dish with fresh herbs like cilantro or basil. A sprinkle of sesame seeds adds crunch and flavor. Finally, green onions give a fresh finish. For the full recipe, check out the [Full Recipe]. In this blog post, we explored how to make delicious cauliflower fried rice. We covered essential ingredients like riced cauliflower, eggs, and vegetables. I shared techniques for preparing and cooking each component to get the best texture. You learned tips for flavor and presentation, plus variations like adding proteins and seasonal veggies. Finally, I provided storage tips and answered common questions. Now, you can create your own healthy, tasty meal with ease. Enjoy making your cauliflower fried rice!

Cauliflower Fried Rice Tasty Low-Carb Meal Option

Looking for a tasty low-carb meal option? Let me introduce you to cauliflower fried rice! This dish is easy to

- 12 vibrant cherry tomatoes - 12 fresh basil leaves - 12 small mozzarella balls (bocconcini) - 1 tablespoon balsamic glaze - 1 tablespoon extra virgin olive oil - 1 teaspoon freshly grated lemon zest - Salt and freshly cracked black pepper - 12 small skewers or toothpicks These ingredients bring life to Caprese salad skewers. You’ll find that each element plays a key role in flavor and texture. The cherry tomatoes add a burst of sweetness, while the basil lends a fresh, herbal note. The mozzarella delivers creaminess, making every bite rich and satisfying. - Calories per serving: About 150 calories - Breakdown of macronutrients: Approximately 10g fat, 8g carbohydrates, 8g protein - Potential allergens: Contains dairy This dish is not only tasty but also packs a nutritional punch. The calories come primarily from healthy fats in the olive oil and mozzarella. This balance makes it a smart choice for a snack or appetizer. Always check for allergens if you serve guests. For the full recipe, feel free to explore details on preparation and presentation! To start, rinse your cherry tomatoes and basil leaves under cold water. Make sure they are clean and fresh. Next, if your mozzarella balls are in liquid, drain them well. You want them dry to avoid soggy skewers. Now it’s time to assemble your skewers. Take a small skewer or toothpick. Slide on one cherry tomato first. Then add a fresh basil leaf, followed by a mozzarella ball. Repeat this until you have three cherry tomatoes on each skewer. Aim to make four skewers total for a nice serving. For the dressing, grab a small mixing bowl. Combine the balsamic glaze, extra virgin olive oil, grated lemon zest, salt, and black pepper. Whisk until it’s well mixed. This zesty dressing will bring all the flavors together beautifully. You can find the full recipe with all details, too. Enjoy making these tasty Caprese Salad Skewers! To make your Caprese salad skewers shine, think about how you serve them. You can arrange the skewers vertically in a glass jar. Fill the jar with rock salt or quinoa for a fun touch. This gives a nice look and holds the skewers in place. Alternatively, you can lay them out on a long serving platter. Arrange them in a row for a clean and elegant display. The colors of the tomatoes, basil, and mozzarella will pop beautifully. Add more flavor with extra seasoning. A pinch of garlic powder or a sprinkle of crushed red pepper can make a big difference. You can also mix in herbs like oregano or thyme for a twist. Fresh ingredients matter a lot. Use ripe tomatoes and fragrant basil for the best taste. Fresh mozzarella also brings a creaminess that ties everything together. One common mistake is over-soaking the mozzarella. If it sits in liquid too long, it can become too watery. Drain it well to keep the skewers from getting soggy. Another mistake is not balancing the flavors in the dressing. Make sure to mix the balsamic glaze, olive oil, and lemon zest well. This will ensure a bright and zesty taste that complements the other ingredients perfectly. {{image_4}} You can switch up the tomatoes for heirloom ones. Heirloom tomatoes add unique colors and flavors. They make your skewers look stunning. For cheese, try using feta or goat cheese. Both offer different tastes, adding fun twists. If you want a vegan option, swap out the mozzarella. Use marinated tofu or cashew cheese. They still provide that creamy texture you crave. For the dressing, replace balsamic glaze with a mix of olive oil and lemon juice. This keeps it fresh and bright while staying plant-based. Pair your skewers with crisp white wine or sparkling water. A light drink enhances the flavors of the salad. You can also serve them with a side of garlic bread. This combo makes for a delightful meal. For parties, these skewers fit right in with a summer BBQ theme. Arrange them on a colorful platter with fresh herbs. They also shine during holiday gatherings. Just add seasonal decorations to make them festive. Try adding sliced avocado to your skewers for creaminess. It pairs well with tomatoes and basil. You could also experiment with strawberries for a sweet touch. The contrast of flavors will surprise and delight your guests. Don't forget to play with different herbs. Instead of basil, try mint or cilantro. Each herb brings a new flavor profile. It’s fun to mix things up and find your favorite combination. To keep your Caprese salad skewers fresh, store them in the fridge. Use an airtight container. This protects the flavors and keeps the ingredients crisp. Ideally, enjoy them within two days for the best taste. If you made the skewers ahead of time, add the dressing just before serving. This keeps the basil vibrant and prevents sogginess. If you plan to store ingredients long-term, freezing works well for some items. Freeze mozzarella balls in a single layer on a baking sheet. Once frozen, transfer them to a freezer bag. This prevents clumping. You can also freeze cherry tomatoes, but they may lose their texture. For meal prep, consider assembling skewers without the dressing. Store them in the fridge for easy access during the week. If you have leftovers, serve them chilled. This maintains the fresh taste. To refresh the appearance, drizzle a bit more balsamic glaze over the skewers. This adds shine and a burst of flavor. You can also sprinkle fresh herbs or lemon zest on top to enhance their look and taste. The best way to make Caprese Salad Skewers is simple. First, gather fresh ingredients. Use vibrant cherry tomatoes, fragrant basil leaves, and creamy mozzarella balls. Start by rinsing the tomatoes and basil. Then, drain the mozzarella. Next, take a skewer and thread your ingredients. Alternate between a tomato, a basil leaf, and a mozzarella ball. Repeat until you have a lovely stack. For extra flavor, drizzle with balsamic glaze and olive oil. This easy method makes for a fresh and tasty appetizer. You can store Caprese Salad Skewers in the fridge for up to two days. Place them in an airtight container to keep them fresh. The tomatoes and mozzarella can lose their texture over time. Always check for any signs of spoilage before eating. If you notice any changes, it’s best to toss them. Yes, you can prepare these skewers ahead of time. Make them a few hours before your event. This allows the flavors to blend nicely. Just keep them in the fridge until you are ready to serve. If you need to make them a day in advance, it's still okay. Just remember to add the dressing right before serving for the best taste. If you don’t have balsamic glaze, you can use several alternatives. A simple mix of olive oil and lemon juice works well. Honey or maple syrup can add a sweet touch, too. You can try a splash of red wine vinegar for a tangy flavor. Each option will bring a different taste to your skewers. Caprese Salad Skewers are an excellent choice for parties. They are bright, colorful, and very easy to eat. Guests love the fresh flavors and fun presentation. Plus, they are quick to make, which saves time for busy hosts. Whether it’s a casual get-together or a formal event, these skewers impress everyone. You can find the Full Recipe to create this delightful appetizer. You learned how to make tasty Caprese Salad Skewers using fresh and vibrant ingredients. Following the steps helps create a colorful dish. Use tips for presentation and flavor to make your skewers shine. Remember, you can tweak the recipe with various ingredients to keep it exciting. Storing your skewers properly ensures they stay fresh. Enjoy the flavors and impress your friends with this simple, fun dish. Try these ideas at your next party or gathering!

Caprese Salad Skewers Fresh and Flavorful Delight

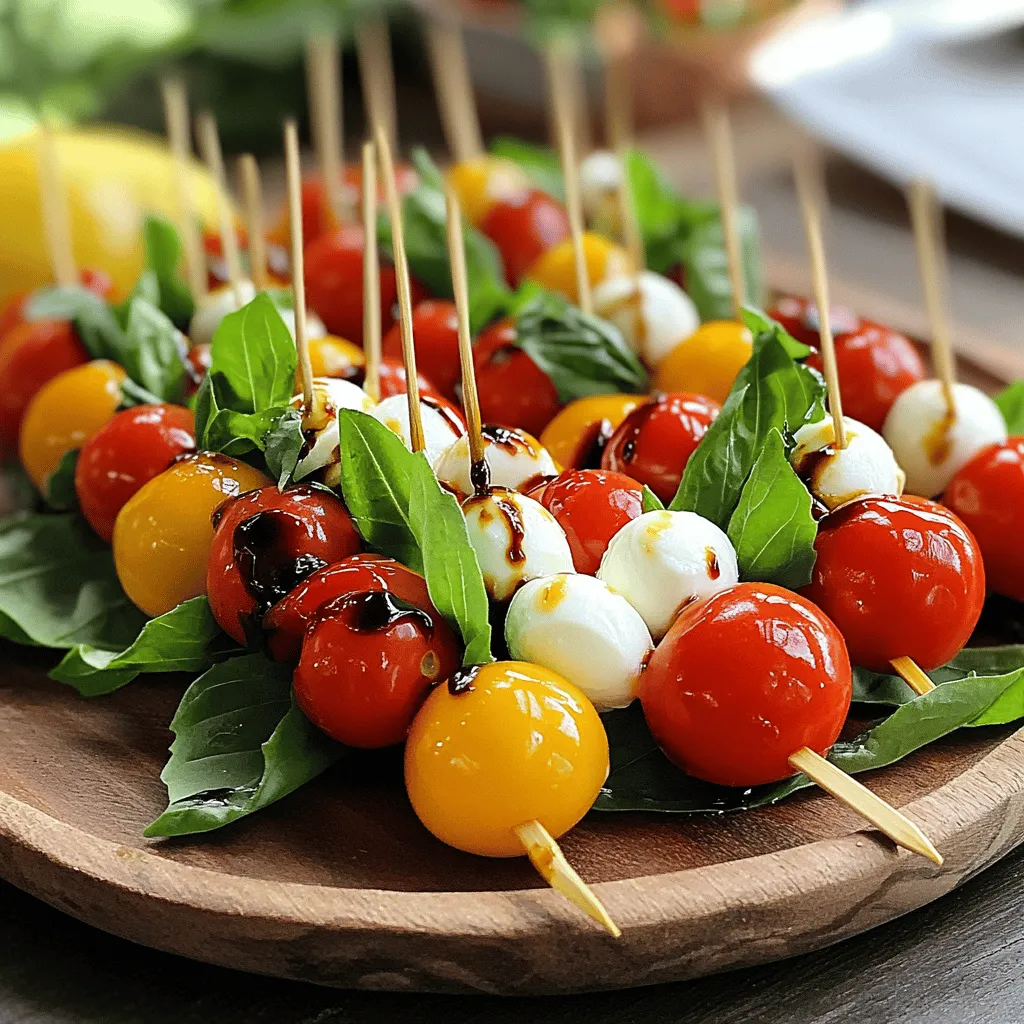
Looking for a simple snack that bursts with flavor? Caprese Salad Skewers are your answer! With juicy cherry tomatoes, fresh

To make this Mango Avocado Fiesta Salsa, gather these fresh ingredients: - 2 ripe mangoes, diced into 1/2-inch cubes - 1 ripe avocado, diced into 1/2-inch cubes - 1 small red onion, finely chopped - 1 red bell pepper, diced - 1 jalapeño, deseeded and finely minced (adjust for desired heat) - 1/4 cup fresh cilantro, finely chopped - 2 tablespoons fresh lime juice (about 1 lime) - Salt and freshly ground black pepper to taste Choosing the right mango and avocado is key for great salsa. Look for mangoes that feel slightly soft but not mushy. The skin should have a nice blush of color. If you're unsure, check for a sweet aroma near the stem. For avocados, gently press the skin. It should yield slightly. Dark green or black skins often indicate ripeness. Feel free to customize your salsa! Try adding: - Diced tomatoes for extra color and flavor. - A splash of orange juice for sweetness. - Corn for a crunchy twist. - Black beans for protein and heartiness. You can swap jalapeños for another mild pepper if you prefer less heat. This salsa fits many tastes! If you want the full recipe, check out the Mango Avocado Fiesta Salsa section. First, gather all your ingredients. You need ripe mangoes, avocado, red onion, red bell pepper, jalapeño, cilantro, lime juice, salt, and pepper. Start by dicing the mangoes and avocado into 1/2-inch cubes. This size looks great and mixes well. Use a sharp knife and a steady cutting board for safety. Chop the red onion and red bell pepper finely. For the jalapeño, remove the seeds and chop it into small pieces. This helps control the heat. Finally, finely chop the cilantro. It adds a fresh taste. In a medium mixing bowl, gently combine the diced mango and avocado. Be careful! You don't want to mash the avocado. Its creaminess makes the salsa special. Next, add the chopped onion, bell pepper, and jalapeño. Mix these ingredients together. They add crunch and spice to the dish. Now, sprinkle the cilantro over the top. This gives the salsa a nice aroma. Drizzle the fresh lime juice evenly over the mixture. It brightens up the flavors. Use a spatula to fold the ingredients together. Do this carefully to keep the chunks intact. Now it's time to season. Add salt and freshly ground black pepper to taste. Mix well and taste again. Adjust the seasoning if needed. Let the salsa rest for about 10 minutes. This waiting time allows the flavors to blend. When you’re ready to serve, use a vibrant bowl. A sprig of fresh cilantro on top looks great. Pair this salsa with crispy tortilla chips. It's also perfect on grilled fish or chicken. Enjoy this flavorful fresh delight! For the full recipe, refer to the Mango Avocado Fiesta Salsa. When making mango salsa, avoid over-mixing. If you mash the avocado, your salsa becomes mushy. Keep the mango and avocado chunky for great texture. Also, don’t skip the lime juice. It brightens flavors and helps keep the avocado fresh. Too much salt can ruin your dish, so add it little by little. Lastly, let your salsa rest for at least 10 minutes. This time allows flavors to mix, making every bite tasty. To boost your salsa's taste, try adding spices. A pinch of cumin adds a warm, earthy note. If you like heat, consider cayenne pepper or chili powder. For a unique twist, mix in some smoked paprika. This spice gives a deep flavor that pairs well with the sweetness of mango. You can also add a bit of freshly grated ginger for a spicy kick. Always taste as you go. Adjust spices to fit your personal preferences. Serve your mango salsa in a colorful bowl. A bright dish makes it look more appealing. Top it with a sprig of fresh cilantro for that final touch. For extra flair, place lime wedges on the side. This adds a pop of color and gives guests a chance to add more lime juice. Consider serving with crispy tortilla chips in a separate bowl. You can even use the salsa as a topping for grilled fish or chicken. This adds a tropical flair to your meal. For the full recipe, check out the Mango Avocado Fiesta Salsa! {{image_4}} To spice up your mango salsa, add more heat. You can start with an extra jalapeño. Dice it finely and mix it in. If you want more kick, consider adding a dash of hot sauce. You can also try diced serrano peppers for a different flavor. These peppers give the salsa a warm, zesty taste. Adjust the amount based on your heat preference. This version will definitely wake up your taste buds! You can easily switch out some ingredients to create a tropical twist. Try adding diced pineapple or papaya for added sweetness. These fruits pair well with mango and avocado. You can also include kiwi for a unique tartness. Mixing different colors and textures makes the salsa more fun. Don’t be afraid to experiment with seasonal fruits. The goal is to create a vibrant, tasty dish that excites the palate. This salsa is already vegan and gluten-free, making it a great choice for many diets. If you want to make it heartier, add black beans or corn. These ingredients will add protein and fiber. Just rinse and drain the canned beans before mixing. You can also serve it with gluten-free chips or over a salad. Enjoying fresh, tasty food is easy with this versatile salsa. Check out the Full Recipe for more ways to enjoy it! To keep your mango salsa fresh, store it in an airtight container. Place it in the fridge right after making it. This helps maintain its bright colors and flavors. Avoid using metal containers, as they can react with the lime juice. Glass or plastic works best for storage. You can keep mango salsa in the fridge for about 2 to 3 days. After that, the ingredients may start to lose their taste and texture. If you notice any changes in smell or color, it’s best to throw it away. Always trust your senses when it comes to food safety. You can freeze mango salsa if you want to keep it longer. Use a freezer-safe container or bag, leaving some space for expansion. It can last up to 3 months in the freezer. When you’re ready to eat it, thaw it in the fridge overnight. The texture may change a bit, but the flavor should still be tasty. For the full recipe, check the previous sections. Yes, you can make Mango Salsa ahead of time. I suggest preparing it a few hours before serving. This way, the flavors blend well. However, if you make it too early, the avocado may brown. To prevent this, add lime juice to the avocado right after cutting. You can store it in the fridge to keep it fresh. Mango Salsa pairs well with many dishes. Here are some tasty options: - Grilled chicken or fish - Tacos or burritos - Tortilla chips for dipping - Salads for a fresh twist - Rice or quinoa bowls These pairings enhance your meal and add flavor and color. To reduce the spice in your Mango Salsa, remove the seeds from the jalapeño. You can also use less jalapeño in the recipe. Another option is to substitute jalapeño with a milder pepper, like a green bell pepper. This way, you keep the flavor without the heat, making it enjoyable for everyone. Mango salsa is fresh, tasty, and easy to make. We covered key ingredients like ripe mangoes, avocados, and add-ins. You learned how to prepare, mix, and serve the salsa. We shared tips to avoid mistakes and boost flavor. Explore variations for spice lovers and dietary needs. Remember best storage practices to keep leftovers fresh. Use this guide to create a bright, delicious dish that impresses everyone at your table. Enjoy the process, and let your salsa shine!

Mango Salsa with Avocado Flavorful Fresh Delight

Are you ready to transform your summer snacks? This Mango Salsa with Avocado is a flavorful fresh delight that you’ll

Older posts
Newer posts
← Previous Page1 … Page77 Page78 Page79 … Page86 Next →

dsad

© 2026 yumymoments • Built with GeneratePress

Our Policies

  • Copyright Policy
  • Cookie Policy
  • GDPR Policy
  • Privacy Policy
  • Disclaimer
  • Terms Of Use

More Information

  • Home
  • About
  • Contact
  • Appetizers
  • Dessert
  • Dinner
  • Drinks
©2026, yumymoments About Back To Top