Skip to content
DisclaimerTerms Of UseGDPR PolicyCookie Policy

yumymoments

  • Home
  • Drinks
  • Appetizers
  • Dinner
  • Dessert
  • About
  • Contact
  • Privacy Policy
DisclaimerTerms Of UseGDPR PolicyCookie Policy

NO-ING-IMG

- 2 ripe peaches - 1 cup vibrant fresh basil leaves - 8 oz fresh mozzarella cheese - 2 tablespoons balsamic glaze - 1 tablespoon extra virgin olive oil - Sea salt and freshly cracked black pepper To make this Peach Caprese Salad, start with the freshest produce. Choose two ripe peaches. Look for peaches that are slightly soft when you press them. Their sweetness shines in this dish. Next, grab a cup of fresh basil leaves. Use vibrant green leaves for a pop of color. They add a fragrant touch that makes this salad special. For the creamy element, you need fresh mozzarella cheese. Aim for eight ounces. The soft texture pairs perfectly with juicy peaches. Now, for flavor, you’ll need balsamic glaze and high-quality extra virgin olive oil. The balsamic glaze adds a sweet tang. The olive oil brings richness. Lastly, sprinkle sea salt and freshly cracked black pepper. These seasonings enhance the flavors of the salad. With these ingredients, you can create a Peach Caprese Salad that is a true summer delight. For the full recipe, check out the detailed instructions above. Start by rinsing the peaches. Use cool water to clean them well. After rinsing, slice the peaches into wedges. Aim for about 1/2 inch thickness. This size gives a nice bite. Next, slice the fresh mozzarella into rounds. Keep the slices around the same thickness as the peaches. This helps with layering. Grab a large serving platter. Begin layering the peach wedges and mozzarella slices. Place them in an alternating pattern. This makes the salad colorful and fun. Now, gently insert fresh basil leaves between the peach and mozzarella slices. The basil adds a fresh aroma and looks great too. Take a spoon and drizzle extra virgin olive oil over the arranged salad. Follow this with balsamic glaze for sweetness. This will tie all the flavors together. Now, sprinkle sea salt and freshly cracked black pepper over the top. This enhances the taste of the salad. Let it rest for a few minutes before serving. This helps the flavors mix well. For the full recipe, check out the section above! To make a great Peach Caprese Salad, start with ripe peaches. Look for peaches that feel firm but yield slightly to gentle pressure. Their skin should have a warm, golden hue. Avoid any with bruises or wrinkles. Fresh, juicy peaches bring a sweet flavor that pairs perfectly with creamy mozzarella. For mozzarella, choose the freshest cheese possible. Look for soft, moist rounds packed in water. This cheese should feel springy and not crumbly. It has a mild taste that balances with the peaches and basil. When arranging your salad, think about color and shape. Alternate peach wedges and mozzarella slices on a large platter. This makes the dish eye-catching and fun. You can also layer them vertically for a stunning effect. For garnishing, sprinkle fresh basil leaves on top. You could also add edible flowers or a drizzle of balsamic glaze around the edges. These touches enhance the look and flavor of your salad. Pair your Peach Caprese Salad with a crisp white wine, like Sauvignon Blanc. This wine’s acidity matches the salad nicely. You can also serve it as a light appetizer before a main dish, such as grilled chicken or fish. The best time to serve this salad is right after you make it. This way, the flavors are fresh and vibrant. If you let it sit too long, the peaches might brown, and the cheese could lose its bright taste. {{image_4}} You can switch up the cheese in your Peach Caprese Salad for fun. Burrata brings a creamy texture and rich taste. Goat cheese adds a tangy note that pairs well with sweet peaches. Feta cheese offers a crumbly contrast that also complements the salad nicely. Try these options to make the dish your own! Add nuts like walnuts or pecans for a delightful crunch. They bring a nice texture and nutty flavor that works well with the peaches. You can also mix in other fruits. Strawberries offer sweetness, while heirloom tomatoes add a savory touch. These twists make your salad even more exciting. Instead of balsamic glaze, you might try different dressings. A simple lemon vinaigrette can brighten the flavors. A honey mustard dressing adds sweetness and zest. If you're feeling adventurous, make your own balsamic vinaigrette. Just mix balsamic vinegar with olive oil, a little honey, and seasoning. This homemade touch enhances the salad's taste. For the full recipe, check the Peachy Caprese Delight section above. To keep your Peach Caprese Salad fresh, follow these steps: - Store leftovers in an airtight container. This helps seal in flavor and moisture. - Place a paper towel inside the container to absorb excess moisture. This keeps the salad crisp. - Store the salad in the fridge. It should stay fresh for about two days. The components of this salad have different shelf lives: - Ripe peaches last about three to five days in the fridge. Check for softness. - Fresh mozzarella cheese should be eaten within five days of opening. Keep it sealed tightly. - Basil leaves stay fresh for about three days. Store them in a glass of water, like cut flowers. This salad is best served cold, but if you want to refresh it: - Take the salad out of the fridge and let it sit for 10 minutes. This brings it to room temperature. - If the salad seems dry, drizzle a bit more olive oil or balsamic glaze before serving. This adds moisture and flavor. - Avoid reheating in the microwave. It will change the texture of the mozzarella and basil. Enjoy your Peach Caprese Salad as a cool, refreshing dish! For the full recipe, follow the link above. A Peach Caprese Salad is a fresh dish that mixes sweet peaches with creamy mozzarella. This salad combines bright flavors and colors, making it perfect for summer. The dish comes from the classic Caprese salad, which features tomatoes, basil, and mozzarella. By swapping in peaches, we create a new twist on a traditional favorite. This dish is a celebration of summer's bounty and pairs well with many meals. Yes, you can make Peach Caprese Salad in advance. To prepare, slice the peaches and mozzarella beforehand. Keep the sliced mozzarella and peaches separate. This helps keep the salad fresh. When ready to serve, layer the ingredients and add basil. Drizzle olive oil and balsamic glaze just before serving. This will keep the salad from getting soggy. Meal prepping this salad allows you to enjoy a fresh taste with little effort. For this salad, choose ripe and juicy peaches. Varieties like Freestone or Donut peaches work well. Freestone peaches are easy to slice, while Donut peaches add a fun shape. Look for peaches that feel slightly soft to the touch and smell fragrant. Fresh, in-season peaches will give the best flavor to your salad. Always select peaches with smooth skin and no blemishes. Absolutely! You can customize your Peach Caprese Salad. Instead of mozzarella, try burrata for creaminess. Feta cheese adds tanginess, while goat cheese brings a unique flavor. You can also mix in other fruits like strawberries or heirloom tomatoes for a twist. If you prefer, swap balsamic glaze with a homemade vinaigrette for a lighter touch. Feel free to get creative with this salad, making it your own! This blog post covered how to make a tasty Peach Caprese salad. We talked about fresh peaches, mozzarella, and the key seasonings. I shared tips for choosing ripe fruit and perfecting your presentation. You can even try variations like different cheeses and nuts. Lastly, I provided storage advice to keep your salad fresh. Enjoy experimenting with this dish, as it’s simple and delicious. You’ll impress your friends and family with your skills in the kitchen.

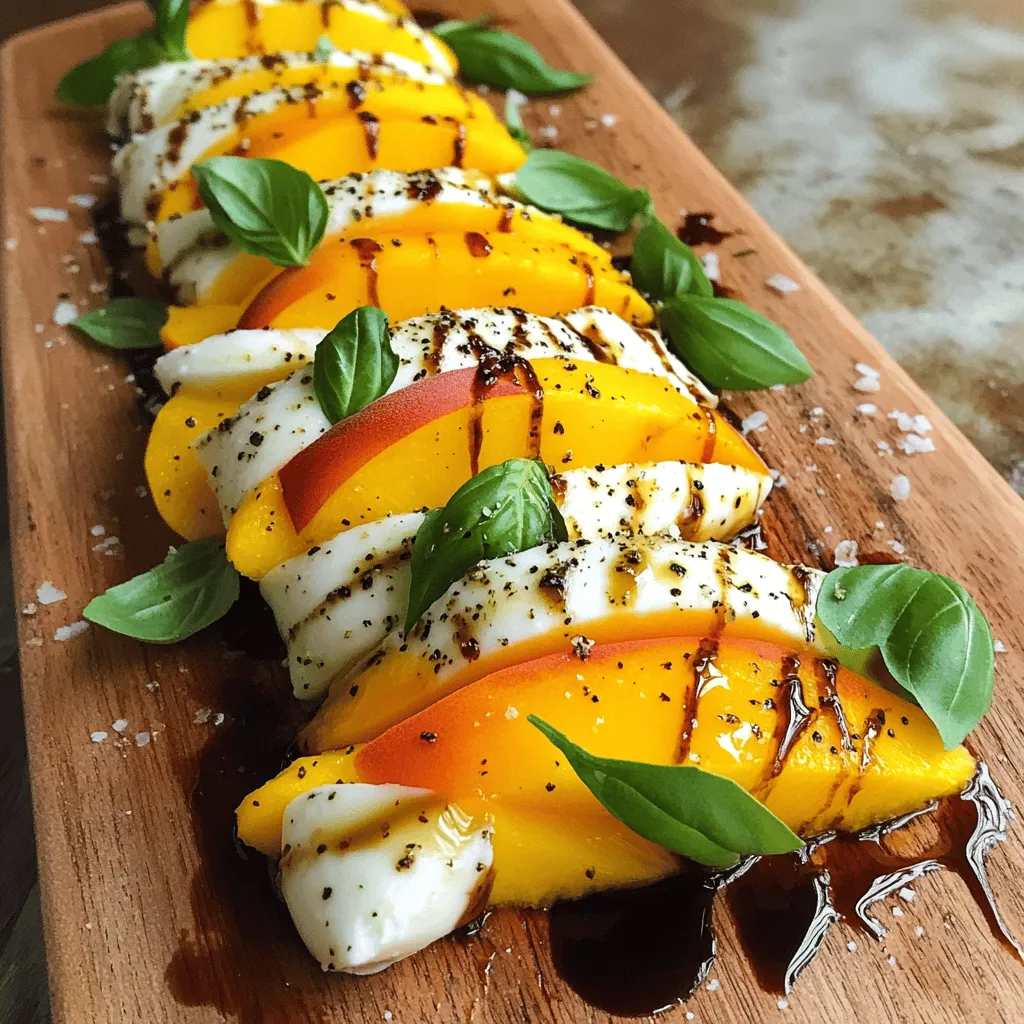
Peach Caprese Salad Flavorful Summer Delight

Summer is here, and it’s time to embrace fresh flavors! One of my favorite dishes this season is Peach Caprese

Garlic Butter Shrimp and Asparagus is a quick dish. It brings bright flavors and a satisfying crunch. This dish is perfect for busy weeknights or special gatherings. - 1 pound large shrimp, peeled and deveined - 1 bunch asparagus, trimmed and cut into 2-inch segments - 4 tablespoons unsalted butter - 4 cloves garlic, finely minced - 1 teaspoon red pepper flakes - 2 tablespoons freshly squeezed lemon juice - Zest of 1 lemon - Salt and freshly ground black pepper, to taste - Fresh parsley, chopped, for garnish You can add a pinch of smoked paprika for a warm flavor. Try fresh basil or chives for a different twist. A sprinkle of grated Parmesan can add a savory touch. Lemon wedges on the side brighten the dish. 1. Pat the shrimp dry with paper towels. This helps them sear better. 2. Season the shrimp with salt and pepper. Let them sit for a few minutes. 3. Trim the asparagus and cut it into 2-inch pieces. This makes it easier to cook. 4. Mince the garlic finely. The smaller the pieces, the better the flavor. 5. Gather all your ingredients. This keeps the process smooth and easy. 1. Heat a large skillet over medium heat. Add 2 tablespoons of butter and let it melt. 2. When the butter foams, add the minced garlic and red pepper flakes. Stir for 1 minute. 3. Increase the heat to medium-high. Add the seasoned shrimp in a single layer. 4. Cook the shrimp for 2-3 minutes on one side. They should turn pink and curl. 5. Flip the shrimp and cook for another 2 minutes. Remove them from the skillet. 6. In the same skillet, add the remaining butter and asparagus. Sauté for 5-6 minutes. 7. When the asparagus is bright green, return the shrimp to the skillet. 8. Drizzle with lemon juice and add lemon zest. Toss everything gently. 9. Taste and adjust seasoning with salt and pepper. 10. Remove from heat and sprinkle with chopped parsley. - Use fresh shrimp for the best taste. Frozen shrimp can work if thawed properly. - Don’t overcrowd the skillet. This ensures even cooking and a nice sear. - Watch the shrimp closely. They cook quickly, and overcooking makes them tough. - Let the shrimp rest briefly after cooking. This keeps them juicy and flavorful. - For more flavor, consider adding a splash of white wine when cooking. Enjoy making this dish using the Full Recipe! To get the best shrimp, start with fresh or thawed shrimp. Dry them well with paper towels. This step helps them sear nicely. Season the shrimp with salt and pepper. Heat your skillet before adding the shrimp. Use medium-high heat for a quick cook. Place the shrimp in a single layer. Cook for 2-3 minutes on one side. Once they turn pink, flip them over. Avoid overcrowding the pan to ensure even cooking. For the garlic butter sauce, use unsalted butter for control over salt. Melt half of the butter in your skillet. Add minced garlic and red pepper flakes. Sauté for just one minute. Stir often to prevent burning the garlic. Once fragrant, add the shrimp. After cooking the shrimp, add the rest of the butter. This keeps the sauce rich and creamy. Finally, finish with lemon juice and zest for a fresh kick. Serve the dish on a large white platter for a beautiful look. Drizzle any leftover sauce over the shrimp and asparagus. Add lemon wedges and fresh parsley on top for color. Pair this dish with rice or crusty bread to soak up the sauce. You can also serve it with a light salad for a healthy twist. This meal is perfect for a quick weeknight dinner or special occasions. For the full recipe, check the earlier section in this article. {{image_4}} You can easily change up this dish. If you prefer, use scallops or chicken instead of shrimp. Both options will bring a new flavor profile. For the asparagus, try green beans or broccoli. They cook nicely and add a different crunch. You can also add vegetables like bell peppers or zucchini. They pair well with garlic and lemon. For a creamier twist, add a splash of heavy cream. This will make a rich sauce that soaks into the shrimp and veggies. While sautéing is quick and tasty, you can grill or bake your shrimp and asparagus. Grilling gives a nice smoky flavor. Simply toss the shrimp and asparagus in the garlic butter, then place them on a grill. Cook for about 3-4 minutes per side. Baking is another easy option. Preheat your oven to 400°F (200°C). Spread the shrimp and asparagus on a baking sheet, drizzle with the garlic butter, and bake for 10-12 minutes. This method is hands-off and allows you to focus on other dishes. Garlic butter shrimp and asparagus fits any meal. For a casual lunch, serve it over rice or pasta. This adds a filling base to catch all the garlic butter goodness. For a fancy dinner, plate it on its own with a lemon wedge. This makes the dish look elegant and fresh. You can also serve it as a starter at a party. Just present small portions on skewers or in small bowls for easy eating. Check the [Full Recipe] for more details on making this delightful dish! To store your leftover garlic butter shrimp and asparagus, first let it cool down. Place it in an airtight container. Make sure it is sealed tightly. You can keep it in the fridge for up to three days. This way, the shrimp and asparagus stay fresh and tasty. When you're ready to eat your leftovers, take them out of the fridge. You can reheat them in a skillet over medium heat. Stir gently until everything is warm. Another option is to use a microwave. Heat in short bursts of 30 seconds, stirring in between. This prevents overcooking and keeps the shrimp tender. If you want to freeze this dish, first let it cool completely. Then, put it in a freezer-safe bag or container. Remove as much air as possible to prevent freezer burn. You can freeze it for up to two months. When you're ready to enjoy it, thaw in the fridge overnight before reheating. This keeps the flavors intact and makes for a quick meal. For more detailed steps, you can refer to the Full Recipe. Yes, you can use frozen shrimp. Just make sure to thaw them first. Place the shrimp in a bowl of cold water for about 15-20 minutes. This helps them thaw quickly. After thawing, pat them dry. This step helps them sear better in the pan. Garlic butter shrimp and asparagus go well with many sides. Here are some tasty options: - Rice, either white or brown - Quinoa for a healthy twist - A crisp green salad for added freshness - Crusty bread to soak up the garlic butter sauce - Mashed potatoes for a hearty option These sides balance the lightness of the shrimp and asparagus. You can tell shrimp are cooked when they turn bright pink. They should curl slightly and feel firm to the touch. Cooking usually takes about 4-6 minutes total. Use a meat thermometer if you want to be extra sure. The internal temperature should reach 120°F. This ensures they are safe to eat and juicy. For a detailed recipe to follow, check out the Full Recipe. You learned how to make Garlic Butter Shrimp and Asparagus. We covered the ingredients, cooking steps, and storage tips. Remember to try different flavors and cooking methods. This dish fits many settings, from simple dinners to special events. With practice, you’ll master it. Enjoy your cooking and impress your guests with this quick, tasty meal!

Garlic Butter Shrimp and Asparagus Simple Delight

Get ready to wow your taste buds with Garlic Butter Shrimp and Asparagus! This simple delight brings together juicy shrimp

- 4 salmon fillets (approximately 6 oz each) - 2 tablespoons extra virgin olive oil - Zest of 2 lemons - Juice of 2 lemons (about 1/4 cup) - 3 cloves garlic, finely minced - 1 tablespoon fresh dill, finely chopped - 1 tablespoon fresh parsley, finely chopped - 1 teaspoon sea salt - 1/2 teaspoon freshly ground black pepper These ingredients make your salmon flavorful. The lemon zest adds a fresh touch. Fresh herbs bring bright flavors that complement the rich salmon. Olive oil keeps the fish moist as it cooks. - Lemon slices for garnish - Additional fresh herbs (dill and parsley) for garnish Garnishes add color and brightness to your dish. Lemon slices look pretty and add extra zest. Fresh herbs give a lovely aroma and taste to the finished salmon. Try serving this salmon with a side of grilled veggies or a light salad. Quinoa or rice also makes a great base. Both options balance the dish, adding texture and nutrition. You may enjoy a crisp white wine, like Sauvignon Blanc, to enhance the meal. For more ideas, check the Full Recipe for delicious sides. To make the marinade, grab a medium bowl. Add 2 tablespoons of extra virgin olive oil. Then, zest 2 lemons and squeeze in their juice. You need about 1/4 cup of juice. Now, finely mince 3 cloves of garlic and add them to the bowl. Next, chop 1 tablespoon each of fresh dill and fresh parsley. Toss those in as well. Finally, add 1 teaspoon of sea salt and 1/2 teaspoon of black pepper. Use a whisk to mix everything well. You want a fragrant and smooth marinade. This will bring great flavor to your salmon. Now, take your 4 salmon fillets and place them skin-side down in a shallow dish or a resealable bag. Pour the marinade over the fillets. Make sure each piece is well-coated. Cover the dish or seal the bag tightly. Refrigerate for at least 30 minutes. If you have time, let it marinate for 1 hour. This extra time helps the flavors soak in deeply. When you’re ready to grill, preheat your grill to medium-high heat. If you use a grill pan, heat it on medium-high. Once hot, take the salmon out of the marinade. Let the excess marinade drip off and throw away the leftover marinade. Carefully place the salmon fillets on the grill, skin-side down. Grill them for 4-6 minutes without moving them. Look for the edges to turn opaque. This means they are cooking well. When they release easily from the grill, it’s time to flip them. Use a wide spatula to do this gently. Grill for another 3-5 minutes. The salmon should flake easily with a fork when it’s done. Once cooked, transfer the salmon to a plate and let it rest for a couple of minutes. This resting time helps the juices redistribute. For a beautiful look, serve the salmon on a platter with lemon slices and fresh herbs. For the full recipe, check out the complete instructions above. Grilling salmon can seem tricky. Here are some tips to make it easy. First, make sure your grill is hot. A hot grill helps to sear the fish and gives it great flavor. Second, keep the skin on. The skin protects the fish and helps it cook evenly. Lastly, don’t flip the salmon too soon. Let it cook for a few minutes before turning it. This helps it stay moist and tender. Choosing fresh salmon is key to a great meal. Look for bright, shiny skin. The flesh should be firm and spring back when you press it. If the salmon has a strong fishy smell, it may not be fresh. You can also ask your fishmonger about the catch date. Fresh salmon is best for grilling and will taste amazing in your lemon herb recipe. Marinades are a simple way to boost flavor. For this lemon herb grilled salmon, mix olive oil, lemon juice, and herbs. Let the salmon soak in the marinade for at least 30 minutes. This allows the flavors to soak in well. You can also try adding spices or other herbs to change up the taste. Feel free to experiment and find your favorite mix. Check out the full recipe for more details on how to make the perfect marinade. {{image_4}} To add a kick, mix in some chili flakes to your marinade. This spice enhances the lemon and herb flavors. You can also use a dash of hot sauce for an extra zing. This variation pairs well with a side of cooling yogurt sauce or a fresh salad. Enjoy the balance of spicy and zesty! For a fruity twist, add orange or lime juice to the marinade. The extra citrus brightens the dish. You can mix in fresh herbs like cilantro for a unique flavor. This variation works great with grilled vegetables or a light rice dish. It brings a refreshing taste to your meal. Cut the salmon into cubes and thread them onto skewers for a fun presentation. Marinate the cubes as you would the fillets. Grill them for about 8-10 minutes, turning often for even cooking. You can also add vegetables like bell peppers or zucchini to the skewers. It’s a great option for summer barbecues! For the full recipe, visit the Full Recipe section above. After making Lemon Herb Grilled Salmon, let it cool. Place the salmon in an airtight container. Store it in the fridge for up to three days. Make sure it is covered tightly to keep it fresh. If you notice any strong smells, it’s best to toss it out. Always check the salmon before you eat it again. You can freeze leftover grilled salmon. First, let it cool completely. Wrap each fillet tightly in plastic wrap. Place the wrapped salmon in a freezer bag. This way, it can last up to three months. When you want to eat it, just thaw it in the fridge overnight. Avoid refreezing it once thawed to keep the best taste and texture. To reheat grilled salmon, use the oven for the best results. Preheat your oven to 350°F (175°C). Place the salmon on a baking sheet and cover it with foil. Heat for about 10-15 minutes, or until warm. You can also use a microwave, but be careful. Heat it in short bursts to avoid drying it out. Enjoy your meal again with the same great flavors from the Full Recipe! You can tell when salmon is done by checking its color and texture. Cooked salmon turns from a deep pink to a light pink. The fish should also flake easily with a fork. For a safe internal temperature, aim for 145°F (63°C). Use a meat thermometer for accuracy. If you don’t have one, look for the fish to become opaque and firm. Yes, you can make the marinade ahead of time. This saves you time on busy days. Simply mix all the marinade ingredients and store them in the fridge. It will stay fresh for about 2 days. Just remember to give it a good stir before using it on the salmon. This allows the flavors to blend well. Feel free to get creative with herbs! Besides dill and parsley, you can use basil, thyme, or cilantro. Each herb adds a unique flavor to the dish. Mint can also bring a fresh twist. Adjust the amount based on your taste. Mixing different herbs can make the salmon even more exciting. For the best results, use fresh herbs whenever possible. In this post, we covered how to make lemon herb grilled salmon. We explored the main ingredients, marinade steps, and grilling tips. You learned about variations and how to store this tasty dish. Remember, fresh salmon and the right herbs make a big difference. Enjoy trying different flavors and share them with friends and family. With these steps, you can create a delicious meal. Happy grilling!

Lemon Herb Grilled Salmon Flavorful and Simple Recipe

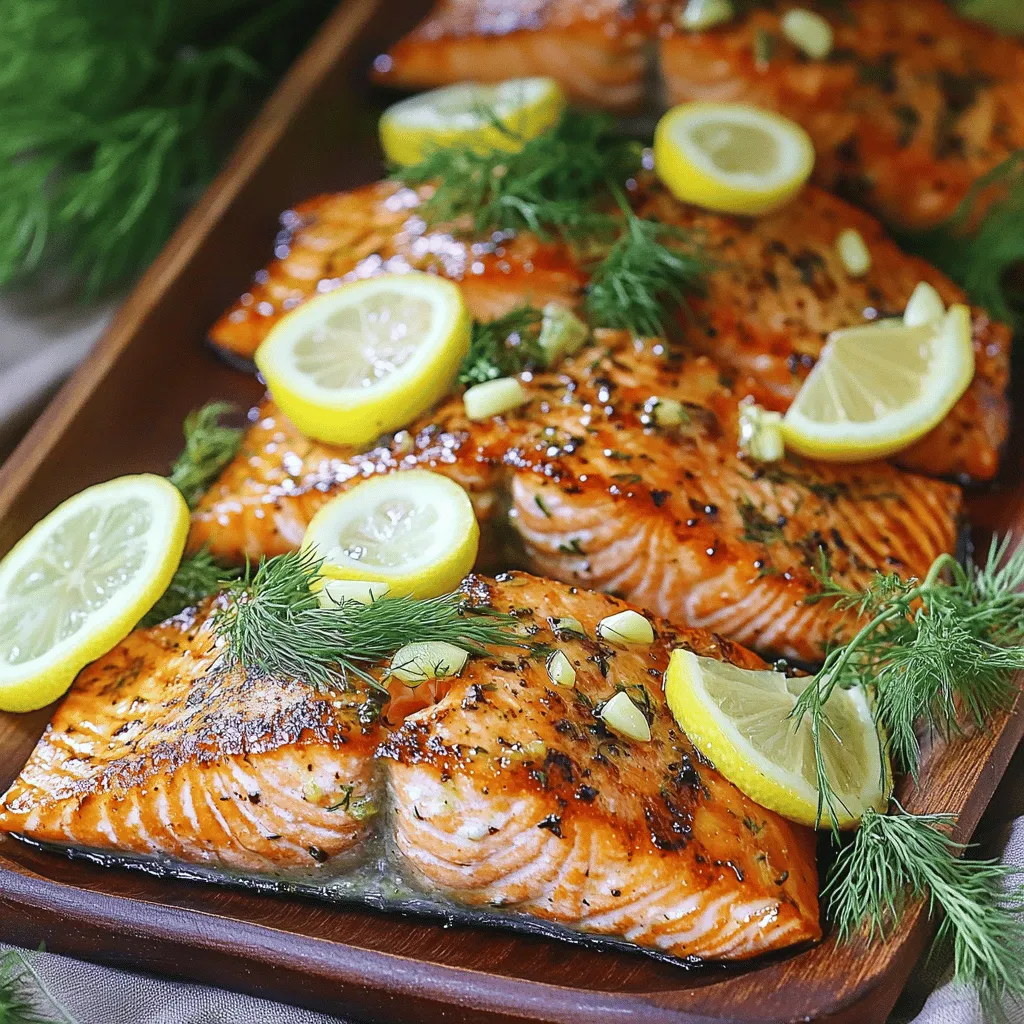
Are you ready to impress your friends and family with a delicious meal? This Lemon Herb Grilled Salmon recipe is

When making Balsamic Glazed Brussels Sprouts, gather these fresh ingredients to create a tasty side dish. Here’s what you need: - 1 pound Brussels sprouts, halved - 3 tablespoons balsamic vinegar - 2 tablespoons honey or maple syrup - 2 tablespoons olive oil - 1 teaspoon garlic powder - Salt and freshly ground black pepper, to taste - Optional add-ins: chopped walnuts, crumbled feta cheese, fresh parsley Each ingredient plays a role in building flavor. The Brussels sprouts provide a hearty base. The balsamic vinegar adds tang, and the honey brings sweetness. Olive oil helps with roasting, while garlic powder gives depth. Don't forget to adjust salt and pepper to your taste. If you want to kick it up a notch, try adding walnuts for crunch or feta for tang. Fresh parsley brightens the dish and makes it look pretty. You’ll find all these ingredients in most grocery stores, making it easy to whip up this flavorful side. For the full recipe, check out the details above. 1. Preheat your oven to 400°F (200°C). This step helps the sprouts cook evenly. 2. Line a baking sheet with parchment paper. This makes cleanup easier later. 3. Take 1 pound of Brussels sprouts and cut them in half. This will help them roast well. 4. In a large bowl, mix the halved Brussels sprouts with 2 tablespoons of olive oil. 5. Add 1 teaspoon of garlic powder, salt, and pepper to taste. Toss until well coated. 1. Spread the Brussels sprouts in a single layer on the baking sheet. This helps them brown nicely. 2. Place the baking sheet in the oven and roast the sprouts for 20 minutes. Shake the pan halfway through. This ensures they cook evenly. 3. While the sprouts roast, whisk together 3 tablespoons of balsamic vinegar and 2 tablespoons of honey or maple syrup in a small bowl. This will be your glaze. 1. After 20 minutes, take the Brussels sprouts out of the oven. Drizzle the balsamic glaze over them. Toss to coat them well. 2. Return the sprouts to the oven and roast for an additional 10 to 15 minutes. They should be caramelized and tender. 3. If you want, sprinkle 1/4 cup of chopped walnuts over the sprouts in the last 5 minutes of roasting. This adds a nice crunch. 4. Once done, let them cool for a few minutes before serving. Enjoy your flavorful side dish! For the full recipe, check the details above. - Arrange the Brussels sprouts in a single layer on the baking sheet. This helps them roast evenly. - Keep an eye on the sprouts as they cook. This avoids burning and keeps them tender. - Try using different vinegars, like red wine or apple cider vinegar. Each one adds a unique twist. - Adjust the sweetness by using honey or maple syrup. Taste as you go to find your perfect balance. - Serve the Brussels sprouts on a large platter to impress guests. Drizzle extra balsamic glaze on top for flair. - Garnish with fresh parsley for a pop of color. You can also sprinkle feta cheese or walnuts for added texture. These tips make Balsamic Glazed Brussels Sprouts a standout side dish. For the full recipe, check out the details above. {{image_4}} If you want to make this dish gluten-free, skip the feta cheese. Instead, use a sprinkle of nutritional yeast for a cheesy flavor. For a vegan twist, swap honey with maple syrup. This change keeps the dish sweet and plant-based. You can also try using roasted sunflower seeds instead of walnuts for added crunch. Want to spice things up? Add chili flakes or paprika to the sprouts before roasting. This step brings a nice heat. For a fresh twist, drizzle some lemon or orange juice over the Brussels sprouts before serving. The citrus adds brightness and balance to the sweet balsamic glaze. You can sauté Brussels sprouts on the stovetop if you prefer. Heat olive oil in a pan, add the sprouts, and cook for about 10-15 minutes. Stir often for even cooking. If you’re short on time, use an air fryer. Set it to 375°F (190°C) and cook for 15 minutes. Shake the basket halfway through for best results. Feel free to explore these variations. Each one gives a unique spin to the classic Balsamic Glazed Brussels Sprouts. For the complete recipe, check out the Full Recipe section! To reheat Balsamic Glazed Brussels Sprouts, use an oven or microwave. For the oven, preheat it to 350°F (175°C). Spread the sprouts on a baking sheet. Heat for about 10 minutes. This keeps them crisp. In the microwave, place them in a bowl and cover. Heat in short bursts, stirring in between. This helps maintain their flavor and texture. Store leftover Brussels sprouts in an airtight container. Place them in the fridge for up to 3 days. For longer storage, you can freeze them. To freeze, spread them on a baking sheet and freeze until solid. Then, transfer to a freezer-safe bag. This way, they last for about 2 months. Brussels sprouts stay fresh in the fridge for about 3 to 5 days. Signs of spoilage include yellowing leaves or a sour smell. If you see these signs, it’s best to toss them out. Always trust your senses to ensure you enjoy the best flavor. How do I choose the best Brussels sprouts? To find the best Brussels sprouts, look for small, firm, and bright green ones. Avoid any with yellow leaves or dark spots. Fresh sprouts should feel heavy for their size. Always choose ones that are similar in size for even cooking. Can I use frozen Brussels sprouts? You can use frozen Brussels sprouts, but they may not taste as fresh. If you use them, don’t thaw them before cooking. Just roast them from frozen, and increase the cooking time slightly. What are the health benefits of Brussels sprouts? Brussels sprouts are rich in vitamins C and K. They provide fiber, which aids digestion. These sprouts have antioxidants that help fight inflammation. Eating them may lower the risk of certain diseases, making them a healthy choice. How many calories are in Balsamic Glazed Brussels Sprouts? A serving of Balsamic Glazed Brussels Sprouts contains about 120 calories without extra toppings. This makes it a light yet flavorful side dish. The calories may vary if you add nuts or cheese. What dishes pair well with Balsamic Glazed Brussels Sprouts? Balsamic Glazed Brussels Sprouts complement roasted meats like chicken or pork. They also pair well with grain dishes, such as quinoa or rice. For a vegetarian meal, serve them with a hearty lentil salad. Suggestions for suitable wines or beverages to pair with the dish A crisp white wine, like Sauvignon Blanc, works well with these sprouts. If you prefer red, try a light Pinot Noir. For non-alcoholic options, sparkling water with lemon adds a nice touch. In this blog post, we explored how to make Balsamic Glazed Brussels Sprouts. We covered the key ingredients, step-by-step cooking instructions, and various tips to enhance flavor. You learned how to store and reheat leftovers. Remember, you can easily adapt the recipe to fit your taste, whether you want it spicy or want a vegan option. Enjoy experimenting with this dish, and make it your own. Delicious Brussels sprouts are just a recipe away!

Balsamic Glazed Brussels Sprouts Flavorful Side Dish

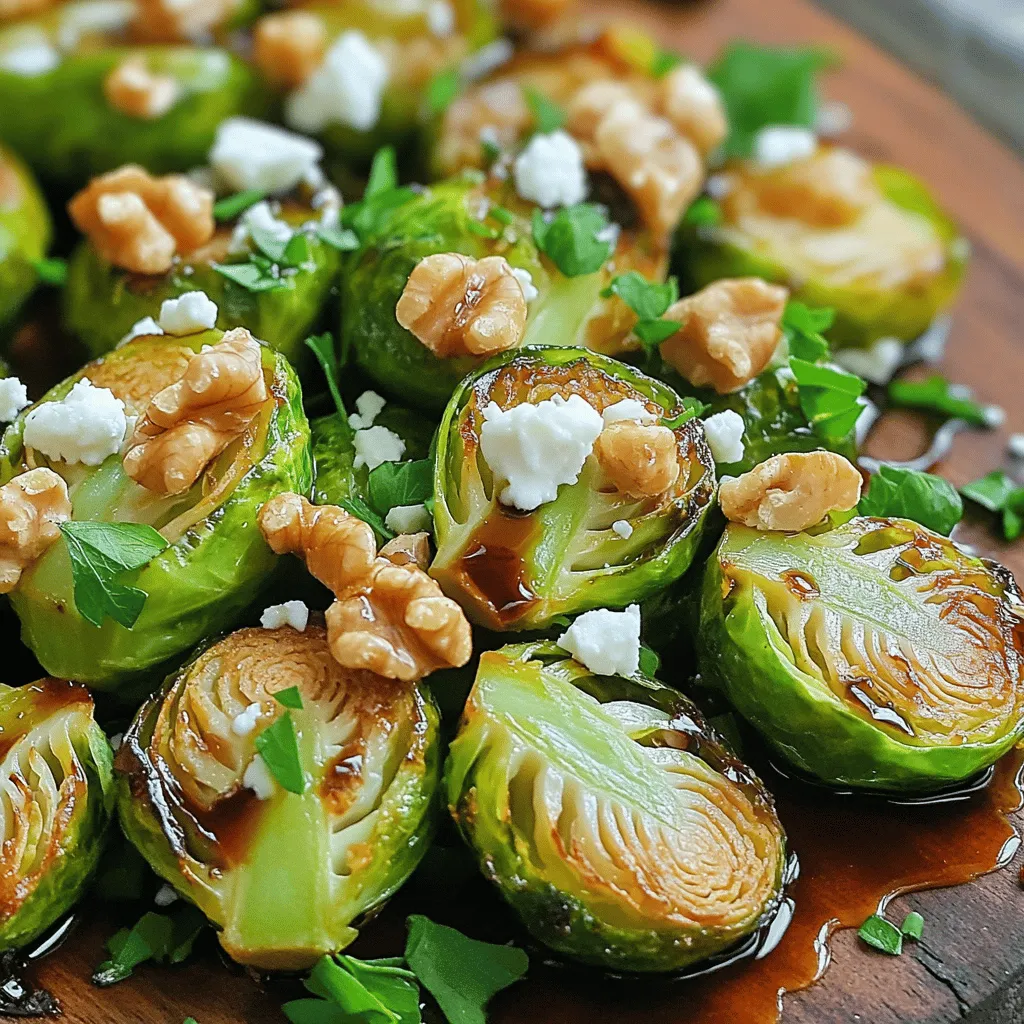
Looking for a side dish that’s as tasty as it is simple? Balsamic Glazed Brussels Sprouts are just what you

- 4 medium bell peppers - 1 cup quinoa (thoroughly rinsed) - 2 cups vegetable broth - 1 cup canned black beans - 1 cup corn kernels - 1 small red onion - 2 cloves garlic - 1 teaspoon ground cumin - 1 teaspoon smoked paprika - ½ teaspoon chili powder - Salt and black pepper to taste - ½ cup shredded cheese - Fresh cilantro or parsley for garnish Stuffed bell peppers with quinoa make a tasty and filling meal. The main ingredients are colorful bell peppers, and quinoa adds a healthy boost. Quinoa is easy to cook and absorbs the flavors well. The flavor enhancers, like black beans and corn, give it a nice texture and taste. Spices like cumin and smoked paprika add warmth and depth. They make the dish exciting and flavorful. Lastly, topping with cheese gives a creamy finish that melts beautifully. Fresh herbs like cilantro or parsley bring a pop of color and freshness. I love making this dish because it is simple and satisfying. You can find the full recipe in the link above, which guides you through each step! - Preheat the oven to 375°F (190°C). - Slice the tops off the bell peppers. Remove the seeds and membranes. Place the peppers upright in a baking dish. - In a medium saucepan, bring 2 cups of vegetable broth to a boil. - Add 1 cup of rinsed quinoa. Reduce heat and let it simmer. - Heat a drizzle of olive oil in a skillet. - Sauté 1 small chopped onion and 2 minced garlic cloves until the onion turns clear. - Add 1 cup of black beans, 1 cup of corn, and spices to the skillet. - Stir in the cooked quinoa and mix well. Season with salt and pepper. - Gently fold in half a cup of shredded cheese. - Carefully stuff each bell pepper with the quinoa mixture. - Top each pepper with the remaining cheese. Cover the dish with foil. - Bake for 25 minutes. Remove the foil and bake for another 10-15 minutes. - Once baked, let the peppers cool for a few minutes. - Garnish with fresh cilantro or parsley to make them pop. - Serve your stuffed peppers on a colorful platter for a great look! You can find the full recipe for more details and specific measurements. - Rinse the quinoa before cooking. This step removes the bitter coating, called saponin. It makes the quinoa taste better. - Avoid overcooking bell peppers. You want them tender but still crisp. Bake them just until soft to keep that nice bite. - Consider adding fresh herbs like cilantro or parsley. They will brighten up the dish. - Adjust the spice level to fit your taste. You can add more chili powder or some diced jalapeños for heat. - Use a glass or ceramic baking dish. It holds heat well and helps cook the peppers evenly. - A non-stick skillet is great for sautéing. It makes cooking the onions and garlic easier, with less sticking. These tips will help you create stuffed bell peppers that are not only delicious but also visually appealing. If you want more details, check the Full Recipe. {{image_4}} For a tasty twist, you can swap black beans with lentils. Lentils cook fast and add a nice texture. You can also try using couscous instead of quinoa. Couscous cooks quickly and absorbs flavors well. Both options are rich in protein and fiber. If you love meat, ground turkey or beef works great in the filling. Brown the meat in the skillet before adding the onions and garlic. Cook it for about 5-7 minutes until it’s no longer pink. This adds a hearty flavor and makes the dish more filling. To change things up, try a Mediterranean version. Add feta cheese and olives to the filling for a salty kick. You can also mix in different types of cheese like mozzarella or gouda. Each cheese brings a unique flavor, making your peppers even more exciting. Stuffed peppers stay fresh in the fridge for about 3-5 days. To store leftovers, place them in an airtight container. This keeps them from drying out and helps preserve flavors. I recommend letting them cool first before sealing them up. Freezing stuffed peppers is easy. Follow these steps: - Cool the Peppers: Allow the cooked peppers to cool completely. - Wrap Well: Wrap each pepper in plastic wrap or foil. - Store in a Bag: Place the wrapped peppers in a freezer-safe bag. This helps prevent freezer burn. When you want to enjoy them, thaw the peppers overnight in the fridge. Reheat in the oven at 350°F until heated through. This usually takes about 20-25 minutes. Pair stuffed peppers with a side salad for a fresh touch. A simple mixed greens salad works well. You can also serve them with rice or quinoa for a hearty meal. To create a complete meal, add a light soup, like tomato or vegetable. This makes for a nice balance of flavors and textures. Bake stuffed bell peppers for about 35 to 40 minutes. Cover them with foil for the first 25 minutes. Remove the foil to let the cheese brown. Yes, you can prepare stuffed peppers ahead of time. Stuff them and store them in the fridge for up to 24 hours. Just bake them right before you serve. If you don’t have quinoa, use rice or couscous instead. Both options work well and still taste great. Just adjust the cooking times based on what you choose. Stuffed peppers are healthy! They are full of veggies, protein, and fiber. Using quinoa adds more nutrients, making them a balanced meal. Peppers are done when they are tender. You should be able to easily pierce them with a fork. The cheese should also be bubbly and slightly golden. Yes, you can use frozen bell peppers. Just thaw and drain them before stuffing. They may cook faster, so keep an eye on them while baking. Stuffed bell peppers with quinoa are fun and healthy. Here’s what you need: - 4 medium bell peppers (any color of your choice) - 1 cup quinoa, thoroughly rinsed - 2 cups vegetable broth - 1 cup canned black beans, drained and rinsed - 1 cup corn kernels (fresh or frozen) - 1 small red onion, finely chopped - 2 cloves garlic, minced - 1 teaspoon ground cumin - 1 teaspoon smoked paprika - ½ teaspoon chili powder - Salt and black pepper to taste - ½ cup shredded cheese (choose between cheddar or pepper jack) - Fresh cilantro or parsley for garnish This recipe is simple! You start by preheating your oven. Then, you slice the bell peppers and remove the seeds. Next, you cook the quinoa in vegetable broth while sautéing the onion and garlic. Combine all the filling ingredients and stuff the peppers. Top with cheese and bake. For a detailed guide, check out the full recipe here: Quinoa-Packed Bell Peppers Surprise . Stuffed bell peppers are a fantastic dish packed with flavor and nutrition. We covered the main ingredients, flavor enhancers, and spices to make these peppers shine. I shared step-by-step instructions, useful tips, and variations to suit any taste. In the end, these peppers are not just easy to make; they also offer endless possibilities. Enjoy experimenting with the recipe to find your perfect flavor!

Stuffed Bell Peppers with Quinoa Flavorful Delight

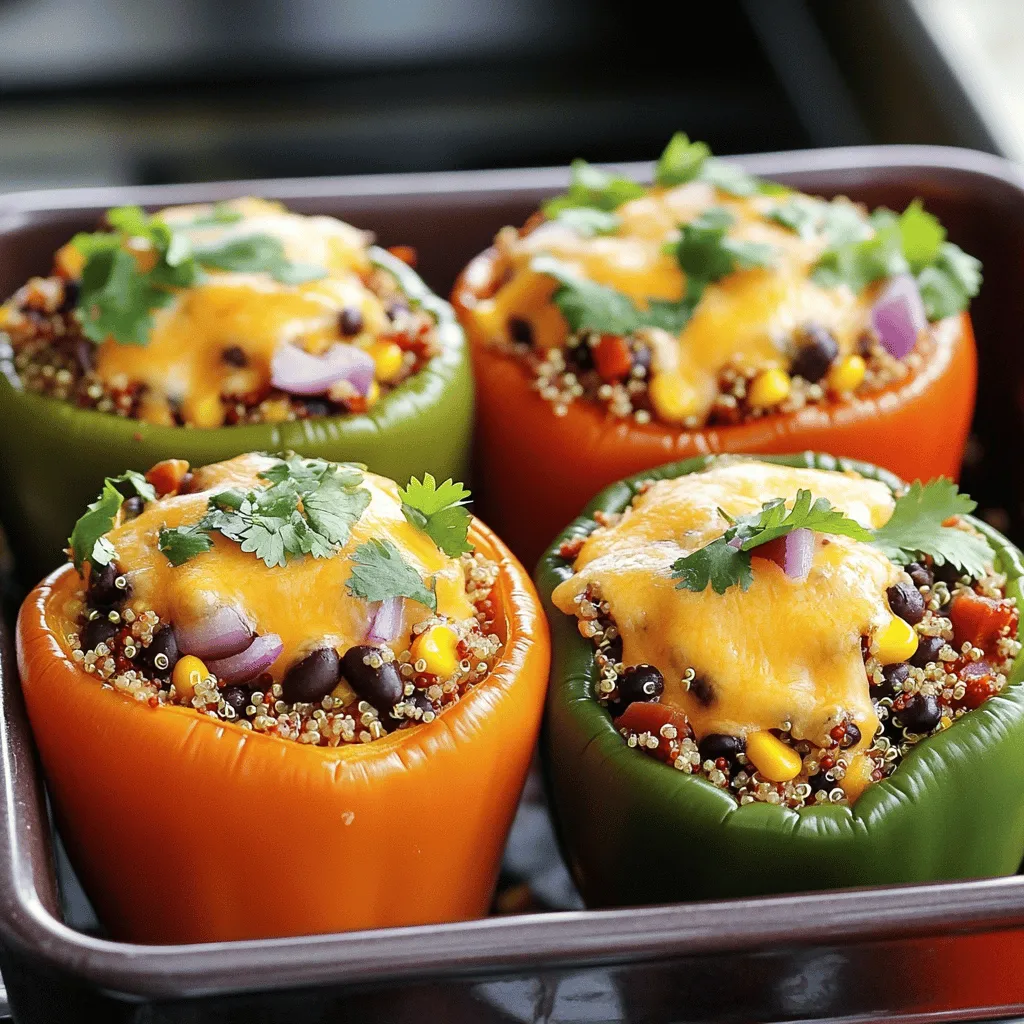
Are you ready to make a meal that sings with flavor? Stuffed bell peppers filled with quinoa are not just

To make these Honey Mustard Chicken Skewers, you need a few key ingredients. Here’s the list: - 1 pound boneless, skinless chicken breasts - 1/4 cup honey - 1/4 cup Dijon mustard - 2 tablespoons soy sauce - 1 tablespoon extra virgin olive oil - 1 teaspoon garlic powder - 1 teaspoon onion powder - 1/2 teaspoon sweet paprika - Salt and pepper to taste - Vegetables for skewering: red bell pepper, yellow bell pepper, and red onion - Skewers (wooden or metal) Each ingredient plays an important role in creating the flavor. The honey gives a nice sweetness. Dijon mustard adds tanginess. Soy sauce brings depth, while garlic and onion powders enhance the overall taste. I like to use fresh vegetables like red and yellow bell peppers and red onion. They add color and crunch. If you want to add more veggies, feel free! Zucchini or cherry tomatoes work well too. Don’t forget the skewers! If you use wooden skewers, soak them in water for 30 minutes. This prevents burning on the grill. You can find all the details in the Full Recipe. To start, gather your ingredients. In a large bowl, whisk together the following: - 1/4 cup honey - 1/4 cup Dijon mustard - 2 tablespoons soy sauce - 1 tablespoon extra virgin olive oil - 1 teaspoon garlic powder - 1 teaspoon onion powder - 1/2 teaspoon sweet paprika - Salt and freshly ground black pepper to taste This mix should be smooth and well combined. The honey gives a sweet touch, while the mustard adds a nice tang. The soy sauce adds depth and saltiness. Next, add 1 pound of diced chicken breasts to the marinade. Make sure each piece is well coated. Cover the bowl with plastic wrap. Now, pop it in the fridge. Let it marinate for at least 30 minutes but up to 2 hours for more flavor. This step is key! It makes the chicken tender and juicy. Now, it’s time to grill! Preheat your grill or grill pan to medium-high heat. If you use wooden skewers, soak them in water for 30 minutes. This stops them from burning. After marinating, it’s time to assemble the skewers. Thread the chicken pieces onto the skewers, alternating with pieces of red and yellow bell peppers and red onion wedges. This not only adds flavor but also makes them look pretty. Place the skewers on the grill and cook for about 10-12 minutes. Turn them occasionally. You want them to get nice grill marks. For safety, make sure the chicken reaches an internal temperature of 165°F (75°C). Once cooked, carefully remove the skewers from the grill. Let them rest for a few minutes before serving. This helps keep the chicken juicy. For the full recipe, check the recipe card above. Enjoy your savory grilled delight! For the best results, heat your grill to medium-high. This helps cook the chicken evenly. Grill the skewers for about 10 to 12 minutes. Make sure to turn them often. Check the chicken's internal temperature with a meat thermometer. It should reach 165°F or 75°C for safe eating. Longer marination gives the chicken more flavor. I recommend marinating for at least 30 minutes. For even better taste, try to marinate for up to 2 hours. If you want to switch things up, you can use yogurt or citrus juice as a marinade. Both options add a nice twist to the flavor. For a great look, serve the skewers on a colorful platter. You can also use a rustic wooden board for a fun touch. Garnish with fresh parsley or arugula to make it pop. Drizzling extra honey mustard sauce over the skewers just before serving adds flavor and makes them shine. Enjoy your dish! For the full recipe, check [Full Recipe]. {{image_4}} You can use different meats for Honey Mustard Chicken Skewers. Try pork or shrimp for a tasty twist. If you prefer plant-based options, tofu works great too. Firm tofu absorbs the marinade well. Just cut it into cubes and follow the same marinating steps. Each protein adds its own flavor, making your skewers unique. Seasonal veggies can enhance your skewers. Consider zucchini, mushrooms, or cherry tomatoes. These veggies add color and flavor. Zucchini brings a mild taste that pairs well with the honey mustard. Mushrooms offer a rich, umami flavor. Cherry tomatoes burst with juice, creating a delightful contrast. Mix and match based on what you enjoy. To add heat, sprinkle in chili flakes or cayenne pepper. This brings a nice kick to your dish. If you want a sweeter option, substitute honey with maple syrup or agave. Both will give a different yet delicious flavor. Experimenting with these variations can make your skewers even more exciting. To keep your Honey Mustard Chicken Skewers fresh, place them in an airtight container. This method locks in moisture and flavor. Make sure to cool the skewers to room temperature before sealing. For best results, store them in the fridge for up to three days. You can freeze both uncooked and cooked skewers. For uncooked skewers, place them on a baking sheet to freeze individually. Once frozen, transfer them to a freezer bag. This way, they won't stick together. To freeze cooked skewers, let them cool completely, then store them in a freezer-safe container. When you want to enjoy them, simply reheat in the oven at 350°F until warmed through. In the fridge, cooked skewers last about three days. You can keep uncooked skewers for up to two days in the fridge. Always check for signs of spoilage. Look for any off smells or changes in color. If you notice these signs, it’s best to discard the skewers. For a delicious meal, always prioritize fresh ingredients. Yes, you can use chicken thighs. Thighs have more fat, making them juicy. They also add flavor. Just cut them into 1-inch pieces like the breasts. Check the chicken's internal temperature. It should be 165°F (75°C). You can use a meat thermometer for accuracy. The chicken should no longer be pink inside. You can serve these skewers with rice or a fresh salad. Grilled veggies also pair well. For a fun twist, try some dipping sauces like extra honey mustard or barbecue. Yes, you can prepare the skewers ahead. Marinate the chicken and veggies in the fridge for up to 2 hours. You can also grill them ahead and reheat later. Soak wooden skewers in water for at least 30 minutes before grilling. This helps keep them from burning on the grill. Use this tip every time for best results. For the full recipe, check out the Honey Mustard Chicken Skewers. This blog post shared how to make delicious honey mustard chicken skewers. You learned about the key ingredients, easy marinade steps, and grilling tips. I also provided options for variations, storage methods, and answers to common questions. You now have all the tools to create tasty skewers. Enjoy your cooking and impress your guests with vibrant flavors and juicy chicken. Cooking can be simple and fun—let your creativity shine!

Honey Mustard Chicken Skewers Savory Grilled Delight

Get ready to impress your taste buds with Honey Mustard Chicken Skewers! This savory grilled delight combines tender chicken, tangy

For this tasty treat, you need: - 1 cup rolled oats - 1 ripe banana, mashed into a smooth puree - 1 cup almond milk (or your preferred milk) - 1/2 teaspoon ground cinnamon - 1 tablespoon pure maple syrup (or honey, if preferred) - 1 tablespoon chia seeds - 1/4 cup walnuts, chopped - A pinch of salt These key ingredients work together to create a creamy and flavorful dish that tastes like banana bread. You can also add: - 1/4 cup raisins (optional for sweetness and texture) - Additional banana slices for garnish - A light sprinkle of cinnamon for garnish These optional ingredients give your oats a little extra sweetness and crunch. Let's talk about what these ingredients bring to the table: - Rolled oats provide fiber, helping with digestion and keeping you full. - Bananas add natural sweetness and potassium, which is good for your heart. - Almond milk is low in calories and adds creaminess without dairy. - Cinnamon can help regulate blood sugar and adds flavor. - Chia seeds are packed with omega-3s and protein, which are great for energy. - Walnuts boost heart health with healthy fats. These ingredients not only taste good, but they also help fuel your day. You can find the full recipe above for more details on how to make these delicious banana bread overnight oats! Making banana bread overnight oats is fun and easy. You need a few simple steps. First, gather all your ingredients. You will use rolled oats, a ripe banana, almond milk, and more. The whole process takes around 10 minutes, but it’s best to leave them overnight. This makes them creamy and delicious. Start by taking a medium-sized bowl. Add 1 cup of rolled oats. Then, mash 1 ripe banana until smooth and add it to the oats. Pour in 1 cup of almond milk next. Sprinkle in 1/2 teaspoon of ground cinnamon. Add 1 tablespoon of maple syrup for sweetness. Don’t forget 1 tablespoon of chia seeds and a pinch of salt. Mix everything together until well combined. Finally, gently fold in 1/4 cup of chopped walnuts and optional 1/4 cup of raisins. This adds great texture and flavor. Now, transfer the mixture into two jars or airtight containers. Fill them evenly, then seal them tightly. Place the jars in the fridge overnight. This allows the oats to soak and get soft. If you're short on time, let them sit for at least 4 hours. When you wake up, the oats will be thick and creamy. Before serving, stir the oats. If they seem too thick, add a splash of almond milk. Top with banana slices and a sprinkle of cinnamon for a tasty finish. Enjoy your Banana Bread Overnight Oats! For the full recipe, check the earlier section. To get the best creamy oats, soak the oats long enough. Chia seeds help here too. They swell in liquid and add thickness. Use a smooth, ripe banana for the best flavor. Almond milk or your favorite milk works great. The blend of ingredients should be mixed well to avoid clumps. You can change the oats to fit your taste. Add nuts or seeds for crunch. If you like more sweetness, add honey or agave. You can also swap walnuts for almonds or pecans. Add a scoop of peanut butter for a protein boost. Try different spices like nutmeg or vanilla for a twist. Serve your oats in clear jars to show off their layers. Top with banana slices and a sprinkle of walnuts for a tasty finish. This makes a great breakfast or snack. If you want a warm dish, heat it in the microwave. Enjoy it chilled for a refreshing treat. For the full recipe, check out [Full Recipe]. {{image_4}} You can easily make banana bread overnight oats vegan and dairy-free. Just swap regular milk for almond milk, soy milk, or coconut milk. These choices keep the recipe creamy. Use maple syrup instead of honey for sweetness. This keeps your oats plant-based and tasty. You can also add plant-based yogurt for extra creaminess. This is a great way to enjoy a delicious breakfast without animal products. If you need gluten-free oats, use certified gluten-free rolled oats. This small change makes your breakfast safe for those with gluten issues. The other ingredients in the recipe are naturally gluten-free. So, you can enjoy all the flavors without worries. Just check that any add-ins, like nuts or dried fruits, are also gluten-free. Want to make your banana bread overnight oats even better? Add spices like nutmeg or ginger for a warm flavor. You can also mix in vanilla extract for a sweet touch. For sweetness, try adding maple syrup or agave nectar. If you like chocolate, sprinkle in some cocoa powder or mini chocolate chips. These additions will give your oats a unique twist. The options are endless, so feel free to get creative! For the full recipe, check out the earlier section. To store your banana bread overnight oats, use airtight containers. Glass jars work well. Make sure the lids fit tightly. This keeps the oats fresh and tasty. You can prepare them the night before. They taste best after soaking overnight. Banana bread overnight oats last up to five days in the fridge. Keep an eye on the oats. If they start to smell off, it’s time to toss them. The oats may thicken over time. You can always add a splash of milk to loosen them up. If you want to heat your oats, use the microwave. Place the oats in a bowl. Add a splash of milk to help with moisture. Heat for about 30 seconds. Stir and check the temperature. If it’s not warm enough, heat for another 15 seconds. Enjoy your warm oats with fresh banana slices and a sprinkle of cinnamon. For the full recipe, check out the earlier section! Yes, you can make Banana Bread Overnight Oats ahead of time. In fact, it tastes better after sitting overnight. Make a batch in the evening and enjoy it in the morning. This recipe keeps well in the fridge for up to five days. Just remember to seal each jar tightly. To adjust the recipe, simply multiply or divide the ingredients. If you need more servings, double the amounts. For fewer servings, cut the amounts in half. Each jar holds enough for one serving. Using measuring cups helps keep the ratios right. Healthy toppings can enhance your Banana Bread Overnight Oats. Here are some great options: - Sliced fresh fruit like bananas or berries - A sprinkle of chopped nuts for crunch - A drizzle of honey or maple syrup - A dollop of yogurt for creaminess - A sprinkle of seeds like chia or flax These toppings add flavor and nutrients. Feel free to mix and match them to suit your taste. Yes, you can use different types of milk. Almond, oat, or coconut milk are all great choices. Each will change the taste slightly, but they all work well. For sweeteners, maple syrup is tasty, but you can also try honey or agave. Adjust the amount to fit your sweetness level. Enjoy experimenting with different flavors! For the complete recipe, check out the Full Recipe section. Banana bread overnight oats are easy, tasty, and healthy. We covered key ingredients and their benefits. You learned how to mix, store, and enjoy these oats. Tips and tricks help you get creamy results, while variations cater to different diets. Proper storing keeps oats fresh, and the FAQs answer your common questions. Try these oats for a fun breakfast or snack. Satisfaction awaits in each bite.

Banana Bread Overnight Oats Simple and Tasty Recipe

Looking for a quick, tasty breakfast? Banana Bread Overnight Oats might be your new favorite! This easy recipe combines the

- 1 cup frozen spinach, thoroughly thawed and squeezed of excess moisture - 1 cup canned artichoke hearts, rinsed, drained, and coarsely chopped - 1 cup cream cheese, softened to room temperature - 1 cup sour cream The stars of this dip are frozen spinach and canned artichoke hearts. They pack a lot of flavor. Cream cheese and sour cream give it a nice, creamy base. Make sure the cream cheese is soft, so it mixes well. - 1 cup shredded mozzarella cheese, divided - 1/2 cup grated Parmesan cheese Cheese makes this dip really special. I love using shredded mozzarella for its meltiness. The grated Parmesan adds a nice, sharp flavor. Use half of the mozzarella in the dip and save some for topping. - 2 cloves garlic, finely minced - 1 teaspoon onion powder - 1/4 teaspoon crushed red pepper flakes (optional, for heat) - Salt and freshly ground black pepper to taste Seasonings bring the dip to life. Minced garlic gives it a punch. Onion powder adds depth. If you like heat, add red pepper flakes. Don’t forget to season with salt and pepper to taste. With these ingredients, you can create a cheesy spinach artichoke dip that everyone will love. You can find the Full Recipe for more detailed steps. - Preheat your oven to 350°F (175°C). - In a large bowl, mix 1 cup of cream cheese and 1 cup of sour cream. Use a spatula to blend until smooth and creamy. - Add 1 cup of drained artichoke hearts and 1 cup of spinach to the bowl. - Stir in 2 cloves of minced garlic and 1 teaspoon of onion powder. - Season with salt, pepper, and 1/4 teaspoon of crushed red pepper flakes if you want some heat. - Mix in half of the shredded mozzarella and 1/2 cup of grated Parmesan cheese. - Transfer the mixture into an oven-safe baking dish. - Spread it evenly and top it with the remaining mozzarella cheese. - Bake for 25-30 minutes until bubbly and golden brown. To make your dip extra creamy, consider using low-fat cream cheese. It still gives a rich taste without too much fat. Blend the cream cheese and sour cream until smooth. This creates a base that is easy to mix with other ingredients. If you want a smoother texture, use a blender or food processor. This ensures every bite is velvety and delicious. Want to kick up the flavor? Add more garlic! Garlic adds a warm, savory taste that pairs well with the dip. You can also incorporate herbs like parsley or basil. Fresh herbs bring a bright taste that balances the creaminess. Experimenting with different herbs can lead to unique flavor profiles. What should you serve with this dip? Tortilla chips are a classic choice. They add a nice crunch that complements the creamy dip. Sliced baguette also works well. For a fun twist, try serving it in a hollowed-out bread bowl. You can even top it with fresh parsley for a pop of color. This will impress your guests and make the dip look even more inviting. Enjoy the delightful flavors! {{image_4}} When it comes to Cheesy Spinach Artichoke Dip, variations can make it even better. You can easily adapt this dish to suit your taste or dietary needs. You can replace sour cream with Greek yogurt. This swap cuts calories and adds protein. Using fresh spinach instead of frozen gives the dip brighter color and taste. Fresh spinach is crisp and full of nutrients. Want a meaty kick? Add bacon or chorizo for flavor. These meats bring a smoky touch. You can also try different cheese combinations. Blending cheddar with mozzarella can add a sharpness that delights. If you prefer plant-based options, use plant-based cream cheese. This substitute keeps the creamy texture. You can also choose non-dairy options for cheese and sour cream. Almond or cashew-based products work well. These choices make the dip just as tasty without dairy. To store leftovers, place the dip in an airtight container. Make sure to cool it down first. It can last for about 3 to 4 days in the fridge. If you want to keep it longer, consider freezing it. When reheating, I recommend using the oven. This keeps the dip creamy and tasty. Preheat your oven to 350°F (175°C). Place the dip in an oven-safe dish, then heat for about 15 minutes. If you use a microwave, keep it on low power. Stir it often to avoid hot spots. Yes, you can freeze Cheesy Spinach Artichoke Dip. To freeze it, first cool the dip completely. Then, put it in a freezer-safe container. Make sure to leave some space at the top. It can stay good for up to 3 months. When you’re ready to eat it, thaw it in the fridge overnight before reheating. Cheesy Spinach Artichoke Dip is a warm, creamy dish. It blends spinach, artichokes, and cheese. The flavor is rich and savory with a hint of garlic. Each bite is smooth, cheesy, and full of goodness. You may taste a slight tang from the sour cream and cream cheese. The artichokes add a unique texture, while the spinach brings a fresh note. This dish is perfect for parties or gatherings. Yes, you can prepare this dip ahead of time. Mix all the ingredients and place them in a dish. Cover it tightly and store it in the fridge. You can make it a day ahead for best results. When ready to serve, just bake it until hot and bubbly. This saves you time on the day of your event. I love to serve this dip with crunchy tortilla chips. Sliced baguette also works well for dipping. You can try fresh veggies like carrots and celery sticks too. These add a nice crunch and color to your spread. Pairing with a simple salad can also balance the flavors. The options are endless, so feel free to get creative! Find the detailed Cheesy Spinach Artichoke Delight recipe [here](#). This blog post covered everything you need for Cheesy Spinach Artichoke Dip. We discussed the key ingredients, from spinach and artichokes to various cheeses. The step-by-step guide makes prep easy, while tips help you enhance flavor and texture. Don't forget the fun variations to try, like healthier options or vegan substitutes. Enjoying this dip is simple and perfect for sharing. You can savor it with friends or at parties. With these insights, you’re ready to impress with a delicious dip everyone will love.

Cheesy Spinach Artichoke Dip Flavorful Party Dish

Looking for a crowd-pleasing dish that will make any party a hit? Cheesy Spinach Artichoke Dip is your answer! It’s

To make savory oatmeal with a fried egg, you'll need the following ingredients: - 1 cup rolled oats - 2 cups vegetable broth (or water) - 1 tablespoon olive oil - 2 large eggs - 1 ripe avocado, sliced - 1 cup fresh baby spinach - 1/2 teaspoon garlic powder - 1/2 teaspoon smoked paprika - Salt and freshly cracked pepper, to taste - Chopped fresh chives or green onions, for garnish This dish is not just tasty; it's also packed with nutrients. Each serving provides: - Calories: Approximately 350 - Protein: 12 grams - Carbohydrates: 40 grams - Fat: 18 grams - Fiber: 9 grams - Vitamins: Rich in vitamins A, C, and K from spinach and avocado To prepare this dish, gather the following kitchen tools: - Medium saucepan for cooking oats - Non-stick skillet for frying eggs - Measuring cups and spoons - Stirring spoon - Serving bowls for plating With these ingredients and tools, you are ready to create a warm, savory bowl of oatmeal topped with a perfectly fried egg. This dish is simple yet satisfying, making it a great choice for breakfast or any meal of the day. For the full recipe, check out the detailed instructions provided earlier. To make savory oatmeal, start by boiling vegetable broth or water in a medium saucepan. This step is key for flavor. Use two cups of broth for one cup of rolled oats. Once the liquid boils, add the oats and a pinch of salt. Lower the heat to a gentle simmer. Stir the oats often. Cook for about 5-7 minutes until they are creamy. If you want a looser texture, add a splash more broth or water. Once done, take the saucepan off the heat. Mix in garlic powder for extra taste. While the oats cook, heat olive oil in a non-stick skillet over medium heat. Crack two large eggs into the skillet. Cook them sunny-side up or to your liking. Season the eggs with salt and pepper. A pinch of smoked paprika adds a nice touch. When the eggs are ready, take them off the heat and place them on a plate. This way, they stay warm while you finish the dish. Now it’s time to put everything together! Spoon the savory oatmeal into deep serving bowls. Top each bowl with a fried egg. Arrange sliced avocado and fresh baby spinach around the egg. Garnish with chopped chives or green onions for a pop of color. This adds flavor and makes the dish look great. For a gourmet finish, drizzle a bit more olive oil on top. For more details, check out the Full Recipe. Enjoy this simple and tasty meal! To make your savory oatmeal stand out, use vegetable broth instead of water. This adds depth and richness. Cooking the oats at a gentle simmer creates a creamy base. Stir occasionally to keep them from sticking. Season with garlic powder and smoked paprika for a tasty twist. Adjust the salt and pepper to fit your taste. One common mistake is overcooking the oats. This can make them mushy. Keep an eye on them, and stop cooking when they are creamy but still have a bit of bite. Another mistake is not seasoning well. Taste the oatmeal as you cook, and add more seasoning if needed. Lastly, don’t forget to cook your eggs just right. A runny yolk adds great flavor and texture. For a beautiful presentation, serve the oatmeal in deep bowls. This creates a cozy feel. Carefully place the fried egg on top, and arrange avocado slices next to it. Adding fresh spinach brings color and freshness. A sprinkle of chives or green onions adds a nice touch. Drizzling a little olive oil on top makes it look gourmet. For the full recipe, check out the details above. {{image_4}} You can easily change some ingredients in this dish. If you need a gluten-free option, use gluten-free oats. For a plant-based choice, swap eggs for a tofu scramble. Instead of vegetable broth, chicken broth adds more flavor. You can also use flavored oils like sesame or avocado oil for a twist. To boost protein, try adding cooked beans or lentils. These add great texture and nutrition. You can also mix in some cheese, like feta or cheddar, for a creamy touch. Another option is to add some sliced smoked salmon or cooked sausage for a heartier meal. Play with different flavors to keep things exciting. Adding fresh herbs like basil or cilantro can brighten up the dish. You can also try spicy elements, like red pepper flakes or sriracha, for a kick. Consider including sautéed mushrooms or roasted vegetables for more depth. Remember, the secret is to mix and match until you find your favorite combo! For the full recipe, check out the earlier sections. To store leftover savory oatmeal, let it cool first. Then, place it in an airtight container. Refrigerate the container for up to three days. Use a separate container for the fried eggs. Keeping them apart helps maintain their texture. When you're ready to enjoy leftovers, heat the oatmeal on the stove. Add a splash of vegetable broth or water to make it creamy again. Stir often over medium heat until warmed through. For the eggs, you can reheat them in the microwave for about 30 seconds. Keep an eye on them to avoid overcooking. You can freeze savory oatmeal, but it's best to skip freezing the eggs. Pour the cooled oatmeal into freezer-safe bags. Remove as much air as possible before sealing. Label the bags with the date. The oatmeal can last for up to two months in the freezer. To eat, thaw in the fridge overnight and reheat as described above. For the full recipe, check out the original cooking instructions. To make savory oatmeal, start with rolled oats. Cook them in vegetable broth for a rich flavor. Bring the broth to a boil, add the oats, and simmer until creamy. Stir in garlic powder for depth. Top with a fried egg for protein and taste. Yes, you can use water instead of broth. However, broth adds more flavor. If you prefer a lighter taste, water works well too. Just remember to season your oats with salt and pepper to enhance the dish. You can add many toppings to savory oatmeal. Try sliced avocado for creaminess. Fresh baby spinach adds a nice touch. You can also use cheese, herbs, or hot sauce for extra flavor. Explore your favorites to make it special. For the complete recipe, check the Full Recipe. This blog post covers all you need to make delicious savory oatmeal. We discussed ingredients, cooking steps, and tips for great flavor and texture. I shared helpful variations and smart storage tips as well. Remember, simple swaps can boost nutrition and taste. Avoid common mistakes for the best dish. With the right approach, your savory oatmeal will impress everyone. Enjoy experimenting with flavors and toppings. Happy cooking!

Savory Oatmeal with Fried Egg Tasty and Simple Meal

Looking for a quick, tasty meal that fuels your day? Savory oatmeal with a fried egg might just be your

- 6 medium tomatillos, husked and rinsed - 1 small onion, quartered - 2 cloves garlic, unpeeled - 1-2 jalapeño peppers (adjust for spice level) - 1 cup fresh cilantro, finely chopped - Juice of 2 limes - Salt, to taste - 1 tablespoon olive oil How do you measure fresh ingredients accurately? To get the best flavor, use a kitchen scale or measuring cups. For tomatillos, choose firm ones that feel heavy for their size. You can replace tomatillos with green tomatoes if needed. They won't taste the same but will work in a pinch. If you can't find jalapeños, try using serrano peppers for extra heat. You can also skip them if you prefer no spice. First, I preheat my oven to 425°F (220°C). This heat helps roast the veggies well. Next, I prepare my baking sheet by arranging the tomatillos, quartered onion, and unpeeled garlic cloves. I also add the jalapeños, making sure they are spaced out. This prevents them from steaming. After that, I drizzle the veggies with olive oil and sprinkle salt over them. This step makes them flavorful. I roast the veggies for about 15-20 minutes. They should become tender and start to char a bit. You’ll know they are ready when the tomatillos turn a deeper green. Once roasted, I carefully take the baking sheet out of the oven and let the veggies cool for a few minutes. This cooling time is key before blending. Now it’s time to blend! I transfer the roasted tomatillos, onion, garlic, and jalapeños into my blender. I add the finely chopped cilantro and the lime juice next. For a smooth salsa, I blend on high speed until it reaches the right texture. If you want a chunkier salsa, I pulse it a few times instead. After blending, I taste it. If it needs more salt, I add some and blend again briefly. This final touch makes the flavor pop. For the full recipe, check out the complete guide to making this zesty green delight! To make your salsa verde shine, balance the acidity and spiciness. Start with the right amount of lime juice. Too much can overpower the flavors. If you want it spicy, add more jalapeños. Taste as you go to find your perfect mix. Consider adding herbs like oregano or spices like cumin. These can give your salsa a unique twist. Experiment with different amounts to see what you like best. You might find a new favorite! Serve your salsa verde in a bright bowl. This makes it pop on the table. Pair it with crispy tortilla chips for a fun snack. You can also add fresh veggies like cucumber sticks or radishes for dipping. For garnishing, sprinkle some chopped cilantro on top. This adds color and a fresh aroma. You can even place whole cilantro leaves for a rustic look. A slice of lime on the side can make it more inviting too. Watch out for over-roasting your veggies. They should be soft with some char but not burnt. If they look too dark, they may taste bitter. Under-roasting leads to bland flavors, so keep an eye on them. When blending, be mindful of consistency. If you want it smooth, blend long enough, but don’t forget to scrape the sides. For a chunkier salsa, pulse the blender a few times. This gives you control over how it turns out. {{image_4}} You can make salsa verde more exciting by adding fruits or veggies. One great choice is avocado. Adding avocado gives a creamy texture that balances the spice. You can mash it into the salsa or blend it for a smooth mix. Another option is roasted bell peppers. They add a sweet flavor that pairs well with the tomatillos. Just roast them alongside your other veggies. This extra step brings a new layer of taste to your salsa. To change the heat in your salsa, swap out jalapeños for other chili peppers. Try serrano peppers for more spice or poblano peppers for mild heat. Each pepper will change the salsa's flavor and heat level. If you want a milder salsa, you can skip the jalapeños. You can still enjoy the fresh taste of tomatillos and herbs without the heat. This makes it great for kids or anyone sensitive to spice. Adding different herbs can change the flavor of your salsa. Try using fresh mint or oregano for a new twist. Both herbs can brighten the taste and give your salsa a unique touch. You can also add spices like cumin. Just a pinch can enhance the taste and add warmth. Experimenting with these elements can make your salsa verde truly your own. For the full recipe, check the complete details above. To keep your homemade salsa verde fresh, use airtight containers. Glass jars work great. You can also use plastic containers, but make sure they close tightly. Homemade salsa verde lasts about one week in the fridge. After that, it may lose flavor and freshness. If you want to save salsa verde for later, freezing is a smart choice. To freeze, pour the salsa into freezer-safe bags or containers. Leave some space at the top, as the salsa will expand when frozen. Label the bags with the date. This way, you know how old it is. To thaw, place the salsa in the fridge overnight. This slow method keeps the flavor. If you're in a hurry, you can use the microwave. Just defrost in short bursts to avoid cooking it. Once thawed, stir well before using to mix any separated liquid. This salsa is perfect for tacos or as a dip! Salsa verde has fresh and vibrant flavors. The main ingredients are: - 6 medium tomatillos, husked and rinsed - 1 small onion, quartered - 2 cloves garlic, unpeeled - 1-2 jalapeño peppers, stems removed - 1 cup fresh cilantro, finely chopped - Juice of 2 limes - Salt, to taste - 1 tablespoon olive oil You can change the heat by using different peppers. For a milder version, skip the jalapeños. You could add fruits like mango for a twist or mix in roasted bell peppers for sweetness. The combinations are endless! Yes, you can make salsa verde ahead of time. It tastes even better after sitting for a few hours. Store it in a glass jar or airtight container. Keep it in the fridge for up to a week. To make it easier, roast the ingredients the day before. Once cooled, blend and store. Just remember to taste and adjust the salt before serving. Salsa verde is great with many foods. Here are some ideas: - Tacos: Use it to top beef, pork, or chicken tacos. - Grilled meats: Drizzle over grilled chicken or steak for a fresh kick. - Quesadillas: Spread it inside for extra flavor. You can also use salsa verde in creative ways. Mix it into pasta for a zesty sauce. Use it as a dressing for salads or grain bowls. The bright taste can make any dish shine! For the full recipe, check out the detailed steps and tips above. Making homemade Salsa Verde is simple and rewarding. You start with fresh tomatillos, jalapeños, and cilantro. Roasting the ingredients brings out their best flavors. You also learned useful tips for storage and ways to tweak the taste. Try different ingredients to create your perfect blend. Salsa Verde enhances any meal or snack. Enjoy experimenting with flavors and share your creations with friends. Your homemade salsa can impress anyone. Happy cooking!

Homemade Salsa Verde Fresh Flavorful Recipe

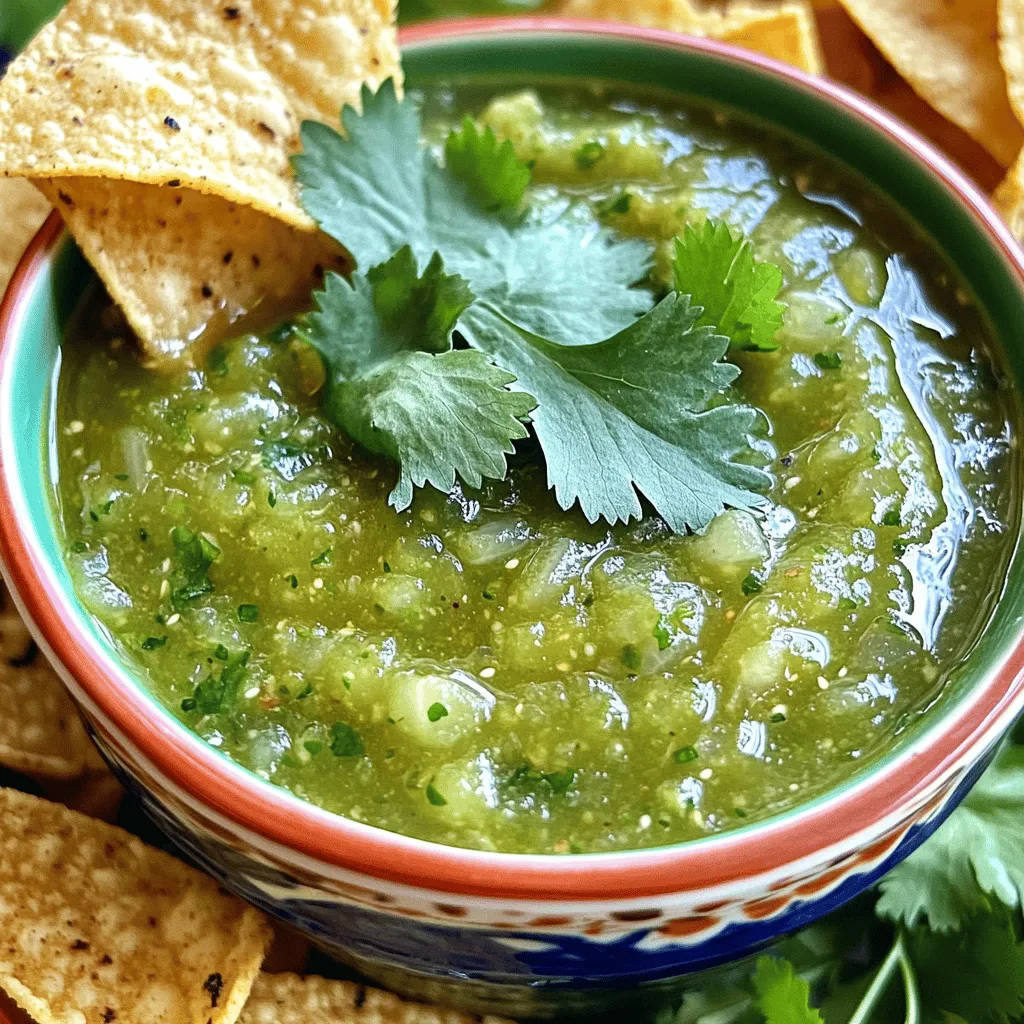
Looking to spice up your meals with a fresh burst of flavor? My homemade salsa verde recipe is just what

Older posts
Newer posts
← Previous Page1 … Page79 Page80 Page81 … Page86 Next →

dsad

© 2026 yumymoments • Built with GeneratePress

Our Policies

  • Copyright Policy
  • Cookie Policy
  • GDPR Policy
  • Privacy Policy
  • Disclaimer
  • Terms Of Use

More Information

  • Home
  • About
  • Contact
  • Appetizers
  • Dessert
  • Dinner
  • Drinks
©2026, yumymoments About Back To Top