Skip to content
DisclaimerTerms Of UseGDPR PolicyCookie Policy

yumymoments

  • Home
  • Drinks
  • Appetizers
  • Dinner
  • Dessert
  • About
  • Contact
  • Privacy Policy
DisclaimerTerms Of UseGDPR PolicyCookie Policy

NO-ING-IMG

For a tasty Savory Quinoa Salad with Feta, you need: - 1 cup quinoa, thoroughly rinsed under cold water - 2 cups vegetable broth (for cooking the quinoa) - 1 cup cherry tomatoes, halved - 1 medium cucumber, diced into small cubes - 1/2 red bell pepper, chopped into bite-sized pieces - 1/2 red onion, finely diced - 1/3 cup Kalamata olives, pitted and sliced - 1/2 cup feta cheese, crumbled into small pieces - 1/4 cup fresh parsley, finely chopped - 3 tablespoons extra virgin olive oil - 2 tablespoons fresh lemon juice - 1 teaspoon dried oregano - Salt and freshly cracked black pepper to taste You can make the salad even more exciting by adding: - Avocado for creaminess - Grilled chicken for protein - Spinach or arugula for greens - Nuts like almonds or walnuts for crunch - Fresh herbs like basil or mint for extra flavor If you need to change some ingredients, here are good swaps: - Use chicken broth instead of vegetable broth for a richer taste. - Swap feta cheese with goat cheese for a tangy flavor. - Try using quinoa flour for a gluten-free option. - Replace Kalamata olives with green olives if you prefer. - For a dairy-free version, use a vegan feta cheese alternative. This recipe is flexible, and you can customize it to fit your taste. For the full recipe, refer to the instructions above. First, boil the vegetable broth in a medium pot over medium-high heat. Once it bubbles, add 1 cup of rinsed quinoa. Stir once and cover the pot. Lower the heat and let it simmer for 15 minutes. The quinoa is ready when it absorbs all the broth and looks fluffy. After cooking, remove the pot from heat and let it cool for a few minutes. Fluff the quinoa with a fork and set it aside until it’s fully cool. In a large mixing bowl, combine the following ingredients: - 1 cup cherry tomatoes, halved - 1 medium cucumber, diced - 1/2 red bell pepper, chopped - 1/2 red onion, finely diced - 1/3 cup Kalamata olives, pitted and sliced Gently stir these ingredients together. This mix adds color and crunch to your salad. In a small bowl, whisk together: - 3 tablespoons extra virgin olive oil - 2 tablespoons fresh lemon juice - 1 teaspoon dried oregano - Salt and freshly cracked black pepper to taste This dressing adds a bright flavor that ties the salad together. Now, add the cooled quinoa to the vegetable mix in the bowl. Pour the dressing over everything and use a spatula to toss it gently. Ensure all the ingredients are well-coated. Finally, sprinkle 1/2 cup crumbled feta cheese and 1/4 cup chopped parsley on top. Toss lightly, being careful not to break the feta too much. Serve your salad in a vibrant bowl or on individual plates. A drizzle of olive oil on top makes it even more appealing. Enjoy this fresh, savory quinoa salad with feta! For the full recipe, check back to ensure you’ve got everything right. To cook perfect quinoa, rinse it well. This step removes bitter saponins. Use a ratio of 1 cup quinoa to 2 cups vegetable broth. Bring the broth to a boil, then add the quinoa. Cover the pot, lower the heat, and let it simmer for about 15 minutes. When done, the grains should look fluffy. Fluff gently with a fork for the best texture. The dressing can change the flavor of your salad. The basic mix of olive oil, lemon juice, and oregano is great. Try adding garlic for a kick. For a creamier dressing, mix in some yogurt or tahini. You can also add a splash of balsamic vinegar for a sweet touch. Experiment until you find your favorite flavor. This salad shines as a side dish or light main. Serve it in a big bowl or on individual plates. Add extra feta on top for a nice touch. Pair it with grilled meats or fish for a full meal. You can also serve it with a slice of crusty bread to soak up the dressing. For a fun twist, add some toasted nuts for crunch. Try the Full Recipe for more details! {{image_4}} To give your salad a Mediterranean twist, add artichoke hearts and sun-dried tomatoes. These ingredients bring a rich flavor and make your dish brighter. You can also use fresh basil or mint instead of parsley. These herbs add a nice touch and enhance the salad’s freshness. If you like spice, toss in some red pepper flakes for a kick. For a heartier meal, include grilled chicken or chickpeas. Both options boost protein and keep you full longer. You can also add shrimp for a seafood flair. Just cook the shrimp until they turn pink and toss them in. For a plant-based choice, try adding black beans or lentils. They blend well with the quinoa and add extra nutrients. Using seasonal vegetables adds freshness and flavor to your salad. In spring, swap in asparagus or snap peas for a crisp bite. In summer, add zucchini or bell peppers for a sweet crunch. In fall, consider roasted butternut squash or Brussels sprouts. These swaps keep your salad exciting and help you enjoy what’s in season. For winter, use hearty vegetables like kale or roasted root veggies. They add depth to your dish and make it cozy. Explore these variations to keep your savory quinoa salad with feta fresh and exciting. For the full recipe, check out the details above. To keep your Savory Quinoa Salad with Feta fresh, place it in an airtight container. This helps prevent moisture and keeps the flavors intact. Store it in the fridge, where it can last for up to three days. If you notice any signs of spoilage, such as a sour smell or mold, it’s best to discard the salad. You can freeze this salad, but it's best to avoid freezing the feta and fresh veggies. These ingredients do not thaw well. Instead, freeze just the quinoa and any cooked ingredients. Place them in a freezer-safe bag or container. When you’re ready to enjoy the salad again, thaw it overnight in the fridge. Then, mix in fresh veggies and feta right before serving. - Quinoa: Uncooked quinoa lasts for about two to three years in a cool, dry place. Cooked quinoa can stay fresh in the fridge for about five days. - Feta cheese: An opened package lasts about five days in the fridge. Check the expiration date for unopened cheese. - Vegetables: Most fresh vegetables last about a week in the fridge. Cherry tomatoes can last longer, while cucumbers and bell peppers should be used within a few days. - Olives: Once opened, olives can stay fresh for up to two weeks in the fridge. With these tips, you can enjoy your Savory Quinoa Salad with Feta for days to come! For the full recipe, check out the entire guide. Yes, you can use other grains. Brown rice, farro, or bulgur will work well. Each grain adds a unique flavor and texture. However, cooking times may differ. Ensure you adjust the cooking method based on the grain you choose. Absolutely! This salad is perfect for meal prepping. It stores well in the fridge for a few days. Just keep the dressing separate until you're ready to eat. This way, the salad stays fresh and crunchy. You can serve this salad cold or at room temperature. It makes a great side dish for grilled meats. You can also pair it with pita bread for a light lunch. For a more filling meal, add grilled chicken or chickpeas. Yes, you can make this salad vegan! Simply omit the feta cheese or use a vegan cheese alternative. The salad will still be tasty and full of flavor. You can also add avocado for creaminess. This salad lasts about 3 to 5 days in the fridge. Keep it in an airtight container. If the salad starts to look soggy, it’s best to eat it sooner. For best taste, enjoy it within the first few days. For the full recipe, check the earlier section. This blog post covers how to create a tasty quinoa salad. We explored essential and optional ingredients, plus substitutions. I provided clear recipes and tips for cooking quinoa, mixing salad ingredients, and dressing. Enjoy making different variations and learn proper storage tips. Overall, this quinoa salad is easy to customize and store. You can adjust it to fit your taste and needs. With these steps, you can serve a fresh, healthy dish any time.

Savory Quinoa Salad with Feta Flavorful and Fresh

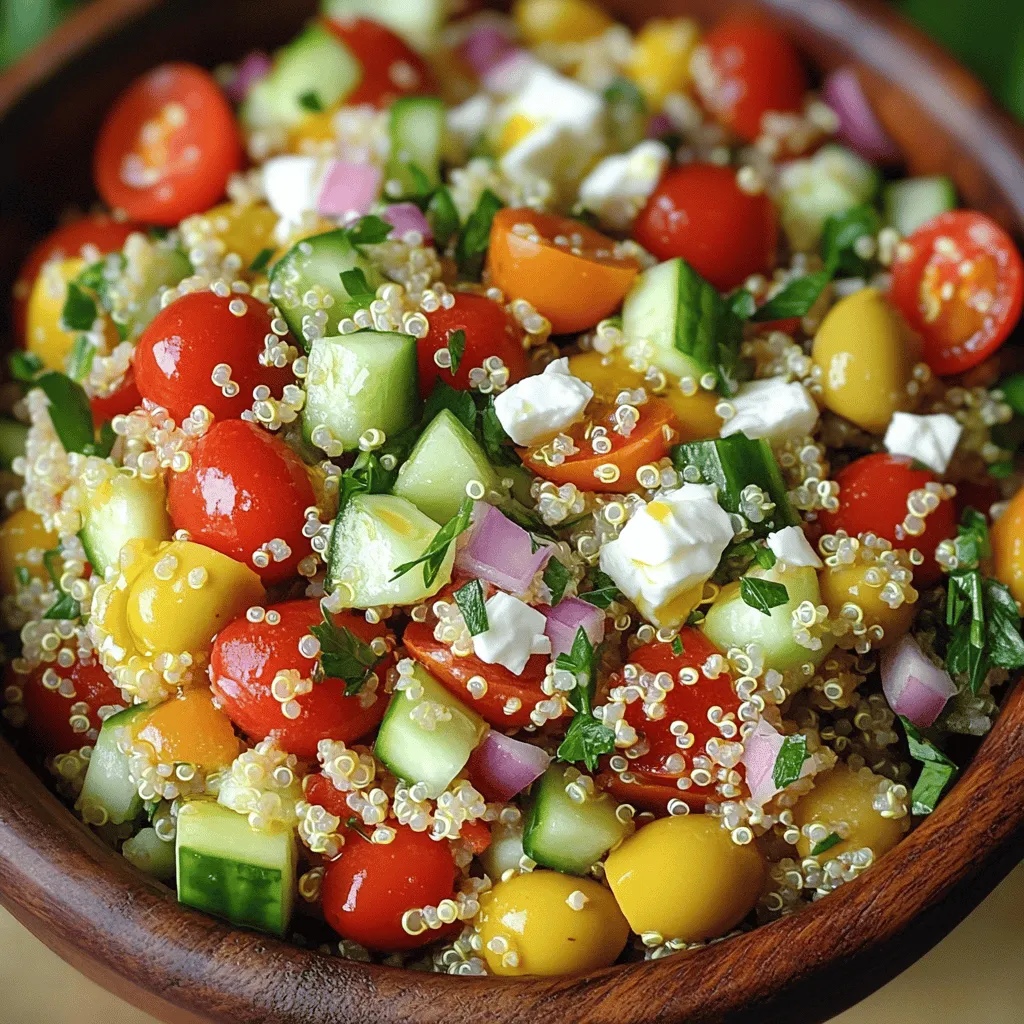
Want a dish that’s tasty, healthy, and quick to make? Try my Savory Quinoa Salad with Feta! This salad bursts

- 1 cup Nutella - 1/2 cup all-purpose flour - 2 large eggs - 1/4 cup granulated sugar - 1/2 teaspoon baking powder - 1/4 teaspoon salt Nutella is the star of these brownies. It gives them a rich, chocolatey flavor. Use good-quality Nutella for the best taste. The all-purpose flour helps bind the brownies. Eggs add moisture and help them rise. Granulated sugar adds sweetness. Baking powder makes them fluffy, while salt enhances the flavors. - 1/2 cup semi-sweet chocolate chips - 1/4 cup chopped hazelnuts You can add semi-sweet chocolate chips for extra chocolate. Chopped hazelnuts give a nice crunch and a nutty flavor. Both are optional but can make your brownies more special. Use the exact amounts for each ingredient. Too much flour can make brownies dry. Too many eggs can make them too cake-like. For the best results, measure carefully. Always use fresh ingredients. Check the dates on your baking powder and Nutella. Fresh ingredients make a big difference in taste. {{ingredient_image_2}} 1. First, preheat your oven to 350°F (175°C). This step is key for even baking. 2. Next, prepare an 8x8 inch baking pan. Grease it with cooking spray or butter. You can also line it with parchment paper. This helps with easy brownie removal later. 1. In a medium bowl, combine 1 cup of Nutella, 1/4 cup of granulated sugar, and 2 large eggs. Whisk these together until they look smooth and creamy. 2. In another bowl, mix 1/2 cup of all-purpose flour, 1/4 teaspoon of salt, and 1/2 teaspoon of baking powder. Make sure there are no lumps in the mixture. 3. Gradually fold the dry mix into the Nutella mix using a spatula. Mix just until combined to keep the brownies chewy. 4. If you want, you can fold in 1/2 cup of semi-sweet chocolate chips and 1/4 cup of chopped hazelnuts. This adds extra flavor and texture. 1. Pour the brownie batter into your prepared pan. Spread it evenly with a spatula. This helps them bake uniformly. 2. Bake your brownies in the oven for 20-25 minutes. To check if they are done, insert a toothpick in the center. It should come out with a few moist crumbs, not wet batter. Mixing your batter just right is key. If you mix too much, your brownies turn out dry. A chewy texture is what we want here. When you add the dry ingredients, use a spatula to fold them in gently. Stop mixing once you see no more dry flour. This keeps them soft and fudgy. Cooling your brownies properly makes a big difference. After baking, let them sit in the pan for 10 minutes. This helps them set. Then, move them to a wire rack to cool down all the way. Cutting them while warm makes them fall apart. Once cool, slice them into neat squares for a nice look. For a fun touch, dust your cooled brownies with powdered sugar. It adds a sweet finish. You can also drizzle them with melted chocolate for a rich look. Want to make it extra special? Serve your brownies with a scoop of vanilla ice cream. That combination is simply delightful! Pro Tips Use Room Temperature Eggs: Make sure your eggs are at room temperature before mixing; this helps them blend more smoothly into the batter, resulting in a better texture. Don't Overmix: Once you combine the dry ingredients with the wet, mix just until incorporated to keep the brownies fudgy and chewy. Check Doneness Carefully: Insert a toothpick into the center; it should come out with a few moist crumbs. Baking too long can lead to dry brownies. Let Them Cool: Allow brownies to cool in the pan for at least 10 minutes before cutting. This helps them set and makes for cleaner cuts. {{image_4}} You can make your Nutella brownies even better with fun add-ins. Try nuts like walnuts or pecans for a nice crunch. They add flavor and texture. You can also mix in different types of chocolate. Dark chocolate chips or white chocolate chunks give a tasty twist. Each choice changes the flavor, making your brownies unique. Want a healthier treat? You can use whole wheat flour instead of all-purpose flour. This swap adds more fiber and nutrients. You can also reduce the sugar content. Try using only two tablespoons of sugar. This helps keep the brownies tasty but lowers the sugar. If you need a gluten-free option, don’t worry! You can use almond flour or coconut flour instead of all-purpose flour. Both flours work well and keep the brownies moist. Just make sure to check that your other ingredients are gluten-free too. This way, everyone can enjoy these yummy brownies! Keep your Nutella brownies fresh at room temperature. Place them in an airtight container. They will stay soft and tasty for up to three days. If you want to keep them moist, add a slice of bread to the container. The bread will help retain moisture. You can freeze Nutella brownies for later use. Cut them into squares before freezing. Wrap each piece in plastic wrap. Then, place them in a freezer-safe bag. This keeps the brownies fresh for up to three months. For thawing, take out the brownies and let them sit at room temperature. It takes about 30 minutes to an hour for them to soften. You can also reheat them in the microwave for a few seconds. This makes them warm and gooey again. Nutella brownies last about three days at room temperature. If you freeze them, they can last up to three months. Always check for any signs of spoilage before eating. If they smell bad or look off, it's best to toss them out. Yes, you can make brownies without eggs. Here are some egg substitutes you can use: - Applesauce: Use 1/4 cup for each egg. - Mashed banana: Use 1/4 cup for each egg. - Yogurt: Use 1/4 cup for each egg. - Flaxseed meal: Mix 1 tablespoon with 2.5 tablespoons of water. Let it sit for 5 minutes. These options will keep your brownies moist and tasty. If you want to swap Nutella, here are some tasty options: - Chocolate hazelnut spread: Many brands offer similar flavors. - Peanut butter: It gives a different taste but is still rich. - Almond butter: This adds a nutty flavor that works well. - Chocolate ganache: Mix chocolate with cream for a smooth texture. These alternatives can change the flavor but still make great brownies. To check if your brownies are done, use these methods: - Toothpick test: Insert a toothpick in the center. It should come out with a few moist crumbs. - Visual cues: The edges should pull away from the pan slightly. - Touch test: Gently press the top. It should feel set but soft. These tips will help you catch that perfect brownie texture! Nutella brownies are simple and fun to make. We covered key ingredients like Nutella and flour, plus tips for perfect texture. Don’t forget about optional add-ins like chocolate chips or nuts to enhance flavor. Proper baking and cooling techniques are key for great results. Lastly, explore variations and storage tips to keep your brownies fresh. Enjoy making these treats, and share them with friends and family for a delightful dessert experience. Happy baking!

Ingredient Nutella Brownies Delightful and Simple Treat

Looking for a treat that’s both delightful and simple? You’ve come to the right place! These Nutella brownies are a

To make the best S'mores Dip, you need just a few key ingredients: - 1 cup semi-sweet chocolate chips - 1 cup mini marshmallows - 1 tablespoon unsalted butter - 1 teaspoon pure vanilla extract - 1/2 cup graham cracker crumbs - Pinch of sea salt These ingredients blend to create a warm and gooey dip that everyone loves. The chocolate chips give a rich taste, while the marshmallows add that fluffy touch. You can add fun toppings to make your S'mores Dip even better: - Crushed graham crackers - Chocolate syrup - Extra mini marshmallows - Whipped cream These toppings are not necessary but can really up the fun factor. They add flavor and texture, making each bite even more exciting. When it comes to dipping, you have some tasty options: - Extra graham crackers - Fresh strawberries - Pretzel sticks - Apple slices These items work great for scooping up the dip. The crunch from graham crackers or pretzels pairs well with the soft dip. Strawberries add a nice fruity twist, while apple slices give a fresh bite. Check out the Full Recipe to get started on this delightful treat! Gather your ingredients first. You will need: - 1 cup semi-sweet chocolate chips - 1 cup mini marshmallows - 1 tablespoon unsalted butter - 1 teaspoon pure vanilla extract - 1/2 cup graham cracker crumbs - Pinch of sea salt - Extra graham crackers and fresh strawberries for dipping Preheat your oven to 350°F (175°C). This step is key for baking. Next, take a medium oven-safe skillet. Melt the butter over low heat. Once melted, remove the skillet from the heat. Sprinkle the graham cracker crumbs evenly over the melted butter. Stir gently to combine. Press this mixture down to form a crust at the bottom. After prepping, layer the chocolate chips over the crust. Make sure to cover it completely. Next, scatter the mini marshmallows on top of the chocolate. This creates a fluffy layer that melts nicely. Now, place the skillet in your preheated oven. Bake for about 15 minutes. Keep an eye on it until the marshmallows are golden brown and the chocolate bubbles. Once baked, remove the skillet from the oven. Drizzle the vanilla extract over the dip. Sprinkle a pinch of sea salt for extra flavor. Let it cool for a few minutes before serving. Serve the dip directly from the skillet. This gives it a warm and rustic feel. Add extra graham crackers and fresh strawberry slices on the side. These make perfect dippers for your gooey treat. Enjoy this delightful dish with family and friends for a cozy gathering. For the complete recipe, check out the full recipe section above. To get those perfect golden marshmallows, watch them closely while baking. You want them to puff up and turn a light brown. If they brown too fast, your dip may burn. I often use mini marshmallows, as they toast quickly and evenly. If you want a crispier top, broil them for a minute after baking. You can make S'mores Dip in three ways. The oven works best, but you can also use a campfire or microwave. For the oven, bake at 350°F until bubbly. A campfire lets you toast marshmallows directly over the flame, which adds a smoky flavor. If you're short on time, the microwave is an option. Heat it in 30-second bursts, stirring between each, until melted. If you find your dip too sweet, adjust the chocolate or marshmallows. Use dark chocolate for a richer flavor. You can also add a pinch of salt to balance sweetness. For creamier texture, mix in a little cream cheese or sour cream. This will add tang and keep the dip smooth. Enjoy experimenting to find your perfect blend! {{image_4}} You can switch up the chocolate in your S'mores Dip! Use dark chocolate for a richer taste. Milk chocolate gives a sweeter flavor. For a fun twist, try white chocolate. Each type brings a new taste, so have fun experimenting! Want to make your dip even better? Add a dollop of peanut butter or almond butter. It mixes well with chocolate and gives a nutty taste. You can also try adding a splash of mint or orange extract for a fresh twist. These flavors make your dip extra special! You can enjoy S'mores Dip even if you have dietary needs. For a vegan version, use dairy-free chocolate chips and coconut oil instead of butter. To make it gluten-free, choose gluten-free graham crackers. This way, everyone can share in the fun of this tasty treat! For the full recipe, check out the detailed steps above. To keep your S'mores Dip fresh, let it cool first. Then, cover it with plastic wrap. You can also use an airtight container. Store it in the fridge for up to three days. When you want to enjoy it again, simply reheat it. When you are ready to eat the leftover dip, use the oven or microwave. For the oven, preheat it to 350°F (175°C). Place the dip in an oven-safe dish and heat for about 10 minutes. For the microwave, use a microwave-safe bowl. Heat it for 30 seconds, then stir. Repeat until warm. You can freeze S'mores Dip, but it may change texture. To freeze, let it cool completely. Place it in a freezer-safe container. Label it with the date. It can stay in the freezer for up to two months. To enjoy, thaw it overnight in the fridge before reheating. Using these storage tips, you can keep your S'mores Dip tasty and ready to share! For the full recipe, check earlier sections of this article. Yes, you can swap out chocolate types. Milk chocolate, dark chocolate, or even white chocolate work well. Each type gives a unique taste. Feel free to mix different chocolates for fun flavors. You can store S'mores Dip in the fridge for up to three days. Just make sure to cover it tightly. The dip may harden a bit, but you can warm it up again. Yes, you can prepare the dip ahead. Just bake it when you are ready to serve. This way, you save time and enjoy fresh, warm dip with friends. While graham crackers are classic, try pretzels, fruit skewers, or cookie pieces. Each option adds a special twist. Strawberries, bananas, or even apple slices taste great too. Absolutely! Combine the ingredients in a microwave-safe bowl. Heat in 30-second bursts, stirring in between. Stop when the chocolate melts and marshmallows puff up. For the full recipe, check out the decadent S'mores Dip section. It includes all the yummy ingredients and steps needed to create this delightful treat. S'mores dip is a fun treat that combines gooey marshmallows and rich chocolate. We explored its main ingredients, optional toppings, and tasty dipping items. I shared step-by-step baking instructions and tips to get the perfect golden marshmallows. Plus, I provided variations for all diets and smart storage info to keep it fresh. S'mores dip is simple to make and enjoy. Try your favorite twists and share with friends!

S’mores Dip Irresistible Chocolatey Treat to Share

If you love rich chocolate and crispy marshmallows, you’ll adore S’mores Dip! This treat is easy to make and fun

- 4 bone-in, skin-on chicken thighs - 1 can (14 oz) full-fat coconut milk - Zest of 2 limes and juice from the same limes - 3 tablespoons honey The main ingredients form the base of this dish. Chicken thighs provide a juicy texture and rich flavor. Coconut milk adds creaminess and a hint of sweetness. Lime brings a bright, zesty kick that balances the richness. Honey rounds it out with a touch of natural sweetness. - 2 garlic cloves, finely minced - 1 teaspoon freshly grated ginger - 1 teaspoon ground turmeric - 1 teaspoon sea salt - ½ teaspoon freshly ground black pepper Spices and seasonings elevate this dish. Garlic offers a savory note, while ginger adds warmth. Turmeric gives a lovely golden hue and subtle earthiness. Sea salt enhances flavors, and black pepper adds a hint of heat. Together, they create a deliciously fragrant marinade. - Fresh cilantro leaves Garnishing with fresh cilantro adds a burst of color and freshness. It also enhances the dish’s aroma. Use it to add a final touch when serving. You can also mix in lime wedges for a zesty accent. For the complete Coconut Lime Chicken recipe, refer to the [Full Recipe]. 1. First, grab a mixing bowl. Whisk together the coconut milk, lime zest, lime juice, honey, minced garlic, grated ginger, turmeric, sea salt, and black pepper. Make sure it blends well. 2. Next, take your chicken thighs and place them in a resealable bag or a shallow dish. Pour the coconut lime mixture over the chicken. Seal the bag or cover the dish. Marinate in the fridge for at least 30 minutes. For deeper flavor, try marinating for up to 2 hours. 1. Preheat your oven to 425°F (220°C) while the chicken is soaking up those flavors. 2. Heat a large, oven-safe skillet over medium-high heat. Add the olive oil. Once hot, remove the chicken from the marinade, letting any extra liquid drip off. 3. Place the chicken thighs skin-side down in the skillet. Sear for 5-7 minutes until the skin is crispy and golden brown. 4. Carefully flip the chicken with tongs. Pour the leftover coconut lime marinade over the chicken. Make sure they are well coated. Transfer the skillet to your preheated oven. 5. Bake the chicken for 25-30 minutes. Check that the internal temperature reaches 165°F (75°C), and the sauce should be bubbly and fragrant. 1. After baking, carefully take the skillet out of the oven. Allow the chicken to rest in the skillet for 5 minutes. This step keeps the chicken juicy. 2. To serve, spoon the delicious coconut sauce over the chicken. Garnish with fresh cilantro leaves for a nice touch. For a complete meal, consider serving with steamed jasmine rice and grilled seasonal vegetables. For the full recipe, check the detailed instructions above. Marinating chicken is key to great flavor. The longer you marinate, the more flavor it absorbs. Aim for at least 30 minutes; 2 hours is even better. This time helps the chicken soak up the coconut lime mix. Use a resealable bag for easy marinating. It allows the marinade to cover every part of the chicken. If you use a dish, make sure to flip the chicken halfway through. This ensures even marinating. Cooking chicken at the right temperature is crucial. I recommend setting your oven to 425°F (220°C). This helps the chicken cook evenly and get crispy skin. To check if the chicken is done, use a meat thermometer. It should read 165°F (75°C) in the thickest part of the thigh. This step ensures your chicken is safe to eat. Pair Coconut Lime Chicken with simple sides. Steamed jasmine rice works wonderfully. You can also add grilled vegetables for color and nutrition. For a beautiful presentation, use a large platter. Spoon extra sauce over the chicken. Add lime wedges and fresh cilantro for a vibrant look. This not only tastes good but also looks stunning on the table. If you want to explore more side options, check out the [Full Recipe]. {{image_4}} You can easily swap the chicken in this recipe. Try shrimp or tofu for a new twist. Both options absorb the coconut lime flavor well. Shrimp cooks fast and adds a nice texture. Tofu soaks up the sauce, giving it a rich taste. Also, consider using different citrus fruits. Lemon or orange can brighten the dish too. Each fruit brings a unique flavor. Experimenting with lime, lemon, or orange adds fun and variety. Enjoy some heat? Add chili or peppers to the marinade. This small change can turn up the flavor. Start with a pinch, then taste as you go. Adjust the heat to fit your taste. You can also tweak the sweetness. If you prefer less sugar, cut back on honey. Or add more for a sweeter flavor. Finding the right balance makes a big difference. Grilling gives the chicken a smoky flavor. If you want a charred look, use a grill. The high heat caramelizes the sauce, creating a delicious crust on the chicken. Baking is simple and results in juicy meat. This method keeps the chicken tender and flavorful. You can also use a slow cooker for a hands-off approach. Just add the marinated chicken and let it cook low and slow. The result is tender meat that falls off the bone. For the full recipe, check the detailed steps provided above. After you make Coconut Lime Chicken, store leftovers in an airtight container. This keeps the chicken fresh. Keep it in the fridge for up to three days. If you want to enjoy it later, don’t wait too long. The flavors stay best when eaten fresh! To freeze the chicken, place it in a freezer-safe bag. Make sure to remove excess air for best results. You can freeze it for up to three months. When you’re ready to eat it, move it to the fridge to thaw overnight. After thawing, reheat it in the oven or on the stove until hot. Leftover chicken can be a tasty snack or meal. Shred it and use it in tacos or salads. You can also mix it into a stir-fry for a quick meal. The extra coconut lime sauce works well in rice dishes or as a dip. Get creative with your leftovers, and enjoy new flavors! You can marinate the chicken for at least 30 minutes. This gives the flavors time to soak in. For the best taste, aim for 2 hours. Longer marination helps the chicken become juicy and full of flavor. Yes, you can use chicken breasts. However, they cook faster than thighs. Chicken breasts may not be as juicy. Keep an eye on the cooking time. Aim for 20-25 minutes in the oven until they reach 165°F. You can serve this chicken with many sides. Here are some tasty options: - Steamed jasmine rice - Grilled seasonal vegetables - Coconut rice for extra flavor - A fresh green salad with lime dressing These sides complement the tropical taste of the chicken well. Yes, this recipe works great for meal prep. You can marinate the chicken ahead of time. Cook it, then store it in containers. It stays good in the fridge for up to 3 days. To reheat, warm it in the oven or microwave until hot. Enjoy it as a quick meal! For the full recipe, check out the provided instructions. This blog post covered how to make a delicious Coconut Lime Chicken. You learned about the main ingredients, including chicken thighs and coconut milk, and the best spices to use. We discussed marinating and cooking steps to ensure juiciness and flavor. You can switch up ingredients or cooking methods for your taste. Remember to store leftovers safely for future meals. With these tips, you can enjoy this dish countless times, each with a unique twist. Happy cooking!

Coconut Lime Chicken Flavorful and Juicy Delight

Are you ready for a burst of tropical flavor? This Coconut Lime Chicken recipe delivers juicy chicken thighs, creamy coconut

- 1 cup natural peanut butter (creamy or crunchy) - 1/2 cup rolled oats - 1/4 cup honey or maple syrup - 1/4 cup ground flaxseed - 1/2 cup dark chocolate chips or cacao nibs - 1/4 teaspoon sea salt - 1 teaspoon vanilla extract - Optional: 1/4 cup shredded coconut (for rolling) To create these Peanut Butter Bliss Balls, I focus on simple, nutritious ingredients. The main star is natural peanut butter. It adds great flavor and creaminess. I suggest using either creamy or crunchy, based on your preference. Next, rolled oats provide texture and help bind everything together. They bring fiber and a wholesome feel to the balls. Honey or maple syrup acts as a sweetener. Both options offer a touch of sweetness without being overpowering. Ground flaxseed is rich in omega-3 fatty acids. It adds a nutty taste and boosts nutrition. Dark chocolate chips or cacao nibs give those bliss balls a delightful chocolatey flavor. I love the way they melt in your mouth! A pinch of sea salt balances the sweetness. It highlights all the flavors nicely. Vanilla extract adds warmth and depth. For a fun twist, I sometimes roll the bliss balls in shredded coconut. This adds a lovely texture and tropical touch. If you want to switch things up, you have options. For sweeteners, try agave syrup or brown rice syrup instead of honey. Both work well and taste great. You can also change the nut butter. Almond butter or cashew butter makes for tasty variations. If you want to add more texture, think about adding chia seeds, dried fruits, or chopped nuts. Each option brings its own flavor and crunch. - Mixing the peanut butter and sweetener Start with a large mixing bowl. Add 1 cup of natural peanut butter and your choice of sweetener, either 1/4 cup of honey or maple syrup. Use a spatula or whisk to mix these until smooth and creamy. This step creates a rich base for your bliss balls. - Adding and combining dry ingredients Next, add 1/2 cup of rolled oats, 1/4 cup of ground flaxseed, 1/4 teaspoon of sea salt, and 1 teaspoon of vanilla extract. Stir well until all dry ingredients blend evenly into the mixture. This ensures every bite bursts with flavor. - Rolling technique and portion sizes With clean hands, scoop out about 1 tablespoon of the mixture. Roll it into a ball shape. Repeat this until you form all the mixture into bliss balls. Keep them roughly the same size for even bites. - Coating options: shredded coconut vs. no coating If you want extra flavor and texture, roll each ball in 1/4 cup of shredded coconut. This adds a fun twist to the bliss balls, but feel free to skip it if you prefer. Both ways taste great! - Importance of chilling for texture Place the bliss balls on a parchment-lined baking sheet. Refrigerate them for at least 30 minutes. This step helps the balls firm up and lets the flavors mix well. The chilling process is key for a satisfying texture. - Tips for storing before serving Store your bliss balls in an airtight container. They can stay in the fridge for up to a week. For longer storage, you can freeze them. Just make sure to separate them with parchment paper to prevent sticking. Using pre-measured ingredients helps speed up the process. You can buy rolled oats and flaxseed in bulk. This way, you have them ready when you want to make Peanut Butter Bliss Balls. The no-bake method makes this recipe quick and easy. You just mix and chill! Serve them right from the fridge for a cool treat. Adjust the sweetness based on your taste. If you like it sweeter, add more honey or syrup. If you prefer a less sweet snack, use less. Adding sea salt helps balance the flavor. A pinch brings out the sweetness and makes each bite pop. These bliss balls pair well with fresh fruits or yogurt. You can add them to your lunchbox for a nutritious snack. They also work great as post-workout snacks. Their mix of protein and carbs gives you a nice energy boost. For a fun twist, drizzle some melted dark chocolate on top! {{image_4}} You can easily change the taste of your bliss balls. Try making Peanut Butter Chocolate Bliss Balls. Just add cocoa powder and more chocolate chips. This gives a rich, chocolatey flavor. If you want something lighter, go for Coconut Almond Bliss Balls. Use almond butter instead of peanut butter and add shredded coconut. This makes a sweet, tropical treat. If you need gluten-free options, use certified gluten-free oats. This keeps your bliss balls safe for everyone. For vegan choices, swap honey for maple syrup. You can also use nut butters that fit your diet. Chia seeds or date paste can replace honey as binders. You can adapt bliss balls for the seasons, too! For holidays, add festive spices like cinnamon or nutmeg. These spices bring warmth and joy to your treats. You can also use themed colors. For example, use red and green for Christmas or pastel colors for Easter. This makes your bliss balls fun for any occasion. Store your peanut butter bliss balls in an airtight container. This keeps them fresh and safe. You can store them in the fridge or at room temperature. However, the fridge is best for longer freshness. In the refrigerator, these bliss balls stay fresh for about one week. If you want to keep them longer, freeze them. They can last up to three months in the freezer. To avoid sogginess, make sure the bliss balls are cool before you store them. If they feel wet, let them air out a bit. When ready to eat frozen bliss balls, place them in the fridge overnight. This helps them thaw without losing their great texture. For quick thawing, leave them at room temperature for about 30 minutes. Enjoy your bliss balls anytime! For the full recipe, check out the original guide. Peanut Butter Bliss Balls are easy, no-bake treats made with simple ingredients. They mix creamy peanut butter with oats, honey, and chocolate chips for a sweet and satisfying snack. People love them for their taste and health benefits. These bliss balls are perfect for a quick energy boost or a healthy dessert option. Peanut Butter Bliss Balls can last up to one week in the fridge. Store them in an airtight container to keep them fresh. You can also freeze them for up to three months. Just let them thaw before enjoying. Yes! You can add your favorite flavors or ingredients. Try using almond butter instead of peanut butter. You can also mix in dried fruits, nuts, or seeds. For a fun twist, use different types of chocolate chips or add spices like cinnamon. Peanut Butter Bliss Balls offer great nutrition. They provide protein from peanut butter and fiber from oats and flaxseed. They can give you energy without the sugar crash from candy. However, keep portion sizes in mind, as they are calorie-dense. To make Peanut Butter Bliss Balls vegan, replace honey with maple syrup or agave nectar. Ensure your chocolate chips are dairy-free, or use cacao nibs. This way, you can still enjoy this tasty treat without any animal products. For the full recipe, check out the complete guide to making these delightful snacks! Peanut Butter Bliss Balls are a simple and tasty snack. We covered the key ingredients, steps, and tips for making them. You can customize these treats to match your tastes or dietary needs. Store them properly, and they will stay fresh for weeks. Enjoy these healthy bites any time you need a boost. Satisfy your cravings with a nutritious snack that’s easy to make and fun to enjoy!

Peanut Butter Bliss Balls Easy No-Bake Treat Recipe

Craving a delicious treat that’s easy to make? Look no further! Peanut Butter Bliss Balls are the perfect no-bake snack.

To make a hearty and spicy lentil soup, you need the following ingredients: - 1 cup red lentils, thoroughly rinsed - 1 medium onion, finely diced - 2 cloves garlic, minced - 1 medium carrot, peeled and diced - 1 celery stalk, diced - 1 red bell pepper, chopped - 1 tablespoon extra virgin olive oil - 1 teaspoon ground cumin - 1 teaspoon smoked paprika - 1/2 teaspoon cayenne pepper (adjust according to your spice preference) - 1 can (14 oz) diced tomatoes, with juices included - 4 cups vegetable broth - 1 tablespoon fresh lemon juice - Salt and freshly ground black pepper, to taste - Fresh cilantro, chopped, for garnish Each ingredient plays a role in building flavor. The red lentils form the soup's base and add protein. Onions and garlic give it depth. Carrots and celery add sweetness and crunch. The spices, including cumin and smoked paprika, make it aromatic. The cayenne pepper adds heat, which you can adjust to your liking. Tomatoes bring acidity and richness, while broth makes it comforting. The lemon juice gives a bright finish and cilantro adds freshness. You can find the Full Recipe to guide you through the cooking process! First, grab a large pot. Heat 1 tablespoon of extra virgin olive oil over medium heat. Add 1 medium diced onion and 2 minced garlic cloves. Toss in 1 diced carrot and 1 diced celery stalk. Sauté these for about 5-7 minutes until the onion turns soft and clear. Next, add 1 chopped red bell pepper. Cook for another 2-3 minutes. The bell pepper should soften just a bit. Now stir in the spices: 1 teaspoon ground cumin, 1 teaspoon smoked paprika, and 1/2 teaspoon cayenne pepper. Mix well and let it cook for 1-2 minutes. The aroma will fill your kitchen. Now, it’s time to add the lentils. Pour in 1 cup of thoroughly rinsed red lentils and 1 can of diced tomatoes, juices included. Stir everything together. Next, add 4 cups of vegetable broth. Bring this mixture to a boil. Once it boils, reduce the heat to low. Cover the pot and let it simmer for 25-30 minutes. The lentils will soften and become tender. After simmering, stir in 1 tablespoon of fresh lemon juice. Taste and add salt and freshly ground black pepper as needed. If your soup is too thick, feel free to add more vegetable broth or water. For a creamier texture, use an immersion blender to mix part of the soup. This way, you’ll keep some chunks for heartiness. For the full recipe, please refer to the earlier section. For making soup, red lentils are the best choice. They cook quickly and break down, creating a creamy texture. Green lentils hold their shape, giving a chunkier feel. If you prefer a thicker soup, use red lentils. When rinsing lentils, do it well to remove dust and debris. Place them in a strainer, run cold water over them, and gently shake. This helps keep your soup clean and tasty. To control heat, you can adjust cayenne pepper. Start with a small amount, then taste as you go. If it’s too spicy, add more broth or tomatoes to balance. You can also add a bit of sugar to tone down the heat. Mixing in dairy, like yogurt, can cool spicy flavors. Try serving the soup with a dollop on top for a nice touch. To add depth to your soup, consider using fresh herbs. Parsley, cilantro, or even thyme bring brightness. You might also try a pinch of cinnamon or nutmeg for warmth. Pair your soup with warm bread or a fresh salad. These sides complement the flavors well, making your meal more satisfying. For extra garnish, a squeeze of lemon adds a zesty twist. Check out the Full Recipe for more details on making this delightful dish! {{image_4}} To make this soup even tastier, consider using homemade vegetable broth. It adds depth that store-bought versions often miss. You can also use mushroom broth for an earthy flavor. Adding more vegetables boosts the nutrition. Think about carrots, zucchini, or spinach. These veggies not only add health benefits but also enhance the soup's color and taste. If you want a heartier meal, add chicken or sausage. Cook the meat first, then add it with the lentils. This way, the meat absorbs all the soup's great flavors. For a plant-based option, consider adding chickpeas or black beans. They also add protein and make the dish filling. To give your soup a global kick, try adding spices like curry powder or garam masala. These spices can transform the dish into something new. Another great idea is to stir in coconut milk. This adds creaminess and a hint of sweetness, perfect for an Asian-inspired twist. These variations keep your Spicy Lentil Soup exciting and full of flavor. For the full recipe, check out the details above. Store your leftover spicy lentil soup in airtight containers. This helps keep the soup fresh. Make sure to let it cool down first. Once cool, seal each container tightly. It is best to eat the soup within 3 to 5 days. To freeze lentil soup, use freezer-safe containers. Leave some space at the top for the soup to expand. This prevents the containers from breaking. When you’re ready to eat, thaw the soup in the fridge overnight. Reheat the soup on the stove or in the microwave. Stir well while reheating to ensure even heat. In the fridge, spicy lentil soup lasts for about 3 to 5 days. In the freezer, it can stay good for up to 3 months. Look for signs of spoilage like off smells or mold. If you see any, throw the soup away. Enjoy your flavorful and comforting soup while it's fresh! For more detailed cooking steps, refer to the Full Recipe. To thicken your soup, you can add more lentils. Red lentils break down well during cooking. You can also blend a portion of the soup. An immersion blender works great for this. If you want it thicker, reduce the amount of broth. You can even simmer it longer to let some liquid evaporate. Another option is to mash some of the lentils against the pot. This will give your soup a nice creamy texture. Yes, you can make this soup ahead of time. It tastes even better the next day. To store it, let it cool before putting it in a fridge-safe container. Cover it tightly. When you're ready to eat, just reheat it on the stove. You may want to add a splash of broth or water as it thickens when cooling. If you want to freeze it, use a freezer-safe container. It can last up to three months in the freezer. You can serve this soup with crusty bread for dipping. A simple side salad also works well. Try a fresh green salad with lemon vinaigrette. You may also sprinkle some fresh cilantro on top for added flavor. If you like, add a dollop of yogurt or sour cream for creaminess. A squeeze of lemon juice brightens the flavor even further. Yes, you can easily substitute some ingredients. If you need a gluten-free option, ensure the broth is gluten-free. You can swap the red lentils for green ones, but they will take longer to cook. If you're vegan, feel free to skip any dairy toppings. You can add different veggies like spinach or kale for extra nutrients. For a spicy kick, try adding more cayenne or some jalapeños. This soup is very healthy. Lentils are packed with protein and fiber. They help keep you full and satisfied. The spices like cumin and cayenne can boost your metabolism. The vegetables add vitamins and minerals, making it a balanced meal. Plus, it's low in fat and can fit any healthy diet. Enjoying this soup is a tasty way to nourish your body. For the full recipe, check out the detailed instructions. This blog post shared a simple spicy lentil soup recipe, from ingredients to cooking tips. You learned how to create a tasty dish that suits your spice preference. Remember, lentils are rich in nutrients and easy to modify. Feel free to adjust flavors or try different ingredients to make it your own. Enjoy this healthy meal, knowing you can customize it any way you like. I hope you make this soup soon and savor its warmth and flavor!

Spicy Lentil Soup Flavorful and Comforting Recipe

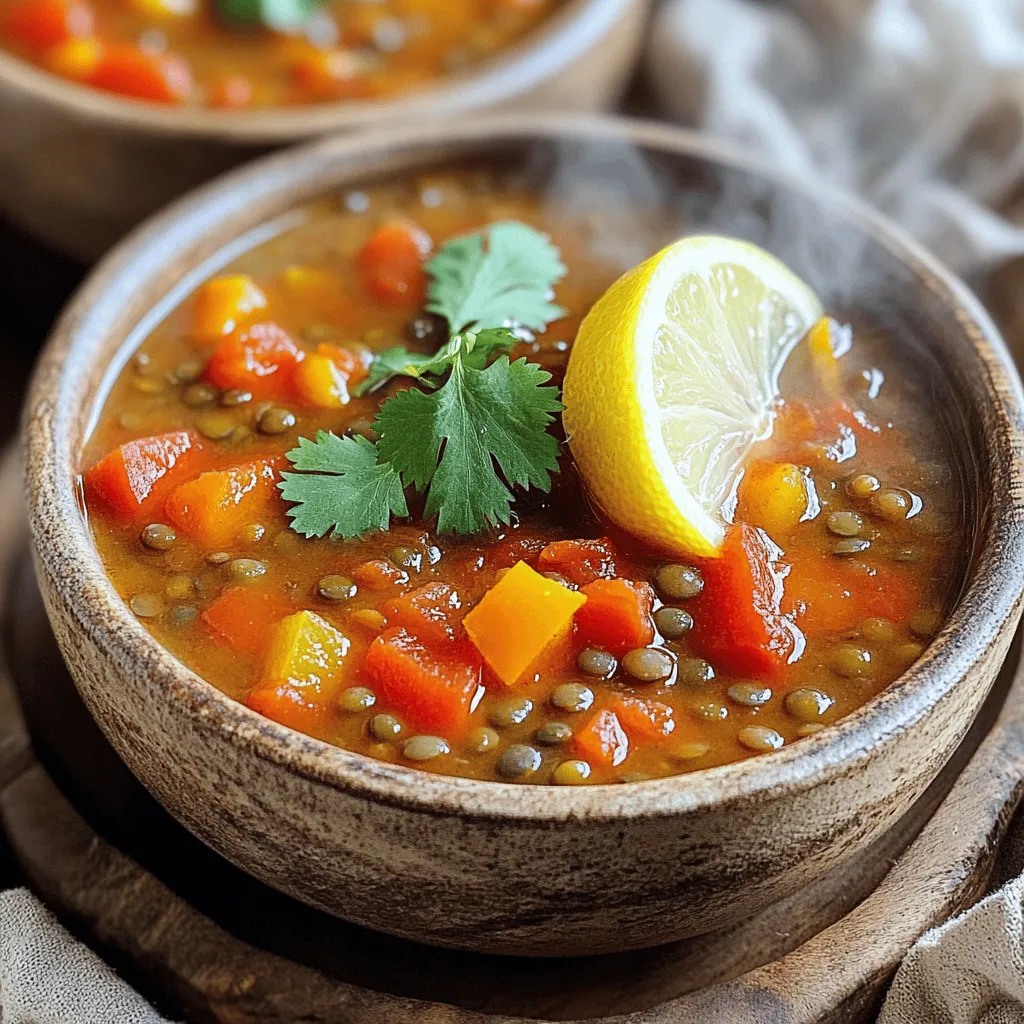
If you’re looking for a meal that warms the soul, try this Spicy Lentil Soup! Packed with flavor and loaded

To make Garlic Herb Grilled Shrimp, you need key ingredients. Here is what you will use: - 1 pound large shrimp, peeled and deveined - 4 cloves garlic, minced - 1/4 cup fresh parsley, finely chopped - 1 tablespoon fresh rosemary, finely minced - 1 tablespoon fresh thyme leaves - 1/4 cup extra virgin olive oil - 2 tablespoons freshly squeezed lemon juice - 1 teaspoon smoked paprika - Salt and freshly ground black pepper, to taste - Lemon wedges, for serving These ingredients blend to create a fresh and tasty dish. The shrimp soak up all the flavors from the garlic and herbs. You can add other ingredients for more flavor. Here are some ideas: - Red pepper flakes for heat - Fresh basil for a sweet note - A splash of white wine for depth - Honey for a touch of sweetness These optional ingredients can give the dish a unique twist. Feel free to mix and match based on your taste. If you don’t have some ingredients, you can swap them. Here are some easy substitutes: - Use shrimp paste instead of fresh shrimp if needed. - Swap parsley with cilantro for a different taste. - Olive oil can be replaced with avocado oil. - Use lemon zest if you don’t have fresh lemon juice. These substitutes help you create a similar flavor profile. This way, you can enjoy Garlic Herb Grilled Shrimp no matter what you have on hand. Don't forget to check the Full Recipe for detailed steps! Start by gathering your ingredients. You need garlic, parsley, rosemary, thyme, olive oil, lemon juice, smoked paprika, salt, and pepper. In a large mixing bowl, add the minced garlic and finely chopped herbs. Pour in the olive oil and lemon juice. Sprinkle in the smoked paprika, salt, and pepper. Whisk all the ingredients together until they blend well. The smell will be amazing, and this mixture will be your marinade. Now, it’s time to add the shrimp. Make sure they are peeled and deveined. Place the shrimp in the bowl with the marinade. Toss them gently to coat each piece well. This step is key because the shrimp will soak up all the flavors. Cover the bowl with plastic wrap and put it in the fridge. Let the shrimp marinate for at least 30 minutes, but not longer than an hour. This allows the flavors to infuse perfectly. When the shrimp are ready, preheat your grill to medium-high heat. If you're using wooden skewers, soak them in water for about 30 minutes. This helps prevent burning. Carefully thread the marinated shrimp onto the skewers. Remember to leave a little space between each shrimp for even cooking. Once the grill is hot, place the skewers on it. Grill the shrimp for 2-3 minutes on each side. They should turn pink and opaque. Be careful not to overcook them; they can get tough. After grilling, transfer the skewers to a serving platter. Serve them warm with lemon wedges on the side for that extra zesty flavor. For more details, check the Full Recipe. To keep shrimp tender, watch the cook time. Shrimp cook fast. Grill them for 2 to 3 minutes per side. When they turn pink and opaque, they’re done. If they get rubbery, you’ve cooked them too long. Keep an eye on them. Timing is key to perfect shrimp. Both gas and charcoal grills work well for shrimp. Gas grills heat up fast and give you great control. Charcoal grills add a nice smoky flavor. If you choose charcoal, let the coals ash over first. This ensures even heat. Either option can make your shrimp delicious. The garlic herb marinade is packed with flavor. You can enhance it further with lemon zest or a dash of hot sauce. Pair the shrimp with fresh sides like salad or grilled veggies. Serve with rice or crusty bread to soak up the juices. These sides complement the shrimp well. For a nice drink, try a crisp white wine. For the full recipe, check out the details above. {{image_4}} To add heat to your garlic herb grilled shrimp, try adding red pepper flakes. Mix in about 1 teaspoon with the marinade. This gives your shrimp a nice kick. You can also use hot sauce instead of lemon juice for a tangy twist. You can grill shrimp with veggies for a full meal. Just add bell peppers, zucchini, or cherry tomatoes to your skewers. Toss the veggies in the same marinade as the shrimp. This adds color and flavor to your dish. The veggies will soak up the garlic and herb goodness, making every bite tasty. Experiment with different marinades to change the taste. For a tropical twist, try coconut milk and lime juice. For a smoky flavor, use chipotle in adobo sauce. You can also mix soy sauce with ginger for an Asian taste. Each marinade will give you a new flavor experience. For more ideas, check out the [Full Recipe]. To keep your grilled shrimp fresh, place them in an airtight container. Let the shrimp cool down first. Once cool, cover them tightly. Store the container in the fridge. Proper storage can keep them good for up to three days. When reheating shrimp, do it gently. You want to avoid making them tough. The best way is to use a skillet. Add a tiny bit of oil, then heat over medium-low. Cook for a few minutes until warm. You can also use a microwave. Heat in short bursts. Cover the shrimp to keep moisture in. If you want to save shrimp for later, freezing works well. First, let the shrimp cool completely. Then, place them in a freezer-safe bag. Squeeze out as much air as possible before sealing. Label the bag with the date. Frozen shrimp can last up to three months. When ready to use, thaw them in the fridge overnight. Marinate shrimp for at least 30 minutes. This time allows the shrimp to soak up the flavors. You can also marinate them for up to 1 hour for a deeper taste. Do not exceed 1 hour, as the acid in the marinade can make the shrimp mushy. Large shrimp work best for grilling. They hold up well on skewers and have a nice texture. Look for shrimp that are peeled and deveined for ease. Fresh shrimp are ideal, but frozen shrimp can also work well. Just be sure to thaw them completely before marinating. Yes, you can use dried herbs if fresh ones are not available. Use about one-third of the amount. Dried herbs have a stronger flavor, so you need less. However, fresh herbs add a brighter taste and color to your dish. If you can, always opt for fresh! You learned about making Garlic Herb Grilled Shrimp. We discussed the key ingredients and substitutes. You also found step-by-step instructions to grill shrimp perfectly. I shared tips on avoiding overcooking and best grilling methods. Variations were covered, from spicy shrimp to veggie options. Finally, we explored storage tips and common questions. Now, you can confidently enjoy delicious grilled shrimp. Use these steps and tips to impress your guests or serve yourself a tasty meal. Happy grilling!

Garlic Herb Grilled Shrimp Quick and Flavorful Recipe

Are you ready to elevate your dinner game? My Garlic Herb Grilled Shrimp is quick, easy, and bursting with flavor.

- 1 ½ cups all-purpose flour - ½ cup granulated sugar - 1 tablespoon baking powder - ½ teaspoon baking soda - ¼ teaspoon salt - 1 teaspoon ground cinnamon - ¼ cup unsalted butter, melted - 1 large egg - ¾ cup milk - Zest of 1 large orange - 1 cup fresh or frozen cranberries (if using frozen, do not thaw) - 1 teaspoon vanilla extract - 2 tablespoons freshly squeezed orange juice - ½ cup chopped walnuts or pecans To make cranberry orange muffins, gather all these ingredients first. This keeps the cooking process smooth and fun. The dry ingredients lay the base for the muffins, while the wet ingredients add moisture and flavor. If you want to add a bit of crunch, consider the optional nuts. They pair well with the tart cranberries and sweet orange flavor. You can find the full recipe linked above! Start by preheating your oven to 375°F (190°C). This step is crucial for even baking. Next, prepare your muffin tin. You can either line it with paper liners or use non-stick spray. This helps the muffins release easily after baking. In a large bowl, sift together the dry ingredients. Combine 1 ½ cups of all-purpose flour, ½ cup of granulated sugar, 1 tablespoon baking powder, ½ teaspoon baking soda, ¼ teaspoon salt, and 1 teaspoon ground cinnamon. Use a whisk to mix them well. This ensures your muffins rise properly. In a separate bowl, melt ¼ cup of unsalted butter. Then, whisk it with 1 large egg, ¾ cup of milk, zest of 1 large orange, 1 teaspoon of vanilla extract, and 2 tablespoons of freshly squeezed orange juice. Mix until smooth and well combined. This blend adds moisture and flavor to your muffins. Carefully pour the wet mixture into the dry ingredients. Use a spatula or wooden spoon to fold them together. Be gentle and stop mixing when you see some lumps. Over-mixing can lead to dense muffins, and we want them light and fluffy. Now it's time to add the star ingredients! Fold in 1 cup of fresh or frozen cranberries. If you like, add ½ cup of chopped walnuts or pecans. Mix just enough to distribute everything evenly in the batter. Spoon the batter into your muffin tin, filling each cup about 2/3 full. This gives them room to rise. Bake in the preheated oven for 18-20 minutes. They are done when the tops are golden brown and a toothpick comes out clean. Remove the muffins and let them cool in the tin for about 5 minutes. Then, transfer them to a wire rack to cool completely. Enjoy your fresh and flavorful Cranberry Orange Muffins! For the complete recipe, check out the Full Recipe. For soft and fluffy muffins, avoid over-mixing your batter. Mix until the ingredients just come together. A few lumps are okay. This keeps the muffins light. Also, measure your flour correctly. Too much flour can lead to dense muffins. Use the scoop and level method for best results. You can switch ingredients based on what you have. If you need a dairy-free option, try almond milk or oat milk instead of regular milk. For the butter, use coconut oil or a dairy-free spread. If you want a different sweetener, honey or maple syrup works well, but adjust the liquid in the recipe. To boost the flavor, add more orange zest or juice. You can also mix in spices like nutmeg or cardamom for warmth. For added crunch, include nuts like walnuts or pecans. If you want more fruit, try dried cranberries or blueberries. These changes can make your muffins unique and special. Check out the Full Recipe for more tips! {{image_4}} You can boost flavor by adding citrus zest. Try lemon or lime zest along with the orange zest. This mix gives your muffins a bright, fresh taste. A little zest goes a long way. It adds a zing that pairs well with cranberries. You can also use zest from other citrus fruits. Each choice brings a unique twist to your muffins. You can experiment with other fruits in the recipe. Instead of cranberries, use blueberries or raspberries. These fruits add sweetness and color. You can also try diced apples for a soft bite. Peaches or pears can bring a juicy texture. Each fruit changes the muffins’ flavor profile. Feel free to mix different fruits for fun combinations. If you want nut-free muffins, simply skip the nuts. You can substitute with seeds like sunflower or pumpkin seeds. These seeds add crunch without allergens. You can also add extra oats for texture. They keep your muffins hearty and filling. Always check for allergies when sharing your treats. Enjoy your nut-free muffins without worry! To keep your cranberry orange muffins fresh, store them in an airtight container. You can place them at room temperature for up to three days. If you want to keep them longer, consider refrigerating them. Just note that refrigeration can change their texture slightly, making them less fluffy. If you want to save some muffins for later, freezing works great. Wrap each muffin in plastic wrap or aluminum foil. Then, place them in a freezer-safe bag. They can stay frozen for about three months. When you're ready to enjoy them, just take them out and let them thaw at room temperature. To reheat your muffins, use the oven for the best results. Preheat your oven to 350°F (175°C). Place the muffins on a baking sheet and warm them for about 10 minutes. You can also use a microwave. Heat each muffin for about 15-20 seconds. Enjoy them warm for the best flavor! Try this with my full recipe for cranberry orange bliss muffins. You can tell muffins are done by checking their tops. They should be golden brown. Insert a toothpick into the center. If it comes out clean, they are ready. Yes, you can use frozen cranberries. Just add them straight from the freezer. Do not thaw them. They will keep the muffins moist and delicious. You can use applesauce or mashed banana as an egg substitute. Use 1/4 cup for each egg. This will help bind the muffins together. Yes, you can make these muffins gluten-free. Use a gluten-free flour blend instead of all-purpose flour. Make sure it has a binding agent like xanthan gum. These muffins last about 3 days at room temperature. Store them in an airtight container. You can also freeze them for up to 3 months. Serve these muffins warm with butter or a light glaze. They pair well with tea or coffee. You can also enjoy them as a quick breakfast or snack. For a fun twist, add a sprinkle of powdered sugar on top. For the full recipe, check the earlier section. In this post, you learned the key ingredients and steps for making delicious Cranberry Orange Muffins. We covered dry and wet ingredients, plus optional add-ins. You now have tips for perfect texture and flavor, as well as storage methods. Remember, small changes can lead to big flavor. With these insights, you can bake muffins that impress. Enjoy experimenting with different flavors and variations. Your kitchen is now ready for great baking adventures. Happy baking!

Cranberry Orange Muffins Fresh and Flavorful Delight

Are you ready to fill your kitchen with the bright scent of fresh Cranberry Orange Muffins? These delicious treats blend

To make zesty lemon bars, you need a few key items. Here’s what you will need: - 1 cup all-purpose flour - 1/4 cup powdered sugar - 1/2 cup unsalted butter, softened - 2 large eggs - 1 cup granulated sugar - 1/4 cup fresh lemon juice (from about 2 lemons) - Zest of 2 lemons - 1/2 teaspoon baking powder - Pinch of salt - Additional powdered sugar for dusting These ingredients create a crumbly crust and a bright filling. The lemon juice and zest give the bars their signature tart flavor. If you’re missing an ingredient, don’t worry. Here are some good substitutes: - Use coconut oil instead of unsalted butter for a dairy-free version. - Substitute lemon juice with lime juice for a different twist. - Replace all-purpose flour with almond flour for a gluten-free option. - Use aquafaba (the liquid from canned chickpeas) as an egg substitute in a vegan version. These swaps keep the taste close to the original while meeting dietary needs. Using fresh ingredients matters a lot in this recipe. Fresh lemons give a bright and lively taste. Old lemons can taste dull and bitter. Fresh eggs also help the bars rise better and taste richer. Always choose the best ingredients for the best results. For the full recipe, check out the detailed instructions to bake your zesty lemon bars. Enjoy! To start, you need to make the crust. First, gather your ingredients. In a medium bowl, mix 1 cup of all-purpose flour and 1/4 cup of powdered sugar. Next, add 1/2 cup of softened butter. Use a fork or your fingers to blend until it looks like coarse crumbs. Once mixed, press the dough into the bottom of an 8x8-inch pan. Make sure it is even. Preheat your oven to 350°F (175°C) while you prepare the crust. Bake this crust for 15 minutes. It should turn light golden brown when done. While the crust bakes, let’s make the lemon filling. In a separate bowl, whisk together 2 large eggs and 1 cup of granulated sugar. Then, add 1/4 cup of fresh lemon juice and the zest of 2 lemons. This adds a bright flavor. Next, mix in 1/2 teaspoon of baking powder and a pinch of salt. Whisk everything until the mixture is smooth. This filling is what makes your lemon bars so tasty. Once the crust is done, carefully pour the lemon filling over it. Return the pan to the oven and bake for another 20-25 minutes. You'll know it's done when the filling sets and does not jiggle. After baking, remove the pan and let it cool on a wire rack. Once cooled, lift the bars using the parchment paper. Dust the top with powdered sugar before cutting. Slice them into squares or rectangles. You can now enjoy your refreshing zesty lemon bars! If you want the full recipe, check out the detailed instructions above. To get the perfect balance, use fresh lemons. The zest adds flavor and aroma. Adjust the sugar to your taste. If you find it too tart, increase the sugar slightly. A little extra lemon juice can also enhance the tartness if desired. Taste your filling before baking to ensure it meets your preference. Cracks often happen due to quick temperature changes. Bake your lemon bars at a steady temperature. Avoid opening the oven door often. Let them cool slowly in the pan. This step reduces sudden temperature shifts. If cracks do appear, dust them with powdered sugar for a lovely finish. Wait until the bars are completely cool before cutting. Use a sharp knife for clean cuts. For neat squares, wipe the knife between cuts. This technique helps keep the edges smooth. Dust with powdered sugar before serving for that elegant touch. Arrange them on a platter for a beautiful presentation. For the full recipe, check out the instructions above. Enjoy your zesty treat! {{image_4}} You can make gluten-free lemon bars easily. Substitute the all-purpose flour with a gluten-free blend. Look for one that works well for baking. This change keeps the texture light and fluffy while still being delicious. You might need to adjust the baking time slightly. Start checking for doneness a few minutes early. For a vegan version, swap the eggs for flax eggs. Mix one tablespoon of flaxseed meal with three tablespoons of water for each egg. Let it sit for a few minutes until thick. You can also use silken tofu as an egg replacement. Blend it until smooth and use half a cup for two eggs. This keeps your lemon bars creamy and tasty. Want to spice things up? Add a bit of ginger or lavender for extra flavor. You can also mix in some berries like raspberries or blueberries. These fruits give a nice contrast to the lemon's tartness. For a fun twist, drizzle melted chocolate on top after they cool. Each bite will burst with new flavors! To keep your lemon bars fresh, place them in an airtight container. Store them in the fridge for up to five days. If you plan to eat them later, make sure they cool completely before storing. This keeps them from getting soggy. Freezing lemon bars is easy. Cut them into squares first. Wrap each square in plastic wrap. Then, place them in a freezer bag or container. They will stay good for up to three months. When you are ready to enjoy, just thaw them in the fridge overnight. Reheating lemon bars is simple. Preheat your oven to 350°F (175°C). Place the bars on a baking sheet for about 10 minutes. This warms them up nicely. Dust with powdered sugar before serving for that extra touch. For a fun twist, serve with whipped cream or fresh fruit. Enjoy your zesty lemon bars! You can use applesauce or mashed bananas. Use 1/4 cup for each egg. Silken tofu is another good choice. Blend it until smooth and add 1/4 cup for each egg. These options keep your lemon bars moist and tasty. To reduce the tartness, add more sugar. Try increasing the granulated sugar by 1/4 cup. You can also use less lemon juice. Start with 3 tablespoons instead of 1/4 cup. Finally, consider adding a pinch of salt. This will balance the flavors nicely. Lemon bars last about 5 to 7 days in the fridge. Store them in an airtight container to keep them fresh. You can also cover them tightly with plastic wrap. This keeps the bars tasting great for longer. Zesty lemon bars are a delightful treat, easy to make with fresh ingredients. The step-by-step guide helps you prepare the dough and filling, ensuring perfect baking each time. Tips on balancing flavors and cutting help avoid common mistakes. Explore variations for gluten-free and vegan options to suit your needs. In summary, making lemon bars is simple and fun. Follow these steps for a tasty dessert that everyone will love. Enjoy your baking journey and share these bright bites with others!

Zesty Lemon Bars Refreshing and Tart Delight

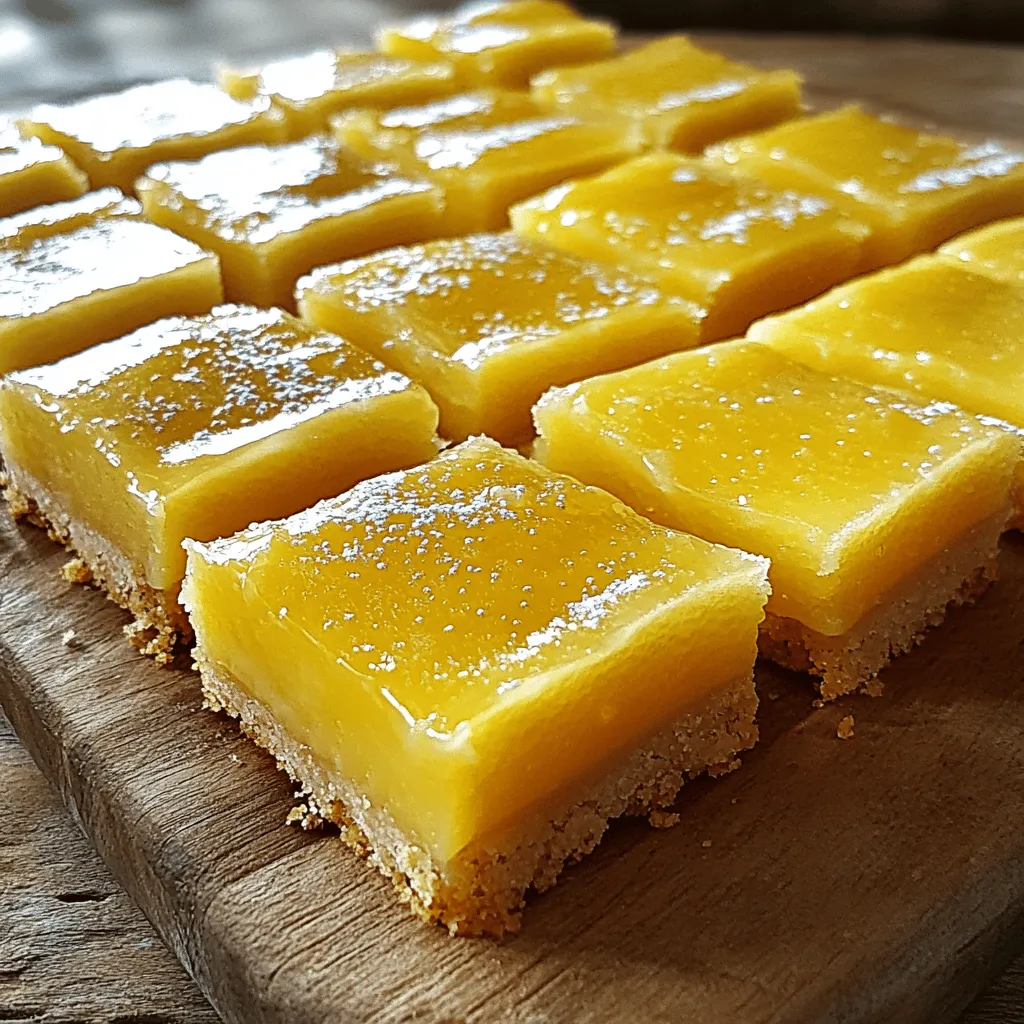
Are you ready to whip up a treat that bursts with flavor? These zesty lemon bars are a refreshing and

- 1 cup all-purpose flour - 1/2 cup almond flour - 2 tablespoons matcha green tea powder - 1 teaspoon baking powder - 1/2 teaspoon baking soda - 1/4 teaspoon salt - 1/2 cup granulated sugar - 1/4 cup honey or maple syrup - 1/2 cup unsweetened applesauce - 1/4 cup vegetable oil or melted coconut oil - 2 large eggs - 1 teaspoon vanilla extract - 1/2 cup white chocolate chips or dark chocolate chips (optional) Matcha green tea muffins have a unique flavor. The matcha powder gives them a rich, earthy taste. This flavor pairs well with sweet ingredients like honey and applesauce. You can also add chocolate chips for a fun twist. - Each muffin has about 150 calories. - They contain 4 grams of protein, 6 grams of fat, and 24 grams of carbs. - Matcha green tea is full of antioxidants. It boosts your metabolism and improves focus. These muffins are not just tasty; they also offer health benefits. You can enjoy a delightful treat without feeling guilty. For the full recipe, check the section above. Start by preheating your oven to 350°F (175°C). Grab a muffin tin and line it with paper liners or give it a light coat of cooking spray. This helps the muffins come out easily. Next, mix the dry ingredients. In a medium bowl, whisk together: - 1 cup all-purpose flour - 1/2 cup almond flour - 2 tablespoons matcha green tea powder - 1 teaspoon baking powder - 1/2 teaspoon baking soda - 1/4 teaspoon salt Make sure to blend these well. In another bowl, combine the wet ingredients. Mix together: - 1/2 cup granulated sugar - 1/4 cup honey or maple syrup - 1/2 cup unsweetened applesauce - 1/4 cup vegetable oil or melted coconut oil - 2 large eggs - 1 teaspoon vanilla extract Stir until this mixture is smooth. Now, it’s time to combine both mixtures. Gradually add the dry mix into the wet bowl. Use a spatula and fold gently. Stop when no dry flour remains. If you want, you can add 1/2 cup of chocolate chips at this stage. Fold them in gently so they spread throughout the batter. Now, let’s fill the muffin cups. Use a spoon or ice cream scoop to fill each cup about two-thirds full. This space allows them to rise perfectly while baking. Place the muffin tin in your preheated oven. Bake for 18 to 20 minutes. To check if they are done, insert a toothpick into the center of a muffin. It should come out clean or with just a few moist crumbs. After baking, take the muffin tin out of the oven. Let them cool in the pan for around 5 minutes. Then, transfer the muffins to a wire rack. This helps them cool completely. For a lovely presentation, serve them warm or at room temperature. You can place them on a rustic wooden board. For extra flair, dust them lightly with powdered sugar. Garnish with fresh mint leaves or edible flowers for a bright touch. Enjoy your Matcha Green Tea Muffins! - Overmixing the batter: Mixing too much makes the muffins tough. Mix just until combined. - Inaccurate measuring techniques: Use a scale or measuring cups for accuracy. This helps keep the muffins light and fluffy. - Suggestions for additional flavorings: You can add lemon zest or ginger for a nice twist. These flavors pair well with matcha. - Using high-quality matcha powder: The flavor of your muffins depends on the matcha you use. Choose a vibrant green powder for the best taste and health benefits. For the full recipe, check out the Matcha Green Tea Muffins 🧁. {{image_4}} You can easily adapt matcha green tea muffins to fit your diet. If you need a gluten-free option, use gluten-free all-purpose flour. This keeps the texture light and fluffy. For a vegan version, replace eggs with flax eggs or applesauce. This change maintains moisture without using eggs. You might also want to change the sweeteners to make them healthier. Instead of granulated sugar, consider coconut sugar or stevia. Both options add sweetness but with fewer calories. Adjust the amount based on your taste preferences. Adding extra flavors can elevate your matcha muffins. You can mix in fruits like blueberries or bananas for a burst of freshness. Nuts like walnuts or pecans can add a nice crunch and extra nutrients. Another fun idea is to infuse flavors like citrus or spices. A bit of lemon or orange zest brightens the taste. You can also add a hint of cinnamon or ginger for warmth. These add-ins create a unique twist on the classic muffin. Explore these options to find your favorite combinations! Let your muffins cool for at least 5 minutes in the pan. This helps them set. Next, move them to a wire rack. This step allows air to flow and keeps them soft. You can use a large container with a tight lid for storage. A glass or plastic container works well. You may also use a resealable plastic bag. Just remove as much air as possible to keep them fresh. Matcha muffins last about 2-3 days at room temperature. Store them in a cool, dry place. If you want them to last longer, freezing is a great option. Wrap each muffin in plastic wrap, then place them in a freezer bag. They can stay in the freezer for up to 3 months. To reheat, just take a muffin out and let it thaw. You can warm it in the microwave for about 20-30 seconds before eating. Enjoy your delicious matcha green tea muffins anytime! To make matcha green tea muffins, you start by mixing dry and wet ingredients. First, preheat your oven to 350°F (175°C). Prepare a muffin tin with paper liners. In one bowl, whisk together all-purpose flour, almond flour, matcha powder, baking powder, baking soda, and salt. In another bowl, mix granulated sugar, honey, applesauce, oil, eggs, and vanilla until smooth. Gradually combine the dry mix with the wet mix. Fold gently to avoid overmixing. Add chocolate chips if you like. Fill each muffin cup two-thirds full and bake for 18-20 minutes. Once baked, cool them on a wire rack. For the full recipe, see above. If you need an alternative to almond flour, you can use coconut flour, oat flour, or even whole wheat flour. Each option changes the texture and taste slightly. Coconut flour is very absorbent, so you need less of it. Oat flour gives a nice, mild flavor and works well in muffins. Whole wheat flour can make muffins denser but adds fiber. Adjust the amount of liquid if you switch flours to get the right batter consistency. Yes, matcha green tea offers many health benefits. It is rich in antioxidants, which help fight free radicals. These antioxidants can improve heart health and boost metabolism. Matcha also contains L-theanine, an amino acid that promotes calmness and focus. Drinking matcha may enhance brain function and support weight loss. Plus, it can provide steady energy without the jitters that coffee sometimes causes. Adding matcha to your diet can be a great choice for overall wellness. Absolutely! You can mix in flavors that complement matcha well. Citrus zest, like lemon or orange, adds a bright note. You can also use spices like cinnamon or ginger for warmth. Nuts, such as walnuts or pecans, provide crunch and depth. If you want a sweeter touch, consider adding dried fruits like cranberries or blueberries. Experimenting with flavors lets you create your unique twist on these delightful muffins! In this blog post, we explored the exciting world of matcha muffins. We covered their ingredients, from flour to matcha powder, and examined their nutritional perks. I shared step-by-step baking instructions, tips for perfect muffins, and storage advice to keep your treats fresh. You can also try creative variations to suit your taste. With these insights, you can bake delicious and healthy matcha muffins that everyone will enjoy. Feel inspired to create your own tasty version!

Matcha Green Tea Muffins Delightful Flavor Boost

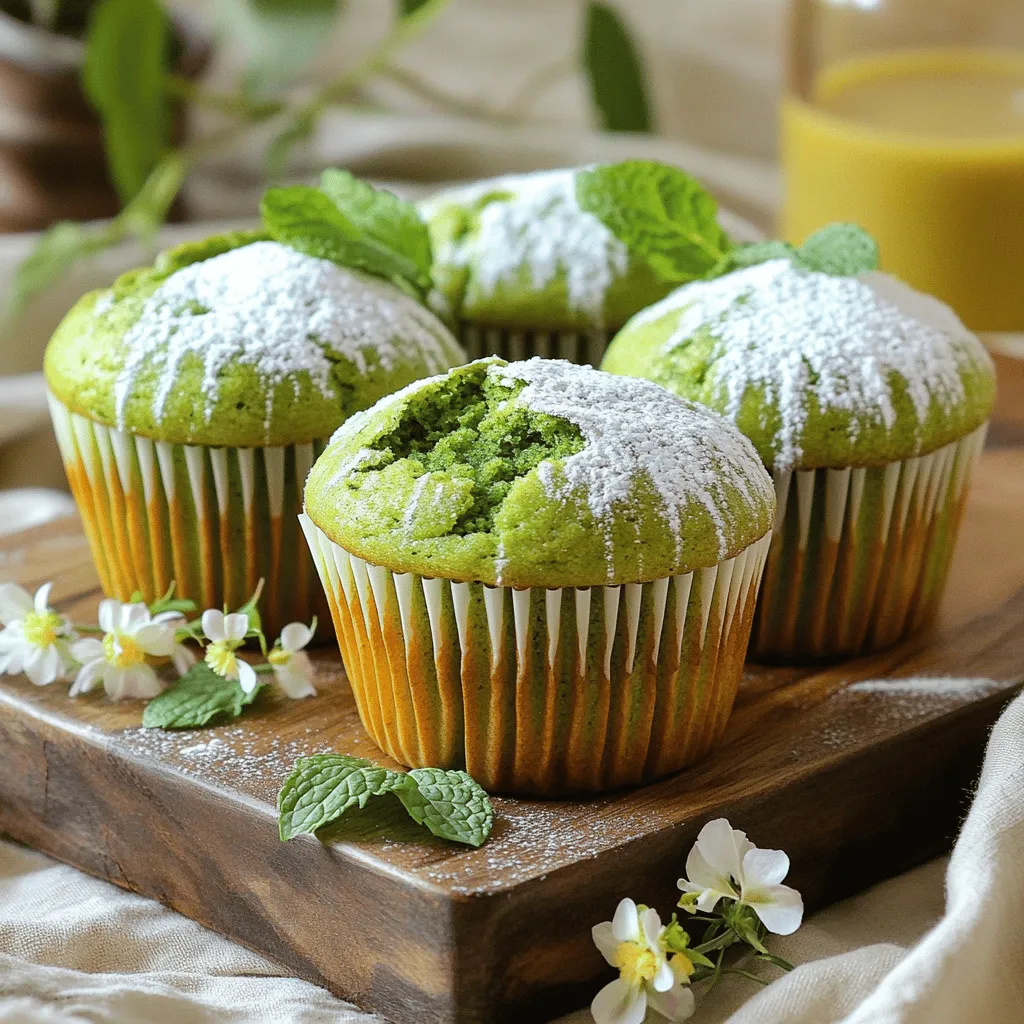
Welcome to the world of Matcha Green Tea Muffins! These tasty treats are more than just a snack; they give

Older posts
Newer posts
← Previous Page1 … Page81 Page82 Page83 … Page86 Next →

dsad

© 2026 yumymoments • Built with GeneratePress

Our Policies

  • Copyright Policy
  • Cookie Policy
  • GDPR Policy
  • Privacy Policy
  • Disclaimer
  • Terms Of Use

More Information

  • Home
  • About
  • Contact
  • Appetizers
  • Dessert
  • Dinner
  • Drinks
©2026, yumymoments About Back To Top