Skip to content
DisclaimerTerms Of UseGDPR PolicyCookie Policy

yumymoments

  • Home
  • Drinks
  • Appetizers
  • Dinner
  • Dessert
  • About
  • Contact
  • Privacy Policy
DisclaimerTerms Of UseGDPR PolicyCookie Policy

NO-ING-IMG

- 2 salmon fillets (approximately 6 oz each) - 1/4 cup soy sauce (or tamari for a gluten-free option) - 2 tablespoons honey or maple syrup - 1 tablespoon rice vinegar - 1 tablespoon sesame oil - 2 cloves garlic, minced - 1-inch piece of ginger, grated - 1 cup broccoli florets - 1 large carrot, julienned - 1/2 red bell pepper, thinly sliced - 1 ripe avocado, sliced - 1 cup jasmine rice (or brown rice for a healthier alternative) - 2 cups water - 2 green onions, finely chopped - Sesame seeds for garnish - Salt and pepper to taste This recipe for teriyaki salmon bowls is simple yet packed with flavor. The star ingredient is salmon, which brings rich taste and healthy fats. You can use soy sauce or tamari, depending on your dietary needs. Honey or maple syrup adds a sweet touch that balances the saltiness of the soy sauce. Rice vinegar brings a tangy note, while sesame oil adds depth. The colorful veggies not only make the dish pretty but also add vitamins and crunch. Broccoli, carrots, and bell peppers are great choices. I love adding creamy avocado for extra richness. For the base, jasmine rice is my go-to, but brown rice works well, too. Green onions and sesame seeds give a nice finish. Salt and pepper enhance all the flavors. You can find the full recipe for a step-by-step guide. Enjoy crafting this delightful dish! To start, mix the marinade ingredients. In a small bowl, combine: - 1/4 cup soy sauce - 2 tablespoons honey or maple syrup - 1 tablespoon rice vinegar - 1 tablespoon sesame oil - 2 cloves garlic, minced - 1-inch piece of ginger, grated Whisk these together until smooth. Set aside half of this marinade for later use. Next, place the salmon fillets in a shallow dish. Pour the marinade over the salmon. Make sure each piece gets a good coating. Let the salmon marinate in the fridge for 15 to 30 minutes. Flip the fillets halfway through. This helps the flavors soak in evenly. While the salmon marinates, cook the rice. Rinse 1 cup of jasmine rice under cold water. Keep rinsing until the water runs clear. This removes excess starch. In a medium saucepan, add the rinsed rice and 2 cups of water. Bring it to a boil over high heat. Then, reduce heat to low and cover the pot. Let it simmer for 15 to 18 minutes. Check for fluffiness once all the water is absorbed. While the rice cooks, prepare the veggies. Place 1 cup of broccoli florets in a steamer basket. Steam them for about 5 minutes until they are tender-crisp. For color and taste, add 1 large carrot, julienned, and 1/2 red bell pepper, thinly sliced, to the steamer for the last 2 minutes. Now, it’s time to cook the salmon. Preheat a non-stick skillet over medium-high heat. Remove the salmon from the marinade. Discard the used marinade. Place the fillets skin-side down in the skillet. Cook for 4 to 5 minutes on each side. The salmon should be opaque and flaky. In the last minute, brush the fillets with the reserved marinade for extra flavor. Once everything is cooked, it’s time to assemble the bowls. Fluff the rice with a fork. Divide the rice into serving bowls. Top each bowl with a salmon fillet, steamed vegetables, and slices of avocado. Drizzle any remaining marinade over the top for more flavor. Finish each bowl with a sprinkle of chopped green onions and sesame seeds. Add salt and pepper to taste for extra seasoning. This method ensures each bowl is colorful and appealing. You can find the full recipe for more details. Enjoy your delicious teriyaki salmon bowls! To make your teriyaki sauce shine, you may want to adjust its sweetness and saltiness. If you find it too salty, add more honey or maple syrup. If it’s too sweet, a splash of soy sauce can help balance it out. You can also substitute ingredients for different diets. For gluten-free options, use tamari instead of soy sauce. If you prefer a lower-calorie choice, try using agave syrup instead of honey. If you want to explore alternatives to skillet cooking, consider grilling or baking your salmon. Grilling gives a nice smoky flavor, while baking helps keep the fish moist. Both methods work well with the teriyaki sauce. For steaming vegetables, the best practice is to use a steamer basket. This method retains their bright colors and nutrients. Steam broccoli, carrots, and bell peppers together, but remember to time each veggie. Start with the broccoli, add the carrots, and finish with the bell peppers for perfect texture. Arranging ingredients beautifully can elevate your teriyaki salmon bowls. Start with a base of fluffy rice. Place the salmon fillet on top, then add the brightly colored vegetables around it. This not only looks good but also makes it easy to enjoy. For garnishing ideas, sprinkle chopped green onions and sesame seeds on top. You can also add a slice of lime or lemon for a fresh touch. These small details make your dish pop and impress anyone who sees it. For the complete guide, check out the Full Recipe. {{image_4}} You can swap salmon for chicken or tofu. Chicken offers a mild flavor and cooks quickly. Tofu brings a nice texture and absorbs the marinade well. For seafood lovers, shrimp or scallops work great too. They cook fast and match the teriyaki sauce perfectly. If you need a gluten-free option, use tamari instead of soy sauce. It tastes similar but is safe for those with gluten issues. For a low-carb meal, try cauliflower rice instead of jasmine rice. It has a light flavor and adds more veggies to your bowl. Feel free to mix in seasonal veggies. Think zucchini, snap peas, or bell peppers. They add color and crunch. You can get creative! Try tossing in edamame or radishes for extra flavor. Each veggie choice makes your dish unique and delicious. To keep your teriyaki salmon bowls fresh, store leftovers in airtight containers. Place them in the fridge right after your meal. This keeps air out and slows spoilage. Eat leftovers within 2 to 3 days for the best taste and safety. When reheating, use the microwave or a skillet on low heat. If using a microwave, cover the bowl with a damp paper towel. This keeps the salmon moist. For skillet reheating, add a splash of water to prevent drying. Heat until warm, but avoid overcooking. Overcooked salmon can become tough. You can freeze assembled bowls for quick meals later. Wrap each bowl tightly in plastic wrap, then place it in a freezer bag. This helps prevent freezer burn. For best quality, eat within 1 to 2 months. To thaw, move the bowl to the fridge overnight. Reheat using the suggestions above for a delicious meal. You can tell if salmon is cooked by checking its color and texture. The fish should look opaque and should flake easily with a fork. If it feels firm and is a light pink, it’s ready. Cooking time varies, but aim for about 4-5 minutes on each side. Always use a food thermometer if unsure; a safe internal temperature is 145°F. Yes, you can prepare the marinade ahead of time. Just mix all the ingredients together and store it in the fridge. It can last up to 3 days. This way, you save time when you’re ready to cook. Just remember to set aside some marinade for later. Great sides that pair well with teriyaki salmon are: - Steamed broccoli - Sauteed green beans - Cucumber salad - Pickled vegetables - Edamame These sides add color and flavor, making your meal more balanced. Making teriyaki sauce at home is easy. Here’s a simple recipe: - 1/4 cup soy sauce - 2 tablespoons honey or maple syrup - 1 tablespoon rice vinegar - 1 tablespoon sesame oil - 2 cloves garlic, minced - 1-inch piece of ginger, grated Mix all ingredients in a bowl. Use half for the salmon and save the rest for later. Yes, teriyaki salmon bowls are quite healthy! Salmon is rich in omega-3 fatty acids, which are good for your heart. The veggies add fiber and vitamins. If you use brown rice, you’ll also get more nutrients. Overall, this dish is a tasty and nutritious meal choice. In this guide, we explored how to create delicious teriyaki salmon bowls. We covered key ingredients, the right cooking techniques, and tips for perfect presentation. With options for substitutions and variations, you can easily customize your meal. Remember, teriyaki salmon bowls are not only tasty but also nutritious. By trying out different proteins and veggies, you can keep your meals exciting. Enjoy your cooking and delight in every flavorful bite!

Teriyaki Salmon Bowls Flavorful and Simple Recipe

Are you ready to spice up your mealtime? Teriyaki Salmon Bowls are not only flavorful, but they are also simple

- Whole wheat couscous - Vegetable broth or water - Cherry tomatoes - Cucumber - Red onion - Kalamata olives - Feta cheese - Fresh parsley - Extra virgin olive oil - Fresh lemon juice - Dried oregano - Salt and pepper The ingredients for Mediterranean couscous salad create a colorful and tasty dish. First, whole wheat couscous forms the base. It cooks quickly and is packed with fiber. I use vegetable broth instead of water for added flavor. Next, I add fresh cherry tomatoes. They give a sweet burst. Diced cucumber adds a crunchy texture. Finely chopped red onion provides a touch of sharpness. Kalamata olives bring a briny taste that enhances the dish. I like to use crumbled feta cheese for creaminess. Fresh parsley adds a bright note. The dressing combines extra virgin olive oil, fresh lemon juice, and dried oregano. This mix ties all the flavors together. Finally, I season with salt and pepper to taste. - Alternative grains for couscous - Vegan substitutes for feta cheese - Seasonal vegetable additions If you need alternatives, try quinoa or farro for the base. Both offer great textures. For a vegan version, use tofu or cashew cheese instead of feta. You can also swap in seasonal veggies like bell peppers or zucchini. This keeps the salad fresh and exciting. - Health benefits of whole grains - Advantages of fresh vegetables - Role of healthy fats in the salad Whole grains like couscous provide energy and fiber. They help digestion and keep you full. Fresh vegetables are low in calories and high in vitamins. They support your immune system and overall health. Healthy fats from olive oil help absorb nutrients. They also promote heart health. This salad not only tastes good but also nourishes your body. You can find the full recipe [here]. - Boiling the broth: Start by pouring 1 1/4 cups of vegetable broth into a medium saucepan. Place the saucepan over medium-high heat. Wait until the broth reaches a rolling boil. - Cooking and fluffing couscous: Once boiling, take the pot off the heat. Add 1 cup of whole wheat couscous and stir briefly. Cover the pot and let it sit for 5-7 minutes. This allows the couscous to absorb the broth. After this time, use a fork to fluff the couscous gently. Break up any clumps. Let it cool to room temperature. - Chopping techniques for uniform size: While the couscous cools, chop your vegetables. Use 1 cup of halved cherry tomatoes, 1 diced cucumber, and 1/2 finely chopped red onion. Make sure all pieces are about the same size. This helps the salad look nice and taste better. - Combining ingredients: In a large mixing bowl, combine the chopped vegetables. Add 1/2 cup of pitted and sliced Kalamata olives, 1/2 cup of crumbled feta cheese, and 1/4 cup of finely chopped fresh parsley. Mix them gently to blend their flavors. - Incorporating the couscous with vegetables: Once the couscous has cooled, add it to the bowl with the vegetables. Use a gentle folding motion. This helps keep the feta cheese intact. - Preparing the dressing and combining flavors: In a small bowl, whisk together 1/4 cup of extra virgin olive oil, 2 tablespoons of fresh lemon juice, and 1 teaspoon of dried oregano. Add a pinch of salt and freshly ground pepper. Drizzle the dressing over the salad and toss everything carefully. Make sure all ingredients are well coated. For the full recipe, refer to the complete instructions above. To make your salad perfect, cooling the couscous is key. After cooking, spread the couscous on a baking sheet to cool it faster. This prevents clumping and keeps the grains light. When mixing, be gentle. You want to combine the couscous and veggies without breaking the feta. Use a folding motion for a tender mix. Balancing flavors is vital for a tasty salad. Start with salt and pepper, but don’t stop there. Lemon juice adds brightness, while olive oil brings richness. Try adding fresh herbs like mint or dill for a twist. A sprinkle of smoked paprika can also wake up the dish. For gatherings, serve the salad in a large bowl. This makes it easy to scoop and share. Garnish with extra parsley and whole olives for a pop of color. If you want a crunch, add toasted pine nuts or sunflower seeds just before serving. This not only enhances flavor but also adds visual appeal. {{image_4}} You can make your Mediterranean couscous salad even better by adding proteins. I love using grilled chicken or shrimp. They add flavor and make the salad heartier. If you prefer a plant-based option, chickpeas are excellent. They are full of protein and easy to mix in. Just toss them in with the vegetables for a filling dish. To change the flavor, think about the Mediterranean style. You can add sun-dried tomatoes or roasted red peppers for a richer taste. If you want to explore global cuisines, try adding a dash of soy sauce or sesame oil. These ingredients can give your salad an Asian twist. Mixing flavors can lead to amazing new tastes. Different seasons bring special ingredients. In summer, fresh corn or bell peppers can brighten your salad. In fall, roasted pumpkin or squash adds warmth. For winter feasts, try including dried fruits like cranberries or figs. These seasonal changes keep your salad exciting and perfect for any holiday meal. To keep your Mediterranean couscous salad fresh, place it in an airtight container. This helps maintain moisture and flavor. Store the salad in the fridge for up to three days. Avoid letting it sit out at room temperature for too long. When refrigerating, try to use a container that is not too large. This way, you can minimize air exposure. Can Mediterranean couscous salad be frozen? Yes, but it’s not the best option. Freezing can change the texture of the vegetables and feta. If you decide to freeze it, follow these steps: - Cool the salad completely. This helps prevent ice crystals from forming. - Portion it out. Use small containers for easy thawing later. - Seal well. Use freezer-safe bags or containers. Remove as much air as possible. To thaw, place it in the fridge overnight. Avoid microwaving to defrost, as this can make it mushy. You can make new dishes with leftovers. Consider using the salad as a filling for wraps. It also works well on top of grilled chicken or fish. You can even blend it into a dip for crackers or veggies. For a fresh twist, add fresh herbs or extra lemon juice before serving. Pair it with pita bread or hummus for a complete meal. Mediterranean Couscous Salad is a fresh, vibrant dish. It combines whole wheat couscous with colorful vegetables and rich flavors. Key components include cherry tomatoes, cucumber, red onion, Kalamata olives, and feta cheese. The salad gets its zest from olive oil, lemon juice, and oregano. This dish is a delightful blend of textures and tastes. You can store Mediterranean Couscous Salad in the fridge for about three days. The freshness of the veggies affects storage time. If the salad sits too long, the vegetables may lose their crunch. For best results, eat it within two days. Yes, you can prepare Mediterranean Couscous Salad a day in advance. Just keep it covered in the fridge. This allows the flavors to blend well. Before serving, give it a gentle stir. This helps mix the dressing and ingredients again. No, traditional couscous is not gluten-free. To make it gluten-free, use quinoa or rice. Both are great alternatives and work well with the salad's flavors. Just cook them as you would couscous. This salad pairs well with grilled chicken or fish. It also complements a light soup or roasted vegetables. For a vegetarian option, serve it with hummus or pita bread. These pairings enhance the meal and add variety. To see the complete steps and ingredients, check out the Full Recipe. This blog post gives a complete look at Mediterranean Couscous Salad. We covered the ingredients, step-by-step instructions, and tips for great texture and flavor. You can make this salad your own by choosing different proteins and flavors. Remember to store any leftovers correctly to keep them fresh. This dish is easy to prepare and highly customizable. Enjoy making it your own!

Mediterranean Couscous Salad Fresh and Flavorful Dish

Looking for a fresh, healthy dish that bursts with flavor? Mediterranean Couscous Salad is your answer! Packed with colorful veggies,

To make the best peach salsa, gather these fresh ingredients: - 3 medium ripe peaches, diced - 1 red bell pepper, finely chopped - 1/2 red onion, finely chopped - 1 jalapeño pepper, seeds removed and minced - 2 tablespoons fresh cilantro, chopped - 1 tablespoon lime juice - 1 tablespoon honey (or vegan-friendly agave syrup) - Salt and pepper to taste Peaches are the star here. Choose ripe ones for sweetness. Red bell pepper adds crunch and color. Red onion gives a bit of bite, while jalapeño peppers bring heat. Fresh cilantro adds a nice herbal note. Lime juice brightens the flavors, and honey balances any tartness. Don't forget salt and pepper for seasoning! You can add some optional ingredients to make your salsa unique: - 1/2 cup diced mango for a sweet twist - 1/4 cup diced cucumber for extra crunch - A pinch of cumin for a warm flavor These additions can enhance your salsa. Mango brings a tropical flair, cucumber adds refreshment, and cumin introduces depth. Feel free to experiment! You will need some basic tools for easy preparation: - A cutting board - A sharp knife - A mixing bowl - A spoon for stirring Having the right tools makes cooking more enjoyable. A sharp knife helps you dice ingredients quickly. A mixing bowl gathers all your fresh bits, making it easy to combine. Enjoy the process of creating! For the full recipe, check out the Peachy Keen Salsa section above. Start with fresh peaches. Wash them well. Peel if you want a smoother salsa. Dice three medium peaches into small pieces. This makes them easy to mix. Next, chop one red bell pepper. Aim for small, even pieces. Do the same with half a red onion. This helps all the flavors blend nicely. Now, take one jalapeño pepper. Remove the seeds for less heat. Mince it finely. If you like spice, keep some seeds in. This choice is all about your taste. In a large bowl, mix all your fresh ingredients. Add the diced peaches, red bell pepper, red onion, and jalapeño. Gently stir them together. You want to combine them without mashing the peaches. Next, add two tablespoons of chopped cilantro. Pour in one tablespoon of lime juice for a zesty kick. To sweeten your salsa, add one tablespoon of honey or agave syrup. This balances the heat and adds depth. Season with salt and pepper to taste. Mix everything lightly to spread the flavors evenly. After mixing, let your salsa sit. Place it in the fridge for about 30 minutes. This marination time lets the flavors come together. The peach salsa will taste even better after resting. To make it shine, serve it in a colorful bowl. Garnish it with a sprig of cilantro. Your peach salsa will look as good as it tastes. Enjoy it with tortilla chips or as a topping on grilled dishes. For the full recipe, check out the details above. To make the best peach salsa, pick ripe peaches. Look for peaches that feel slightly soft when you press them. They should have a sweet smell, too. The color should be deep yellow or orange, not green. If your peaches are hard, leave them out for a day or two. They will ripen at room temperature. You can make peach salsa as spicy as you like. If you want more heat, add more jalapeño. Start with a small amount and taste it. You can always add more. If you prefer a milder salsa, remove all the seeds from the jalapeño. This step will lower the spice level, making it more enjoyable for everyone. You can boost the flavor of your peach salsa with extra ingredients. Try adding diced mango or pineapple for a tropical twist. A splash of vinegar can add a nice tang. If you want a smokier flavor, mix in some smoked paprika. Fresh herbs like mint or basil can also bring a fresh taste. Experiment with these extras to create your perfect blend. You can find the full recipe to guide you through these tasty options. {{image_4}} For a fun twist, try a tropical peach salsa. Add diced mango and pineapple to your mix. The sweetness of these fruits pairs well with the peaches. You can also include chopped mint for a fresh taste. This salsa adds a bright flavor to grilled fish or chicken. It’s perfect for summer barbecues! If you want a heartier salsa, mix in black beans. Use one can of rinsed black beans for added protein. This makes the salsa more filling. The beans balance the sweetness of the peaches with a lovely texture. Serve this version with tortilla chips or on tacos for a delicious meal. For those who like heat, try spicy peach salsa with pineapple. Add diced jalapeños for a kick. You can also mix in some crushed red pepper flakes. The heat balances nicely with the sweetness of the peaches and pineapple. This spicy salsa is a fun topping for burgers or grilled shrimp. Feel free to explore these variations to find your favorite. Each option brings a new twist to the classic peach salsa. For the full recipe, check out the Peachy Keen Salsa section! To keep your peach salsa fresh, store it in an airtight container. This helps prevent it from absorbing other smells in your fridge. Make sure to chill it within two hours of making. The cooler temperature helps keep the flavors vibrant. Always use a clean spoon when serving to avoid cross-contamination. If you notice any excess liquid, gently drain it before serving to maintain a thick consistency. You can freeze peach salsa for later use. To do this, place it in a freezer-safe container. Leave some space at the top to allow for expansion as it freezes. Remember that the texture may change after thawing. It might become a bit watery. To use it, simply thaw it in the fridge overnight before serving. Homemade peach salsa lasts about 3 to 5 days in the fridge. Store-bought salsa usually has preservatives, so it can last longer. Check the label for specific dates. Opened store-bought salsa can last 1 to 2 weeks. If you want the best flavor, eat your homemade salsa fresh. Enjoy the delicious taste of your peach salsa while it's at its peak! For the full recipe, refer to the Peachy Keen Salsa section above. Yes, you can use frozen peaches for salsa. Just make sure to thaw them first. Drain any excess water after thawing. This ensures your salsa stays thick and flavorful. Frozen peaches may be less sweet than fresh, but they still add a nice taste. Homemade peach salsa lasts about 3 to 5 days in the fridge. Store it in an airtight container. After a few days, the flavors may change. Check for any signs of spoilage before using. If it smells off, it's best to toss it. Peach salsa goes well with many dishes. Here are some tasty pairings: - Grilled chicken or fish - Tacos or burritos - Tortilla chips as a dip - Salads for a fresh twist - Quesadillas for added flavor These pairings will make your meals more exciting and flavorful! For the full recipe, check out the detailed instructions above. This blog post covers how to make delicious peach salsa. We explored fresh and optional ingredients, plus tools you’ll need. I shared steps for prep, mixing, and marinating for great flavor. You learned tips on choosing ripe peaches and adjusting spice levels. Variations like tropical and spicy salsa were discussed, along with best storage practices. Remember, homemade salsa tastes better and lasts in the fridge longer than store-bought. Now, try these ideas and enjoy your salsa with your favorite dishes!

Peach Salsa Fresh and Flavorful Summer Delight

Are you ready to make summer unforgettable? This Fresh and Flavorful Peach Salsa will brighten up any meal. With sweet,

This dish needs a few key ingredients. Here’s what you need: - 2 large sweet potatoes, peeled and diced into ½-inch cubes - 1 red bell pepper, diced - 1 green bell pepper, diced - 1 medium onion, finely chopped - 2 cloves garlic, minced - 1 teaspoon smoked paprika - 1 teaspoon ground cumin - ½ teaspoon chili powder - Salt and black pepper to taste - 3 tablespoons extra virgin olive oil These ingredients come together to create a sweet and savory mix. The sweet potatoes are the star, offering a creamy texture and natural sweetness. You can add a few extras to boost flavor and presentation: - 2 tablespoons fresh cilantro, chopped (for garnish) - 4 eggs (optional, for topping) Fresh cilantro adds brightness. Eggs on top can make the dish heartier and more filling. The right oils and spices enhance the flavor. I recommend: - Extra virgin olive oil for its rich taste. - Smoked paprika for a smoky kick. - Ground cumin adds warmth and depth. - Chili powder brings a bit of heat. Using these oils and spices will make your sweet potato hash stand out. For the full recipe, visit [Full Recipe]. Start by peeling the sweet potatoes. Use a sharp knife to remove the skin. Cut them into ½-inch cubes. This size helps them cook evenly and get nice and tender. Aim for uniform pieces to ensure even cooking. Heat 2 tablespoons of olive oil in a large skillet over medium heat. Once the oil is hot, add the diced sweet potatoes. Sprinkle salt and black pepper over them. Cook for 10-15 minutes, stirring now and then. You want them tender and golden-brown around the edges. Next, add the chopped onion, diced red bell pepper, and diced green bell pepper to the skillet. Stir well to mix. Cook for another 5-7 minutes until the veggies soften. This step lets their flavors blend nicely. Now, add the minced garlic to the skillet. Follow with smoked paprika, ground cumin, and chili powder. Stir everything together. Cook for 2-3 minutes to let the spices become aromatic. Taste the hash and adjust the seasoning with more salt and pepper if needed. For a special touch, you can fry eggs in a separate skillet while the hash cooks. Serve the sweet potato hash hot on plates. If you like, top it with a fried egg and sprinkle fresh cilantro for a pop of flavor. This recipe is easy and packed with taste! For the full recipe, check out the details above. To make sweet potatoes soft and crispy, cut them into even cubes. I like using ½-inch pieces. This size cooks well and caramelizes nicely. Heat your skillet before adding the sweet potatoes. A hot pan helps them brown better. Stir them often to avoid burning. Using fresh herbs and spices adds a lot of flavor. I recommend smoked paprika and cumin for depth. You can mix in garlic for extra taste. Add bell peppers for sweetness and crunch. Don’t forget to season well with salt and pepper. This ensures every bite pops with flavor. Fried eggs pair perfectly with sweet potato hash. Cook them sunny-side up or over-easy for a creamy yolk. This adds richness to the dish. For a more filling meal, try poached eggs too. The warm yolk combines well with the hash. It takes your dish to another level. For more ideas, check the full recipe. {{image_4}} You can easily make this dish vegetarian or vegan. Just skip the eggs on top. Instead, try adding more veggies. Zucchini, mushrooms, or spinach work well. You can also add beans for protein. Black beans or chickpeas add a nice touch. Use vegetable broth instead of oil for cooking. This keeps it healthy and tasty. To make your sweet potato hash more filling, add protein. Cooked sausage or bacon gives great flavor. You can also use tofu for a plant-based option. Just cube it and add it with the veggies. Chicken or turkey works too. This makes the dish a complete meal. You can cook sweet potato hash in two ways: in a skillet or oven. The skillet method is quick. It gives the hash a nice crispy edge. For the oven, spread the hash on a baking sheet. Roast it at 400°F for about 25-30 minutes. This method makes it easy to cook larger batches. Both methods are delicious, so choose what you like! After making sweet potato hash, let it cool down first. Use an airtight container to keep it fresh. Store it in the fridge for up to four days. If you want to keep it longer, freezing is a good option. Always label your containers with the date. This helps you track how long it has been stored. To reheat sweet potato hash, use either a skillet or the microwave. For a skillet, heat a little olive oil over medium heat. Add the hash and stir until hot. This keeps the texture nice. If using a microwave, place it in a bowl and cover it. Heat in short bursts, stirring in between. This helps it warm evenly without drying out. To freeze your sweet potato hash, place it in a freezer-safe bag. Press out as much air as possible before sealing. This helps prevent freezer burn. You can freeze it for up to three months. When ready to eat, thaw it overnight in the fridge. Reheat it in a skillet for the best taste. Remember, the texture may change a bit. Yes, you can use regular potatoes. However, sweet potatoes offer a unique flavor. They bring sweetness and a creamy texture. Regular potatoes will change the taste and texture a bit. If you decide to use them, choose Yukon Gold or red potatoes. These varieties cook well and add nice creaminess. To add spice, include jalapeños or cayenne pepper. You can also use spicy sausage or smoked paprika. Start with a small amount, then taste as you go. This way, you control the heat level. Remember, the goal is to enhance flavor, not overpower it. Sweet potato hash is versatile. You can serve it with poached eggs on top. This adds protein and richness. You can also pair it with a side salad or sliced avocado. These options boost nutrients and flavor. For a lighter meal, serve it alone or with a dollop of Greek yogurt. For the full recipe, check out Sweet Potato Hash Delight 🥔. This article shows you how to make a delicious sweet potato hash. We covered the main and optional ingredients, cooking steps, and tips to enhance flavor and texture. You can also explore variations, storage methods, and answers to common questions. Sweet potato hash is flexible and full of taste. Whether you want it hearty, spicy, or simple, it fits your needs. Get creative with your hash, and enjoy every bite!

Savory Sweet Potato Hash Easy and Flavorful Recipe

Are you ready for a tasty twist on breakfast? This Savory Sweet Potato Hash recipe is not just easy to

- 1 cup all-purpose flour - 1/2 cup powdered sugar - 1/4 teaspoon salt - 1/2 cup unsalted butter, softened - 2 large eggs - 1 cup granulated sugar - 2 tablespoons lemon zest - 1/4 cup fresh lemon juice - 1 cup fresh raspberries - 1/4 teaspoon baking powder - Extra powdered sugar for dusting The ingredients for raspberry lemon bars are simple and easy to find. You need basic baking staples like flour, sugar, and eggs. The key flavors come from fresh lemons and ripe raspberries. Using fresh lemon juice and zest makes your bars bright and tangy. Fresh raspberries add a burst of sweetness. The butter gives the crust a rich taste. - Gluten-free flour options: You can use a gluten-free blend. Make sure it works well in baking. - Egg replacements: Use flax seeds or applesauce. Each egg equals 1 tablespoon of ground flaxseed mixed with 3 tablespoons of water. - Alternative sweeteners: Try honey or maple syrup for a different flavor. Adjust the amounts to taste. With these substitutions, everyone can enjoy this treat, no matter their diet! You can check the Full Recipe for precise measurements and steps. 1. Preheat the oven and prepare the baking pan: First, set your oven to 350°F (175°C). Grab an 8x8 inch baking pan and lightly grease it. Line the pan with parchment paper. Leave some paper hanging over the edges. This will help you lift the bars out later. 2. Mixing and pressing the crust dough: In a medium bowl, whisk together 1 cup of all-purpose flour, 1/2 cup of powdered sugar, and 1/4 teaspoon of salt. Next, take 1/2 cup of softened unsalted butter and mix it into the dry ingredients. Use your fingers or a pastry cutter to blend until you see a crumbly dough. Now, press this dough evenly into the bottom of the baking pan. This will form your crust. Bake this crust for 15 minutes until it looks lightly golden. 1. Whisking eggs and sugars together: While the crust is baking, take another bowl. Whisk together 2 large eggs and 1 cup of granulated sugar until smooth. This will be the base for your lemon filling. 2. Incorporating lemon zest and juice: Add in 2 tablespoons of lemon zest and 1/4 cup of fresh lemon juice to the egg mixture. Also, include 1/4 teaspoon of baking powder. Whisk everything until it’s well combined. This mix will give the bars their bright flavor. 1. Mixing in the raspberries: After the crust is done baking, gently fold in 1 cup of fresh raspberries into the lemon filling. Be careful not to mash the berries. You want them to stay whole for texture. 2. Pouring the filling over the crust: Once mixed, pour this raspberry-lemon filling over the warm crust. Spread it evenly to cover all of the crust. 3. Baking time and indicators of doneness: Return the pan to the oven. Bake for another 20 to 25 minutes. You will know the bars are done when the filling is set but still has a slight jiggle in the center. This is key for that creamy texture. Enjoy making these sweet and tangy raspberry lemon bars. For the full recipe, check the earlier section. To get a creamy filling, whisk the eggs and sugars well. This helps mix air into the batter. The air makes the filling light. Use fresh lemons for zest and juice. Freshness boosts flavor and aroma. For the perfect crust, use softened butter. Cold butter will not blend well. Make the dough crumbly but not too dry. Press it firmly but gently into the pan. This ensures a nice base for the filling. Bake until golden, then cool before adding the filling. Raspberry lemon bars shine when served cool. Dust them with powdered sugar for a sweet touch. Garnish with fresh mint for color. They look great on a pretty plate. Pair these bars with tea or lemonade. Their tart flavor balances well with sweet drinks. You can also serve them with vanilla ice cream. The creaminess complements their zesty taste. If the filling is too runny, bake it longer. Check for a slight jiggle in the center. This shows the filling is set. Let the bars cool completely for the best texture. To cut the bars cleanly, use a sharp knife. Dip it in hot water and dry it off. This softens the edges for neat slices. You can also chill the bars longer for easier cutting. For a full recipe, check out the detailed instructions above. {{image_4}} You can change the flavors of raspberry lemon bars in fun ways. Try using different berries like blueberries or strawberries. Each berry brings its own unique taste. If you want a twist, add spices like cinnamon or ginger. These spices can warm up the flavor and make it even more special. You can also add vanilla extract for a hint of sweetness. Experiment with these ideas to find your perfect mix. If you follow a vegan diet, you can make vegan raspberry lemon bars. Replace the eggs with flaxseed meal or unsweetened applesauce. This keeps the texture rich and moist. For those watching sugar intake, use a natural sweetener like honey or agave. You can also try using stevia or monk fruit sweetener. These options keep the bars tasty without all the sugar. Both adjustments make it easy to enjoy this dessert, no matter your diet. Check the Full Recipe for more details on making these changes. To keep your raspberry lemon bars fresh, follow these steps: - Use an airtight container: Place the bars in a container with a tight lid. - Refrigerate: Store them in the fridge to maintain their texture and flavor. - Duration: These bars can last up to one week in the fridge. Want to enjoy your bars later? Freezing is a great option. Here’s how: - Wrap each bar: Use plastic wrap to cover each square tightly. - Place in a freezer bag: Put wrapped bars in a zip-top freezer bag. - Duration: They can stay in the freezer for up to three months. When you're ready to enjoy them: - Thaw in the fridge: Move the bars from the freezer to the fridge overnight. - Reheat gently: If you want, warm them in the oven at a low temp. These steps help keep your raspberry lemon bars tasty and fresh for a longer time! For the full recipe, check out the [Full Recipe]. Lemon bars have a simple lemon filling. Raspberry lemon bars add fresh raspberries for extra flavor and color. The raspberries give a sweet-tart taste that brightens the dish. The texture also changes; it’s creamier due to the fruit. You get both the zing of lemon and the sweetness of raspberries. Yes, you can make raspberry lemon bars ahead of time. They taste great after a day in the fridge. This makes them perfect for parties or family gatherings. Just bake, chill, and store them until you are ready to serve. Raspberry lemon bars can stay fresh at room temperature for about two hours. After that, it’s best to store them in the fridge. Keeping them cool helps maintain their flavor and texture. Chilling the bars is very important. It helps them set and makes cutting easier. The flavors also deepen when they chill. I recommend chilling for at least two hours for the best taste. Yes, you can use frozen raspberries. Just let them thaw and drain excess juice. This keeps the filling from getting too watery. Frozen raspberries can work well, especially if fresh ones are not in season. For the complete recipe, check out the Full Recipe. Enjoy making these delightful treats! In this blog post, we explored how to make delicious raspberry lemon bars. You learned the key ingredients, step-by-step instructions, and helpful tips for the best results. We also discussed fun variations and smart storage methods. By following these guidelines, you can create a tasty treat that delights everyone. Enjoy your baking journey, and don’t hesitate to get creative with flavors and ingredients! Happy baking!

Raspberry Lemon Bars Delightful and Easy Dessert Recipe

Raspberry lemon bars are the perfect treat to brighten your day! With a buttery crust and a zesty filling, they

To make your Buffalo Cauliflower Tacos, gather these fresh ingredients: - 1 medium head of cauliflower, cut into bite-sized florets - 1 cup all-purpose flour - 1 cup water - 1 teaspoon garlic powder - 1 teaspoon onion powder - 1 teaspoon smoked paprika - 1/2 teaspoon salt - 1 cup buffalo sauce (store-bought or homemade) - 8 small corn or flour tortillas - 1 ripe avocado, sliced - 1/2 cup red cabbage, finely shredded - 1/4 cup fresh cilantro, coarsely chopped - Lime wedges for serving - Optional: Vegan ranch or sour cream for drizzling To kick up the flavor, consider adding: - Diced jalapeños for heat - Fresh lime juice for zest - Crumbled feta or queso fresco for creaminess - Pickled red onions for tang These optional ingredients can change the taste and make your tacos more exciting. Feel free to mix and match based on your taste. Each serving of these tacos has a good mix of nutrients. Here’s what you can expect: - Calories: 300 - Protein: 8g - Carbohydrates: 45g - Dietary Fiber: 7g - Sugars: 2g - Fat: 10g This recipe makes a delicious meal that is filling yet light. You can enjoy the flavors without the guilt. The full recipe can guide you through each step to make these tasty tacos. Enjoy! Start by getting your kitchen ready. Gather all your ingredients. You’ll need a medium head of cauliflower, flour, water, and spices. Make sure to have your tortillas, avocado, red cabbage, and cilantro on hand. Preheat your oven to 450°F (230°C). Line a baking sheet with parchment paper. This makes cleanup easy. In a bowl, mix the flour, garlic powder, onion powder, smoked paprika, and salt. Gradually add water while stirring. You want a smooth batter. Take each cauliflower floret and dip it into the batter. Make sure each piece is well coated. Let any extra batter drip off. Place the florets in a single layer on the baking sheet. Bake for 20-25 minutes. Turn the florets halfway through. They should be crispy and golden when done. After baking, put the cauliflower in a bowl. Pour buffalo sauce over it and toss gently. Make sure every piece gets coated. Return the cauliflower to the baking sheet. Bake for another 10 minutes for extra crispiness. While the cauliflower bakes again, warm your tortillas. You can heat them in a skillet or microwave. For the tacos, take a tortilla and add a good amount of buffalo cauliflower. Top with sliced avocado, shredded red cabbage, and chopped cilantro. If you want, drizzle some vegan ranch or sour cream on top. Serve your tacos right away with lime wedges for a zesty kick. Enjoy this flavorful meal! For the full recipe, check the earlier section. To get your cauliflower super crispy, follow these simple steps. First, make sure to cut the cauliflower into small, even florets. This helps them cook evenly. When you prepare the batter, dip each piece fully and let excess drip off. Bake at a high temperature, 450°F (230°C), for the first round. After baking, toss with buffalo sauce and bake again for a few extra minutes. This double-baking method gives your cauliflower that crunchy texture we all love. When serving your Buffalo Cauliflower Tacos, presentation matters. Stack the tacos on a vibrant platter. Add lime wedges around the edges for color. Sprinkle extra cilantro on top for a fresh look. You can also serve with crunchy tortilla chips on the side. This adds texture and makes the meal feel special. You can easily change the flavors in these tacos. If you want more heat, add extra buffalo sauce or some sliced jalapeños. For a milder taste, try a sweet chili sauce instead. You can also mix herbs like dill or parsley into the topping for a fresh twist. Want creaminess? Drizzle with vegan ranch or sour cream. Each of these ideas helps you make the dish your own! Check out the Full Recipe for more details. {{image_4}} You can choose between spicy and mild buffalo sauce. Spicy sauce gives a bold kick. It adds heat and flavor to your tacos. If you prefer less heat, opt for a mild sauce. Look for sauces labeled “mild” in stores. You can also mix sauces to find your perfect level. This way, everyone can enjoy the tacos. Buffalo cauliflower tacos are great, but you can switch things up. Try adding beans, chickpeas, or lentils for protein. These options provide nice texture and taste. You can also include veggies like bell peppers or zucchini. They add color and crunch. Don’t be afraid to experiment with different fillings! The type of tortilla you use matters. Corn tortillas are gluten-free and have a nice flavor. They hold up well with all the toppings. Flour tortillas are soft and chewy, great for a hearty bite. You can even try lettuce wraps for a low-carb option. Each tortilla type brings its own charm to the dish. Choose what you like best! For the full recipe, check out [Full Recipe]. To store leftover tacos, place them in an airtight container. Use parchment paper to separate layers. This keeps the tortillas and fillings fresh. Store them in the fridge for up to three days. If you only have the cauliflower left, just store that. Reheat tacos in an oven or air fryer. Preheat the oven to 350°F (175°C). Place the tacos on a baking sheet and heat for about 10 minutes. This helps keep the tortillas from getting soggy. You can also reheat the cauliflower on its own. Heat it in the oven for about 5-7 minutes. Freezing cauliflower is easy and smart. First, roast the cauliflower as usual. Let it cool completely. Then, spread it in a single layer on a baking sheet. Freeze it for 1-2 hours. After that, transfer the cauliflower to a freezer bag. It will keep well for up to three months. When ready to use, just thaw it in the fridge overnight. Then, reheat it as needed. For the full recipe, check out the Buffalo Cauliflower Tacos. Yes, you can use frozen cauliflower. Just thaw it before using. Pat it dry to remove excess moisture. This helps the batter stick better and keeps the cauliflower crispy. I love these toppings for Buffalo Cauliflower Tacos: - Sliced avocado for creaminess - Shredded red cabbage for crunch - Chopped cilantro for freshness - Lime wedges for a zesty kick - Vegan ranch or sour cream for creaminess Feel free to mix and match your favorites! This recipe is already vegan-friendly! Use vegan ranch or any plant-based toppings. Just make sure your buffalo sauce is vegan, too. Most store-bought sauces are plant-based. Always check the label to be sure. This blog post showed you how to make tasty Buffalo Cauliflower Tacos. We covered the key ingredients, step-by-step cooking tips, and ways to make them crispy. You learned about options for spice levels and different fillings. Plus, I shared storage tips and answered common questions. These tacos are not just tasty but also fun to make. Enjoy your cooking adventure and feel free to mix things for your perfect flavor!

Buffalo Cauliflower Tacos Flavorful and Simple Meal

If you’re craving a fun twist on taco night, Buffalo Cauliflower Tacos are your go-to! They are spicy, crispy, and

To make crispy baked chickpeas, you need a few simple items. Here’s what you will need: - 1 can (15 oz) chickpeas, thoroughly drained and rinsed - 1 tablespoon extra-virgin olive oil - 1 teaspoon garlic powder - 1 teaspoon smoked paprika - 1/2 teaspoon ground cumin - 1/2 teaspoon chili powder - Sea salt, to taste These ingredients come together to create a snack that is both tasty and healthy. You can add extra flavors to your chickpeas to make them even better. Try these options: - Lemon juice for a zesty kick - Cayenne pepper for heat - Parmesan cheese for a savory twist - Fresh herbs like rosemary or thyme Feel free to mix and match based on your taste! A serving of crispy baked chickpeas is not just crunchy; it’s also good for you. Here’s a quick look at the nutrition: - Calories: Approximately 130 - Protein: About 6 grams - Fiber: Around 5 grams - Fat: Roughly 5 grams This snack is a great way to add protein and fiber to your diet. Plus, you can enjoy it guilt-free! For the full recipe, check out the details above. First, set your oven to 400°F (200°C). Preheating helps the chickpeas get crispy. Next, drain and rinse the chickpeas in a colander. This step removes excess salt. Then, spread them on a clean towel. Pat them dry gently. The drier they are, the crispier they will be. In a big bowl, mix the chickpeas with olive oil, garlic powder, smoked paprika, ground cumin, chili powder, and a pinch of sea salt. Toss them well. You want each chickpea to be coated in the tasty mix. Now, line a baking sheet with parchment paper. This keeps the chickpeas from sticking. Spread them out in one even layer. Bake in the hot oven for 25 to 30 minutes. Shake the pan halfway through for even cooking. Keep an eye on them. They can burn quickly at the end. Once they turn golden brown, take them out. Let them cool for a few minutes on the baking sheet. They will get crunchier as they cool. Enjoy your crispy baked chickpeas as a snack or a crunchy topping on salads. To make your chickpeas super crispy, follow these steps. First, make sure the chickpeas are dry. Any moisture will make them soggy. After rinsing, pat them dry well with a towel. Next, use enough oil. One tablespoon is good, but feel free to add a bit more for extra crunch. Finally, spread them out on the baking sheet. If they are too close, they won’t crisp up well. Rinsing is key to a great texture. Drain the can of chickpeas well, then rinse under cold water. This removes excess sodium and gives a fresher taste. After rinsing, drying is just as important. Use a clean kitchen towel or paper towels. Spread them out and gently pat them. The more moisture you remove, the crispier they will be. If you have extra crispy baked chickpeas, store them in an airtight container. Keep them at room temperature for the best crunch. Refrigeration can make them soft, so avoid that. They should stay fresh for up to three days. If they lose some crunch, pop them back into the oven for a few minutes to crisp up again. Enjoy these tasty bites as a snack or salad topping! For the full recipe, check out the previous section. {{image_4}} You can change the flavor of your crispy baked chickpeas easily. For a spicy kick, add cayenne pepper or chili flakes. If you prefer sweet flavors, mix in cinnamon and a touch of honey. You can also try using different herbs like rosemary or thyme. Each variation gives the chickpeas a new taste, keeping snacks exciting. If you have an air fryer, use it for quick, crispy chickpeas. Set your air fryer to 400°F and cook for about 15-20 minutes. Shake the basket halfway through to ensure even cooking. You can also roast them on the stovetop. Heat a non-stick pan over medium heat and stir the chickpeas until crispy. Crispy baked chickpeas work well with many dishes. You can serve them on salads for a crunchy texture. They also make great toppings for soups or grain bowls. Pair them with dips like hummus or guacamole. You can even enjoy them as a stand-alone snack. For the full recipe, check out the previous section. Yes, you can use dried chickpeas, but they need more prep. You must soak them overnight, then cook them until soft. This can take a few hours. Canned chickpeas are quick and ready to use. They save time and still taste great. Look for a golden brown color and a crunchy texture. They should not feel soft or mushy. You can shake the pan halfway through baking. This will help them cook evenly. Keep an eye on them towards the end to avoid burning. Yes, you can make crispy baked chickpeas ahead of time. Store them in an airtight container. They stay crisp for a few days. Just remember, they taste best when fresh. Reheat them in the oven to regain that crunch. Crispy baked chickpeas are a tasty snack. They are easy to make and healthy. You need just a few simple ingredients. Start with one can of chickpeas. Drain and rinse them well. This step is key for crispness. You will add olive oil and spices to give them flavor. Garlic powder, smoked paprika, ground cumin, and chili powder work well together. You can adjust spices to match your taste. Toss everything in a bowl until coated. Preheat your oven to 400°F (200°C). Spread the seasoned chickpeas on a lined baking sheet. Bake for 25 to 30 minutes. Halfway through, shake the pan for even cooking. Keep an eye on them to avoid burning. Once golden and crunchy, let them cool a bit. Serve warm or at room temperature. They taste great alone or as a salad topping. For a nice touch, add fresh parsley on top. - Make sure to dry the chickpeas well before seasoning. - Spread them in a single layer for even baking. - Adjust spices to your liking for a personal touch. - Cool them before serving for extra crunch. - Check them often to avoid burning. You can find the full recipe for crispy baked chickpeas in the earlier section. Enjoy this healthy snack! Crispy baked chickpeas are easy and fun to make. We explored key ingredients, from basic to optional flavors. You learned the steps for preparation and baking. I'm sure the tips will help you get perfect crunch every time. With variations and serving ideas, you can enjoy these treats in many ways. Remember, you can experiment with different spices too. Enjoy your tasty, healthy snack!

Crispy Baked Chickpeas Easy and Healthy Snack Option

Looking for a tasty snack that’s both easy to make and good for you? Crispy baked chickpeas are your answer!

To make a tasty Cheesy Taco Pasta Bake, gather these simple ingredients: - 8 oz elbow macaroni - 1 lb ground beef or ground turkey - 1 packet taco seasoning (about 1 ounce) - 1 cup diced tomatoes (canned or fresh) - 1 can black beans, rinsed and drained (15 oz) - 1 cup corn (fresh, frozen, or canned) - 2 cups shredded cheddar cheese (divided) - 1 cup diced onion (about 1 medium onion) - 2 cloves garlic, minced - 1 tablespoon olive oil - 1 cup sour cream - 1/2 cup chopped fresh cilantro (optional) - Salt and pepper to taste These ingredients come together to create a dish full of flavor. The elbow macaroni gives it a nice base. The ground meat adds protein, while the taco seasoning brings a punch of taste. You can choose beef or turkey based on your preference. The black beans and corn add texture and nutrition. I love using fresh tomatoes when they are in season. They give a bright taste. The cheddar cheese melts perfectly, making it gooey and delicious. Don't forget the sour cream! It adds creaminess and balances the spices. Feel free to adjust the ingredients based on what you have at home. You can mix in different veggies or use other types of cheese. This recipe is flexible, making it easy to customize for your family’s taste. For the full recipe, check out the instructions to bring this dish to life! - Preheat the oven to 350°F (175°C). - Cook the elbow macaroni according to package instructions. - Sauté onion and garlic in olive oil. First, I start by preheating the oven. This helps the dish cook evenly. As the oven heats, I boil salted water for the elbow macaroni. I cook it until it's al dente, meaning it still has a slight bite. After draining, I set the pasta aside. Next, I heat olive oil in a large skillet over medium heat. I add diced onion and sauté it for about 3-4 minutes. The onion will turn soft and fragrant. Then I toss in minced garlic and let it cook for another minute. This brings out a wonderful aroma. - Brown the ground beef or turkey. - Combine taco seasoning, tomatoes, black beans, and corn. - Mix in sour cream and cheddar cheese with macaroni. After the onion and garlic, I add ground beef or turkey to the skillet. I break the meat apart as it cooks. Once it’s brown and no pink remains, I drain any extra fat. Now, I stir in taco seasoning, diced tomatoes, black beans, and corn. I let this cook for about 3-5 minutes. The mix should heat through. I taste it and add salt and pepper if needed. Next, I combine this mixture with the cooked macaroni in a large bowl. I mix in sour cream and one cup of shredded cheddar cheese. This makes the dish creamy and cheesy. - Transfer mixture to a greased baking dish. - Bake for 25-30 minutes until cheese is melted and bubbly. - Cool before serving and garnish as desired. I pour the macaroni and meat mixture into a greased 9x13 inch baking dish. I spread it evenly, then sprinkle the remaining cheddar cheese on top. I place the dish in the oven. I set a timer for 25-30 minutes. I know it’s done when the cheese is melted, bubbly, and slightly golden. After removing it from the oven, I let it cool for a few minutes. Before serving, I like to add fresh cilantro on top for a burst of flavor. For the full recipe, check out the details in the other sections. - Ensure the pasta is cooked al dente for the best texture. This keeps it firm and helps hold the sauce. - Drain excess fat from meat for a lighter dish. This step makes your meal healthier and less greasy. - Serve with extra sour cream and salsa on the side. These toppings add coolness and spice to your dish. - Garnish with chopped cilantro for added freshness. This brightens the flavors and makes the dish pretty. - Experiment with different types of cheese for variation. Try pepper jack for heat or mozzarella for creaminess. - Add jalapeños for heat or bell peppers for added crunch. This gives your pasta bake an exciting twist. {{image_4}} You can switch up the meat in this dish. Ground chicken or turkey works great. Both have a lighter taste. If you want a meatless option, try lentils or mushrooms. They add texture and soak up all the flavors. Cheese lovers can try different cheeses. Mozzarella or pepper jack cheese adds a nice twist. If you need a healthier option, swap sour cream for Greek yogurt. It gives a creamy taste with less fat and more protein. Want to add more veggies? Bell peppers or spinach are perfect choices. They bring color and nutrients. You can also mix in olives or avocado for a fun flavor twist. These additions make the dish even more exciting and help balance out the cheesy goodness. Store leftovers in an airtight container in the fridge for up to 3-4 days. This way, you can enjoy the Cheesy Taco Pasta Bake again. Just make sure to let it cool before sealing it up. Keeping it airtight helps keep the flavors fresh and the texture nice. To freeze the Cheesy Taco Pasta Bake, let it cool completely first. Then, place it in a freezer-safe container or wrap it tightly with foil. It will stay good for about 2-3 months in the freezer. When you're ready to eat it, just thaw it in the fridge overnight before reheating. The best methods for reheating this dish are in the oven or the microwave. For the oven, place it in a preheated oven at 350°F (175°C) for about 20 minutes. Cover it with foil to keep it moist. If using a microwave, heat it in short bursts, stirring in between, until it's hot throughout. This helps keep the flavors and texture just right. You can replace ground beef with ground turkey. It has less fat and is lighter. You can also try plant-based proteins. Options like lentils or meat substitutes work well. This keeps the dish tasty and healthy. Yes, you can prep this dish before you cook it. Assemble the pasta bake and cover it. Store it in the fridge for up to two days. You can also freeze it for longer storage. Just remember to thaw it before baking. Look for golden, bubbly cheese on top. You want it to be smooth and gooey. A light browning is a great sign. If you see this, it is ready to come out of the oven. Yes, it works great for meal prep! You can portion it into containers. This makes it easy to grab a meal. Reheat in the microwave or oven until hot. It tastes just as good the next day! This blog post shared a tasty Cheesy Taco Pasta Bake recipe. It covered ingredients, cooking steps, and helpful tips. You’ll delight in this dish's flavor and ease, whether you like meat or prefer veggies. Feel free to adjust the recipe to match your taste. Use different cheeses or add fresh veggies. Remember, leftovers store well and can be reheated easily. Enjoy creating this meal, and let it bring smiles to your table!

Cheesy Taco Pasta Bake Flavorful Family Favorite

Looking for a quick, tasty dish that the whole family will love? My Cheesy Taco Pasta Bake hits the spot!

- Fresh spinach - Olive oil - Garlic - Onion - Heavy cream - Cream cheese - Parmesan cheese - Nutmeg - Salt and black pepper - Pine nuts for garnish I love using fresh spinach for this dish. It has a bright flavor and great texture. You can find it at your local grocery store or farmer's market. Olive oil adds richness, while garlic and onion provide a nice base of flavor. Heavy cream makes the dish smooth and creamy. Cream cheese adds a lovely tang. Parmesan cheese brings a salty, nutty taste that rounds out the dish. Don't forget the nutmeg! It gives a warm spice that elevates the flavors. Lastly, salt and black pepper enhance everything. - Alternatives for heavy cream: You can use half-and-half or whole milk for a lighter option. - Non-dairy options for cream cheese: Silken tofu or cashew cream works well for a vegan choice. - Other types of cheese: Try using gouda or feta for a different taste. These substitutions let you customize the dish to your needs. You can still enjoy that creamy texture and rich flavor, even if you're dairy-free. For the cheese, pick one that melts well to keep the dish smooth. For the full recipe, check out the details in the section above. Start by heating 2 tablespoons of olive oil in a large skillet over medium heat. Once the oil warms, add 3 minced garlic cloves and 1 finely chopped onion. Sauté them together for about 3 to 4 minutes. The onion should turn soft and clear. Keep an eye on the garlic. You don’t want it to burn. Now it's time to bring in the star of the dish—1 pound of fresh spinach. Gradually add the chopped spinach to the skillet. Stir it often as it cooks. In about 5 minutes, the spinach will wilt and shrink down a lot. This is when the magic starts to happen. Lower your heat to a gentle simmer. Pour in 1 cup of heavy cream and add ½ cup of softened cream cheese. Stir well until the cream cheese melts completely. You want a smooth and creamy base. Next, mix in ½ cup of grated Parmesan cheese and ¼ teaspoon of fresh nutmeg. Stir until everything combines nicely. Taste your mixture and add salt and black pepper as needed. After this, let the mixture simmer for 3 to 4 more minutes. Stir it occasionally to stop it from sticking. The flavors will blend beautifully, creating a rich and comforting dish. For the full recipe, refer to the section above. To avoid garlic burning, watch the heat closely. Keep your skillet on medium heat. When you add garlic, stir it often. This keeps it from turning bitter. If garlic burns, it can ruin your dish. The right heat level matters. When you add spinach, turn the heat up a bit. This helps the spinach wilt quickly. Once it's soft, lower the heat to simmer. This allows the cream to blend well without boiling. Adding spices and herbs can boost flavor. Try a pinch of red pepper flakes for warmth. Fresh herbs like thyme or basil add a nice touch too. Nutmeg already gives a warm taste, but other spices can enhance it. To add crunch, consider toasted pine nuts on top. They offer a nutty flavor and texture. You can also use crispy breadcrumbs. Sprinkling them adds a delightful contrast to the creamy spinach. For a beautiful dish, use shallow bowls. Drizzle a bit of olive oil around the edge. This adds a touch of elegance. A sprig of fresh herb on top brings color and freshness. Skillet creamed spinach pairs nicely with many main courses. Try it with grilled chicken or steak. It also works well with roasted fish. This dish is a great side that complements a variety of meals. {{image_4}} You can make creamed spinach lighter by swapping out heavy cream. Use low-fat or light cream instead. This keeps the dish creamy but cuts the calories. You can also add more veggies. Try mixing in chopped mushrooms or bell peppers. They add color and nutrients. For a spicy kick, add red pepper flakes to your skillet. Just a pinch can heat things up. If you like meat, try adding crispy bacon or shredded chicken. This adds a savory depth to the dish. Both meat and spice can create a new version of creamed spinach that excites the palate. To give it a Mediterranean twist, mix in sun-dried tomatoes and feta cheese. This adds a tangy flavor and makes it unique. If you want to try something different, use Indian spices. A pinch of garam masala or curry powder can transform your creamed spinach. This will surprise your guests with bold, rich flavors. For more ideas, check the Full Recipe. To keep your creamed spinach fresh, store leftovers right away. Let it cool to room temperature before storing. Place it in an airtight container to prevent drying out. Make sure to consume it within 3 to 4 days for the best flavor. Glass containers work well, as they don’t absorb smells. They also allow you to see what’s inside. If you want to save your creamed spinach for later, you can freeze it. First, let it cool completely. Then, scoop it into freezer-safe bags or containers. Squeeze out as much air as possible to avoid freezer burn. You can freeze it for up to 3 months. When you’re ready to eat, thaw it in the fridge overnight. Reheat it gently on the stove over low heat. Stir it often to make sure it warms evenly. If it seems thick, add a splash of milk or cream to bring it back to life. You can use alternatives like milk or cashew cream. For a thick texture, try blending silken tofu. Both options give a creamy feel without heavy cream. You can also add a bit of flour to thicken the mixture. This method keeps the dish light yet satisfying. Yes, you can use frozen spinach. It is convenient and saves time. Frozen spinach is pre-cooked and chopped, which helps in quick preparation. However, it may have extra water, so drain it well. Fresh spinach has a brighter taste and better texture. Choose based on your preference and what you have on hand. Skillet creamed spinach pairs well with many dishes. You could serve it alongside grilled chicken or steak. It also complements fish, adding a rich flavor. For a vegetarian option, try it with roasted vegetables or a hearty grain dish. A warm crusty bread also works great to soak up the sauce. Skillet creamed spinach lasts about three to four days in the fridge. Store it in an airtight container to keep it fresh. Reheat it gently on the stove or in the microwave. Stir it well to ensure even heating. If it thickens, add a splash of milk to loosen it up. Enjoy your creamy delight as a side dish all week long! This blog post covered how to make a delicious creamed spinach dish. We explored key ingredients, easy steps, and helpful tips. You learned about substitutions and variations to suit your taste and health needs. Proper storage methods ensure your leftovers stay fresh. In the end, creamed spinach can be a simple and tasty addition to any meal. Get creative with flavors and enjoy each bite!

Skillet Creamed Spinach Savory and Comforting Dish

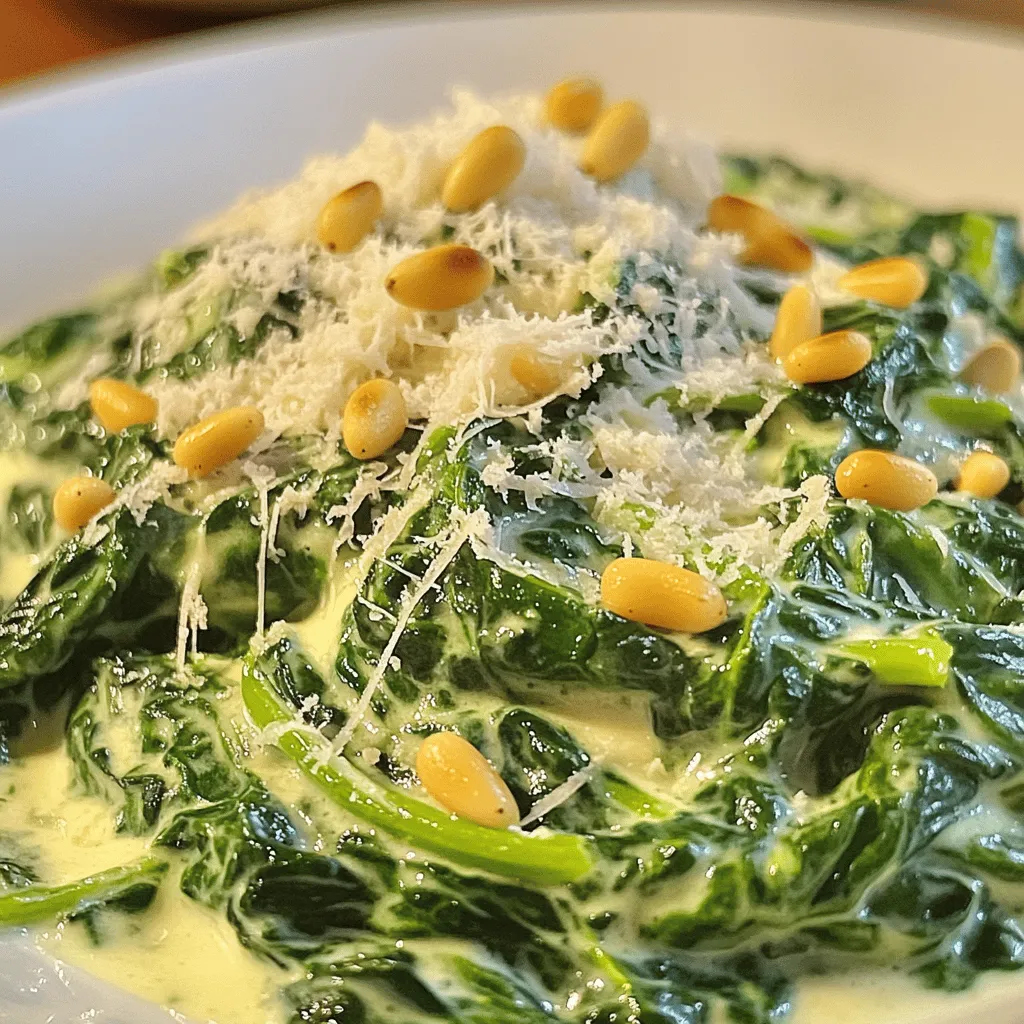
If you’re looking for a warm and cozy dish, Skillet Creamed Spinach is it! This rich, creamy side is quick

- Chicken and marinade essentials - 2 lbs chicken wings - 1/4 cup honey - 1/4 cup sriracha sauce - 2 tablespoons soy sauce - 1 tablespoon rice vinegar - 2 cloves garlic, minced - 1 teaspoon ginger, grated - 1 teaspoon smoked paprika - Salt and pepper to taste - Optional garnishes and accompaniments - 2 tablespoons sesame seeds (optional) - 2 green onions, thinly sliced (for garnish) These ingredients create a perfect blend of sweet and spicy flavors. The honey adds a nice sweetness, while the sriracha brings the heat. Soy sauce and rice vinegar round out the taste. The garlic and ginger add depth, and smoked paprika gives it a hint of smokiness. Use sesame seeds and green onions for that extra touch. They not only look great but also add flavor. You can serve these wings with celery sticks and your favorite dipping sauce. It’s a fun way to enjoy your meal! For the full recipe, check out the detailed instructions later. 1. Preheating and baking setup Start by preheating your oven to 400°F (200°C). This temperature helps the wings cook evenly and get crispy. Line a baking sheet with aluminum foil for easy cleanup. Place a wire rack on top. This allows fat to drip away while baking. 2. Marinade mixing technique In a large bowl, mix honey, sriracha sauce, soy sauce, rice vinegar, minced garlic, grated ginger, and smoked paprika. Add a generous pinch of salt and pepper. Whisk until smooth and well blended. This marinade gives the wings their sweet and spicy flavor. 3. Marinating tips for maximum flavor Add the chicken wings to the marinade. Make sure each wing gets coated well. For the best taste, marinate in the fridge for at least 30 minutes. If you have time, let them marinate for up to 2 hours. This deepens the flavor. 4. Baking and broiling instructions Once marinated, lay the wings in a single layer on the wire rack. Make sure they are spaced apart. This helps them cook evenly. Save any leftover marinade for basting. Bake the wings for 25 minutes. After that, remove them from the oven and baste with the reserved marinade. Return the wings to the oven and bake for another 10-15 minutes. They should be golden brown and crispy. For extra crispiness, switch your oven to broil. Broil the wings for 2-3 minutes. Keep an eye on them to avoid burning. When they are done, take the wings out of the oven. Sprinkle optional sesame seeds and garnish with sliced green onions. This adds color and freshness. For the full recipe, refer to the Sweet and Spicy Chicken Wings section. To get the right mix of sweet and spicy, adjust your ingredients. If you prefer more heat, add extra sriracha. For more sweetness, increase the honey. You can find the perfect balance by tasting your marinade before adding the wings. Cooking times can vary by oven type. If you have a convection oven, reduce the time by about 5 minutes. For a regular oven, stick to the suggested times. Always check for doneness by ensuring the wings reach an internal temperature of 165°F (74°C). Pair the wings with crunchy sides like celery sticks or carrot sticks. These add a nice crunch and freshness. For a dip, ranch or blue cheese works great with the sweet and spicy flavor. When serving, use a large platter. Arrange the wings neatly and sprinkle with green onions and sesame seeds. This makes the dish look inviting and colorful. You can also add small bowls of dipping sauce on the side for easy access. {{image_4}} You can change the flavor of your sweet and spicy chicken wings easily. Here are some ideas: - Different sauces: Try using BBQ sauce for a smoky taste. Teriyaki sauce will add a sweet, Asian twist. You can also mix sauces for unique flavors. - Alternative proteins: If you want a non-meat option, use tofu or plant-based wings. They soak up flavors well and can be just as tasty. You have options when cooking these wings: - Grilling vs. oven baking: Grilling adds a nice char and smoky flavor. Oven baking is easier and keeps the wings juicy. Both methods work well. Choose what suits your time and taste. - Air fryer options: For a quick and crispy finish, use an air fryer. It cooks wings fast and reduces oil use. Just follow the same marinade steps, then pop them in the air fryer for about 25 minutes, shaking halfway through. For the complete process, refer to the Full Recipe for sweet and spicy chicken wings. To keep your sweet and spicy chicken wings fresh, follow these tips: - Refrigeration: Place leftover wings in an airtight container. This helps prevent them from drying out. Store them in the fridge for up to four days. - Freezing: You can freeze the wings for longer storage. Use a freezer-safe bag or container. Squeeze out as much air as possible before sealing. They can last up to three months in the freezer. For reheating, try these methods: - Oven: Preheat your oven to 375°F (190°C). Place wings on a baking sheet and heat for about 15 minutes. - Microwave: Heat wings in a microwave-safe dish for about one minute. This is quick but may leave them less crispy. Sweet and spicy chicken wings can last: - In the fridge: Up to four days. - In the freezer: Up to three months. Always check for smell and texture before eating leftovers. Enjoy your wings safely! To make your wings crispier, follow these tips: - Dry the wings well: Use paper towels to remove any moisture. - Use a wire rack: Place the wings on a wire rack while baking. This helps air circulate around them. - Bake at a high temperature: A hot oven makes the skin crisp up nicely. - Broil at the end: Switch to broil for a few minutes for extra crisp. These steps will give you that crunchy texture without frying. Yes, you can use frozen chicken wings. Here’s how: - Skip thawing: You can bake them directly from frozen. - Adjust cooking time: Increase the cooking time by about 10-15 minutes. - Check doneness: Make sure the wings reach an internal temperature of 165°F (74°C). Using frozen wings is a great option when you’re in a pinch. Sweet and spicy wings taste great with these sauces: - Blue cheese dressing: The creaminess balances the heat. - Ranch dressing: A classic choice for wings. - Honey mustard: Adds a tangy sweetness. - Sriracha mayo: For those who want extra spice. These sauces enhance the flavors and make your meal more fun. For the full recipe, check out the Sweet and Spicy Chicken Wings details. In this post, we explored tasty sweet and spicy chicken wings. We covered ingredients, step-by-step baking tips, and tricks for the perfect flavor. I shared variations, like using different sauces or proteins, and methods like grilling or air frying. You now have ideas for storage, crispiness tips, and great dipping sauce pairings. With this knowledge, you can create delicious wings that impress your friends and family. Enjoy making your next meal fun and flavorful!

Sweet and Spicy Chicken Wings Flavorful Recipe Guide

Looking to spice up your next game day or gathering? I’ve got the perfect treat for you: sweet and spicy

Older posts
Newer posts
← Previous Page1 … Page82 Page83 Page84 … Page86 Next →

dsad

© 2026 yumymoments • Built with GeneratePress

Our Policies

  • Copyright Policy
  • Cookie Policy
  • GDPR Policy
  • Privacy Policy
  • Disclaimer
  • Terms Of Use

More Information

  • Home
  • About
  • Contact
  • Appetizers
  • Dessert
  • Dinner
  • Drinks
©2026, yumymoments About Back To Top