Skip to content
DisclaimerTerms Of UseGDPR PolicyCookie Policy

yumymoments

  • Home
  • Drinks
  • Appetizers
  • Dinner
  • Dessert
  • About
  • Contact
  • Privacy Policy
DisclaimerTerms Of UseGDPR PolicyCookie Policy

NO-ING-IMG

- 1 large head of cauliflower, cut into bite-sized florets - 4 tablespoons extra virgin olive oil - 4 cloves of garlic, finely minced - 1 teaspoon sea salt - ½ teaspoon freshly ground black pepper - ½ teaspoon smoked paprika - ½ cup freshly grated Parmesan cheese - 2 tablespoons chopped fresh parsley (for garnish) - Cauliflower: 1 large head - Olive oil: 4 tablespoons - Garlic: 4 cloves - Sea salt: 1 teaspoon - Black pepper: ½ teaspoon - Smoked paprika: ½ teaspoon - Parmesan cheese: ½ cup - Parsley: 2 tablespoons One serving of garlic Parmesan roasted cauliflower contains: - Calories: 150 - Protein: 5g - Fat: 12g - Carbohydrates: 8g - Fiber: 3g - Sugar: 2g This dish is both healthy and tasty. The cauliflower gives you fiber and vitamins. The olive oil and cheese add flavor and healthy fats. Enjoy this dish as a side or snack! For the full recipe, check out the recipe section. First, you need to preheat your oven to 425°F (220°C). This step is key for getting the cauliflower nice and crispy. While the oven heats, you can prepare the baking sheet. Line it with parchment paper. This makes cleanup much easier later. Next, take your large head of cauliflower. Cut it into bite-sized florets. In a big mixing bowl, add the florets. Pour in 4 tablespoons of extra virgin olive oil. Add 4 cloves of finely minced garlic, 1 teaspoon of sea salt, ½ teaspoon of black pepper, and ½ teaspoon of smoked paprika. Toss everything together with your hands or a spatula. Make sure every floret is coated well. Now, spread the seasoned cauliflower on your lined baking sheet. Make sure it’s in a single layer for even cooking. Place it in your preheated oven and roast for about 25-30 minutes. Halfway through, around 15 minutes, give the florets a gentle toss. This helps them roast evenly. When they turn tender and golden brown, take the baking sheet out. Immediately sprinkle ½ cup of freshly grated Parmesan cheese over the hot cauliflower. The heat will melt the cheese a bit. For a bubbly topping, switch your oven to broil. Broil for 2-3 minutes, but watch closely to avoid burning. Once the cheese is golden and bubbly, take it out. Garnish with 2 tablespoons of chopped fresh parsley for color. Serve warm and enjoy this tasty side dish! For the full recipe, check out the details above. To roast cauliflower well, follow a few simple steps. First, cut the cauliflower into even florets. This helps them cook at the same rate. Next, coat the florets with olive oil and spices. Use your hands to mix them well. Spread the florets in a single layer on the baking sheet. This allows hot air to reach all sides. Roast at 425°F (220°C) for about 25-30 minutes. Toss them halfway through for even browning. Want more cheese flavor? Use fresh grated Parmesan. This cheese melts nicely and adds a rich taste. For an even cheesier dish, add a mix of cheeses. Try mozzarella or cheddar. Just sprinkle the cheese on top right after roasting. Return the baking sheet to the oven and broil for a few minutes. Watch closely to avoid burning. To elevate the taste, add extra spices. A pinch of red pepper flakes gives it heat. Lemon juice or zest adds brightness. Fresh herbs like thyme or rosemary also work well. You can even mix in some balsamic vinegar for a tangy twist. These small changes can make your dish stand out. For the full recipe, check out the detailed steps above. {{image_4}} You can mix up the flavors in your Garlic Parmesan Roasted Cauliflower. Try adding a pinch of red pepper flakes for some heat. A sprinkle of Italian herbs like oregano or basil adds a nice touch. Lemon zest brightens the dish, giving it a fresh taste. Use curry powder for a fun twist, or add a dash of cayenne for spice. If you want to switch up the cheese, try using feta or goat cheese. These cheeses give a unique flavor and creaminess. For a sharper taste, use aged cheddar. If you're after a vegan option, use nutritional yeast. It adds a cheesy flavor without dairy. To make this dish vegan, skip the Parmesan cheese and use a vegan cheese substitute. Nutritional yeast also works well here. For gluten-free options, this recipe is already safe. Just ensure your seasonings are gluten-free. You can enjoy Garlic Parmesan Roasted Cauliflower without worry! For the full recipe, check out the complete details above. After enjoying Garlic Parmesan Roasted Cauliflower, you might have some leftovers. To keep them fresh, let the cauliflower cool first. Then, place it in an airtight container. You can store it in the fridge for up to three days. This way, you can enjoy it again later. When you're ready to eat your leftovers, reheating is easy. Preheat your oven to 350°F (175°C). Spread the cauliflower on a baking sheet. Heat it for about 10-15 minutes. This will keep it crispy. You can also use the microwave. Just cover it with a damp paper towel and heat for 1-2 minutes. You can freeze roasted cauliflower if you want it to last longer. First, let it cool completely. Then, place it in a freezer-safe bag or container. Remove as much air as possible to prevent freezer burn. It will stay good for up to three months. When you’re ready, thaw it in the fridge overnight. Reheat it in the oven for the best results. For a full recipe, refer to the Garlic Parmesan Roasted Cauliflower section above. Yes, you can use frozen cauliflower. However, it may not roast as well. Fresh cauliflower gives a better texture and flavor. If using frozen, thaw it first and pat it dry. This step helps remove excess moisture. You can roast many vegetables with this recipe. Broccoli, Brussels sprouts, or carrots work great. Just cut them into similar sizes as the cauliflower. Toss them with the same olive oil and spices for a balanced taste. To add spice, try these ideas. Mix in red pepper flakes or cayenne pepper. Start with a small amount, then taste as you go. You can also add a dash of hot sauce before serving. These options give your dish a nice kick! For the full recipe, check out the detailed instructions above. In this post, we explored the best ways to prepare roasted cauliflower. We covered ingredients, step-by-step instructions, and storage tips. You learned how to achieve the perfect roast with added cheese and flavor. We also discussed tasty variations and answered common questions. Roasted cauliflower is simple and fun to make. Enjoy experimenting with your favorite flavors and techniques!

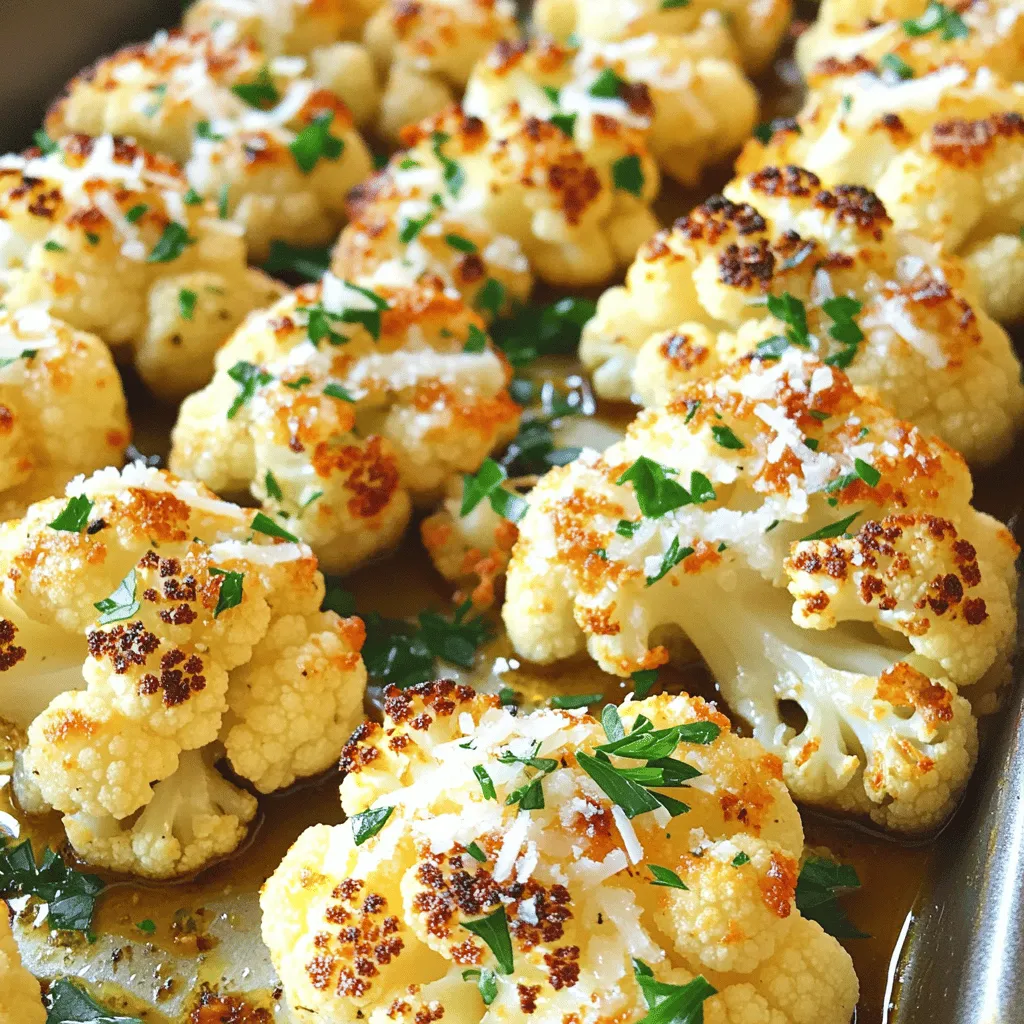
Garlic Parmesan Roasted Cauliflower Tasty Side Dish

Looking for a tasty side dish that’s easy to make? Garlic Parmesan Roasted Cauliflower is your answer! With a crispy

- 1 cup quinoa - 1 cup cherry tomatoes, halved - 1 cucumber, diced - 1/2 red onion, finely chopped - 1 cup canned chickpeas, drained and rinsed - Optional: 1/2 cup Kalamata olives, pitted and sliced in half - Optional: 1 cup feta cheese, crumbled In making these bowls, quinoa acts as a healthy base. It is full of protein and fiber. You can use any quinoa: white, red, or black. The fresh veggies add color and crunch. Cherry tomatoes and cucumbers bring a bright taste. Red onion gives a sharp bite. Chickpeas add more protein and a hearty feel. You can mix in Kalamata olives for a briny touch. Feta cheese, if you like, adds creaminess and saltiness. - 1 lemon, juiced (about 2 tablespoons) - 3 tablespoons extra virgin olive oil - 1 teaspoon dried oregano - Salt and freshly cracked black pepper, to taste The dressing ties everything together. Fresh lemon juice brings a zesty flavor. Extra virgin olive oil adds a rich, smooth taste. Dried oregano gives a classic Mediterranean touch. Don't forget salt and pepper to enhance all the flavors. For the full recipe, check out the details above. Enjoy your cooking! First, rinse the quinoa well under cold water. This helps remove the bitter coating. Next, in a medium saucepan, combine the rinsed quinoa and vegetable broth. Bring the mixture to a gentle boil over medium heat. Once it boils, reduce the heat to low and cover the pot. Let it simmer for about 15 minutes, or until the quinoa absorbs all the liquid and becomes tender. After cooking, remove it from heat and let it sit, covered, for 5 minutes. Finally, fluff the quinoa with a fork to make it light and airy. While the quinoa cooks, make the dressing. In a small bowl, whisk together the freshly squeezed lemon juice, extra virgin olive oil, dried oregano, and a pinch of salt and pepper. This step is key, as it blends the flavors well. Allow the dressing to rest for a few minutes. This resting time helps the flavors become richer and more vibrant. In a large mixing bowl, toss together the halved cherry tomatoes, diced cucumber, drained chickpeas, finely chopped red onion, and halved Kalamata olives. Mix these ingredients gently to ensure an even distribution. Once the quinoa is cooked and slightly cooled, add it to the bowl of mixed vegetables. Drizzle the prepared dressing over the mixture. Use a spatula to toss everything carefully. This ensures that all the ingredients get coated in the dressing. To finish, sprinkle crumbled feta cheese and chopped fresh parsley on top. Fold them in gently to combine flavors without breaking the feta too much. For the full recipe, check out the Mediterranean Quinoa Bowls recipe. You can serve these bowls warm or chilled, and feel free to garnish with extra parsley if you like! - Make ahead and store in the refrigerator. - Use meal prep containers for easy portions. Preparing meals in advance can save you time during the week. I love making these Mediterranean quinoa bowls on a Sunday. You can pack them in meal prep containers and grab one when you need a quick lunch or dinner. They stay fresh in the fridge for up to five days. - Adjust seasoning according to taste. - Chill before serving for enhanced flavors. Flavor is key! After you mix everything, taste it. You might want to add more salt or lemon juice. I often chill the bowls for a bit. This helps the flavors mingle and develop. The longer they sit, the better they taste! - Tips for cooking perfect quinoa. - Best methods for chopping vegetables. To cook quinoa just right, rinse it first. This removes bitter saponins. Then, cook it in vegetable broth for extra flavor. I use a 2:1 ratio of broth to quinoa. Once it’s done, let it sit for a few minutes before fluffing it with a fork. When chopping vegetables, a sharp knife makes a big difference. For even pieces, cut all your veggies to a similar size. This not only looks nicer but also helps them cook evenly. For the full recipe, check out the complete guide to Mediterranean quinoa bowls. {{image_4}} You can change the ingredients based on the season. In summer, I love to add bell peppers and corn. They bring a fresh crunch and sweetness. In winter, I suggest adding roasted vegetables. Roasting enhances their natural flavors and gives warmth to the dish. If you want to switch the protein, try using grilled chicken or tofu instead of chickpeas. Both options add heartiness. For those who want a vegan option, consider using nut-based cheeses. They provide a creamy texture without dairy. To make your bowl even better, add nuts or seeds for some crunch. Almonds or sunflower seeds work great! You can also experiment with different herbs and spices. Fresh basil or a pinch of cumin can elevate the flavor. These variations can help you enjoy this dish in many ways. Check out the Full Recipe for more details! To store your quinoa bowls, let them cool down first. Use an airtight container. This keeps the flavors fresh and the food safe. Your quinoa bowls last up to 4 days in the fridge. Make sure to eat them within this time for the best taste. If you want to save some quinoa bowls for later, freezing is a great option. Pack them in freezer-safe containers. Leave some space at the top, as food expands when frozen. Your bowls can last up to 3 months in the freezer. When ready to eat, thaw them in the fridge overnight. To warm up your quinoa bowls, use the microwave or stovetop. For the microwave, heat in short intervals, stirring often. This keeps the texture nice. On the stovetop, add a splash of water and reheat gently. You can serve the bowls cold or warm, based on your mood. Enjoy them however you like! Yes! You can easily make these bowls vegan. Simply replace the feta cheese with vegan cheese or skip it altogether. You can also add more chickpeas or use nuts for extra protein. Fresh herbs like basil or mint add great flavor too. To cook quinoa, start by rinsing 1 cup of quinoa under cold water. This removes any bitter taste. Then, combine it with 2 cups of vegetable broth in a medium saucepan. Bring it to a boil over medium heat. Once boiling, reduce the heat to low and cover. Let it simmer for about 15 minutes. When the quinoa is fluffy and absorbs all the liquid, remove it from heat. Let it sit, covered, for 5 more minutes. Fluff it with a fork, and it's ready! You can customize your quinoa bowl with many toppings. Try adding roasted vegetables like bell peppers or zucchini. Fresh herbs like parsley or cilantro enhance the flavor. You can also add nuts like almonds or walnuts for crunch. If you love spice, sprinkle some red pepper flakes or drizzle hot sauce on top. For sweetness, add dried fruits like raisins or cranberries. You’ll find endless ways to enjoy your bowl! Mediterranean quinoa bowls are a healthy, tasty option for any meal. We covered key ingredients like quinoa, chickpeas, and fresh veggies. I shared step-by-step instructions for cooking and combining everything, plus tips for meal prep and flavor enhancement. Remember, you can swap ingredients for the season and choose your favorite proteins. Proper storage also keeps your bowls fresh for later. With these ideas, you can enjoy a meal that’s both vibrant and satisfying every time. Now go create your perfect bowl!

Mediterranean Quinoa Bowls Flavorful and Nutritious Meal

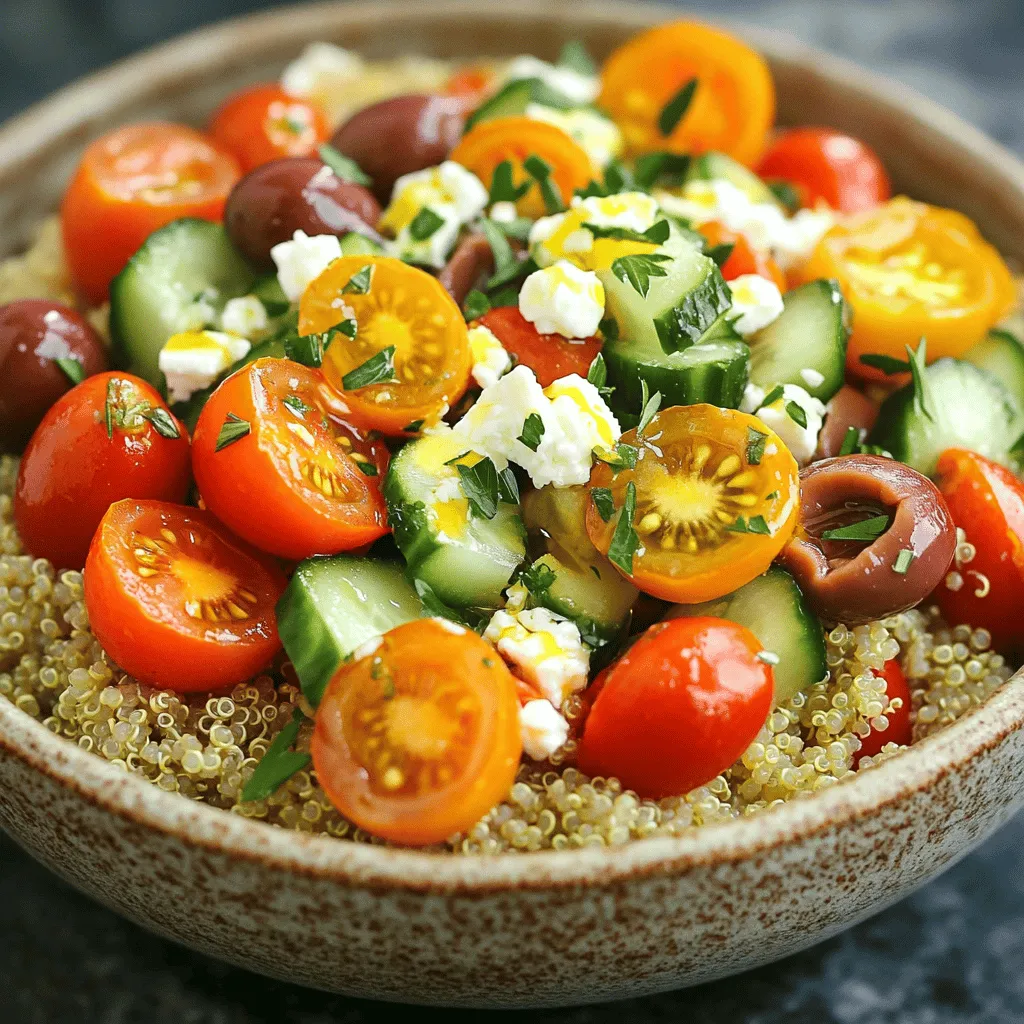
Looking for a meal that bursts with flavor and packs a nutritious punch? Mediterranean quinoa bowls are the answer! This

To make Zesty Lemon Garlic Shrimp Pasta, gather these fresh ingredients: - 8 oz fettuccine or linguine pasta - 1 lb large shrimp, peeled and deveined - 4 cloves garlic, minced - 1/4 teaspoon red pepper flakes (optional for heat) - 3 tablespoons extra-virgin olive oil - 2 tablespoons unsalted butter - Zest of 1 large lemon - 1/4 cup freshly squeezed lemon juice - 1/4 cup chicken or vegetable broth (low-sodium preferred) - Salt and freshly ground black pepper to taste - Fresh parsley, finely chopped (for garnish) - Grated Parmesan cheese (for serving) Using fresh ingredients makes a big difference. The shrimp should be large and firm. Fresh garlic adds great flavor. Zesting the lemon brings out its natural oils, giving the dish a bright taste. You'll want to have everything ready before you start cooking. This helps keep the process smooth and fun. For the full recipe, check out the instructions. You'll see how to create a dish that is not only tasty but also quick to make. Enjoy the vibrant flavors of lemon and garlic that make this pasta a delight! To start, bring a large pot of salted water to a rolling boil. This step is key to making tasty pasta. When the water boils, add 8 oz of fettuccine or linguine. Cook the pasta according to the package instructions until it is al dente. This means it should be firm to the bite. Before draining, reserve about 1/2 cup of the pasta water. This water is starchy and will help your sauce later. After that, drain the pasta and set it aside. Next, it’s time to prepare the shrimp. Use 1 lb of large shrimp, peeled and deveined. In a bowl, season the shrimp with salt, freshly ground black pepper, and red pepper flakes if you like heat. Toss gently to coat each shrimp. This will give them great flavor. For even cooking, make sure to lay the shrimp in a single layer when cooking. This helps them cook evenly and prevents steaming. Now, let’s sauté the garlic. Heat a large skillet over medium heat and add 3 tablespoons of extra-virgin olive oil and 2 tablespoons of unsalted butter. Once the butter melts and the mix shimmers, add 4 cloves of minced garlic. Sauté for about 1 minute, but be careful not to burn it. Burnt garlic can ruin the dish. Next, add the seasoned shrimp to the skillet in a single layer. Let them cook without stirring for about 2-3 minutes until the underside is golden. Flip the shrimp and cook for another 2-3 minutes until they are pink and opaque. This means they are done. Now, lower the heat slightly. Add the zest of 1 large lemon, 1/4 cup of fresh lemon juice, and 1/4 cup of low-sodium chicken or vegetable broth to the skillet. Stir well and scrape up any bits from the bottom. These bits add flavor. Let this mix simmer for about 2 minutes to meld the flavors. Finally, add the cooked pasta to the skillet. Toss gently to combine the pasta with the shrimp and sauce. If it looks dry, add some reserved pasta water a little at a time until you reach your desired creaminess. Taste and adjust seasoning with more salt and black pepper if needed. Enjoy this zesty lemon garlic shrimp pasta! For the full recipe, check out the section above. To balance acidity and heat in your dish, use lemon juice and red pepper flakes. Start with small amounts and taste as you go. The lemon adds brightness while the red pepper gives warmth. If you need more heat, add more flakes. For added depth, consider using smoked paprika or fresh herbs like basil. For creamy pasta, let the reserved pasta water work its magic. This starchy water helps bind the sauce to the pasta. If the sauce seems too thick, add the water slowly until you reach the right creaminess. Remember, the goal is a silky sauce that clings to every strand of pasta. Serving your dish well makes it more appealing. Plate the pasta in shallow bowls for a lovely display. Top each bowl with fresh parsley and a sprinkle of Parmesan cheese. For a colorful touch, add a lemon slice on the side. This not only looks great, but it also gives a fresh scent when served. For the full recipe, check here: [Full Recipe]. {{image_4}} For a fun twist, try different pasta shapes. Penne or spaghetti works well too. You can even use whole wheat or gluten-free pasta. Each option brings a unique flavor and texture. If shrimp isn’t your favorite, consider chicken or scallops. Firm tofu is a great choice for a plant-based meal. Just adjust cooking times for each protein to ensure they are cooked right. Adding vegetables makes this dish even better. Spinach or kale add color and nutrients. You can toss them in during the last few minutes of cooking. In spring, use asparagus or peas. In summer, cherry tomatoes are a tasty choice. In fall and winter, consider adding broccoli or squash for a hearty meal. For a richer taste, try adding white wine. Pour in a splash before adding the lemon juice for depth. You can also switch up the citrus. Lime or orange zest brings a fresh twist. Fresh herbs like basil or thyme add a lovely aroma. Don’t be afraid to experiment! Check out the Full Recipe for more tips on making this dish shine. To keep your zesty lemon garlic shrimp pasta fresh, let it cool first. This helps keep moisture from building up in the container. Use an airtight container or a resealable bag. Store it in the fridge for up to three days. If you use a shallow container, it cools faster and stays fresh longer. When you’re ready to enjoy the leftovers, you have a few options. The best way is to reheat it on the stove. Add a splash of broth or water to help keep it moist. Heat it over low heat, stirring often. You can also use a microwave. Heat it in short bursts of 30 seconds. Stir in between to avoid hot spots. If you want to save some pasta for later, freezing works well. Portion the pasta into smaller servings. Wrap each portion tightly in plastic wrap, then place it in a freezer bag. It can last up to three months in the freezer. To defrost, move it to the fridge overnight or use the microwave. Avoid refreezing once it has thawed. Enjoy the full recipe to savor every bite! If you want a non-seafood option, try chicken or tofu. Both work well in this dish. Cut chicken into small pieces and cook until golden. For tofu, use firm tofu and press it to remove water. Then, cube it and sauté until golden. Yes! You can use gluten-free pasta. Look for options made from rice, quinoa, or chickpeas. They cook similarly to regular pasta and taste great in this dish. The heat level depends on the red pepper flakes. For mild flavor, skip the flakes. If you like spice, add more flakes to taste. Start with a little and adjust as it cooks. You can store leftovers in the fridge for up to three days. Keep them in an airtight container. If the pasta looks dry, add a splash of broth or water when reheating. Yes! You can cook the pasta and shrimp ahead of time. Store them separately in the fridge. When you're ready to eat, mix them together with the sauce. This way, your dish stays fresh and tasty. For the best flavor, try to eat it within two days. For the complete preparation details, check out the Full Recipe. This blog post covered a tasty shrimp pasta recipe with key ingredients and step-by-step instructions. You learned how to cook pasta, prepare shrimp, and create a delicious sauce. I shared tips to enhance flavors and ideas for variations, plus storage and reheating advice. Cooking is about exploring and having fun. Feel free to adjust the recipe to suit your taste. Enjoy your cooking journey and impress others with your new skills!

Zesty Lemon Garlic Shrimp Pasta Delightful Recipe

If you’re craving a quick, flavorful meal, look no further than my Zesty Lemon Garlic Shrimp Pasta! This dish combines

To make delicious granola bars, you need a few key ingredients. Here’s what you'll need: - 2 cups rolled oats - 1 cup unsweetened shredded coconut - 1/2 cup almond butter (or any nut butter of your choice) - 1/4 cup honey or maple syrup - 1/2 cup nuts (like almonds or walnuts), roughly chopped - 1/2 cup dark chocolate chips or chunks - 1/4 teaspoon sea salt - 1/2 teaspoon vanilla extract These ingredients create a tasty base for your bars. The oats provide fiber, while the nuts add healthy fats. The chocolate gives a sweet touch that everyone loves. You can customize your granola bars with optional ingredients. Here are some great add-ins to try: - 1/4 cup dried fruit (like cranberries, apricots, or raisins) - Seeds (such as pumpkin or sunflower seeds) - Spices (like cinnamon or nutmeg) - Protein powder for an extra boost Feel free to mix and match these extras. They can enhance flavor and nutrition, making your bars even better! Homemade granola bars are not just tasty; they are healthy too. Here’s a quick look at the benefits: - Calories: About 150 per bar - Protein: Around 4 grams - Fiber: About 3 grams - Healthy Fats: Thanks to nuts and nut butter These bars provide energy and keep you full. You can enjoy them as a snack or breakfast. They fit well into a balanced diet! For the full recipe, click [Full Recipe]. Making granola bars is easy. You will need to gather your ingredients first. The process involves mixing, baking, and cooling. Here’s how to do it. 1. Preheat the Oven: First, set your oven to 350°F (175°C). Line an 8x8 inch baking pan with parchment paper. Let some paper hang over the edges. 2. Mix Dry Ingredients: In a large bowl, combine the rolled oats, shredded coconut, chopped nuts, dark chocolate chips, and sea salt. Stir everything well with a spoon. 3. Combine Wet Ingredients: In a small pot, add the almond butter and honey (or maple syrup). Heat it gently while stirring until it melts. Then, take it off the heat and mix in the vanilla extract. 4. Combine Mixtures: Pour the warm almond butter mix over the dry ingredients. Use a spatula to fold them together gently. If you want, add dried fruits here and mix. 5. Press into Pan: Spoon the mixture into the lined baking pan. Use your hands or a spatula to press it down firmly. Make sure it is compact for better bars. 6. Bake: Place the pan in the oven. Bake for about 20-25 minutes. The edges should be a golden brown. Watch closely so they don’t burn. 7. Cool and Slice: Take the pan from the oven and let it cool for 10 minutes. Use the parchment paper to lift the granola out. Place it on a wire rack to cool completely before cutting it into bars. 8. Store: Keep the granola bars in an airtight container. They last a week at room temperature or longer in the fridge. These steps will help you create delicious granola bars. For the full recipe, refer back to the ingredients and instructions. Enjoy your homemade treat! To get that perfect crunch, use old-fashioned rolled oats. They hold their shape well. Next, make sure to pack your mixture tightly in the pan. This helps the bars stay together. Bake until the edges turn golden brown, but watch them closely. A few minutes too long can lead to a dry bar. Lastly, let the bars cool completely before slicing. This step is key for a clean cut. One common mistake is not measuring ingredients correctly. Use a kitchen scale for accuracy. Another mistake is skipping the pressing step. If the mixture isn’t packed tightly, your bars may crumble. Avoid using too much liquid, as it can make the bars soggy. Lastly, don’t skip the cooling time. Cutting them too soon leads to a messy result. These bars make a great snack anytime! Pair them with yogurt and fresh fruit for a hearty breakfast. You can also crumble them on top of oatmeal for added crunch. For a midday treat, enjoy them with a cup of tea or coffee. Wrap each bar in parchment for easy grab-and-go snacks. You can even serve them at parties, sliced into bite-sized pieces. Everyone loves a homemade treat! {{image_4}} To make your granola bars vegan, simply swap honey for maple syrup. This change makes the bars plant-based. Use almond butter or any nut butter that is dairy-free. You can also add ingredients like chia seeds or flaxseed for extra nutrition. Both options work well and keep the bars delicious. If you need gluten-free granola bars, choose certified gluten-free oats. These oats ensure no cross-contamination occurs. You can also replace regular chocolate chips with gluten-free options. This small change keeps your bars safe for gluten-sensitive friends and family. Feel free to get creative with flavors! Add dried fruits like cranberries or apricots for sweetness. You can mix different nuts, such as almonds, walnuts, or pecans, for added crunch. Try spices like cinnamon or nutmeg for warmth. Each combination brings a unique taste, making every batch a new adventure. For the complete recipe, check out the Full Recipe section. I love to keep my homemade granola bars fresh and tasty. To do this, I store them in an airtight container. This keeps moisture out and helps them stay crunchy. If you want them to last longer, use wax paper between layers. This prevents sticking. When stored at room temperature, granola bars last about one week. Keep them in a cool, dry place. If you refrigerate them, they can last up to two weeks. Just remember, refrigeration may make them a bit chewy. For longer storage, freezing is a great option. Wrap each granola bar in plastic wrap. Then, place them in a freezer-safe bag. They can last for up to three months in the freezer. When you’re ready to eat, just thaw them at room temperature. Enjoy your crunchy coconut-chocolate granola bars whenever you like! For the full recipe, check out the Crunchy Coconut-Chocolate Granola Bars section. You can easily make nut-free granola bars. Just skip the nuts and use seeds instead. Sunflower seeds or pumpkin seeds work great. You can also add more dried fruit for flavor and texture. The rest of the recipe stays the same. This way, your bars remain crunchy and tasty. Yes, you can use other sweeteners instead of honey. Maple syrup is a great choice. Agave nectar or brown rice syrup also works well. Each sweetener has a different taste, so feel free to experiment. Just keep the same amount as the honey in the recipe. Homemade granola bars are healthy and full of good stuff. They have fiber from oats, which helps digestion. You control the sugar, so they can be low in added sugars. You can also add seeds or dried fruit for added vitamins and minerals. Eating these bars gives you energy for your day. Customizing granola bars is easy! For gluten-free bars, use gluten-free oats. If you need them vegan, swap honey for maple syrup. You can also add or remove ingredients based on allergies or tastes. Just stick to the same basic structure of oats, binder, and sweetener. You can always check the Full Recipe for different options. This article covered all you need to know about making granola bars. We talked about main and optional ingredients, plus their nutrition. You learned step-by-step instructions for crunchy coconut-chocolate bars. I shared tips for perfect bars and common mistakes to avoid. We explored variations for different diets and great storage practices. Homemade granola bars are not only tasty but also easy to customize. With these insights, you can make bars that fit your needs and taste. Happy cooking!

Homemade Granola Bars Healthy and Easy Recipe

Are you tired of store-bought granola bars filled with preservatives? You’re in the right place! I’ll show you how to

To make Sweet and Spicy Chicken Stir-Fry, you will need: - 1 lb (450g) boneless chicken breasts, sliced into thin strips - 2 tablespoons cornstarch - 2 tablespoons vegetable oil - 1 red bell pepper, sliced - 1 yellow bell pepper, sliced - 1 cup broccoli florets - 2 carrots, julienned - 4 green onions, chopped, plus extra for garnish - 2 cloves garlic, minced - 1 tablespoon fresh ginger, minced - 3 tablespoons soy sauce - 1 tablespoon chili paste (adjust based on preferred spice level) - 2 tablespoons honey - 1 tablespoon rice vinegar - Salt and pepper to taste - Sesame seeds for garnish For the best flavor, choose fresh, high-quality ingredients. Select chicken that is firm and has no dark spots. Fresh vegetables should feel crisp and bright in color. When picking bell peppers, look for ones that are shiny and smooth. Use freshly minced garlic and ginger for a robust taste. Choose a soy sauce that has no added preservatives for better flavor. Honey should be raw or local for a more natural sweetness. If you cannot find some ingredients, there are good substitutes: - Chicken: Use shrimp, beef, or tofu for different proteins. - Bell Peppers: Any color will work, and you can try zucchini or snap peas instead. - Soy Sauce: Tamari or coconut aminos are great gluten-free options. - Honey: Maple syrup or agave nectar can replace honey for sweetness. - Chili Paste: Sriracha or red pepper flakes can add heat. - Rice Vinegar: Apple cider vinegar or white vinegar can work in a pinch. For the complete cooking experience, check out the Full Recipe. First, gather your ingredients. You will need chicken, cornstarch, oil, and veggies. Start by slicing the chicken breasts into thin strips. This helps them cook quickly and evenly. Next, toss the chicken strips in a bowl with cornstarch. Make sure each piece is coated. This gives the chicken a nice, crispy texture later on. Heat a large skillet or wok over medium-high heat. Add 1 tablespoon of vegetable oil to the pan. Once hot, add the chicken strips in a single layer. Cook them for about 4-5 minutes. Flip occasionally until the chicken turns golden brown and is no longer pink. Remove the chicken and set it aside on a plate. In the same pan, add the remaining oil. When it gets hot, stir in the minced garlic and ginger. Cook for about 30 seconds, just until they smell good. Then, throw in the sliced red and yellow peppers, broccoli florets, and julienned carrots. Stir-fry these veggies for 2-3 minutes, keeping them crisp. While the veggies cook, whisk together soy sauce, chili paste, honey, rice vinegar, and a pinch of salt in a small bowl. Pour this sauce over the veggies in the skillet. Mix everything well to coat the vegetables. Now, return the cooked chicken to the skillet. Gently toss everything together, ensuring all the chicken and veggies are coated in the sauce. Cook for an additional 2 minutes, letting everything heat up and the flavors blend. Once heated, take the skillet off the heat. Garnish your stir-fry with chopped green onions and a sprinkle of sesame seeds. This adds a nice touch of color and flavor. For a complete meal, serve this dish in bowls and consider pairing it with fluffy jasmine rice or light quinoa. You’ll love how easy and delicious this Sweet and Spicy Chicken Stir-Fry is! For more details, check out the Full Recipe. To cook chicken well, start with even slices. This helps the chicken cook evenly. Coating the chicken in cornstarch gives it a nice crisp. Heat your pan before adding the chicken. This keeps the chicken from sticking. Cook in a single layer for the best results. Flip the pieces often for even browning. Remove the chicken as soon as it turns golden. Overcooking can make it dry. For a colorful stir-fry, use a mix of veggies. I like red and yellow bell peppers for sweetness. Broccoli adds crunch and nutrition. Carrots give a nice color and taste. Green onions bring a fresh flavor. You can also try snap peas or zucchini. Use whatever is fresh or in season. This keeps your dish vibrant and full of flavor. To adjust the spice in your stir-fry, start with less chili paste. You can always add more later. If it’s too spicy, mix in some honey or sugar. This will balance the heat. Another option is to add coconut milk for creaminess. This can cool down the spice. Always taste your sauce before adding it to the pan. This way, you can find the right heat for you. {{image_4}} You can swap chicken for other proteins. Try shrimp, beef, or tofu. Each option brings a new taste. Shrimp cooks fast and adds a sweet flavor. Beef gives a hearty bite. Tofu is perfect for a plant-based meal. Just make sure to adjust cook times based on your choice. To make this dish vegetarian or vegan, use tofu or tempeh instead of chicken. Marinate the tofu in soy sauce for added flavor. Add more veggies like mushrooms or snap peas for texture. Use maple syrup in place of honey to keep it vegan. This way, the dish stays sweet without losing its charm. Sauce is key to this stir-fry. You can mix it up with different flavors. For a tangy kick, add lime juice or tamarind paste. If you prefer a sweeter sauce, use more honey or agave. For a smoky taste, try adding smoked paprika or liquid smoke. These changes keep the dish exciting and unique. For the full recipe, check out the Sweet and Spicy Chicken Stir-Fry recipe. To keep your Sweet and Spicy Chicken Stir-Fry fresh, first let it cool. Place the leftovers in an airtight container. Store it in the fridge. The dish stays good for up to three days. If you want to keep it longer, consider freezing it instead. When you’re ready to eat your leftovers, take them out of the fridge. You can reheat them on the stove or in the microwave. For the stove, use medium heat. Stir occasionally until heated through. For the microwave, place the stir-fry in a bowl. Heat it in short bursts, stirring in between. This way, it warms evenly. If you want to freeze your stir-fry, portion it into smaller containers. Use freezer-safe bags or airtight containers. Label them with the date. The stir-fry can last in the freezer for up to three months. To enjoy it later, thaw it overnight in the fridge before reheating. This keeps the flavors fresh and tasty. For the full recipe, check the earlier section. You can serve this dish with fluffy jasmine rice or light quinoa. Both options soak up the sauce well. You might also enjoy it with crispy lettuce wraps for a fun twist. Adding a side of steamed dumplings or spring rolls can make your meal even more exciting. Yes, you can use frozen vegetables. They save time and are often just as healthy. However, you should cook them a bit longer to ensure they are tender. Keep in mind that frozen vegetables release more water, so you may want to increase cooking time to avoid a soggy stir-fry. Sweet and Spicy Chicken Stir-Fry lasts about 3 to 4 days in the fridge. Be sure to store it in an airtight container. Reheat it well before eating. If you notice any strange smells or colors, it's best to discard it. You can prepare the chicken and sauce ahead of time. Store them separately in the fridge for up to 2 days. When you’re ready to serve, stir-fry the veggies and combine everything. This helps preserve the freshness and crunch of the vegetables. You can add crushed red pepper for extra heat or sesame oil for a nutty kick. Garlic powder and onion powder also work well for depth. Experiment with your favorite spices to create your perfect blend. To make it healthier, use less oil and add more vegetables. You can also swap chicken for tofu or shrimp. Using low-sodium soy sauce reduces sodium without sacrificing flavor. Absolutely! You can use shrimp, beef, or tofu. Just adjust the cooking time accordingly. Chicken is great, but any protein can shine with this sauce. Garnish with chopped green onions and sesame seeds for a nice finish. You can also add fresh cilantro or sliced chili for extra flavor. A squeeze of lime or lemon right before serving adds a bright touch. You can find the full recipe at the top of this article. It includes all the ingredients and steps you need to create this delicious dish. This blog post covered key ingredients, cooking steps, and useful tips for your dish. You learned about quality selections, substitutes, and the best veggies for great flavor. I shared how to adjust spices and offered tasty variations for all diets. Lastly, you found practical storage advice to keep your meal fresh. With these insights, you'll make a fantastic Sweet and Spicy Chicken Stir-Fry. Enjoy your cooking adventure!

Sweet and Spicy Chicken Stir-Fry Flavorful Recipe

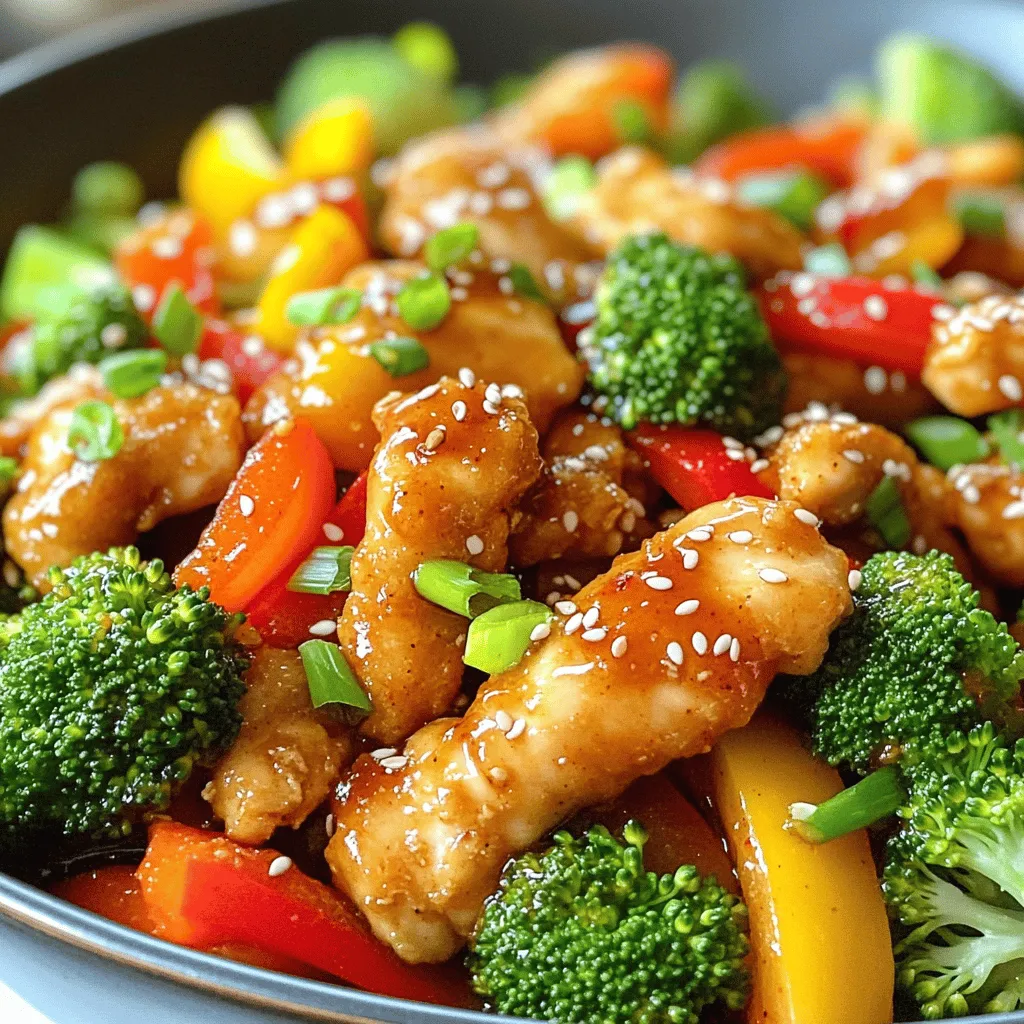
Get ready to spice up your dinner routine with my Sweet and Spicy Chicken Stir-Fry! This easy recipe packs bold

- 1 can (15 oz) chickpeas, rinsed and drained - 2 tablespoons extra virgin olive oil - 1 teaspoon smoked paprika - 1 teaspoon garlic powder - ½ teaspoon cayenne pepper (optional for added spice) - ½ teaspoon ground cumin - Sea salt to taste - Freshly ground black pepper to taste I love using canned chickpeas for this recipe. They save time and are ready to go! Just rinse and drain them well. This keeps them clean and helps them crisp up nicely. Next, we have the olive oil. It adds richness and helps the spices stick to the chickpeas. Choose extra virgin for the best flavor. Now, let’s talk seasoning. I often use smoked paprika for a warm, smoky taste. Garlic powder gives a savory punch. If you like heat, cayenne pepper adds a nice kick. Ground cumin brings a warm, earthy note. You can mix and match these spices to find your favorite blend. Don’t forget the sea salt and black pepper! They enhance all the flavors. - Fresh herbs for garnish - Additional spices for flavor variations After baking, I love to add fresh herbs like parsley or cilantro. They look pretty and taste great. You can also try other spices. Experiment with your favorites! First, preheat your oven to 400°F (200°C). This is the best temperature for crispy roasted chickpeas. Next, line a baking sheet with parchment paper. This makes cleanup easy and helps prevent sticking. Now, take a can of chickpeas and rinse them under cold water. Drain them well, and then transfer them to a clean kitchen towel. Pat them dry gently. Removing moisture is key for that crispy texture. In a large mixing bowl, add the dried chickpeas. Pour in two tablespoons of extra virgin olive oil. Then, add one teaspoon of smoked paprika, one teaspoon of garlic powder, and a half teaspoon of ground cumin. If you like heat, sprinkle in a half teaspoon of cayenne pepper. Finally, season with sea salt and black pepper to taste. Use a spatula or wooden spoon to mix everything well. Make sure each chickpea gets coated evenly in the spice mix. Now, spread the chickpeas in a single layer on the prepared baking sheet. Give them space; crowding them may lead to soggy spots. Place the baking sheet in the preheated oven. Roast the chickpeas for about 25 to 30 minutes. Halfway through, shake the pan gently to help them brown evenly. Keep an eye on them during the last few minutes to avoid burning. When they're golden brown and crispy, take them out of the oven. Let them cool for a few minutes before you enjoy your flavorful snack. For the full recipe, check the complete instructions above. To get crispy roasted chickpeas, drying them is key. After rinsing, use a clean towel to pat them dry. The less moisture, the better the crunch. Next, spread the chickpeas in a single layer on the baking sheet. If they are crowded, they will steam instead of roast. This space allows hot air to flow around them, giving you that perfect texture. Don’t hesitate to play with spices. You can mix smoked paprika with garlic powder for a classic flavor. If you want something bold, try adding chili powder and cumin. Here are some fun combinations: - For a spicy kick: smoked paprika and cayenne pepper. - For a savory taste: garlic powder and Italian herbs. - For a sweet treat: cinnamon and a sprinkle of sugar. For a stunning presentation, serve crispy roasted chickpeas in a stylish bowl. You can also sprinkle fresh herbs on top. Parsley or cilantro adds a nice touch. These tasty bites are great on their own. You can also toss them onto salads or mix with yogurt for a dip. Try pairing with hummus or guacamole for extra flavor. For the full recipe, check out the details in the recipe section. {{image_4}} You can make crispy roasted chickpeas sweet or savory. For a sweet treat, mix cinnamon and sugar. This combo gives a warm and cozy taste. For something savory, try Italian herbs or chili powder. These spices add a kick and make each bite exciting. Crispy roasted chickpeas fit many diets. They are naturally gluten-free, so no worries there! If you're vegan, this recipe is perfect too. You can enjoy these snacks without any animal products. The right spices can change your chickpeas' flavor. Try curry powder for a taste of India. For a Mexican twist, use taco seasoning. These blends bring cultural influences to your kitchen. Feel free to mix and match. Finding your favorite combination is part of the fun! You can check the Full Recipe for more ideas. After you enjoy your crispy roasted chickpeas, store any leftovers in an airtight container. This helps keep them fresh and tasty. I recommend using glass or plastic containers with tight-fitting lids. If you have a lot left, you can also use resealable bags. Just be sure to squeeze out as much air as you can before sealing. If your chickpeas lose their crunch, don’t worry! You can easily bring back their crispiness. Preheat your oven to 400°F (200°C). Spread the chickpeas in a single layer on a baking sheet. Bake them for about 5 to 10 minutes. Keep an eye on them to avoid burning. This method works great to restore that satisfying crunch. Crispy roasted chickpeas can last up to one week when stored properly. Check for signs of spoilage before eating. If they smell off or feel soggy, it’s best to toss them. Remember, freshness is key for that delightful snack experience. Enjoy your crispy roasted chickpeas, and try the full recipe for a fun cooking adventure! To cook chickpeas for snacks, start with high-quality chickpeas. Choose canned ones that are firm and fresh. Rinse them in cold water to remove any canning liquid. Pat them dry with a towel. This step is key for crispiness. The drier they are, the better they roast. Toss the chickpeas in olive oil and your favorite spices. Spread them in a single layer on a baking sheet. This helps them cook evenly. Roast at 400°F (200°C) for 25-30 minutes. Shake the pan halfway through for even cooking. Yes, you can use dried chickpeas. First, soak them overnight in water. This softens them and cuts cooking time. After soaking, drain and rinse the chickpeas. Boil them in fresh water for about one hour. You want them tender but not mushy. Once cooked, follow the same steps as for canned chickpeas. Dry them well and season before roasting. Chickpeas are packed with nutrition. They are a great source of protein and fiber. One cup of cooked chickpeas has about 15 grams of protein. This makes them a filling snack. They also provide important vitamins and minerals like iron and magnesium. Eating chickpeas can help lower cholesterol. They support heart health and help with digestion. Adding them to your diet can be a tasty way to boost health. Crispy roasted chickpeas are a simple, healthy snack you can make at home. We reviewed ingredients, preparation steps, tips for crispiness, and storage methods. You can customize flavors and enjoy them in many ways. Experiment with different spices to find your favorite taste. Whether you enjoy savory or sweet, chickpeas are versatile and nutritious. Keep practicing, and you’ll master the perfect roasted chickpeas in no time!

Crispy Roasted Chickpeas Flavorful Snack to Savor

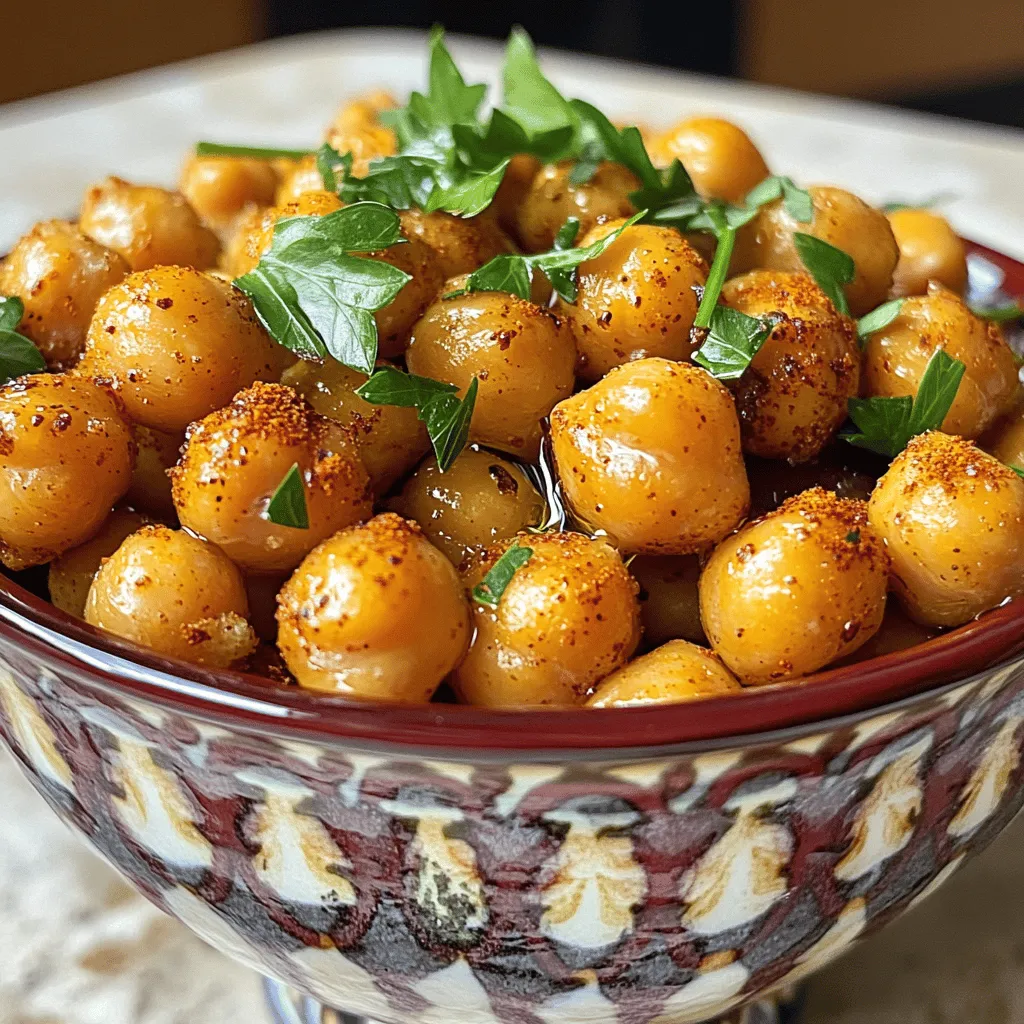
Are you ready to crunch on a delicious and healthy snack? Crispy roasted chickpeas are the perfect blend of flavor

- 1 cup rolled oats - 1 cup almond milk (or any milk of your choice) - ½ cup pumpkin puree - 2 tablespoons maple syrup (or honey) - 1 teaspoon pumpkin spice blend - ¼ teaspoon vanilla extract - 1 tablespoon chia seeds - A pinch of salt - Toppings: chopped pecans, sliced banana, or yogurt When I make pumpkin spice overnight oats, I focus on these key ingredients. The rolled oats serve as the base, soaking up all the flavors. I like using almond milk, but any milk works well. The pumpkin puree adds creaminess and a rich taste. Next, I sweeten with maple syrup. It pairs perfectly with the pumpkin spice blend. This blend usually contains cinnamon, nutmeg, and ginger. I also add a hint of vanilla for depth. Chia seeds are a must in my recipe. They add texture and boost nutrition. A pinch of salt enhances the flavors, making everything pop. For toppings, I love chopped pecans for crunch and sliced banana for sweetness. Yogurt also adds creaminess and a tangy touch. These ingredients create a delightful mix of flavors and textures in every bite. Check out the Full Recipe for more tips and tricks! Start by taking a medium bowl. In it, combine 1 cup rolled oats and 1 tablespoon chia seeds. Mix these dry ingredients well. This step is vital. It ensures the chia seeds blend evenly with the oats. Now, grab a separate bowl. Whisk together 1 cup almond milk, ½ cup pumpkin puree, and 2 tablespoons maple syrup. This adds sweetness. Add 1 teaspoon pumpkin spice blend and ¼ teaspoon vanilla extract. Keep whisking until everything is smooth. This mixture gives the oats their rich flavor. Next, pour the pumpkin mixture over the oat blend. Use a spatula or spoon to stir it thoroughly. Make sure every oat is well-coated in the pumpkin mix. This step ensures that every bite has flavor. Evenly divide the mix into two jars or airtight containers. Seal them tightly to keep moisture inside. Place the jars in the fridge. Let them sit overnight or for at least 4 hours. This soaking process allows the oats to absorb all the flavors. The next morning, stir well before serving. You can top your oats with chopped pecans, sliced banana, or a dollop of yogurt for extra taste. For the full recipe, check out the provided details. Using the right milk makes a big difference. Almond milk adds a nutty taste and a nice creaminess. You can also try oat or coconut milk. Adjust the sweetness to your liking. Maple syrup gives a warm flavor. Honey is another great option if you want it sweeter. Start with two tablespoons and add more if needed. Use clear jars to show off the layers. This makes it look more appealing and fun to eat. You can also garnish with toppings for extra texture. Chopped pecans add crunch. Sliced bananas give sweetness. A dollop of yogurt adds creaminess. These small details make your oats look gourmet! Preparing multiple servings saves time. You can make a few jars on Sunday and eat them all week. Store different flavors in the same batch if you like. Just add unique toppings or spices for variety. This way, you enjoy a new taste every day! {{image_4}} You can switch up the spices to change the taste of your oats. Try adding: - 1 teaspoon cinnamon for a warm flavor. - A pinch of nutmeg for extra depth. - Ginger powder for a spicy kick. You might also use flavored milk. Almond milk gives a nutty taste. Coconut milk adds a tropical twist. If you need gluten-free options, choose gluten-free oats. They taste just as good and are safe for gluten-free diets. For sweetening, consider using low-calorie sweeteners like stevia or monk fruit. These will keep your oats tasty without the extra calories. You can also explore non-dairy options. Try oat milk or soy milk. Both work well and are creamy. Toppings can make your oats even better. Here are some nut-free ideas: - Sunflower seeds for crunch. - Dried cranberries for sweetness. - Pumpkin seeds for a fall touch. For seasonal fruit, add sliced apples or pears. They pair perfectly with pumpkin spice. Fresh berries can add a nice pop of color and flavor too. For the full recipe, check the recipe section above. To store your pumpkin spice overnight oats, keep them in the refrigerator. I recommend using airtight containers or jars. This method helps them stay fresh and tasty. Your oats will last about 3 to 5 days in the fridge. After that, they may lose flavor and texture. You can freeze your overnight oats if you want to keep them longer. To do this, place the oats in a freezer-safe container. Leave some space at the top for expansion. They will last up to 3 months in the freezer. When you’re ready to eat them, move the container to the fridge for 6 to 8 hours to defrost. For a quicker method, use the microwave on a low setting. When you want to enjoy your oats again, there are easy ways to reheat them. The microwave works well for this. Heat the oats in short bursts of 20-30 seconds. Stir in between to check the temperature. If the oats feel too thick, add a splash of milk to restore creaminess. This way, you’ll keep that smooth texture. Yes, you can skip the chia seeds. If you want more texture, try ground flaxseeds or hemp hearts. Both options add fiber and nutrients. If you want a smoother mix, you can leave them out entirely. Just remember, chia seeds help with creaminess. Pumpkin spice overnight oats last about four to five days in the fridge. Store them in airtight containers to keep them fresh. Always check for any off smells or changes in texture before eating. If they look good, they are likely still safe to enjoy. Yes, you can use fresh pumpkin. You will need to cook and puree it first. To do this, cut the pumpkin, remove the seeds, and roast it until soft. Blend it until smooth. Use about the same amount as canned puree in your recipe. Absolutely! You can add more maple syrup or honey if you want it sweeter. If you prefer less sweetness, reduce the amount of sweetener. You can also try using mashed bananas or applesauce for natural sweetness. Pumpkin spice overnight oats are packed with health benefits. They are high in fiber, which helps digestion. Pumpkin is rich in vitamins A and C, which support your immune system. The oats provide energy and keep you full longer. Overall, it’s a nutritious way to start your day. You can personalize your overnight oats in many fun ways! Add nuts or seeds for crunch. Try different fruits like apples or berries for a fresh twist. You can also mix in yogurt or nut butter for creaminess and protein. Get creative and make it your own! Making pumpkin spice overnight oats is simple and fun. You combine rolled oats, almond milk, and pumpkin puree with sweeteners and spices. Let it sit overnight, and you get a tasty breakfast. Remember, you can adjust flavors and add toppings to fit your taste. Experiment with different milks, spices, and fruits. This dish is not only easy but also healthy and satisfying. Enjoy your healthy morning fuel!

Pumpkin Spice Overnight Oats Simple and Tasty Recipe

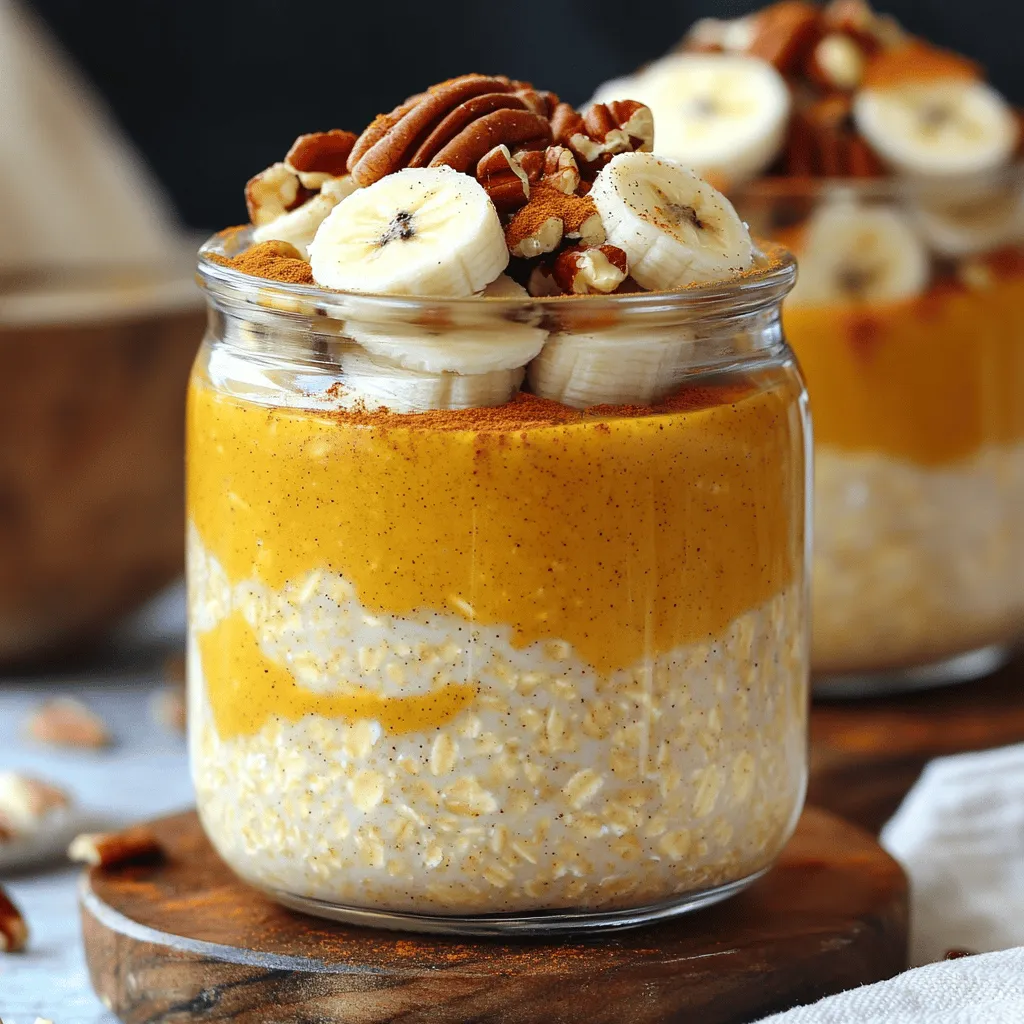
If you love fall flavors, you’ll adore my Pumpkin Spice Overnight Oats recipe. It combines creamy oats with rich pumpkin

To make this rich chocolate avocado mousse, gather these simple ingredients: - 2 ripe avocados, pitted and peeled - 1/2 cup unsweetened cocoa powder - 1/2 cup pure maple syrup or honey (or to taste) - 1/4 cup almond milk (or your preferred non-dairy milk) - 1 teaspoon pure vanilla extract - A pinch of salt Toppings can add fun and flavor. Here are some great options: - Whipped coconut cream - Dark chocolate shavings - Fresh berries - Crushed nuts If you need to swap ingredients, here are some ideas: - Use silken tofu instead of avocados for a different texture. - Try a sugar substitute, like agave nectar, for a lower-calorie option. - For a nut-free version, use oat milk instead of almond milk. These swaps can help you customize the mousse to fit your needs. You can find the full recipe above and explore more options to make this dish your own! Start by picking ripe avocados. Their skin should be dark green and slightly soft. Cut the avocados in half, remove the pit, and scoop the flesh into your food processor. This process makes the mousse creamy and rich. Blend the avocados until they are smooth. You might need to stop and scrape the sides. This ensures every bit gets blended evenly. Once your avocados are smooth, it’s time to add the rest of the ingredients. Add 1/2 cup of unsweetened cocoa powder, 1/2 cup of pure maple syrup or honey, 1/4 cup of almond milk, 1 teaspoon of pure vanilla extract, and a pinch of salt to the processor. Blend again on high until the mix is creamy and smooth. Taste the mousse and adjust the sweetness if needed. Sometimes, a little more maple syrup or honey can make it perfect! Carefully transfer the mousse into individual bowls or dessert glasses. Cover each bowl with plastic wrap. Place them in the refrigerator for at least 30 minutes. This chilling time helps the mousse set and enhances the flavors. When you’re ready to serve, take the mousse out of the fridge. You can top it with whipped coconut cream, dark chocolate shavings, fresh berries, or crushed nuts. These toppings add texture and extra flavor, making your dessert even more delightful. For the full recipe, refer to the beginning of this article. To get that rich and creamy mousse, start with ripe avocados. Soft avocados blend smoother. You should blend your avocados until they are completely smooth. If you see lumps, keep blending. Adding almond milk helps achieve a lighter texture. If the mousse is too thick, just add a little more almond milk. Taste is key! After blending your ingredients, taste the mousse. If you want it sweeter, add more maple syrup or honey. You can mix in a little at a time. This way, you control the sweetness. Remember, the cocoa powder adds some bitterness, so balance is important. For a stunning presentation, use clear dessert cups. This shows off the rich color of your mousse. Top each serving with a dollop of whipped coconut cream. Dark chocolate shavings or fresh berries add a nice touch. You can even sprinkle some crushed nuts for extra crunch. Serve it chilled for the best taste. Check out the Full Recipe for more details! {{image_4}} If you're looking for a vegan treat, you’re in luck. The base of this mousse is already plant-based. Just use maple syrup instead of honey. This change keeps it sweet and vegan-friendly. You can enjoy a creamy dessert that feels rich without any dairy. Adding flavors can make the mousse even more exciting. If you love mint, add a few drops of peppermint extract. It gives a fresh twist. For coffee lovers, try adding a teaspoon of instant coffee. This will enhance the chocolate taste and add depth to your mousse. If you want to cut back on sugar, there are easy fixes. Use less maple syrup or honey. You can also try using a sugar substitute like stevia. This keeps the mousse sweet without the extra calories. Just remember to taste as you go to find your perfect balance. For the full recipe, check out the detailed instructions above. After enjoying your Chocolate Avocado Mousse, you may have some left. To keep it fresh, store it in an airtight container. I recommend covering the surface with plastic wrap. This step helps prevent browning. Place it in the fridge. It will stay delicious for about two days. If you want to save some mousse for later, you can freeze it. Use an airtight container or freezer-safe bags. Make sure to leave some space for expansion. When you're ready to enjoy it, thaw the mousse in the fridge overnight. This way, it maintains its creaminess. The mousse is best when eaten fresh. It stays good in the fridge for about two days. When frozen, it can last for up to a month. To enjoy the best flavor, try to eat it sooner. Always check for any changes in smell or texture before eating. If you do not have cocoa powder, you can use carob powder. Carob has a mild, sweet flavor. You can also try Dutch-processed cocoa. It is less bitter than regular cocoa. Dark chocolate can work too. Melt it and mix it into the mousse. Just remember, any change will alter the taste a bit. Yes, this mousse is healthy! It uses ripe avocados, which are full of good fats. These fats help your heart and keep you full. The cocoa powder offers antioxidants that help fight free radicals. If you use maple syrup or honey, it adds sweetness without refined sugar. Overall, this dessert gives you taste and nutrition. Chocolate Avocado Mousse stays fresh for about three days in the fridge. Make sure to cover it well. Use plastic wrap or an airtight container to keep it fresh. If you see any change in smell or color, throw it out to be safe. Enjoy the mousse while it's still creamy and yummy! This blog post covered how to make chocolate avocado mousse. We discussed the best ingredients, different toppings, and substitutes. I explained the step-by-step process and shared tips for the perfect texture. You also learned about fun variations and storage options. In summary, making this mousse is easy and fun. You can tailor it to your taste or diet. Enjoy creating your own delicious treats!

Chocolate Avocado Mousse Rich and Decadent Delight

Are you ready to indulge in a dessert that’s rich, creamy, and guilt-free? My Chocolate Avocado Mousse delivers all the

To make this tasty dish, you need some key ingredients. Here’s what I use: - 1 lb Brussels sprouts, trimmed and halved - 3 tablespoons high-quality olive oil - 4 cloves garlic, finely minced - Zest and juice of 1 medium-sized lemon - 1 teaspoon honey (or maple syrup for a vegan option) - Salt and freshly ground black pepper to taste These ingredients create a bright and zesty flavor profile. The Brussels sprouts get crispy on the outside while staying tender inside. If you want to take your dish up a notch, consider adding these optional ingredients: - 1/4 teaspoon red pepper flakes (for a kick) - 2 tablespoons freshly grated Parmesan cheese (for garnish) - 2 tablespoons fresh parsley, finely chopped (for garnish) The red pepper flakes add a nice heat. Parmesan cheese gives it a creamy, salty touch. Fresh parsley brightens up the dish visually and in flavor. Seasonings are key to enhancing your Brussels sprouts. Here are my favorites: - Salt and freshly ground black pepper - Lemon zest and juice - Honey or maple syrup These not only season the dish but also balance the flavors. The salt enhances the natural taste of the sprouts. The honey or maple syrup brings a sweet touch, while lemon adds a refreshing zing. For the complete recipe, check out the Full Recipe link. To start, gather your ingredients. You need Brussels sprouts, olive oil, garlic, lemon, honey, salt, and pepper. You can also add red pepper flakes and Parmesan if you want. Wash the Brussels sprouts well. Trim the ends and cut them in half. This helps them cook evenly. 1. Preheat your oven to 425°F (220°C). This high heat gives the Brussels sprouts a nice brown color. 2. In a large bowl, mix the halved Brussels sprouts with olive oil, minced garlic, lemon zest, lemon juice, honey, salt, and pepper. Toss them well to coat. 3. Spread the sprouts on a baking sheet in a single layer. Make sure the cut sides face down. This allows for maximum browning. 4. If you like heat, sprinkle red pepper flakes over the sprouts. 5. Roast them in the oven for 20 to 25 minutes. Stir them halfway through for even cooking. They should be soft and crispy at the edges. 6. When done, remove the baking sheet from the oven. If using, sprinkle Parmesan cheese on top while they are hot. 7. Lastly, garnish with fresh parsley for color and freshness before serving. - Use fresh Brussels sprouts for the best flavor. - Don't overcrowd the baking sheet. Give them space to roast well. - Stir the sprouts halfway through cooking. This helps them brown evenly. - Adjust cooking time based on your oven. Some ovens may cook faster. - For extra flavor, add a splash of balsamic vinegar before serving. For a complete guide to making this dish, check the Full Recipe. When making Lemon Garlic Roasted Brussels Sprouts, avoid these mistakes to ensure success: - Not trimming the sprouts: Always trim and halve your Brussels sprouts. This helps them cook evenly. - Using low-quality oil: Choose high-quality olive oil for the best flavor. Cheap oils can ruin your dish. - Crowding the pan: Spread the sprouts out on the baking sheet. If they touch, they'll steam instead of roast. - Skipping the toss: Toss the sprouts well with the oil and seasonings. This ensures every piece gets coated. You can prepare Brussels sprouts in advance: 1. Prep the sprouts: Trim and halve them a day before. Store in an airtight container in the fridge. 2. Mix the marinade: Combine lemon juice, zest, garlic, honey, salt, and pepper ahead of time. Keep it in the fridge. 3. Combine before cooking: When you are ready to roast, mix the sprouts with the marinade. This saves time. To boost the flavors of your Lemon Garlic Roasted Brussels Sprouts, consider these tips: - Add herbs: Fresh thyme or rosemary can add depth. Toss in some chopped herbs before roasting. - Use citrus: Try adding orange or lime juice for a different twist on the lemon flavor. - Experiment with spices: A pinch of smoked paprika or cumin can enhance the taste. These spices add warmth and complexity. - Top with nuts: Chopped walnuts or almonds add crunch and richness. Sprinkle them on after roasting for a delightful texture. This flavorful recipe is sure to impress. For all the steps, check the Full Recipe. {{image_4}} You can easily make this dish vegan. Simply swap the honey for maple syrup. It adds the same sweetness without any animal products. Plus, skip the Parmesan cheese for a pure plant-based option. The lemon and garlic flavors still shine bright, giving you a tasty side dish. This recipe is naturally gluten-free. All the ingredients are safe to eat for those with gluten sensitivities. Use high-quality olive oil, fresh garlic, and lemon juice. You can enjoy this dish without worry. You can customize the flavor of your Brussels sprouts. Here are some ideas: - Balsamic Glaze: Drizzle some balsamic glaze before roasting for a sweet tang. - Nuts: Add chopped walnuts or almonds for crunch and richness. - Spices: Mix in smoked paprika or curry powder for a new twist. - Cheese: For a richer taste, try feta cheese instead of Parmesan. Experiment with these options to make the dish your own! For the complete recipe, check out the Full Recipe. To keep your Lemon Garlic Roasted Brussels Sprouts fresh, let them cool first. Place them in an airtight container. They can last in the fridge for up to three days. If you want to keep them longer, consider freezing. Just remember, they taste best fresh! Reheating Brussels sprouts can be simple. You can use an oven or a skillet. For the oven, preheat it to 350°F (175°C). Spread the sprouts on a baking sheet. Heat for about 10-15 minutes until warm. If using a skillet, add a little olive oil over low heat. Stir gently until heated through. This will help keep them crispy. If you choose to freeze your Brussels sprouts, do this right after cooking. Allow them to cool, then spread them out on a baking sheet. Freeze them for a few hours until solid. Transfer the frozen sprouts to a freezer bag. They will keep for about three months. When you are ready to use them, just reheat directly from the freezer! For the full recipe, check out the Lemon Garlic Roasted Brussels Sprouts 🧄. Roast Brussels sprouts for 20 to 25 minutes at 425°F (220°C). This time allows them to become tender and brown. Stir them halfway through to ensure even cooking. You want them to have nice crispy edges and a soft center. Yes, you can use frozen Brussels sprouts. However, fresh ones will taste better. If you use frozen, roast them a bit longer, around 25 to 30 minutes. Make sure to thaw them first and drain excess water to avoid sogginess. These roasted sprouts pair well with many dishes. Try them with grilled chicken, fish, or pork. They also go nicely with quinoa or rice. For a vegetarian option, serve them alongside a hearty grain salad or pasta. Check the Full Recipe for more ideas. Lemon garlic roasted Brussels sprouts are a tasty dish that everyone can enjoy. We covered the key ingredients for great flavor and the steps to cook them perfectly. I shared tips to avoid common mistakes and ideas for making them ahead. You also learned about variations, storage, and answers to common questions. This dish is easy to make and offers many options to suit your taste. Enjoy your cooking adventure and make this dish your own!

Lemon Garlic Roasted Brussels Sprouts Flavorful Recipe

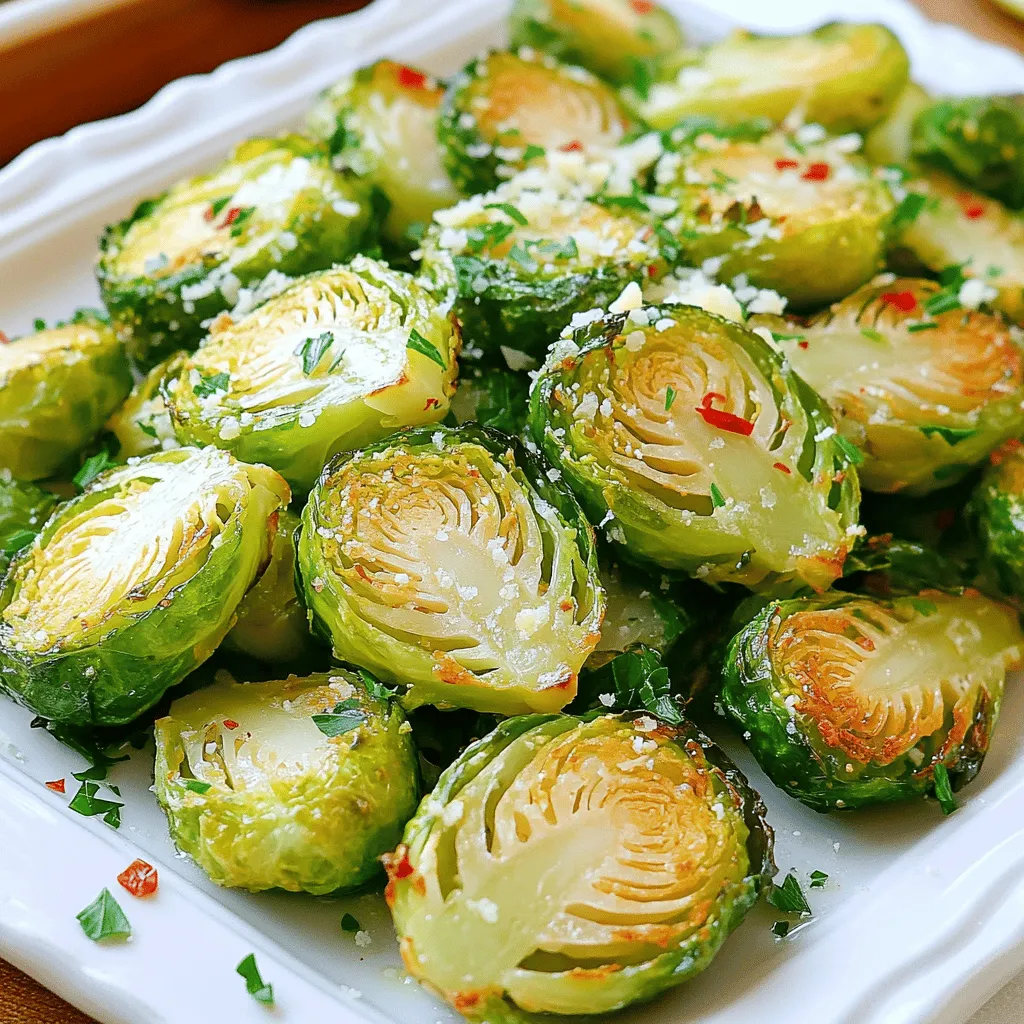
If you’re looking for a simple yet tasty side dish, you’ve come to the right place! My Lemon Garlic Roasted

To make this delicious dish, gather these ingredients: - 4 boneless, skinless chicken breasts - 2 cups fresh spinach, finely chopped - 1 cup feta cheese, crumbled - 1/2 cup cream cheese, softened - 2 cloves garlic, minced - 1 teaspoon dried oregano - 1 tablespoon olive oil - Salt and freshly ground black pepper to taste - 1/2 cup breadcrumbs (optional, for topping) - Fresh parsley, chopped, for garnish Choosing the best ingredients makes a big difference in flavor. Here are my tips: - Chicken Breasts: Look for fresh, plump chicken breasts. Organic options are often tastier. - Spinach: Choose vibrant, dark green spinach. Avoid any yellow or wilted leaves. - Feta Cheese: Opt for crumbled feta made from sheep's milk. It has a richer taste. - Cream Cheese: Use full-fat cream cheese for a creamy texture. - Garlic: Fresh garlic cloves pack more flavor than pre-minced options. - Herbs: Use dried oregano for a hint of earthiness. Fresh herbs can also elevate the dish. This dish is not just tasty; it's also nutritious. Here’s a breakdown of the main components per serving: - Calories: Approximately 350 - Protein: About 40g - Fat: Roughly 20g - Carbohydrates: Around 6g - Fiber: 1g - Sodium: Depends on added salt and feta used Spinach adds vitamins A and K, while feta cheese provides calcium. This meal balances protein, healthy fats, and greens. For the full recipe, check out the detailed instructions on how to prepare this flavorful delight. Gather all your ingredients first. This makes cooking easier and fun. You need: - 4 boneless, skinless chicken breasts - 2 cups fresh spinach, finely chopped - 1 cup feta cheese, crumbled - 1/2 cup cream cheese, softened - 2 cloves garlic, minced - 1 teaspoon dried oregano - 1 tablespoon olive oil - Salt and black pepper to taste - 1/2 cup breadcrumbs (optional) - Fresh parsley, chopped, for garnish Wash the spinach and chop it finely. Mince the garlic too. Make sure the cream cheese is soft. This helps it blend well with other ingredients. In a medium skillet, heat the olive oil over medium heat. Add the minced garlic and sauté for about 1 minute. Watch it closely so it doesn’t burn. Next, stir in the chopped spinach. Cook for 2-3 minutes until the spinach wilts. Remove the skillet from heat and let it cool. In a mixing bowl, combine the wilted spinach, crumbled feta, cream cheese, and oregano. Mix until creamy. Season with salt and black pepper to your taste. Take each chicken breast and slice a pocket in the thickest part. Be careful not to cut it all the way through. Fill each breast generously with the spinach and feta mixture. Preheat your oven to 375°F (190°C). Arrange the stuffed chicken in a baking dish. If you like, sprinkle breadcrumbs on top for added crunch. Cover the dish with aluminum foil to keep the chicken moist. Bake for 25 minutes. After that, remove the foil and bake for another 15-20 minutes. You want the chicken to reach 165°F (75°C) inside. Once finished, take the dish out of the oven. Let it rest for 5 minutes before slicing. This helps the juices stay inside the chicken. Right before serving, sprinkle fresh parsley on top for a lovely color. Enjoy your flavorful delight! For the full recipe, check the earlier section. To stuff your chicken breasts just right, start by cutting a pocket. Cut into the thick side and do not cut all the way through. This method keeps the filling inside. Use a spoon to fill the pocket generously with the spinach and feta mixture. Make sure it is packed, but not overflowing. This way, the filling stays inside during cooking. For juicy chicken, avoid overcooking. Use a meat thermometer to check the temperature. The chicken should reach 165°F (75°C) for safety. Bake covered for part of the time. This keeps moisture in, making the chicken tender. Let the chicken rest for five minutes after baking. This helps the juices settle, ensuring every bite is juicy. When serving, slice the chicken breasts for a lovely display. Arrange them on a large platter to impress your guests. Drizzle with olive oil or lemon juice for extra flavor. Add a side of vibrant steamed vegetables for color. You can also sprinkle fresh parsley on top. This adds a pop of green and enhances the dish's look. Enjoy your flavorful delight! {{image_4}} You can change the cheese for fun. Cream cheese gives a rich taste. You might enjoy mozzarella for a gooey texture. Goat cheese adds a tangy kick. Use cheddar for a sharper, bolder flavor. Mix and match to find your favorite! You can add healthy grains like quinoa. Quinoa boosts protein and fiber. It makes the filling more filling. You can also use brown rice for a nutty taste. These grains add texture and nutrition. Adding herbs and spices can change the flavor. Try fresh basil or dill for bright notes. A pinch of paprika gives a slight warmth. You can also use lemon zest for a citrus burst. These small tweaks can make each dish unique and exciting. To keep your Spinach Feta Stuffed Chicken Breast fresh, store it in an airtight container. Make sure the chicken is cool before sealing it. Place the container in the fridge. This keeps leftovers safe for up to three days. When you’re ready to enjoy the leftovers, preheat your oven to 350°F (175°C). Place the chicken in an oven-safe dish. Cover it with foil to keep moisture in. Heat for about 15-20 minutes. This method helps the chicken stay juicy and tasty. If you want to save your stuffed chicken for later, freezing is a good option. Wrap each piece tightly in plastic wrap. Then, place them in a freezer bag. This keeps the chicken safe for up to three months. When you’re ready to eat, thaw it overnight in the fridge. Then, follow the reheating instructions to enjoy your flavorful delight again. Yes, you can prepare Spinach Feta Stuffed Chicken Breast ahead of time. You can make the filling and stuff the chicken breasts a day before. Store them in the fridge. When you are ready to cook, just bake them as per the recipe. You can serve many sides with Spinach Feta Stuffed Chicken Breast. Some great options include: - Steamed vegetables like broccoli or green beans - Rice or quinoa for a hearty meal - A fresh salad for a light touch - Mashed potatoes for comfort food To check if the chicken is fully cooked, use a meat thermometer. The internal temperature should reach 165°F (75°C). If you don’t have a thermometer, cut into the thickest part. The juices should run clear, and the meat should no longer be pink. Yes, you can use frozen spinach. Make sure to thaw it first and squeeze out excess water. This helps keep the filling from getting too watery. Frozen spinach can save time and still taste great. You can find the full recipe for Spinach Feta Stuffed Chicken Breast above. It includes all the ingredients and step-by-step instructions to make this delicious dish. Enjoy cooking! In this post, we explored how to make a delicious Spinach Feta Stuffed Chicken Breast. We covered the key ingredients and tips for choosing the best ones. You learned step-by-step cooking and baking instructions for perfect results. I shared helpful tricks to ensure your chicken stays juicy and flavorful. In addition, we discussed variations you can try and how to store your leftovers effectively. Enjoy creating this tasty dish and impressing your friends and family.

Spinach Feta Stuffed Chicken Breast Flavorful Delight

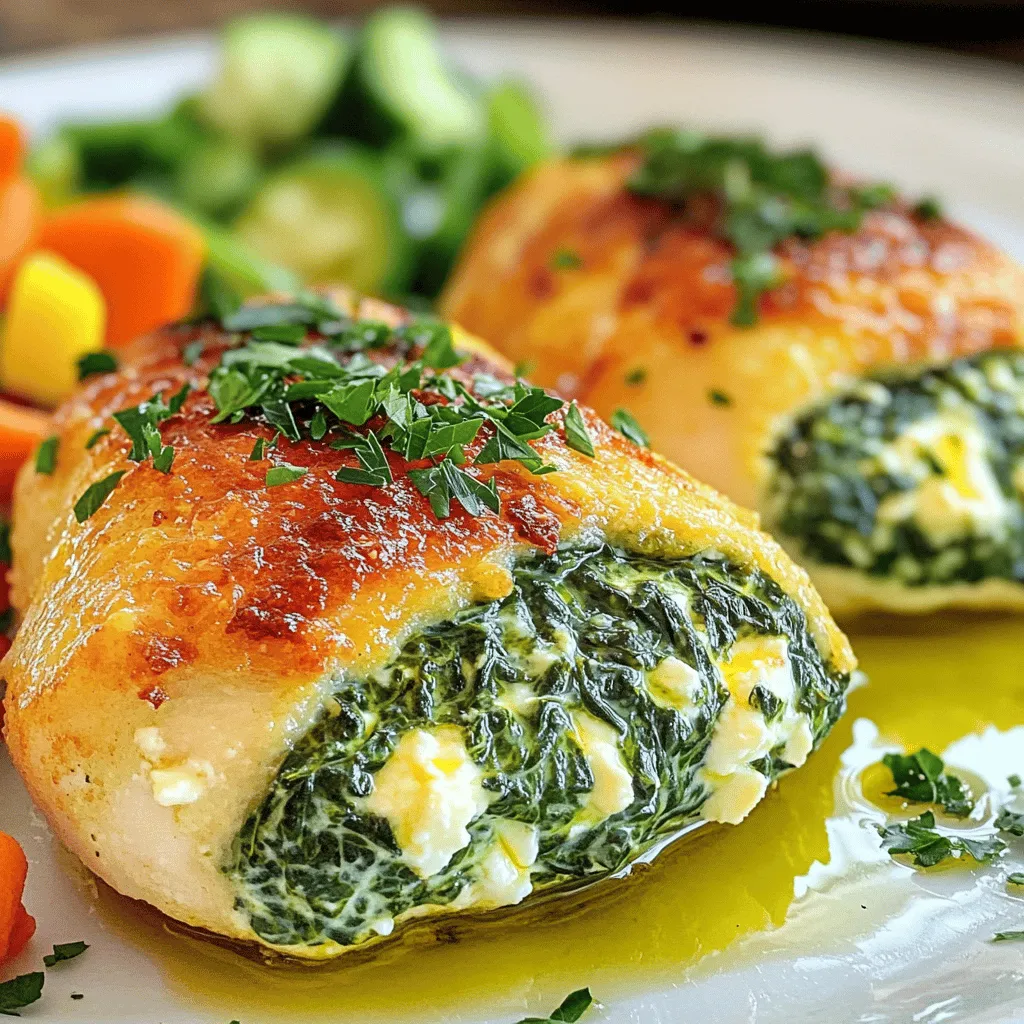
Are you ready to impress your family at dinner? Spinach Feta Stuffed Chicken Breast is a dish that packs flavor

Older posts
Newer posts
← Previous Page1 … Page84 Page85 Page86 Next →

dsad

© 2026 yumymoments • Built with GeneratePress

Our Policies

  • Copyright Policy
  • Cookie Policy
  • GDPR Policy
  • Privacy Policy
  • Disclaimer
  • Terms Of Use

More Information

  • Home
  • About
  • Contact
  • Appetizers
  • Dessert
  • Dinner
  • Drinks
©2026, yumymoments About Back To Top