Are you ready to indulge in the best baked mac and cheese ever? This ultimate recipe brings together creamy cheeses, hearty pasta, and a crispy topping that will make your dinner unforgettable. With easy steps and simple ingredients, you can whip up this delightful dish in no time. Whether you’re cooking for family or hosting friends, this is the comfort food you need. Let’s dive into how to create this cheesy masterpiece!
Ingredients
Main Ingredients
– 2 cups elbow macaroni
– 4 tablespoons unsalted butter
– 4 tablespoons all-purpose flour
– 2 cups milk (whole or 2%)
– 1 cup sharp cheddar cheese, shredded
– 1 cup Gruyère cheese, shredded
– 1 cup mozzarella cheese, shredded
I love using elbow macaroni for this dish. It holds the cheese sauce perfectly. Butter and flour make a roux, which is the base of our sauce. Then, we add milk to create that creamy goodness. I use three types of cheese: sharp cheddar, Gruyère, and mozzarella. This combo adds flavor and texture.
Seasonings and Extras
– 1 teaspoon Dijon mustard
– 1/2 teaspoon garlic powder
– 1/2 teaspoon onion powder
– Salt and pepper to taste
Seasonings bring life to our cheese sauce. Dijon mustard adds a nice tang. Garlic and onion powders give it depth. Always taste and adjust salt and pepper to your liking.
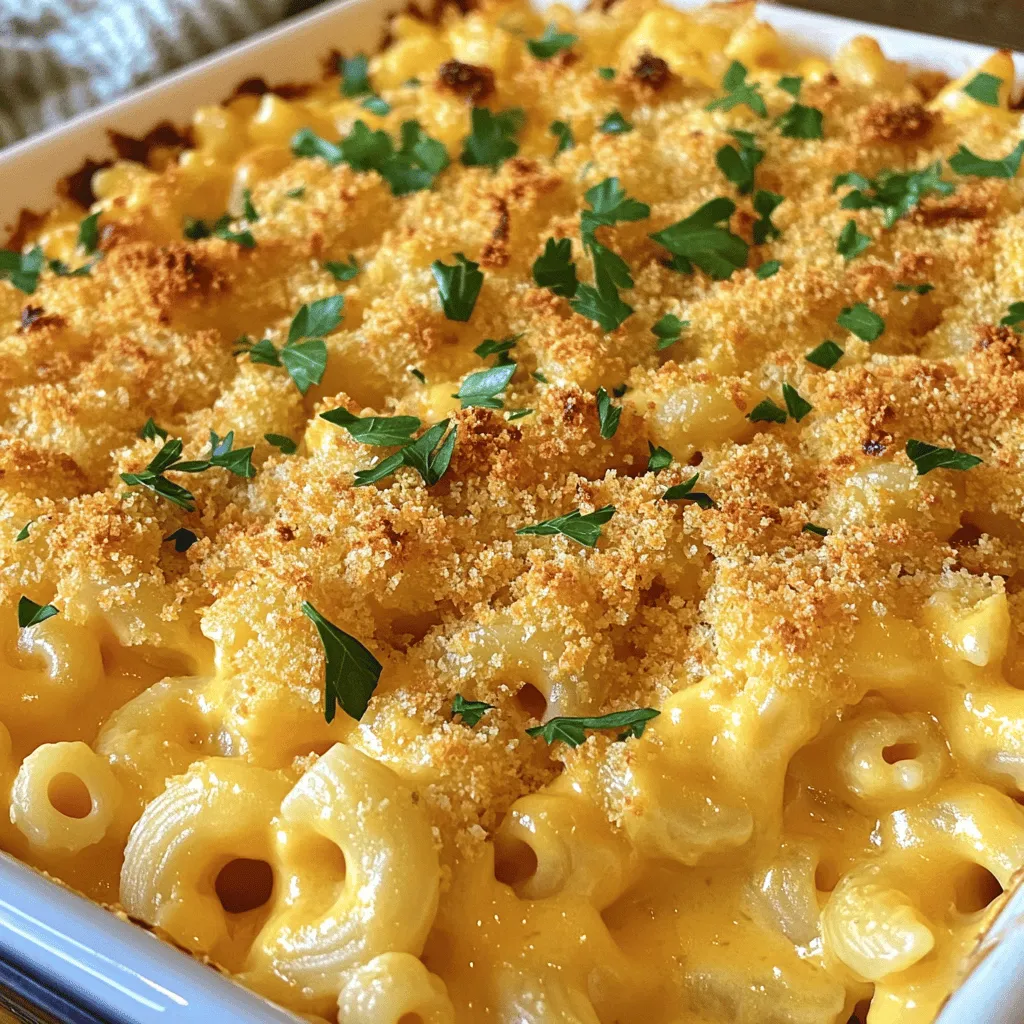
Topping
– 1/2 cup breadcrumbs (preferably panko)
– 2 tablespoons fresh parsley, chopped (for garnish)
Panko breadcrumbs make a crispy topping. This crunch contrasts well with the creamy mac and cheese. Fresh parsley adds a pop of color and flavor when serving.
Step-by-Step Instructions
Preparing the Pasta
– Preheat the oven to 350°F (175°C).
– Cook the elbow macaroni in salted boiling water until al dente.
– Drain and set aside.
First, I start by preheating my oven. It’s important to get it ready before cooking the pasta. I fill a large pot with water. I add a good pinch of salt to the boiling water. Once it bubbles, I toss in the elbow macaroni. I cook it just until it’s al dente, which means it still has a little bite. After draining the pasta, I set it aside to let it cool a bit.
Making the Cheese Sauce
– Melt butter in a saucepan and create a roux with flour.
– Gradually add milk to the roux and whisk until thickened.
– Stir in the seasonings and melted cheeses.
Next, I focus on the cheese sauce. I melt four tablespoons of butter in a large saucepan over medium heat. Once the butter is melted, I add four tablespoons of flour. I whisk them together to form a roux. This takes about one to two minutes. Then, I slowly pour in two cups of milk while whisking. This helps to avoid lumps. I keep stirring until the sauce thickens, which takes about five to seven minutes. Once thick, I lower the heat and add a teaspoon of Dijon mustard, garlic powder, and onion powder. I season it with salt and pepper. Finally, I mix in the shredded cheeses until they melt, making a creamy sauce.
Combining and Baking
– Fold the macaroni into the cheese sauce.
– Pour into a greased baking dish.
– Prepare the breadcrumb topping and bake.
Now, I fold the cooked macaroni into the cheese sauce. I make sure every piece is coated. Then, I pour the mixture into a greased baking dish. For the crispy topping, I mix breadcrumbs with melted butter in a small bowl. I spread this over the mac and cheese. I then bake it in the oven for 25 to 30 minutes. I know it’s done when the top is golden brown and the cheese is bubbly.
Tips & Tricks
Perfecting the Cheese Sauce
To make the best cheese sauce, choose a blend of sharp cheddar, Gruyère, and mozzarella. This mix gives your mac and cheese a deep, rich flavor. Sharp cheddar adds tang, while Gruyère brings a nutty taste. Mozzarella offers creaminess that ties it all together.
Whisking is key to a smooth sauce. When you add milk to the roux, whisk constantly. This prevents lumps and ensures a silky texture. If you see lumps, keep whisking. The goal is a creamy, even sauce.
Achieving a Crispy Topping
For the topping, I prefer panko breadcrumbs over regular ones. Panko gives a crunch that adds texture. Mix the breadcrumbs with a bit of melted butter for added flavor. You can also add spices like paprika or garlic powder for an extra kick.
Feel free to get creative with your toppings. A sprinkle of Parmesan cheese can enhance the flavor even more. You want a topping that contrasts with the creamy cheese below.
Cooking Time Variations
Baking times can change based on your oven. If your oven runs hot, check the mac and cheese a few minutes early. You want a golden top and a bubbly inside. Use a toothpick to check if the center is hot.
To ensure the interior is bubbly, cover the dish with foil for the first half of baking. This traps steam and helps cook the pasta. Remove the foil for the last few minutes to crisp up the top. Enjoy your delicious Ultimate Baked Mac & Cheese!

Variations
Ingredients Substitutions
When making baked mac and cheese, you can switch up the cheese. If you want a lighter dish, try lower-fat cheese. For a vegan option, use plant-based cheese like cashew or almond cheese. These alternatives melt well and still taste great.
If you need a gluten-free option, choose gluten-free pasta. Many brands now offer tasty gluten-free elbow macaroni. This way, everyone can enjoy this dish without worry.
Flavor Enhancements
To boost flavor, consider adding cooked bacon or sausage. Simply chop them up and mix them into the cheese sauce. This addition gives your mac and cheese a savory kick.
You can also mix in vegetables like broccoli or spinach. Lightly steam the veggies before adding. This makes your dish colorful and adds some nutrients.
Different Toppings
For a crunchy topping, you can use more than just breadcrumbs. Crushed crackers or even herbs work well. Try using crushed potato chips for a fun twist.
If you like some heat, sprinkle paprika or cayenne pepper on top. This adds a nice kick to your creamy dish.
Storage Info
Refrigeration
To store any leftover mac and cheese, let it cool first. Then, place it in an airtight container. This helps keep it fresh. In the fridge, your mac and cheese will stay good for about three to five days. Make sure to check for any signs of spoilage before eating.
Freezing Instructions
If you want to save some for later, freezing is easy. First, cool the mac and cheese completely. Then, scoop it into freezer-safe containers or bags. Squeeze out as much air as you can. This helps prevent freezer burn. You can freeze it for up to three months. When you’re ready to eat it, let it thaw in the fridge overnight before reheating.
Reheating Tips
To reheat your mac and cheese, the oven or microwave works best. If using the oven, preheat it to 350°F (175°C). Place the mac and cheese in a baking dish and cover it. This helps keep it creamy. Bake for about 20 minutes or until hot. If using the microwave, heat it in short bursts. Stir it often to avoid hot spots. Keep an eye on it to prevent overcooking. You want it warm but still creamy.
FAQs
How can I make mac and cheese creamy?
To keep your mac and cheese creamy, focus on the sauce. Start by making a smooth roux with butter and flour. Gradually add milk while whisking. This helps avoid lumps. Use whole milk for a richer sauce. Don’t skimp on cheese! The more, the better. Stir the cheese in until it melts into the sauce. If the sauce seems dry, add a splash of milk until it reaches your desired creaminess.
Can I make this recipe ahead of time?
Yes, you can make this dish ahead of time. Prepare the mac and cheese until the baking step. Then, cover it and store it in the fridge. You can bake it the next day. Just add a few extra minutes to the bake time. This ensures it’s hot and bubbly when served. If you want to freeze it, let it cool first. Then, wrap it tightly. When ready to eat, thaw it overnight in the fridge before baking.
Can I use different types of pasta?
Absolutely! While elbow macaroni is classic, feel free to try other pasta shapes. Cavatappi, shells, or penne work well too. These shapes hold the cheese sauce nicely. You can even use gluten-free pasta if needed. Just make sure to cook it until al dente, as it will bake more in the oven.
What do I serve with mac and cheese?
Mac and cheese pairs well with many sides. A simple green salad adds freshness. Roasted vegetables can balance the richness. You might also serve it with grilled chicken or bacon for added protein. For a fun twist, try it alongside BBQ ribs. This creates a hearty meal that everyone will enjoy.
This blog post covered how to make Ultimate Baked Mac & Cheese. We discussed the main ingredients, step-by-step instructions, and important tips for success. You can choose from many cheeses and toppings for flavor. Remember, adjusting cooking times will help you get the best results. Use leftovers wisely for future meals. With these ideas, you can create a dish that delights everyone. Enjoy your cheesy goodness and feel free to share your results!