White Chicken Chili Comforting and Hearty Recipe

WANT TO SAVE THIS RECIPE?

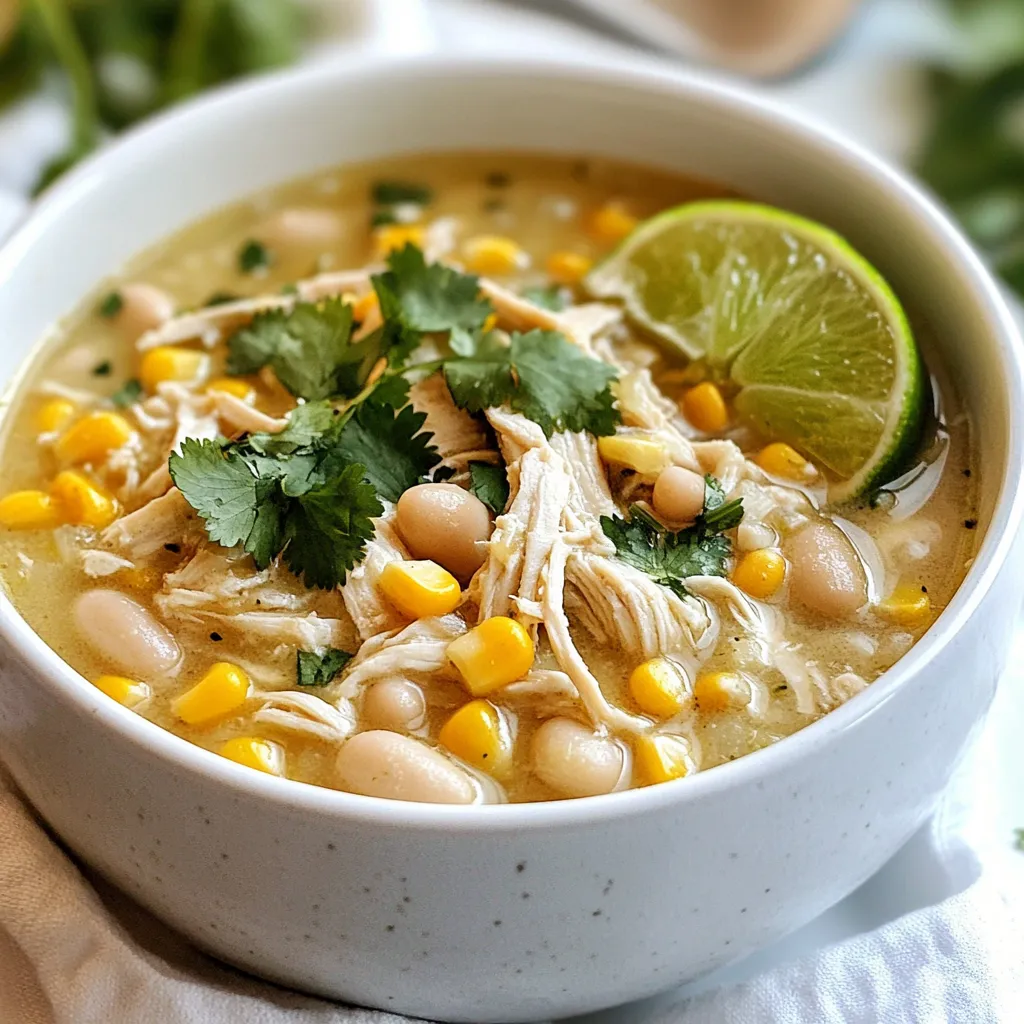
If you’re searching for a warm, filling meal, look no further than this White Chicken Chili. This recipe combines tender chicken, creamy ingredients, and just the right spices to make comfort food at its best. I’ll guide you through each step, share tips to elevate the flavors, and offer tasty variations. Let’s dive into a dish that you and your loved ones will crave, especially on chilly nights!

Why I Love This Recipe

  1. Quick and Easy: This chili comes together in just 40 minutes, making it perfect for busy weeknights or last-minute gatherings.
  2. Flavorful Comfort: The combination of spices and creamy texture creates a warm and comforting dish that everyone will love.
  3. Versatile Ingredients: Using rotisserie chicken and canned beans means you can whip this up with minimal prep, and it can easily be customized to your taste.
  4. Great for Leftovers: This chili reheats beautifully, making it a fantastic option for meal prep or enjoying the next day.

Ingredients

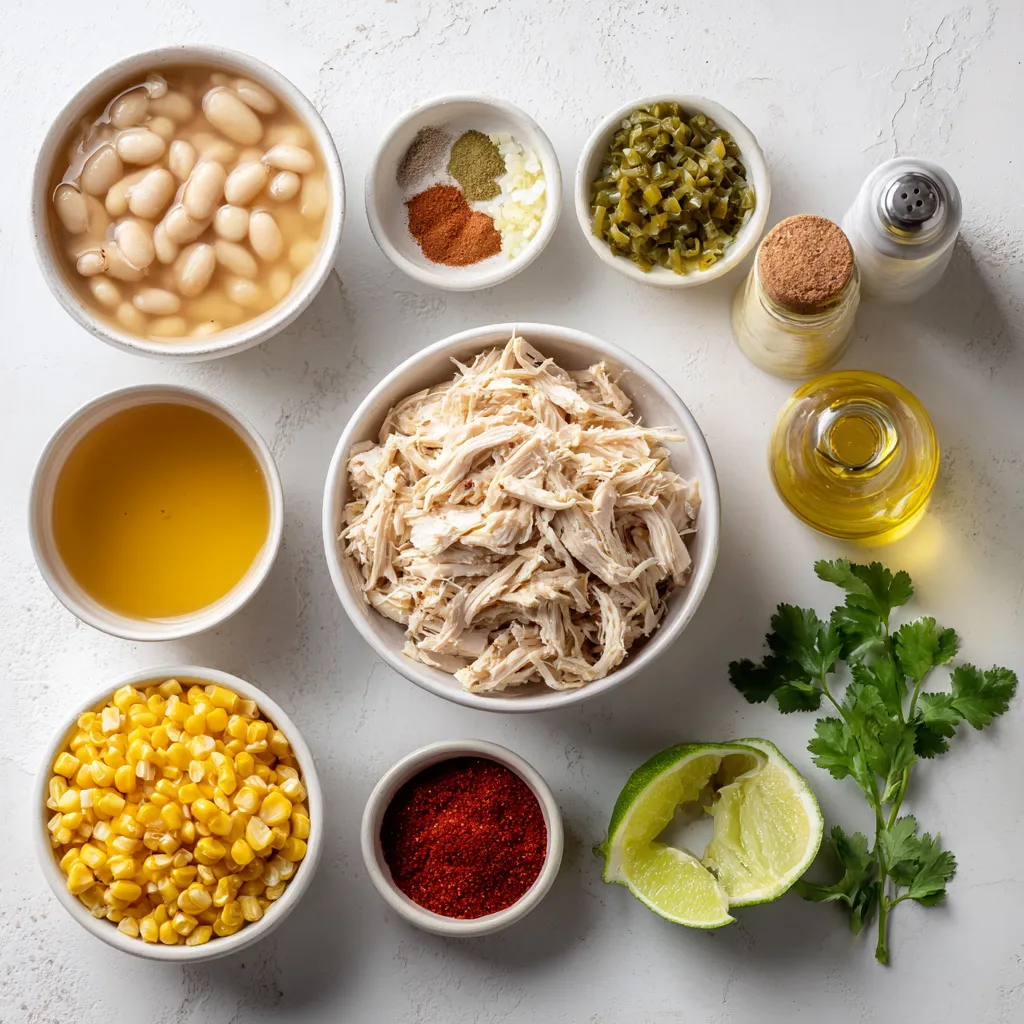
List of Required Ingredients

– 2 cups cooked chicken, shredded

– 1 can (15 oz) white beans, drained and rinsed

– 1 cup chicken broth

– 1 can (4 oz) diced green chiles

– 1 medium onion, diced finely

– 3 cloves garlic, minced

– 1 teaspoon ground cumin

– 1 teaspoon dried oregano

– ½ teaspoon chili powder

– 1 cup corn

– 1 cup heavy cream or coconut cream

– 2 tablespoons extra virgin olive oil

– Salt and pepper to taste

– Fresh cilantro, chopped

– Lime wedges

Substitutions for Ingredients

You can swap chicken for turkey if you prefer. Canned beans can change too. Use black beans or pinto beans if you like. Instead of chicken broth, vegetable broth works well. If you want a milder taste, skip the green chiles. For creaminess, use Greek yogurt instead of heavy cream. This makes it lighter and adds a tangy kick.

Explanation of Essential Ingredients

The cooked chicken gives this chili its heartiness. I often use rotisserie chicken for ease, but any cooked chicken works. White beans add creaminess and protein. The chicken broth forms the base, making it rich and flavorful. Diced green chiles bring heat and zest. Onion and garlic add depth to the flavor. Spices like cumin and oregano give warmth and aroma. Corn adds sweetness and texture. Finally, the heavy cream or coconut cream makes it rich and smooth. Each ingredient plays a key role in making this chili a comforting dish.

Step-by-Step Instructions

Detailed Cooking Instructions

1. Sauté Aromatics: First, heat 2 tablespoons of extra virgin olive oil in a large pot over medium heat. Add 1 medium diced onion and sauté for about 5 minutes. Wait until it becomes soft and clear. Then, add 3 minced garlic cloves and cook for another minute until it smells great.

2. Add Spices: Next, add 1 teaspoon of ground cumin, 1 teaspoon of dried oregano, and ½ teaspoon of chili powder to the pot. Stir well to cover the onion and garlic with the spices. Cook for 1-2 minutes to let the flavors grow.

3. Combine Ingredients: Now, add 2 cups of shredded chicken, 1 can of drained white beans, 1 cup of chicken broth, 1 can of diced green chiles, and 1 cup of corn to the pot. Mix everything well and bring it to a gentle simmer.

4. Simmer the Chili: Let the chili cook on low heat for 15-20 minutes. Stir occasionally. This helps all the flavors mix nicely and develop a rich taste.

5. Add Cream: Lower the heat to keep the chili warm. Stir in 1 cup of heavy cream or coconut cream. Heat gently for another 5 minutes until the cream mixes in well.

6. Season and Serve: Finally, taste your chili. Add salt and pepper as needed.

Tips for Each Cooking Step

Sauté Aromatics: Make sure the oil is hot before adding the onions. This helps them cook evenly.

Add Spices: Always stir spices in well to release their full flavor.

Combine Ingredients: Use a wooden spoon to scrape the bottom of the pot. This adds more flavor.

Simmer the Chili: Keep the heat low to avoid burning. Stirring helps too.

Add Cream: Do not boil the chili after adding cream. It can curdle if too hot.

Season and Serve: Remember to taste often. Adjust seasoning to your liking.

Cooking Techniques to Enhance Flavor

Sautéing: This method builds a deep flavor base. Always start with aromatics.

Simmering: Slow cooking helps meld the flavors together. Be patient; it’s worth it!

Deglazing: If you scrape the bottom of the pot, you get extra flavor.

Garnishing: Adding fresh cilantro and lime brightens the dish. It adds freshness to each bite.

Serving with Tortilla Chips: This adds crunch and a fun texture contrast.

Each step brings you closer to a warm and tasty bowl of white chicken chili. Enjoy the process, and don’t forget to share your delicious creation!

Tips & Tricks

How to Make It Extra Creamy

To make your chili extra creamy, use heavy cream or coconut cream. You can also add cream cheese for a richer texture. If you prefer a lighter option, blend some white beans into a puree and mix it in. This adds creaminess without extra fat. Always stir the cream in gently to keep that smooth blend.

Suggestions for Spice Adjustment

If you want to adjust the heat, use mild green chiles or add more spices. For a kick, try adding jalapeños or cayenne pepper. Start with a little and taste as you go. You can always add more, but you can’t take it out! This way, you can find the perfect balance for your taste buds.

Ways to Make It More Nutritious

Add more veggies to boost the nutrition of your chili. Chopped bell peppers, zucchini, or spinach work well. You can also mix in quinoa or brown rice for added fiber. Use low-sodium broth to keep it healthy. This way, your chili remains delicious and packed with nutrients!

Pro Tips

  1. Use Rotisserie Chicken: For a time-saving option, use store-bought rotisserie chicken. It adds great flavor and shreds easily for this chili.
  2. Adjust Spice Level: Depending on your preference, choose mild or spicy diced green chiles. You can also add fresh jalapeños for extra heat.
  3. Thickening the Chili: If you prefer a thicker chili, mash some of the white beans before adding them to the pot. This will create a creamier texture.
  4. Garnish for Flavor: Fresh cilantro and lime juice add brightness to the dish, enhancing the overall flavor profile. Don’t skip these garnishes!

Variations

Dairy-Free Options

To make this chili dairy-free, use coconut cream instead of heavy cream. Coconut cream adds a rich, creamy texture without dairy. It also brings a subtle sweetness. This option is perfect for those who are lactose intolerant or prefer plant-based ingredients.

Vegetarian or Vegan Adaptations

For a vegetarian or vegan version, replace the chicken with extra beans or vegetables. You can use mushrooms, zucchini, or bell peppers. Switch the chicken broth with vegetable broth to keep the flavors strong. This way, you get a hearty chili that’s still satisfying and full of flavor.

Flavor Variants Using Different Ingredients

You can switch up the spices to change the flavor profile. Try adding smoked paprika for a smoky taste. You can also add jalapeños for a spicy kick. Using different beans, like pinto or black beans, will give the chili a new look and taste. Don’t be afraid to experiment!

Storage Info

How to Store Leftovers

To store leftover white chicken chili, let it cool first. Then, transfer it to an airtight container. This keeps the chili fresh for up to three days in the fridge. If you want to keep it longer, freezing is a great option.

Freezing Instructions

For freezing, use freezer-safe containers or bags. Make sure to leave some space at the top. The chili will expand as it freezes. Label the containers with the date. It can stay fresh for up to three months in the freezer. To thaw, move it to the fridge overnight before reheating.

Reheating Best Practices

When you’re ready to enjoy your chili again, reheat it on the stove or in the microwave. If using the stove, heat it in a pot over low heat. Stir often to avoid burning. For the microwave, use a microwave-safe bowl and cover it loosely. Heat it in short bursts. This helps to warm it evenly. Always check that it’s heated through before serving again.

FAQs

Can I Use Canned Chicken?

Yes, you can use canned chicken. It saves time and is easy to use. Look for canned chicken that has good flavor. Drain it well before adding to the chili. Canned chicken works best if it is shredded. This way, it blends well with the other ingredients.

Using canned chicken can cut down on prep time. However, fresh chicken gives a better taste. If you have cooked chicken at home, use that instead.

How Long Does White Chicken Chili Last?

White chicken chili can last for about 3 to 4 days in the fridge. Store it in an airtight container for the best results. Make sure it cools down before you put it in the fridge. This helps keep it fresh.

If you want it to last longer, you can freeze it. It can stay in the freezer for up to 3 months. Just remember to label the container with the date. Thaw it in the fridge overnight before reheating.

What Can I Serve with White Chicken Chili?

There are many great options to serve with white chicken chili. Here are a few ideas:

– Warm tortillas or tortilla chips

– Rice or quinoa for a hearty meal

– A fresh salad for a light side

– Sour cream or Greek yogurt for creaminess

– Avocado slices for added richness

These sides will enhance your meal and make it more filling. Get creative and enjoy your chili with your favorite toppings!

You learned about the key ingredients, cooking steps, and tips for white chicken chili. I shared ways to make it creamy, nutritious, and exciting through variations. You also discovered storage tips and answered common questions. In the end, this dish is not only tasty but also flexible. You can adjust it to your needs and preferences. Enjoy your cooking journey and make every bowl a delicious masterpiec

- 2 cups cooked chicken, shredded - 1 can (15 oz) white beans, drained and rinsed - 1 cup chicken broth - 1 can (4 oz) diced green chiles - 1 medium onion, diced finely - 3 cloves garlic, minced - 1 teaspoon ground cumin - 1 teaspoon dried oregano - ½ teaspoon chili powder - 1 cup corn - 1 cup heavy cream or coconut cream - 2 tablespoons extra virgin olive oil - Salt and pepper to taste - Fresh cilantro, chopped - Lime wedges You can swap chicken for turkey if you prefer. Canned beans can change too. Use black beans or pinto beans if you like. Instead of chicken broth, vegetable broth works well. If you want a milder taste, skip the green chiles. For creaminess, use Greek yogurt instead of heavy cream. This makes it lighter and adds a tangy kick. The cooked chicken gives this chili its heartiness. I often use rotisserie chicken for ease, but any cooked chicken works. White beans add creaminess and protein. The chicken broth forms the base, making it rich and flavorful. Diced green chiles bring heat and zest. Onion and garlic add depth to the flavor. Spices like cumin and oregano give warmth and aroma. Corn adds sweetness and texture. Finally, the heavy cream or coconut cream makes it rich and smooth. Each ingredient plays a key role in making this chili a comforting dish. {{ingredient_image_2}} 1. Sauté Aromatics: First, heat 2 tablespoons of extra virgin olive oil in a large pot over medium heat. Add 1 medium diced onion and sauté for about 5 minutes. Wait until it becomes soft and clear. Then, add 3 minced garlic cloves and cook for another minute until it smells great. 2. Add Spices: Next, add 1 teaspoon of ground cumin, 1 teaspoon of dried oregano, and ½ teaspoon of chili powder to the pot. Stir well to cover the onion and garlic with the spices. Cook for 1-2 minutes to let the flavors grow. 3. Combine Ingredients: Now, add 2 cups of shredded chicken, 1 can of drained white beans, 1 cup of chicken broth, 1 can of diced green chiles, and 1 cup of corn to the pot. Mix everything well and bring it to a gentle simmer. 4. Simmer the Chili: Let the chili cook on low heat for 15-20 minutes. Stir occasionally. This helps all the flavors mix nicely and develop a rich taste. 5. Add Cream: Lower the heat to keep the chili warm. Stir in 1 cup of heavy cream or coconut cream. Heat gently for another 5 minutes until the cream mixes in well. 6. Season and Serve: Finally, taste your chili. Add salt and pepper as needed. - Sauté Aromatics: Make sure the oil is hot before adding the onions. This helps them cook evenly. - Add Spices: Always stir spices in well to release their full flavor. - Combine Ingredients: Use a wooden spoon to scrape the bottom of the pot. This adds more flavor. - Simmer the Chili: Keep the heat low to avoid burning. Stirring helps too. - Add Cream: Do not boil the chili after adding cream. It can curdle if too hot. - Season and Serve: Remember to taste often. Adjust seasoning to your liking. - Sautéing: This method builds a deep flavor base. Always start with aromatics. - Simmering: Slow cooking helps meld the flavors together. Be patient; it’s worth it! - Deglazing: If you scrape the bottom of the pot, you get extra flavor. - Garnishing: Adding fresh cilantro and lime brightens the dish. It adds freshness to each bite. - Serving with Tortilla Chips: This adds crunch and a fun texture contrast. Each step brings you closer to a warm and tasty bowl of white chicken chili. Enjoy the process, and don't forget to share your delicious creation! To make your chili extra creamy, use heavy cream or coconut cream. You can also add cream cheese for a richer texture. If you prefer a lighter option, blend some white beans into a puree and mix it in. This adds creaminess without extra fat. Always stir the cream in gently to keep that smooth blend. If you want to adjust the heat, use mild green chiles or add more spices. For a kick, try adding jalapeños or cayenne pepper. Start with a little and taste as you go. You can always add more, but you can't take it out! This way, you can find the perfect balance for your taste buds. Add more veggies to boost the nutrition of your chili. Chopped bell peppers, zucchini, or spinach work well. You can also mix in quinoa or brown rice for added fiber. Use low-sodium broth to keep it healthy. This way, your chili remains delicious and packed with nutrients! Pro Tips Use Rotisserie Chicken: For a time-saving option, use store-bought rotisserie chicken. It adds great flavor and shreds easily for this chili. Adjust Spice Level: Depending on your preference, choose mild or spicy diced green chiles. You can also add fresh jalapeños for extra heat. Thickening the Chili: If you prefer a thicker chili, mash some of the white beans before adding them to the pot. This will create a creamier texture. Garnish for Flavor: Fresh cilantro and lime juice add brightness to the dish, enhancing the overall flavor profile. Don't skip these garnishes! {{image_4}} To make this chili dairy-free, use coconut cream instead of heavy cream. Coconut cream adds a rich, creamy texture without dairy. It also brings a subtle sweetness. This option is perfect for those who are lactose intolerant or prefer plant-based ingredients. For a vegetarian or vegan version, replace the chicken with extra beans or vegetables. You can use mushrooms, zucchini, or bell peppers. Switch the chicken broth with vegetable broth to keep the flavors strong. This way, you get a hearty chili that’s still satisfying and full of flavor. You can switch up the spices to change the flavor profile. Try adding smoked paprika for a smoky taste. You can also add jalapeños for a spicy kick. Using different beans, like pinto or black beans, will give the chili a new look and taste. Don't be afraid to experiment! To store leftover white chicken chili, let it cool first. Then, transfer it to an airtight container. This keeps the chili fresh for up to three days in the fridge. If you want to keep it longer, freezing is a great option. For freezing, use freezer-safe containers or bags. Make sure to leave some space at the top. The chili will expand as it freezes. Label the containers with the date. It can stay fresh for up to three months in the freezer. To thaw, move it to the fridge overnight before reheating. When you're ready to enjoy your chili again, reheat it on the stove or in the microwave. If using the stove, heat it in a pot over low heat. Stir often to avoid burning. For the microwave, use a microwave-safe bowl and cover it loosely. Heat it in short bursts. This helps to warm it evenly. Always check that it's heated through before serving again. Yes, you can use canned chicken. It saves time and is easy to use. Look for canned chicken that has good flavor. Drain it well before adding to the chili. Canned chicken works best if it is shredded. This way, it blends well with the other ingredients. Using canned chicken can cut down on prep time. However, fresh chicken gives a better taste. If you have cooked chicken at home, use that instead. White chicken chili can last for about 3 to 4 days in the fridge. Store it in an airtight container for the best results. Make sure it cools down before you put it in the fridge. This helps keep it fresh. If you want it to last longer, you can freeze it. It can stay in the freezer for up to 3 months. Just remember to label the container with the date. Thaw it in the fridge overnight before reheating. There are many great options to serve with white chicken chili. Here are a few ideas: - Warm tortillas or tortilla chips - Rice or quinoa for a hearty meal - A fresh salad for a light side - Sour cream or Greek yogurt for creaminess - Avocado slices for added richness These sides will enhance your meal and make it more filling. Get creative and enjoy your chili with your favorite toppings! You learned about the key ingredients, cooking steps, and tips for white chicken chili. I shared ways to make it creamy, nutritious, and exciting through variations. You also discovered storage tips and answered common questions. In the end, this dish is not only tasty but also flexible. You can adjust it to your needs and preferences. Enjoy your cooking journey and make every bowl a delicious masterpiece.

White Chicken Chili

Discover the ultimate creamy white chicken chili that’s perfect for any meal! This easy white chicken chili features tender rotisserie chicken, hearty white beans, and a rich, creamy broth. Try this delicious white bean chili recipe and savor the flavor in every spoonful. Ready in just 40 minutes, it's a quick win for busy nights! Don’t miss out—save this chicken chili with cream recipe today! #WhiteChickenChili #EasyChili #CreamyChili #RotisserieChickenRecipe

Ingredients
  

2 cups cooked chicken, shredded (rotisserie chicken works well)

1 can (15 oz) white beans (cannellini or great northern), drained and rinsed

1 cup chicken broth (homemade or store-bought)

1 can (4 oz) diced green chiles (mild or spicy, based on preference)

1 medium onion, diced finely

3 cloves garlic, minced

1 teaspoon ground cumin

1 teaspoon dried oregano

½ teaspoon chili powder

1 cup corn (fresh off the cob or frozen)

1 cup heavy cream or coconut cream (for a dairy-free option)

2 tablespoons extra virgin olive oil

Salt and pepper to taste

Fresh cilantro, chopped (for garnish)

Lime wedges (for serving)

Instructions
 

Sauté Aromatics: In a large pot, heat the olive oil over medium heat. Once hot, add the diced onion and sauté for about 5 minutes, or until it becomes soft and translucent. Then, stir in the minced garlic and cook for an additional minute until it is fragrant and golden.

    Add Spices: Add the ground cumin, dried oregano, and chili powder to the pot. Stir thoroughly to coat the onions and garlic with the spices, cooking for another 1-2 minutes to enhance their flavors.

      Combine Ingredients: In the same pot, add the shredded chicken, drained white beans, chicken broth, diced green chiles, and corn. Stir the mixture well, allowing all ingredients to combine, and bring it to a gentle simmer.

        Simmer the Chili: Allow the chili to simmer on low heat for 15-20 minutes, stirring occasionally. This simmering time allows the flavors to blend beautifully and develop richness.

          Add Cream: Lower the heat to keep the chili warm, then stir in either the heavy cream or coconut cream. Heat gently for an additional 5 minutes, or until the cream is fully incorporated and the chili is heated through.

            Season and Serve: Taste your delicious chili and season with salt and freshly ground pepper as needed.

              Prep Time: 15 mins | Total Time: 40 mins | Servings: 6

                - Presentation Tips: Serve the creamy white chicken chili in warm bowls, garnished with freshly chopped cilantro for a fresh flavor burst, and a lime wedge on the side for squeezing over the top. For an extra crunch, consider offering tortilla chips as a delightful topping option.

                  WANT TO SAVE THIS RECIPE?

                  Leave a Comment

                  Recipe Rating