Go Back
- 2 cups plain Greek yogurt - 8 oz cream cheese, softened to room temperature - 1/2 cup honey or maple syrup - 1 teaspoon pure vanilla extract - 1 teaspoon freshly squeezed lemon juice - 1/4 cup powdered sugar - 1 cup crushed graham crackers or almond flour - 4 tablespoons melted unsalted butter or coconut oil - Fresh berries: strawberries, blueberries, or raspberries - Fresh mint leaves for garnish You can switch honey for maple syrup for a vegan option. Instead of graham crackers, use almond flour for a gluten-free crust. For a dairy-free choice, replace cream cheese with a plant-based cream cheese. I love adding fresh berries on top for a burst of flavor. You can choose strawberries, blueberries, or raspberries. A sprig of mint adds a nice touch and boosts the look. For a chocolate twist, consider drizzling some melted dark chocolate over the top. To start, you need to make the crust. Grab a mixing bowl and add 1 cup of crushed graham crackers. If you want a gluten-free option, use almond flour instead. Next, melt 4 tablespoons of unsalted butter or coconut oil. Pour this into the bowl with the crumbs. Mix well until everything is coated and looks like wet sand. Now, take your serving cups or small jars. Evenly divide the crust mixture among them. Press down firmly with the back of a spoon. This step helps form a smooth, even layer at the bottom. Place the cups in the fridge to chill while you make the filling. For the cheesecake filling, use a large mixing bowl. Beat 8 ounces of softened cream cheese with a hand mixer. Mix until it is creamy and smooth with no lumps. Slowly add 2 cups of plain Greek yogurt to the bowl. Next, pour in 1/2 cup of honey or maple syrup, depending on your choice. Add 1 teaspoon of pure vanilla extract, 1 teaspoon of freshly squeezed lemon juice, and 1/4 cup of powdered sugar. Mix on medium speed until you have a smooth and creamy texture. Now, it’s time to assemble. Take the crust cups out of the fridge. Spoon the cheesecake filling over the crusts. Smooth the tops for a nice finish. Cover the cups with plastic wrap or a lid. Put them back in the fridge for at least 2-4 hours. The longer they chill, the better they taste! When you’re ready to serve, top each cup with fresh berries like strawberries, blueberries, or raspberries. Add a sprig of mint for a pretty garnish. Enjoy the creamy goodness of your Greek yogurt cheesecake cups! For a smooth cheesecake, start with soft cream cheese. Beat it until creamy. Then, add the Greek yogurt slowly. Mixing on medium speed helps blend well. This method keeps lumps away. The result? A creamy and rich texture that melts in your mouth. Sweetness is key in a cheesecake. You can use honey or maple syrup. Start with half a cup; taste it. If you want it sweeter, add more. Remember, toppings like berries add natural sweetness. This way, you can balance the flavors just right. How you serve matters. Use clear cups to show off the layers. It looks fancy and fun! Top with fresh berries and mint leaves for color. This adds a vibrant touch to your dessert. Your guests will love the look and the taste! {{image_4}} To make Greek yogurt cheesecake cups vegan, simply swap honey for maple syrup. This sweetener is plant-based and brings a rich flavor. Use 1/2 cup of pure maple syrup for the right sweetness. The creamy texture comes from the Greek yogurt and softened vegan cream cheese. This option keeps your dessert tasty and cruelty-free. You can easily make these cheesecake cups gluten-free. Instead of using crushed graham crackers, try almond flour. Mix 1 cup of almond flour with 4 tablespoons of melted coconut oil. This creates a delicious, nutty base that pairs well with the cheesecake filling. It’s a great choice for those avoiding gluten. You can customize your cheesecake cups with different flavors. For a chocolate twist, add 1/4 cup of cocoa powder to the filling. Mix it well to blend. If you want fruit-infused flavors, fold in fresh pureed fruits like strawberries or blueberries. You can also layer the fruit on top for a vibrant look and taste. To keep your Greek yogurt cheesecake cups fresh, store them in the fridge. Use an airtight container or cover them with plastic wrap. This will help keep the flavors intact. They should stay good for about three to four days. If you make a big batch, it’s best to store the cups separately. This way, you can grab just what you want to enjoy. You can freeze these cheesecake cups if you want to save them for later. First, let the cups chill in the fridge for at least four hours. After they set, cover each cup tightly with plastic wrap. Then place them in a freezer-safe container. You can freeze them for up to two months. When you want to eat them, move them to the fridge to thaw overnight. These cheesecake cups last well in the fridge for about three to four days. After that, the texture and taste may change. If you freeze them, they can last for about two months. Eating them sooner is best for the best taste and texture. Keep an eye on any signs of spoilage, like an off smell or changes in color. Always trust your senses when it comes to food! Yes, you can use low-fat Greek yogurt. This swap lowers fat content. The taste stays rich and creamy. Your cheesecake cups will still taste great. You might notice a slight change in texture, but they will be delicious. To make these cheesecake cups dairy-free, use dairy-free cream cheese. You can find this at many stores. Also, use plant-based yogurt instead of Greek yogurt. Coconut yogurt works well for this. For sweetness, stick with maple syrup. This keeps the treat vegan and tasty. You can substitute cream cheese with silken tofu. Blend it until smooth for a creamy texture. Another option is cashew cream. Soak cashews in water, then blend them until smooth. This adds a nice flavor and keeps the cups creamy. This blog post covered how to make delicious cheesecake cups. We explored the key ingredients, easy step-by-step instructions, and helpful tips for perfect texture and presentation. You learned about tasty variations like vegan and gluten-free options. Lastly, we shared best practices for storing leftovers. Remember, cheesecake cups can be fun and flexible. Enjoy creating your own flavors and sharing them with others!

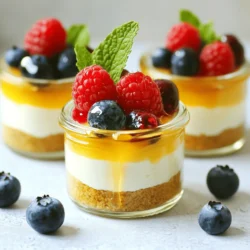
Greek Yogurt Cheesecake Cups

Indulge in the creamy delight of Greek yogurt cheesecake cups with this easy recipe! These delicious treats feature a luscious filling made from Greek yogurt and cream cheese, layered over a crisp crust with just the right sweetness. Perfect for any occasion, they can be topped with fresh berries for a burst of flavor. Click through now to discover how to make these delightful treats and impress your friends and family!

Ingredients
  

2 cups plain Greek yogurt

8 oz cream cheese, softened to room temperature

1/2 cup honey or maple syrup (choose maple syrup for a vegan option)

1 teaspoon pure vanilla extract

1 teaspoon freshly squeezed lemon juice

1/4 cup powdered sugar

1 cup crushed graham crackers (or almond flour for a gluten-free option)

4 tablespoons melted unsalted butter or coconut oil

Fresh berries: strawberries, blueberries, or raspberries for topping

Fresh mint leaves for garnish (optional)

Instructions
 

Prepare the crust: In a mixing bowl, combine the crushed graham crackers (or almond flour) with the melted butter (or coconut oil). Stir until all the crumbs are well coated and resemble wet sand.

    Form the base: Evenly divide the crust mixture among your serving cups or small jars. Press down firmly with the back of a spoon to create a smooth, even layer at the bottom. Transfer the cups to the fridge to chill and set while you prepare the cheesecake filling.

      Make the cheesecake filling: In a large mixing bowl, beat the softened cream cheese using a hand mixer until it becomes creamy and smooth, ensuring there are no lumps.

        Incorporate the Greek yogurt and sweeteners: Gradually blend in the Greek yogurt, followed by the honey (or maple syrup), vanilla extract, lemon juice, and powdered sugar. Mix on medium speed until the combination reaches a luxurious, creamy texture.

          Layer the filling: Retrieve the crust cups from the refrigerator. Carefully spoon the cheesecake filling over the chilled crusts, smoothing the tops for an appealing finish.

            Chill to set: Cover the cups with plastic wrap or a lid and refrigerate for a minimum of 2-4 hours. Allowing them to chill for longer enhances the flavors and texture!

              Serve and enjoy: Just before serving, top each cheesecake cup with a generous handful of fresh berries and a sprig of mint for a vibrant garnish. Serve cold, and dive into the creamy deliciousness!

                Prep Time: 20 minutes | Total Time: 4 hours | Servings: 6-8

                  Presentation Tips: For an elegant touch, use clear glass cups to showcase the layers of crust and cheesecake, allowing guests to appreciate the visual appeal!