Go Back
When making No-Bake Chocolate Peanut Butter Bars, you need some key ingredients. Each one adds flavor and texture to the bars. - 1 cup natural peanut butter (smooth or chunky) - 1 cup rolled oats - 1/2 cup honey or maple syrup - 1/2 cup unsweetened cocoa powder - 1/4 teaspoon salt - 1 teaspoon pure vanilla extract - 1/2 cup dark chocolate chips - 2 tablespoons coconut oil (optional) Natural peanut butter is a must. It gives the bars their rich taste. Choose smooth if you like a creamier bite or chunky for a crunch. Rolled oats form the base of the bars. They add fiber and help bind everything together. Honey or maple syrup offers sweetness. Both work well, so pick your favorite. Cocoa powder adds a deep chocolate flavor. It makes the bars a treat for chocolate lovers. A tiny bit of salt balances the sweetness. It enhances the flavors in the bars. Pure vanilla extract adds warmth. It rounds out the taste, making it even more delicious. Dark chocolate chips are for topping the bars. They melt beautifully and give a rich finish. Coconut oil is optional but helpful. It creates a creamier texture if you decide to use it. These ingredients come together to make a tasty snack. Mix them right, and you will enjoy a delicious treat! - In a large bowl, combine: - 1 cup natural peanut butter - 1 cup rolled oats - 1/2 cup honey or maple syrup - 1/2 cup unsweetened cocoa powder - 1/4 teaspoon salt - 1 teaspoon pure vanilla extract Mix these ingredients using a strong spoon. Keep mixing until you get a thick blend. This blend should hold together well. - If you want a creamier texture, melt 2 tablespoons of coconut oil in a microwave. Heat it slowly and stir often. Once it melts, mix it into the peanut butter blend. - Grab an 8x8-inch baking pan. Line it with parchment paper, leaving some paper hanging over the edges. This helps when you take the bars out later. - Next, take the peanut butter mixture and press it firmly into the lined pan. Use your hands or a spatula to create a flat, even layer. - In a separate bowl, place 1/2 cup dark chocolate chips. If you want, add 1 tablespoon of coconut oil for a shiny finish. - Microwave the chocolate in short bursts. Stir often until it is fully melted and smooth. - Carefully pour this melted chocolate over the peanut butter layer. Use a spatula to spread it evenly across the top. - Put the pan in the fridge. Let the bars chill for at least 2 hours. This helps them set and become firm. - Once they are firm, lift them out using the parchment paper. Place the block on a cutting board. Cut the bars into squares or rectangles, based on how big you want each serving. To change the thickness of your bars, adjust the oats. For thicker bars, use more oats. For creamier bars, add melted coconut oil. This gives a nice texture. You can also enhance flavor by adding a dash of cinnamon or a pinch of sea salt. These small changes make a big difference. For a great look, garnish your bars. Drizzle melted chocolate on top for shine. You can add crushed peanuts or sea salt for extra flair. When serving, arrange the bars on a nice platter. This makes them perfect for parties or events. Having the right tools helps. You need a large mixing bowl and a sturdy spatula. A microwave-safe bowl is key for melting chocolate. Parchment paper is essential for easy removal. Lastly, a sharp knife helps cut the bars neatly. {{image_4}} You can make these bars more exciting by adding nuts or seeds. Try chopped almonds, walnuts, or even sunflower seeds for a nice crunch. If you want a warm spice note, add a dash of cinnamon. This simple tweak can change the whole taste. You can explore many flavor paths with just a few ingredients. If you follow a vegan diet, you can easily swap honey for maple syrup. This keeps your bars sweet without using any animal products. For gluten-free options, ensure you choose certified gluten-free oats. This way, everyone can enjoy these treats without worry. When it comes to toppings, you have choices. You can use milk chocolate, white chocolate, or even dark chocolate for a richer taste. If you want to change it up, try spreading almond butter or a layer of fruit like sliced bananas on top. These options keep your bars fresh and surprising! To keep your No-Bake Chocolate Peanut Butter Bars fresh, store them in the fridge. Use an airtight container to prevent them from drying out. Place parchment paper between layers if you stack them. This way, they won't stick together. Enjoy your bars within one week for the best taste and texture. If you want to save some bars for later, freezing is a great option. Wrap each bar in plastic wrap or aluminum foil. Place them in a freezer-safe bag for extra protection. When you want to enjoy a bar, take it out and thaw it in the fridge overnight. This keeps the texture smooth and tasty. These bars can stay fresh for up to two weeks in the fridge. Check for any changes in smell or texture to know they are still good. If you see any signs of spoilage, it's best to toss them. Always trust your senses when it comes to food safety. These bars need about 2 hours in the fridge to set. After that, they become firm and easy to slice. The longer you chill them, the better the texture. Yes, you can use almond butter or sunflower seed butter. These alternatives work well and offer different flavors. Make sure the texture is similar to peanut butter for the best result. You can add more honey or maple syrup to the mixture. Another option is to sprinkle some powdered sugar on top before chilling. This will give you a sweeter taste while keeping it delicious. Yes, you can use sunflower seed butter as a nut-free option. It gives a similar creamy texture and taste. This is great for schools or events where nut allergies are a concern. Each bar contains healthy fats from peanut butter, fiber from oats, and antioxidants from cocoa. They also provide natural sugars from honey or maple syrup. Overall, they are a good treat that can fit in a balanced diet. You learned how to make tasty no-bake chocolate peanut butter bars. We covered key ingredients, step-by-step instructions, and tips for perfect results. Remember to store them right to keep them fresh. With many variations and options, you can customize these bars to your liking. I hope you try this recipe and enjoy it as much as I do. Happy baking!

No-Bake Chocolate Peanut Butter Bars

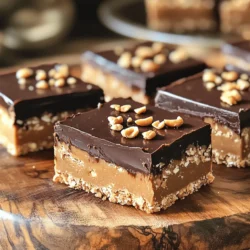
Indulge in these no-bake chocolate peanut butter bars that are both simple to make and deliciously satisfying. With just a few natural ingredients like peanut butter, oats, and honey, you can whip up a sweet treat in no time. These bars are perfect for a quick snack or dessert! Ready to satisfy your cravings? Click through to explore the full recipe and learn how to make this delightful treat today!

Ingredients
  

1 cup natural peanut butter (choose smooth or chunky based on your preference)

1 cup rolled oats

1/2 cup honey or maple syrup (for natural sweetness)

1/2 cup unsweetened cocoa powder

1/4 teaspoon salt (to enhance flavors)

1 teaspoon pure vanilla extract

1/2 cup dark chocolate chips (for the rich topping)

2 tablespoons coconut oil (optional, to add extra creaminess to the texture)

Instructions
 

In a spacious mixing bowl, combine natural peanut butter, rolled oats, honey (or maple syrup), cocoa powder, salt, and vanilla extract. Use a sturdy spoon or spatula to mix until all ingredients are thoroughly combined, resulting in a thick, cohesive mixture.

    If you choose to incorporate coconut oil for creaminess, melt it in a microwave-safe bowl. Heat in short intervals, stirring between each, until completely melted. Once ready, blend it into the peanut butter mixture for a smoother consistency.

      Prepare an 8x8-inch baking pan by lining it with parchment paper. Ensure to leave some overhang on the sides to assist with easy removal later.

        Transfer the peanut butter mixture into the lined pan, using a spatula or your clean hands. Firmly press the mixture down to create an even, tightly packed layer.

          In another microwave-safe bowl, combine the dark chocolate chips with 1 tablespoon of coconut oil, if using. Microwave in short bursts, stirring frequently until the chocolate is completely melted and smooth.

            Carefully pour the melted chocolate over the pressed peanut butter mixture, using a spatula to spread it evenly, covering the entire surface.

              Place the pan in the refrigerator and allow the bars to chill for a minimum of 2 hours until they are firm and set.

                After chilling, use the parchment overhang to lift the entire block of bars out of the pan. Place it on a cutting board and slice into squares or rectangles, depending on your desired serving size.

                  Prep Time: 20 minutes | Total Time: 2 hours 20 minutes | Servings: 12 bars

                    - Presentation Tips: For an appealing display, arrange the bars neatly on a serving platter. Drizzle some extra melted chocolate over the tops for a glossy finish. Consider garnishing with crushed peanuts for a delightful crunch and added visual interest.