Go Back
- 2 cups heavy whipping cream - 1 can (14 oz) sweetened condensed milk - 1 ½ cups Oreo cookies, crushed - ¼ cup chocolate syrup for swirling - Additional crushed Oreos for topping - 1 teaspoon vanilla extract - A pinch of salt When it comes to making no-churn Oreo ice cream, you need just a few simple items. Heavy whipping cream gives the ice cream its rich and creamy texture. Sweetened condensed milk adds sweetness and a smooth finish. The crushed Oreo cookies bring that delicious chocolate and cream flavor. You can also add some fun extras! Chocolate syrup gives a sweet swirl. More crushed Oreos on top make it look pretty. A splash of vanilla extract boosts the flavor even more. Don't forget that pinch of salt! It balances the sweetness and enhances all the flavors. With these ingredients ready, you can create a delightful treat that everyone will love. If you're eager to get cooking, check out the Full Recipe for all the steps! Whipping the heavy cream Start by pouring 2 cups of heavy whipping cream into a large bowl. Use an electric mixer to whip the cream. Beat it until soft peaks form, which takes about 3 to 5 minutes. The cream should look light and fluffy. This step adds volume to our ice cream. Combining sweetened condensed milk and vanilla In a separate medium bowl, mix one can of sweetened condensed milk with 1 teaspoon of vanilla extract and a pinch of salt. Stir until everything blends well. This mixture brings rich flavor to your ice cream. Folding in whipped cream Now, take your whipped cream and gently fold it into the sweetened condensed milk mix. Do this in two parts. Use a rubber spatula to combine carefully. This keeps the air in the whipped cream, making your ice cream light. Adding crushed Oreos Next, add 1 ½ cups of crushed Oreo cookies into the mixture. Fold them in gently. You want the cookies evenly spread throughout the base, but don’t overdo it. We want those tasty chunks in every scoop. Incorporating chocolate syrup Drizzle ¼ cup of chocolate syrup over the mixture. Use your spatula to lightly swirl it in. This creates a beautiful marbled look. Be cautious not to mix too much; we want those lovely ribbons of chocolate to stand out. Preparing for freezing Pour the mixture into an airtight container. Smooth the top with your spatula. Sprinkle extra crushed Oreos on top for added crunch. Cover the container tightly and place it in the freezer. Let it freeze for at least 6 hours or overnight. This ensures your ice cream is perfectly set and ready to enjoy. To get a creamy ice cream, soft peaks are key. Soft peaks happen when you whip the cream to a light, fluffy state. This takes about 3 to 5 minutes. When you see the peaks form, stop whipping. Over-whipping can lead to grainy ice cream. When mixing the whipped cream with the condensed milk, always fold. Folding keeps the air in the cream. If you stir, you lose that lightness. Use a rubber spatula and gently lift the cream from the bottom and fold it over the top. You can switch up the cookie flavors! Try using mint Oreos or peanut butter Oreos for a twist. You could also add extra goodies like chocolate chips or peanut butter swirls. These will add richness and fun flavors to your ice cream. For a more indulgent treat, consider adding a splash of coffee or a sprinkle of sea salt. Both can elevate the taste and give it a unique touch. Serve your no-churn Oreo ice cream in fun vessels. Waffle cones and bowls are great options. They add to the experience and look nice too! For garnishing, don’t skip the toppings. A drizzle of chocolate syrup and a sprinkle of crushed Oreos make it visually appealing. You can even add whipped cream or cherries for extra flair. Enjoy your ice cream adventure! For the complete recipe, check out the Full Recipe section. {{image_4}} You can change the flavor of this ice cream easily. Two fun options are mint Oreo ice cream and peanut butter Oreo ice cream. For mint Oreo, just add a few drops of mint extract. This gives it a fresh taste. For peanut butter Oreo, mix in creamy peanut butter. This adds a rich, nutty flavor that complements the Oreo cookies. If you need dairy-free options, use coconut cream instead of heavy cream. Coconut cream gives a nice texture and taste. For sweetened condensed milk, try a dairy-free brand. You can also create lower sugar options by using sugar-free sweetened condensed milk. This way, you still enjoy the treat without too much sugar. Make your ice cream more exciting by adding mix-ins. You can add chopped nuts or chocolate chips for a crunch. This adds texture and flavor. You can also incorporate fruit, like sliced strawberries or bananas, for a fresh twist. These fun additions make each scoop unique and delightful. To freeze your no-churn Oreo ice cream properly, use an airtight container. This keeps the ice cream fresh and prevents ice crystals from forming. A glass or plastic container with a lid works best. Remember to smooth the ice cream surface before sealing. This helps avoid air pockets that can ruin texture. Your Oreo ice cream will last about two to three months in the freezer. After this time, it may lose flavor and texture. Check for signs of freezer burn, which appear as icy patches or a dry surface. If you see these signs, it's best to toss it out for a fresh batch. To soften your ice cream for serving, let it sit at room temperature for about five to ten minutes. This method lets it soften evenly without melting too fast. Avoid using a microwave, as it can melt parts of the ice cream and ruin its creamy texture. Enjoy your delicious treat in a cone or bowl! You can make no-churn Oreo ice cream easily at home. You do not need fancy tools. First, whip the heavy cream until soft peaks form. This usually takes 3 to 5 minutes. Then, mix the sweetened condensed milk, vanilla extract, and a pinch of salt in another bowl. Combine these two mixtures gently. Fold the whipped cream into the condensed milk mix. Add in crushed Oreo cookies. Finally, swirl in the chocolate syrup and pour it into a container. Freeze it for at least 6 hours or overnight. You’ll have creamy ice cream without an ice cream maker. Yes, you can use many types of cookies. Try chocolate chip cookies for a twist. You can also use mint cookies for a fresh taste. If you like peanut butter, mix in peanut butter cookies. Each cookie type gives a special flavor. Be creative and mix flavors to find what you love most. Serving no-churn Oreo ice cream can be fun. You can use waffle cones or bowls. Top it with extra chocolate syrup and crushed Oreos. This adds a nice crunch and taste. For parties, serve scoops in small cups with colorful sprinkles. This makes it look festive. You can also pair it with brownies for a delicious dessert combo. This blog outlines how to make no-churn Oreo ice cream easily. You learned about key ingredients, steps, and helpful tips for great results. I shared flavor variations and dietary adjustments to suit your needs. Proper storage and thawing techniques help maintain freshness. Enjoy this treat at any gathering or as a fun snack at home. Making this ice cream is simple and rewarding, so gather your ingredients and start creating deliciousness today!

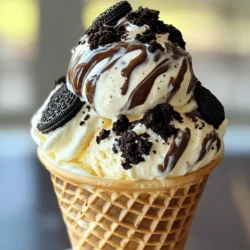
No-Churn Oreo Ice Cream

Indulge your sweet tooth with this easy Oreo Dream No-Churn Ice Cream! Made with just a few simple ingredients, this creamy dessert is packed with Oreo goodness and swirled with chocolate syrup for an irresistible treat. Perfect for warm days or family gatherings, it's a quick and delightful way to enjoy homemade ice cream without any special equipment. Click through to discover the full recipe and treat yourself today!

Ingredients
  

2 cups heavy whipping cream

1 can (14 oz) sweetened condensed milk

1 teaspoon vanilla extract

1 ½ cups Oreo cookies, crushed (plus extra for topping)

¼ cup chocolate syrup (for swirling)

A pinch of salt

Instructions
 

In a spacious mixing bowl, use an electric mixer to whip the heavy whipping cream until soft peaks begin to form. This process usually takes about 3 to 5 minutes, and the cream should become light and fluffy.

    In a separate medium bowl, combine the sweetened condensed milk, vanilla extract, and a pinch of salt. Stir the mixture thoroughly until all ingredients are well incorporated.

      Gently fold the whipped cream into the condensed milk mixture. Do this in two additions, using a rubber spatula to carefully combine, ensuring you preserve the airiness of the whipped cream.

        After fully incorporating the whipped cream, add the crushed Oreo cookies to the mixture. Fold them in gently until evenly distributed throughout the ice cream base.

          Drizzle the chocolate syrup over the mixture, then use the spatula to lightly swirl it in, creating a marbled effect. Be cautious not to over-mix; you want to maintain visible ribbons of chocolate throughout.

            Pour the mixture into an airtight container, smoothing the surface with the spatula. Sprinkle additional crushed Oreos on top for an appealing finish and extra crunch.

              Cover the container with a lid or plastic wrap and place it in the freezer. Allow it to freeze for at least 6 hours or overnight until the ice cream is completely set.

                When you’re ready to indulge, let the ice cream sit at room temperature for a few minutes to soften slightly, making it easier to scoop.

                  Prep Time: 15 minutes | Total Time: 6 hours 15 minutes | Servings: 6-8

                    - Serving Suggestions: Perfectly serve in waffle cones or bowls, topped with a generous drizzle of extra chocolate syrup and a sprinkle of crushed Oreos for an extra delightful touch!